Shopping cart
Your shopping cart is empty :( Try adding something!
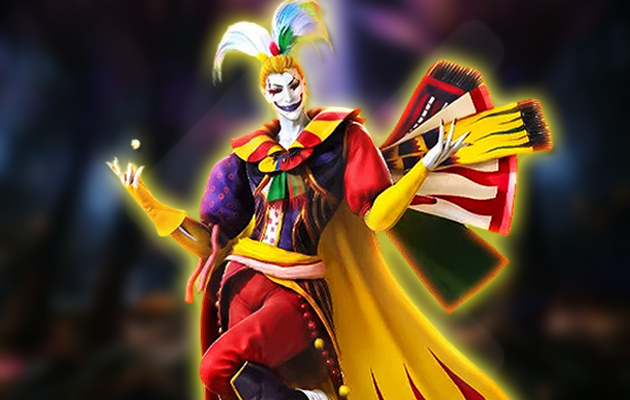
Buy FF14 DMU clear — Cruel Legend title and 795 ilvl Weapon, yours without progression nights.

FFXIV Dancing Mad carry services exist because Dancing Mad is a new Ultimate — and new Ultimates break most groups before they see the final phase. The fight launched in Patch 7.51, and the majority of players who've attempted it through Party Finder are still working through phase one mechanics weeks later. Prog stalls, statics disband, and weekly lockouts pass without a clear while the fight's rewards — 805 ilvl weapons, exclusive title, Adventurer Plate — stay out of reach.
The gap between players who have the clear and players who don't widens every week. Every Tuesday reset that passes without a kill is another week behind on totem accumulation for the Ultimate Diamond Weapon. For a fight that requires 7 totems per weapon, that math compounds quickly — players who cleared week one are already on their second or third weapon while most are still in early prog.
Our carry exists specifically for this window — when the fight is new, the community knowledge is still developing, and the difference between a team that's cleared it and one that hasn't is measured in months of prog time. Buy FFXIV UMAD carries now and your clear happens this week, not after the meta stabilises.
Dancing Mad launched in Patch 7.51. Our teams had their first clear within the opening days — before most players had finished learning phase one. That's not a marketing claim — it's the standard we hold our Ultimate rosters to, and it's what makes the difference on your order.
Week one clears require a different level of preparation than reclear services. There are no established guides, no practiced strategies, no safety net of community knowledge. Our teams go into new Ultimate content with fight-specific preparation, coordination built across dozens of prior Ultimate clears, and the ability to solve mechanics on the fly without resetting for days. By the time most players are entering Dancing Mad for the first time, our statics have already mapped every phase transition and executed the clear repeatedly.
What this means for your order: the team handling your Dancing Mad boost isn't working from a YouTube guide and hoping for the best. They've cleared this fight. They know where wipes happen, how to recover from near-misses, and how to get through the kill cutscene in a single session. Your 1–2 day window isn't an estimate padded for safety — it's the actual execution timeline of a team that clears on demand.
Every Dancing Mad clear awards one Mad Harlequin's Totem. Totems are exchangeable at the designated vendor for the 805 ilvl Ultimate Diamond Weapon for your job — the highest item level weapon currently available outside of current Savage BiS crafted gear, and one of the most visually distinct weapons in Patch 7.5.
| Weapon | Job | ilvl | Stats |
|---|---|---|---|
| Palazzo Diamond Sword | GLA, PLD | 795 | STR +605, VIT +674, Crit +319, Det +223 |
| Palazzo Diamond Shield | GLA, PLD | 795 | STR +242, VIT +269, Crit +128, Det +90 |
| Palazzo Diamond Axe | MRD, WAR | 795 | STR +605, VIT +674, Crit +319, Det +223 |
| Palazzo Diamond Greatsword | DRK | 795 | STR +605, VIT +674, Crit +319, Det +223 |
| Palazzo Diamond Bayonet | GNB | 795 | STR +605, VIT +674, Crit +319, Det +223 |
| Palazzo Diamond Halberd | LNC, DRG | 795 | STR +605, VIT +674, Crit +319, DHR +223 |
| Palazzo Diamond War Scythe | RPR | 795 | STR +605, VIT +674, Crit +319, DHR +223 |
| Palazzo Diamond Knuckles | PGL, MNK | 795 | STR +605, VIT +674, Crit +319, DHR +223 |
| Palazzo Diamond Katana | SAM | 795 | STR +605, VIT +674, Crit +319, DHR +223 |
| Palazzo Diamond Daggers | ROG, NIN | 795 | DEX +605, VIT +674, Crit +319, DHR +223 |
| Palazzo Diamond Saberfangs | VPR | 795 | DEX +605, VIT +674, Crit +319, DHR +223 |
| Palazzo Diamond Bow | ARC, BRD | 795 | DEX +605, VIT +674, Crit +319, DHR +223 |
| Palazzo Diamond Musketoon | MCH | 795 | DEX +605, VIT +674, Crit +319, DHR +223 |
| Palazzo Diamond Chakrams | DNC | 795 | DEX +605, VIT +674, Crit +319, DHR +223 |
| Palazzo Diamond Rod | THM, BLM | 795 | INT +605, VIT +586, Crit +319, SpS +223 |
| Palazzo Diamond Grimoire | ACN, SMN | 795 | INT +605, VIT +586, Crit +319, Det +223 |
| Palazzo Diamond Tuck | RDM | 795 | INT +605, VIT +586, Crit +319, Det +223 |
| Palazzo Diamond Fan Brush | PCT | 795 | INT +605, VIT +586, Crit +319, Det +223 |
| Palazzo Diamond Cane | CNJ, WHM | 795 | MND +605, VIT +586, Crit +275, Det +393 |
| Palazzo Diamond Codex | SCH | 795 | MND +605, VIT +586, Crit +275, Det +393 |
| Palazzo Diamond Sextant | AST | 795 | MND +605, VIT +586, Crit +275, Det +393 |
| Palazzo Diamond Wings | SGE | 795 | MND +605, VIT +586, Crit +275, Det +393 |
Unlike Savage gear coffers which drop a random armour slot, the weapon vendor lets you choose exactly which job's weapon to receive. One totem, one weapon, no RNG on the specific item.
Dancing Mad is current tier Ultimate — the hardest active content in FFXIV right now. The team you clear it with matters more than on any other fight in the game.
Dancing Mad is available this week. Order now and your team is assigned within 30 minutes.
Dancing Mad is the Ultimate raid introduced in Patch 7.51 of Final Fantasy XIV — the current hardest content in the game. It's a multi-phase encounter themed around the Final Fantasy VI villain Kefka, combining mechanics from multiple bosses into a single extended fight. Like all Ultimates, it requires a coordinated eight-player team and offers no weekly gear lockout rewards — instead awarding exclusive titles, Adventurer Plate designs, and Mad Harlequin's Totems exchangeable for the 805 ilvl Ultimate Diamond Weapon. Dancing Mad is currently the active Ultimate tier, meaning it follows a weekly lockout schedule for its loot coffer. Our FFXIV Dancing Mad boost covers the full fight from start to clear — team assembled, session scheduled, rewards delivered.
Both are community shorthand for the same fight. DMU stands for Dancing Mad Ultimate — the most common abbreviation used in Party Finder listings, Discord servers, and boost listings. UMAD is an alternative shorthand also used in the FFXIV community, derived from Ultimate MAD (Dancing). You'll see both used interchangeably across the game and third-party platforms — they refer to the same encounter, the current Ultimate raid introduced in Patch 7.51.
Yes — as the current active Ultimate tier, Dancing Mad follows a weekly loot lockout. Each character can receive one loot coffer per weekly reset (Tuesday 4:00 AM EST / 1:00 AM PST). The clear itself, title, Adventurer Plate, and Mad Harlequin's Totem are awarded regardless of lockout status — the lockout only applies to the loot coffer. Once Dancing Mad is superseded by a newer Ultimate tier, the lockout is removed entirely and the fight can be cleared repeatedly for totems without restriction — the same as all legacy Ultimates.
Each Dancing Mad clear awards one Mad Harlequin's Totem. The Ultimate Diamond Weapon for your job costs 7 Mad Harlequin's Totems at the exchange vendor. This means a minimum of 7 clears to obtain the weapon through totem exchange — or one clear if the weapon drops directly as a coffer reward from the fight. While Dancing Mad is on weekly lockout (current tier), totem accumulation is limited to one per weekly reset. Once the lockout is removed after a new Ultimate releases, multiple clears per week become available — totem farming runs are offered for players targeting the weapon on multiple jobs.
Team assignment happens within 30 minutes of purchase. The session itself — the time your account is active — is typically 2–3 hours for a full Dancing Mad clear with an experienced static. The full service window is 1–2 days from order to clear confirmation, which accounts for session scheduling around your availability. The 1–2 day window is not how long your account is in use — it's the timeframe within which the session is booked and completed. Once the fight ends, your booster logs out immediately.
Yes. Final Fantasy XIV has a notably permissive environment compared to other MMOs — account actions related to carry services are not a standard enforcement concern in FFXIV, and our team has operated across every FFXIV patch without a single account incident. Every session is handled by a real player using standard in-game methods — no automation, no third-party software, no behaviour that creates unusual account patterns. Your booster plays the fight the same way any raider would. Your login details are never shared beyond the session, and your UI, hotbars, and glamour are left exactly as found after every login.
FFLogs is the standard performance tracking tool used across the FFXIV raiding community. It records damage, healing, and ability usage during raid encounters and assigns a parse percentile — a color-coded ranking showing how your performance compares to all other players on the same boss worldwide. The colors in ascending order: White (25th+), Green (50th+), Blue (75th+), Purple (90th+), Orange (95th+), Pink (99th+)
Logs matter primarily for guild and static recruitment — most progression-focused groups review FFLogs before accepting applicants, and a Dancing Mad parse on your profile signals both that you've cleared the fight and how well your character performed during it. If you're planning to apply to a static or raiding guild after your clear, selecting a target parse color as an add-on means your log entry on Dancing Mad reflects the performance level the group is looking for — not just proof of clear, but proof of contribution.

 WoW Midnight
  Diablo 4
  WoW Forever
  Wardogs
  WoW TBC Anniversary
  Final Fantasy XIV
  Path of Exile 2
  Path of Exile
  WoW Pandaria
  WoW Classic
  ARC Raiders
  Apex Legends
  Lost Ark
  Battlefield 6
  Escape from Tarkov
 English
  Deutsch
  Français