
Mining is the profession that keeps the metal economy moving. Blacksmithing, Engineering, and Jewelcrafting all lean on ore, and that makes every deposit more than a node on the minimap. It can become ingots, alloys, gems, parts, tools, weapons, armor, and high-value reagents. In Midnight, Mining keeps the familiar loop of flying between deposits, but the profession has enough node types, Overload interactions, and specialization decisions that efficient Mining is no longer just about having a fast route.
The guide focuses on the difference between gathering more ore and gathering smarter ore. Refulgent Copper, Umbral Tin, Brilliant Silver, and rare materials like Dazzling Thorium all matter for different markets, while Rich and themed deposits change the value of each stop. Mining specializations also create a real choice between general yield, mounted gathering, and Infused deposit play through Overload. The leveling path will get you from 1 to 100, but the stronger goal is to help you understand when to farm broadly, when to target specific ore, and when a “slower” route is actually better because the deposits are worth more.
Midnight Mining is still a gathering profession built around flying from node to node, but several details changed compared to The War Within. The biggest difference is that ore now has only two quality levels, which makes inventory management cleaner and removes the old three-quality spread from regular gathering.
The profession now also has its own currency, Artisan Miner's Moxie. Instead of using a shared Artisan's Acuity pool, Miners spend a profession-specific currency on Mining-related items, Knowledge purchases, and surplus reagent options. This makes Mining progression more self-contained, but also means you should not waste early currency without knowing what you want from the profession.
| Midnight Change | What It Means for Mining |
|---|---|
| Two ore qualities. | Mining materials now use two quality levels instead of three. Bronze quality is gone, so gathered ore is easier to sort and sell. |
| Artisan Miner's Moxie. | Mining has its own profession currency. Use it for Mining purchases instead of treating it like a general crafting resource. |
| Epic profession equipment. | Epic Mining gear gives more secondary stats than Rare gear, but the base skill bonus is not higher. It is a farming optimization, not a hard leveling requirement. |
| Overload Infused Deposit. | Infused deposits can be overloaded for extra effects. The spell has a long cooldown, but mining Midnight deposits reduces it. |
| Meticulous Mining. | Investing into this specialization eventually lets you mine Midnight ore deposits while mounted, which is one of the biggest quality-of-life upgrades for serious farming. |
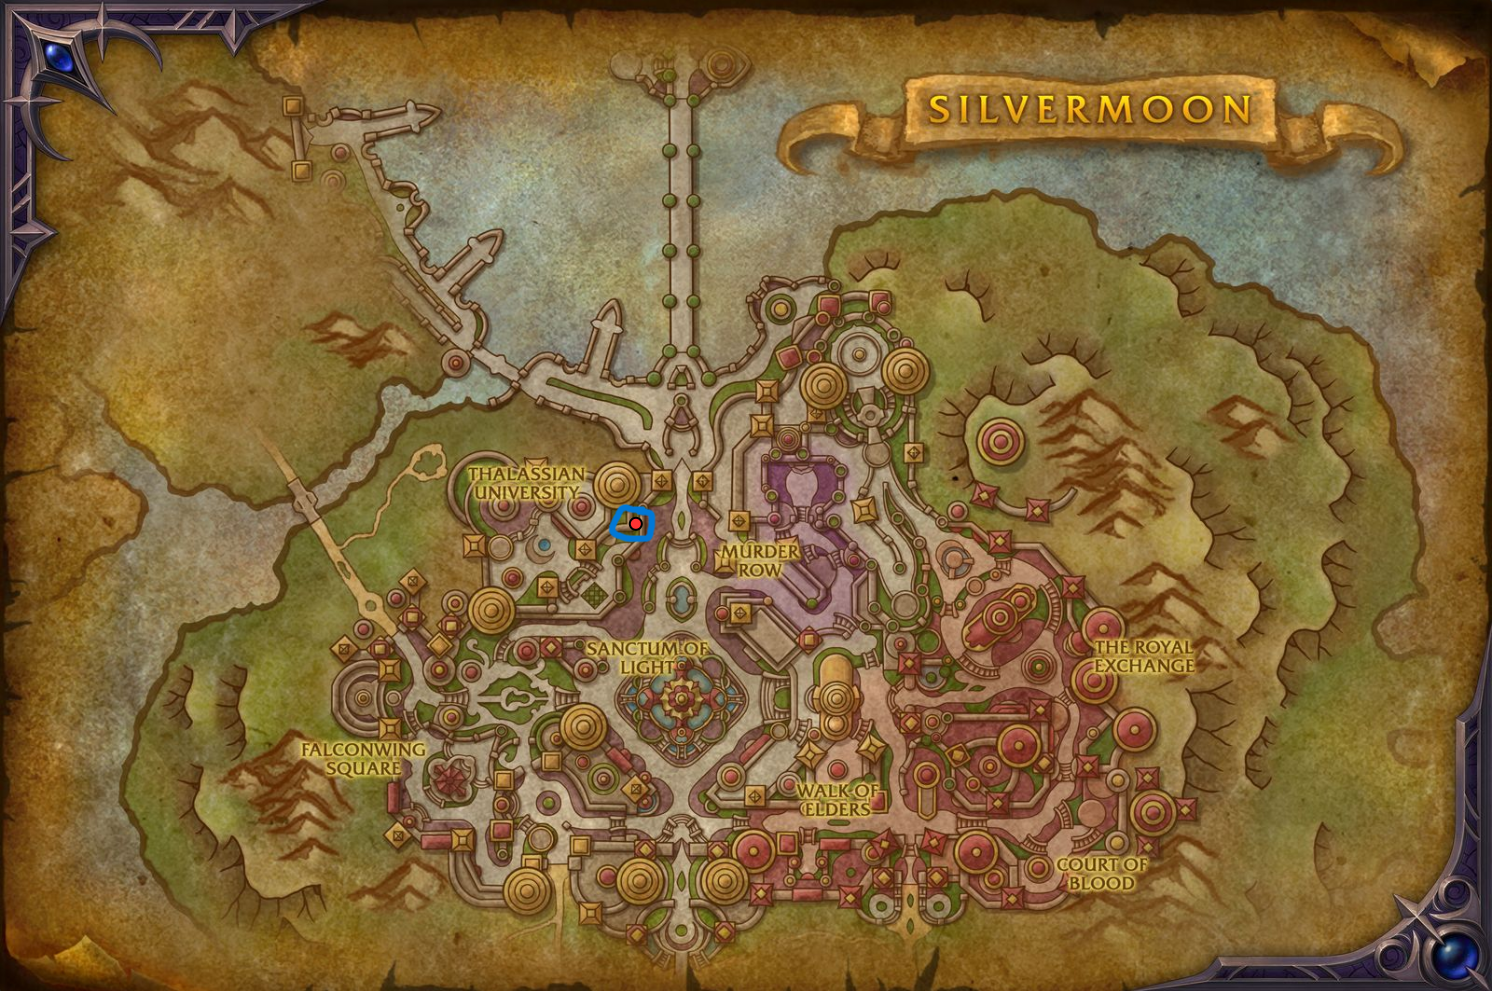
You can learn Midnight Mining from Belil in Silvermoon City. If your character does not already have Mining, learn the base profession first, then train the Midnight version before you start flying through the new zones for ore.
If you are starting Mining from scratch, make sure you have a Mining tool equipped before you leave the city. The basic Mining tool slot is filled by a Pickaxe, while the two accessory slots are used for a Hardhat and a Satchel. Better profession equipment is not required to begin leveling, but it makes a major difference once you start farming Midnight ores seriously.
Midnight Mining does not have a crafting route, shopping list, or mass-production shortcut. You level it by mining ore deposits in Midnight zones. That makes the profession cheaper to level than crafting professions, but also more time-dependent: your progress is controlled by node density, route quality, Deftness, and how often you find Rich deposits, Seams, or Infused deposits.
The cleanest approach is to start in Eversong Woods, mine everything until you understand node behavior, then rotate through the other zones for more deposit types and first-gather Knowledge bonuses. Do not ignore Infused nodes while leveling. They stay relevant longer than normal deposits and also teach or interact with Overload Infused Deposit.
The main leveling breakpoint is simple: normal deposits stop carrying you after the middle of the profession. Early on, almost every node gives skill. Later, you need higher-value variants such as Rich deposits, Seams, and Infused deposits to keep moving toward 100.
| Skill Range | Best Nodes to Mine | Leveling Notes |
|---|---|---|
| 1-30 | Any Midnight ore deposit | Mine everything you see. Normal deposits, Rich deposits, Seams, and Infused nodes all contribute well here, so route efficiency matters more than node selection. |
| 30-60 | Normal deposits, Rich deposits, Seams, and Infused deposits | Normal deposits become less reliable during this bracket. Keep mining them for materials, but prioritize Rich, Seam, and Infused versions whenever they appear. |
| 60-100 | Rich deposits, Seams, and Infused deposits | Regular base deposits are no longer useful for skill gains. You still mine them for ore and cooldown reduction, but the actual leveling comes from the special node variants. |
Midnight has three main ore families. Each one can appear as a regular node or as a Seam, and any of them can also appear in an Infused version. Dazzling Thorium is the rare side material to watch for while farming.
| Ore | Regular Node | Seam | Notes |
|---|---|---|---|
| Refulgent Copper Ore | Refulgent Copper | Refulgent Copper Seam | Common ore type and a strong early farming target because many crafting professions use it heavily. |
| Umbral Tin Ore | Umbral Tin | Umbral Tin Seam | Appears across multiple Midnight zones and is especially common enough to farm while leveling. |
| Brilliant Silver Ore | Brilliant Silver | Brilliant Silver Seam | Usually more valuable than basic ore depending on realm prices, so do not skip these nodes while routing. |
| Dazzling Thorium | Rare side gather | Rare side gather | Perception can increase the bonus amount when this rare material appears, but it does not simply replace route quality or node volume. |
You unlock Mining specializations at skill 25, 50, and 75. If your main goal is fast and comfortable farming, Meticulous Mining is the safest early direction because its mounted-mining unlock changes how the profession feels in the open world. Being able to mine while mounted saves time and reduces the number of fights you are forced into near hostile packs.
After that, Plentiful Ores improves the general value of your routes, while Over-LODED becomes more important if you want to target Infused deposits and their mote yields. For pure early leveling, do not overthink the tree too much; the bigger mistake is leaving points unspent while you continue farming.
| Specialization | Main Value | When to Prioritize It |
|---|---|---|
| Meticulous Mining | General Mining skill and quality-of-life bonuses, including mounted mining after enough investment. | Best first pick for most players who want smoother leveling and farming. |
| Plentiful Ores | Better yield from regular ore families, with sub-specializations for Refulgent Copper, Umbral Tin, and Brilliant Silver. | Strong once you care more about gold per hour than simply reaching 100 skill. |
| Over-LODED | Improves Infused deposit gameplay and the value of Overload Infused Deposit. | Useful if you deliberately farm Lightfused, Wild, Primal, or Voidbound nodes for motes. |
The routes below are meant as practical pathing guides, not strict rails. Mining nodes can appear slightly outside the drawn path, and the best gold per hour usually comes from adjusting your loop as you learn where deposits spawn on your realm. If you are leveling from 1 to 100, mine everything along the way. If you are farming for profit, prioritize dense areas, safer terrain, and Infused deposits that match the mote you want.
Eversong Woods is the best starting zone because the terrain is readable and the mob pressure is lower than in the other Midnight areas. Zul'Aman, Harandar, and Voidstorm can all be productive, but they are more punishing if your Deftness is low or your character is undergeared.
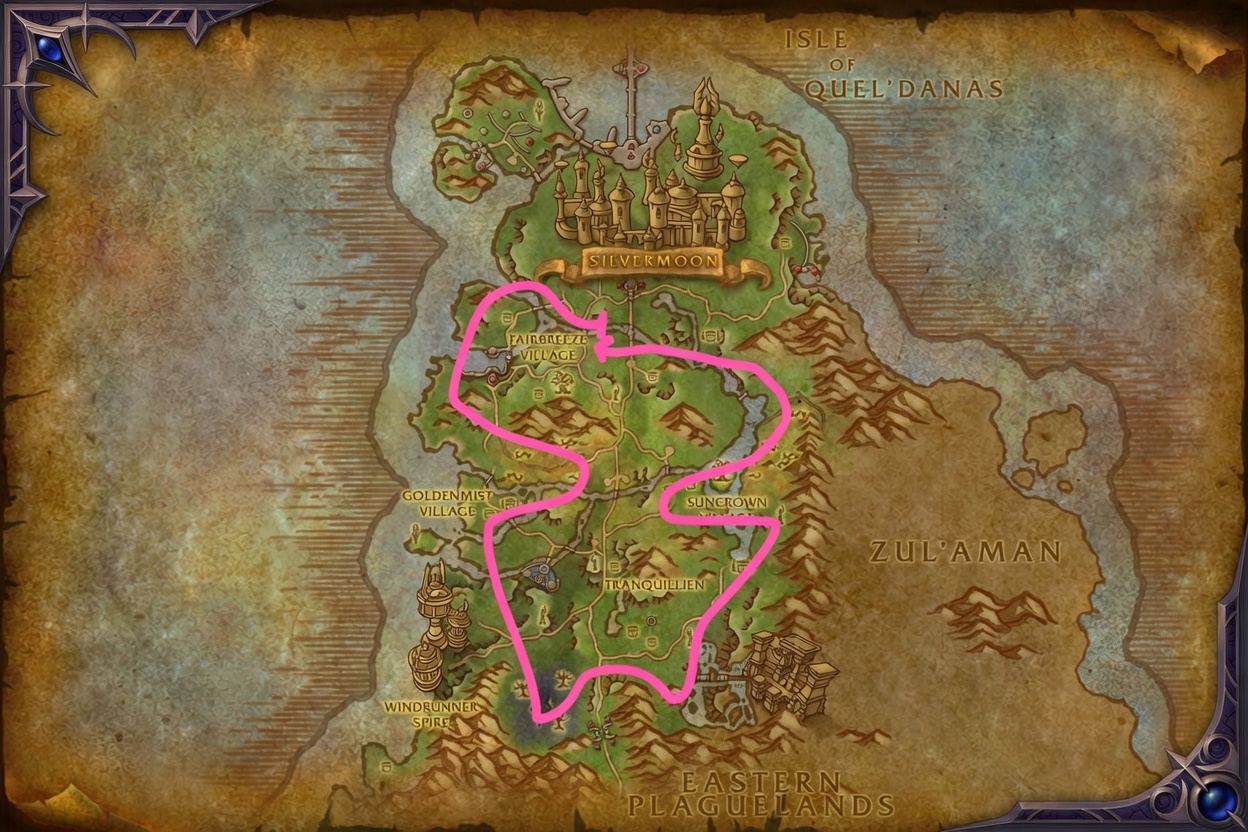
Eversong Woods is the cleanest zone for early Mining. The terrain is open enough to follow a stable loop, hostile mobs are easier to avoid, and Lightfused deposits are common enough to make the route useful for both leveling and mote farming. Start here if you want a low-friction path to the first 30-60 skill points.
The best route is a broad loop around the zone with short cuts through the middle whenever nearby nodes appear on the minimap. Do not overcommit to a perfect line. If you see a cluster off-path, take it, then return to the outer loop. This zone is also a good place to practice Overload Infused Deposit because Lightfused overloads are easier to execute than most other types.
Zul'Aman has good node density, but it is less friendly for undergeared characters. Wild deposits can summon Rumbling Oreling enemies, and these can slow the route down heavily if you cannot kill them quickly. If you are trying to level only through gathering and your character has weak gear, start elsewhere first.
This route is better once you have enough Deftness to finish casts before random enemies interrupt you. It also works well for double gatherers who combine Mining with Herbalism, but be careful around elite-heavy areas. For overload usage, Wild deposits are not usually the best target.
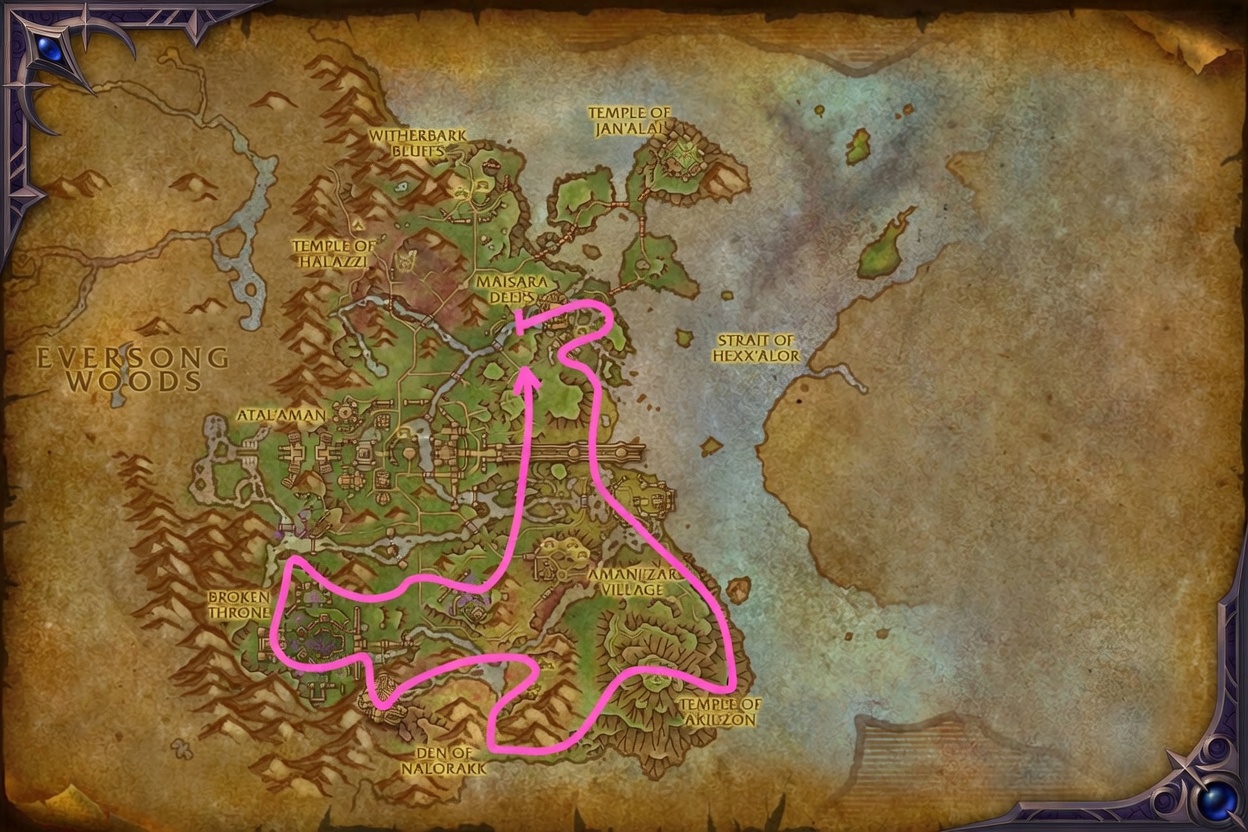
Harandar can produce solid ore, but it is one of the more annoying zones to farm cleanly. The terrain has more vertical movement, nodes can sit near hostile packs, and the route becomes worse if you are also gathering herbs because many Herbalism nodes appear on mushrooms or awkward elevated terrain.
For Mining alone, Harandar is manageable because most ore deposits are still reachable from the ground. High Deftness is strongly recommended here. Primal deposits are the main Infused type to watch for, and their overload can be worthwhile if you are in a safe spot with enough health to complete the channel.
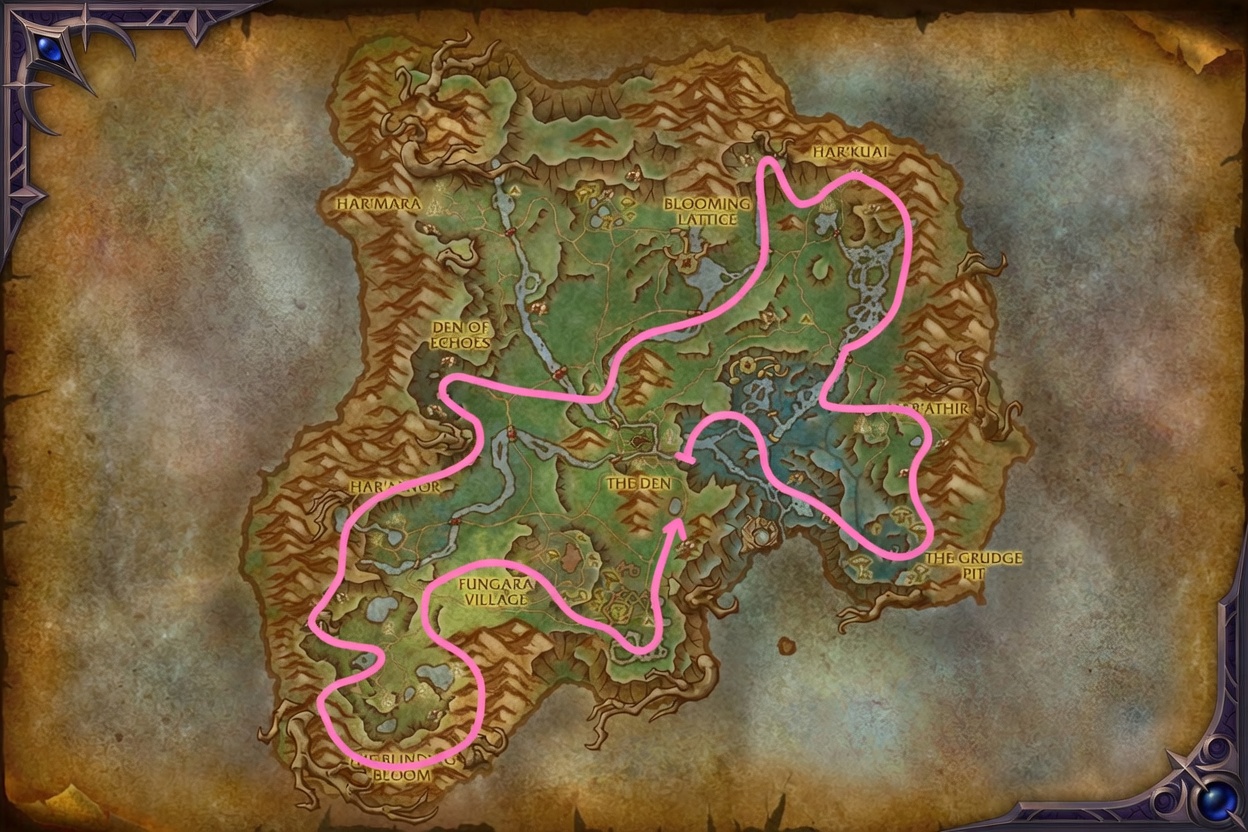
Voidstorm has strong node density, but the zone layout is rough and many deposits are close to enemies. Even with good Deftness, you may need to spam the node interaction or reposition before a cast completes. This is not the most relaxed leveling zone, but it can be profitable once you know where the safer stretches are.
The most practical path is not a tight precision route. Fly around the edges of the zone, cut toward the middle when the minimap shows multiple deposits, and avoid wasting time in areas with too much mob pressure. Voidbound deposits can be valuable for Mote of Pure Void, but their overload is awkward enough that you should use it only when you are ready to collect the orbs quickly and deal with the portal effect.
Mining uses three profession equipment slots: one Pickaxe tool, one Hardhat accessory, and one Satchel accessory. The Pickaxe is crafted by Blacksmiths, while the Hardhat and Satchel come from Engineering. You can begin leveling without expensive gear, but once you start farming for gold, equipment becomes one of the easiest ways to improve route speed and material output.
Rare equipment is the practical starting point for most characters. Epic equipment has stronger secondary stats, but it uses Fused Vitality, so it is better treated as a long-term upgrade or a Crafting Order purchase rather than a day-one requirement.
| Tool | Slot | Crafted By | Materials |
|---|---|---|---|
| Thalassian Pickaxe | Pickaxe | Blacksmithing | 3x Luminant Flux, 6x Refulgent Copper Ingot |
| Farstrider Hardhat | Hardhat | Engineering | 1x Evercore, 1x Soul Sprocket |
| Farstrider Rock Satchel | Satchel | Engineering | 1x Evercore, 1x Soul Sprocket |
| Sun-Blessed Pickaxe | Pickaxe | Blacksmithing | 5x Sterling Alloy, 2x Dazzling Thorium, 1x Majestic Claw |
| Sin'dorei Gilded Hardhat | Hardhat | Engineering | 1x Malleable Wireframe, 1x Majestic Hide, 4x Aetherlume, 2x Evercore |
| Junker's Big Ol' Bag | Satchel | Engineering | 1x Malleable Wireframe, 1x Majestic Hide, 4x Aetherlume, 2x Evercore |
| Sunforged Pickaxe | Pickaxe | Blacksmithing | 5x Sterling Alloy, 2x Dazzling Thorium, 2x Majestic Claw, 20x Fused Vitality |
| Rock Bonkin' Hardhat | Hardhat | Engineering | 1x Malleable Wireframe, 1x Majestic Hide, 4x Aetherlume, 2x Evercore, 20x Fused Vitality |
| Heavy-Duty Rock Assister | Satchel | Engineering | 1x Malleable Wireframe, 1x Majestic Hide, 4x Aetherlume, 2x Evercore, 20x Fused Vitality |
Deftness increases gathering speed, Finesse gives a chance to gather extra materials from a node, and Perception helps with rare bonus finds such as Dazzling Thorium. For most players, the best tool setup is either Deftness or Finesse. Perception can be useful if rare materials are extremely expensive on your realm, but it is less consistent than simply mining faster or getting more regular ore.
Deftness is especially valuable in Midnight because several routes place nodes near hostile mobs. If your mining cast finishes before enemies interrupt you, you save time, avoid unnecessary combat, and keep your route moving. Once your Deftness feels comfortable, stack more Finesse for better long-term returns.
| Stat | Missive | Tool Enchant | Best Use |
|---|---|---|---|
| Deftness | Thalassian Missive of Deftness | Enchant Tool - Sin'dorei Deftness | Best for faster mining casts, safer node tapping near mobs, and smoother route flow. |
| Finesse | Thalassian Missive of Finesse | Enchant Tool - Haranir Finesse | Best general goldmaking stat once you can mine comfortably without frequent interruptions. |
| Perception | Thalassian Missive of Perception | Enchant Tool - Amani Perception | Useful when rare side materials are highly valuable, but weaker for stable everyday farming. |
Mining feels noticeably better with consumables because ore nodes require a channel. Azeroot Tea and Darkmoon Firewater are the most important comfort items for long routes, especially in zones where mobs are packed tightly around deposits.
For pure farming value, use either a Finesse or Perception phial depending on the material market. Finesse is the stable default; Perception becomes more attractive when Dazzling Thorium and other rare materials are selling high.
| Consumable | Effect | Duration | Use Case |
|---|---|---|---|
| Haranir Phial of Perception | +38 Perception and +11 Deftness | 30 minutes | Use when rare side materials are expensive enough to justify a Perception setup. |
| Haranir Phial of Finesse | +38 Finesse and +11 Deftness | 30 minutes | Best default phial for steady ore farming and Auction House material volume. |
| Argentleaf Tea | +50 Finesse | 1 hour | Good for maximizing regular ore output once your Deftness is already comfortable. |
| Sanguithorn Tea | +50 Perception | 1 hour | Use when you specifically care about rare gathering bonuses. |
| Azeroot Tea | +50 Deftness | 1 hour | Best comfort option for faster mining casts and safer routes through hostile areas. |
| Darkmoon Firewater | +15% Deftness | 1 hour | Excellent for any serious farming session because it shortens the gathering channel. |
| Refulgent Razorstone | +43 Finesse on gathering tools | 2 hours | Strong long-session bonus for Mining, Herbalism, and Skinning tools. |
Infused deposits are special versions of regular ore nodes. They have a distinct visual effect, drop motes tied to their theme, and apply an extra mechanic when mined. These nodes are important for leveling because they remain useful after normal deposits stop giving reliable skill points.
The first time you interact with an Infused deposit, you gain access to Overload Infused Deposit. The ability has a 12-hour cooldown, but every Midnight ore deposit you mine reduces that cooldown by 30 minutes. In practice, around 24 mined deposits fully resets it. If the spell does not appear on your bars, check the normal Spellbook under the General tab rather than the profession window.
Each Infused deposit type is associated with a specific mote and is most common in one zone. Some types can appear outside their primary zone, but the table below is the cleanest way to plan targeted farming.
| Deposit Type | Main Zone | Mote | Normal Gather | Overload Effect |
|---|---|---|---|---|
| Lightfused | Eversong Woods | Mote of Light | Light circles appear on the ground. Run through them quickly to collect extra motes. | Creates more light circles. Use it in flat, open areas so you do not lose motes to terrain or nearby mobs. |
| Wild | Zul'Aman | Mote of Wild Magic | Mining the node summons Rumbling Oreling enemies. Kill them, then mine their corpses for extra materials. | Summons Avatar of Nalorakk. Defeating it grants a temporary Perception buff, but this is usually less valuable than mote-focused overloads. |
| Primal | Harandar | Mote of Primal Energy | The node applies a slow and damage effect while you gather. | Starts a channel that drains health in exchange for extra motes. Do not move or cancel the channel, and avoid using it while low on health. |
| Voidbound | Voidstorm | Mote of Pure Void | A void effect pulls or slows you around the node. Move out quickly before it disrupts your route. | Creates a portal and purple orbs. Collect the orbs quickly for extra rewards, but the portal behavior can be unreliable before specialization support. |
Lightfused is the easiest overload type to use well because the reward pattern is straightforward: run into circles, collect motes, and move on. Primal can also be useful, but only when you are safe enough to complete the full channel.
Wild is less attractive as an overload target because the elite reward is mostly a short Perception buff rather than direct extra motes. Voidbound can be profitable if you handle the orbs well, but the teleport effect makes it awkward enough that many players save overloads for easier node types.
Mining naturally gives Knowledge while you level because first-time gathers from different node and infusion combinations award profession progress. That means you should not sit in only one tiny route forever at the start. Moving between Eversong Woods, Zul'Aman, Harandar, and Voidstorm helps you encounter more deposit types and unlock more early Knowledge.
Once your character has Midnight Mining at skill 25, you can start using Knowledge items and managing specializations properly. Weekly Mining quests from Belil reward Thalassian Miner's Notes, and Scribes can craft Thalassian Treatise on Mining for another repeatable Knowledge source through Work Orders.
| Knowledge Source | How It Helps |
|---|---|
| First-time node gathers | Mining different ore types, Rich deposits, Seams, and Infused variants gives early Knowledge as you explore. |
| Thalassian Miner's Notes | Comes from weekly Mining profession quests after the requirements are met. Useful for steady weekly progression. |
| Thalassian Treatise on Mining | Created by Scribes and usually obtained through Work Orders. Good for controlled extra Knowledge. |
| Artisan Miner's Moxie | Mining-specific currency used for profession purchases, including Knowledge-related options from Mining vendors. |