The Voidspire's difficulty wasn't created just around one gimmick. Each boss asks for something different: board control, add priority, puddle discipline, target balancing, council management, or late-fight space control. That makes clean preparation matter. The raids that walk in with a real plan waste fewer pulls, stabilize faster, and reach the back half of the instance with far less chaos.
This guide focuses on the actual kill conditions behind every encounter. You will find the mechanics that matter most, the mistakes that cause wipes, and the positioning, swaps, soaks, interrupts, and damage windows that shape each fight on Heroic (don't worry, the guide is generally extremely helpful for Normal as well). The goal is simple: cut through the noise, show what each boss is really testing, and give your raid a cleaner route from the opener to the final platform.
Voidspire Boss Order
The Voidspire is built as a straight progression climb, and the boss order matters for more than just route planning. It helps you map out where your raid is likely to stall, which encounters gate later and usually more valuable loot, and how far your group can realistically push each week for raid progression and Great Vault value. Early bosses are your entry point. Late bosses are where the raid starts asking for cleaner execution and where many groups begin targeting their real chase kills.
| Boss |
Boss |
Encounter Role in the Raid |
| 1 |
Imperator Averzian |
Opening boss and first execution check |
| 2 |
Vorasius |
Early single-target pressure fight |
| 3 |
Fallen-King Salhadaar |
Mid-raid coordination and add-control test |
| 4 |
Vaelgor & Ezzorak |
Two-boss HP balance and positioning encounter |
| 5 |
Lightblinded Vanguard |
Late-raid council fight with layered overlap |
| 6 |
Crown of the Cosmos |
Final boss and end-of-raid progression wall |
Voidspire Raid Overview
The boss guides cover the pulls. The overview guide covers the full raid picture around them. If you want one page that breaks down the raid’s rewards, gear drops, tier-set value, loot structure, and the other details that matter before you even zone in, start there first. It gives the broader context behind what the raid drops, why certain kills matter more for gearing, and what rewards are actually worth chasing.
Voidspire Raid Overview
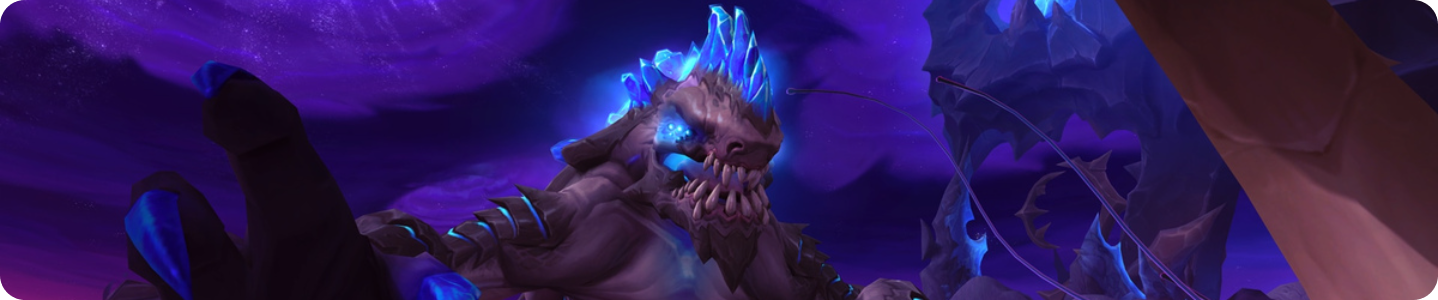
Imperator Averzian Boss Strategy

Averzian opens The Voidspire with a fight that stands out more than most first-boss encounters. On Heroic, the battle revolves around a tic-tac-toe-style control mechanic that defines the pull from the start. The idea is easy to read, but the punishment is real if your raid gives the boss too much room to develop the board.
That is what makes the encounter work. Instead of being a forgettable opener with barely any identity, this boss forces the raid to stay alert right away. Once your group understands how the board develops and stops handing over free progress, the fight becomes much more manageable, but it still rewards discipline and clean execution.
- Fight Style: Heavy cleave.
- Recommended Setup: 2 Tanks / 4 Healers / 14 DPS.
- Required Utilities: None.
- Heroism/Bloodlust Usage: On pull.
This is a strong take on what a first raid boss should look like in future WoW raids. It introduces a distinct central mechanic without turning the pull into something bloated or irritating, and that alone gives the encounter more personality than a lot of openers usually get.
Most first bosses tend to feel light on mechanics and are often little more than a warm-up before the real raid begins, so this is a welcome change. The main drawback is that once your raid fully understands the tic-tac-toe layer, there is not much else driving the fight, but for an opening Heroic boss, it still lands well.
This fight revolves around board control. The goal is simple: never let the boss lock in three claimed tiles in a row.
Shadow's Advance Board Phase
- The boss opens the sequence with Shadow's Advance and places three Abyssal Voidshapers onto the board.
- Each Voidshaper channels Gathering Darkness. If that cast goes through, the matching tile is permanently claimed.
How to Save Two Tiles with Umbral Collapse
- Every wave gives the raid two back-to-back Umbral Collapse soaks.
- Your raid leader should call the two tiles that matter most before the movement starts.
- If you are targeted by Umbral Collapse, move straight to the assigned marker and let the raid stack with you for the soak.
- The moment the first explosion finishes, shift immediately to the second tile and repeat the same play.
- When this is handled cleanly, only one tile gets lost per set instead of letting the whole board spiral out of control.
Add Priority
- Your first kill target should always be the Abyssal Voidshaper. Once it reaches 100 Energy, it upgrades into an Obsidian Endwalker.
- Use cleave pressure on Voidmaws and the Shadowguard Stalwart / Annihilators whenever they overlap.
- Voidmaws need to die before they can reach a portal after dropping below 35% health.
- Stop Pitch Bulwark from the Stalwart or Annihilator. If that cast lands, the enemy pack gets buried under a massive absorb shield.
Movement Checks
- Void Fall brings a knockback together with heavy swirly coverage. Keep moving and give it room.
- Oblivion's Wrath sends spikes across a chosen direction. Read the line early and sidestep before the pattern closes you in.
Tank Notes
- Swap the boss around 8 to 10 stacks of Blackening Wounds, depending on healer comfort and incoming add pressure.
- Keep in mind that newly active adds gravitate toward the tank holding the higher stack count.
Vorasius Heroic Boss Strategy
Vorasius is the second boss of The Voidspire, and on Heroic the encounter is built around pure raw pressure. The boss plants itself in the middle of the room, slams the floor, punishes bad movement, and occasionally forces the raid to respect line-of-sight and arena space. It is a cleaner fight than it looks at first glance, but it does not leave much room for lazy positioning.
The core rhythm is simple: keep control of the room, stay sharp during the heavy hits, and avoid letting the encounter snowball through preventable mistakes. There is not much subtlety here. Vorasius is a blunt-force check that leans on execution, awareness, and stable handling of the occasional add pressure rather than layered mechanical depth.
- Fight Style: Single Target fight with occasional add cleave.
- Recommended Setup: 2 Tanks / 4 Healers / 14 DPS.
- Recommended Utilities: None.
- Heroism/Bloodlust Usage: Pull.
This is not a boss that wins people over. The encounter feels flat, the pacing is one-note, and most of its danger comes from repetition rather than interesting escalation. Even the Mythic version does not meaningfully transform the fight so much as hit harder and punish errors more brutally.
The upside is that it comes early. Kill it, take the loot, and move deeper into The Voidspire, where the raid finally starts showing more personality.
Core Fight Rhythm
- Start the pull stacked in front of the boss so the healing from Primordial Roar lands cleanly on the raid. Return to that same setup each time the loop restarts.
- Every Primordial Roar also grants a stack of Primordial Power. That stack keeps ramping the damage, so the fight gets rougher the longer it goes.
Handling Shadowclaw Slam
- The first two Shadowclaw Slam hits apply Smashed, which increases physical damage taken by 150% for 2 minutes and stacks.
- Tank 1 should intentionally take those first two hits, then play the next part of the cycle as safely as possible.
- From there, Tank 2 controls the boss and soaks every other smash circle until the pattern resets.
- No one else should enter smash circles unless it is an emergency call. Immunities do not stop Smashed from applying on those opening slams.
Aftershock Positioning
- Every smash is followed by expanding rings from Aftershock.
- Melee should stay with the active tank, then step into the impact point as soon as it lands, because the middle becomes the safe area.
- Ranged can either move in with melee if they have the mobility for it, or stay far enough out to avoid the rings entirely.
Blistercreeps and Wall Breaks
- When Blistercreeps appear, avoid the ground swirls while they are spawning in.
- The adds fixate players, so split the handling by role:
- Melee drag their Blistercreeps into the left wall.
- Ranged pull theirs into the right wall.
- Kill the adds directly on the wall so their death explosion damages it.
- Do not stand inside the blast radius after they die, because it leaves a dangerous 30-second debuff.
- Each wall needs two Blistercreep explosions to fully break open.
Playing Around Void Breath
- About 30 seconds after the creeps spawn, the boss fires Void Breath from one hand.
- Identify which hand the cast comes from, then run in the opposite direction.
- Broken walls are what give you enough room to outrun the beam. If only one wall is open, you are basically betting on the boss picking the correct side.
Resetting the Loop
- After the laser ends, return to the original pull position and prepare to run the full sequence again.
- Expect much heavier raid damage once the group reaches 2 or more stacks of Primordial Power.
By the way, you can get all the Loot & Rewards from Voidspire fast and secure with our help!
Fallen-King Salhadaar Boss Strategy
Fallen-King Salhadaar is one of those The Voidspire encounters that feels familiar on paper but plays much better once the pull actually starts. On Heroic, the room gradually turns messy as pressure builds from multiple angles at once: orbs drifting toward the boss, interrupts that cannot be ignored, puddle placement that can ruin space fast, and a damage amp window that sharply raises the value of clean execution.
That mix is what gives the fight its edge. You are not dealing with one oversized gimmick. You are managing several smaller threats that overlap just enough to keep the raid busy the whole time. If orb control slips, interrupts get missed, or the room gets flooded by bad puddle drops, the encounter starts collapsing on itself very quickly. When the raid stays organized, though, the fight has a strong flow and a satisfying pace.
- Fight Style: Single Target Fight with Orb Cleave / Multi DoT.
- Recommended Setup: 2 Tanks / 4 Healers / 14 DPS.
- Required Utilities: None.
- Heroism/Bloodlust Usage: On pull or during damage amp.
Reused bosses usually land with a thud. This one does not. The encounter borrows familiar ideas, then rebuilds them into something that feels sharper, cleaner, and far less stale than a straight repeat. There is enough overlap between mechanics to create pressure, but not so much that the fight becomes noise.
The damage amp window is the real hook. It gives DPS a proper payoff moment instead of turning the encounter into pure maintenance from start to finish, and it adds tension to how the raid handles the rest of the mechanic set. If the tuning holds up, this should stay one of the more satisfying bosses in the raid rather than just another recycled body in a different room.
Bloodlust works either on pull or inside Entropic Unraveling, where the boss takes 25% extra damage.
Orb Control Comes First
- At the start of the pull, the boss marks 2 of the 3 gates with lightning beams. Those marked gates are where the orbs will enter from.
- Void Convergence summons two orbs that begin moving toward the boss.
- If either orb reaches the boss, it triggers Void Infusion and the pull is effectively over.
- Move the boss toward one of the marked gates and kill an orb while continuing to kite the boss forward.
Do Not Overlap Dark Radiation
- Whenever an orb dies, the whole raid takes Dark Radiation for 8 seconds.
- Let that debuff expire before finishing the second orb whenever possible.
- If both orb deaths are going to overlap, commit real healing cooldowns instead of trying to greed through it.
Aiming Shattering Twilight
- Shattering Twilight lands on the tank first, then jumps to several other players.
- When the debuff expires, it fires spikes in the exact direction your arrows are facing.
- Point those arrows away from the raid, and never aim them through the boss.
Despotic Command Puddle Drops
- Despotic Command marks several players with a circle.
- After 10 seconds, it drops a puddle at your feet and applies a large absorb to you.
- Step out early and place the puddle on the edge so the middle of the room stays playable.
Shut Down the Images Fast
- Stationary images spawn and attempt to cast Shadow Fracture.
- Any crowd control stops the cast and kills the image immediately.
- If one finishes the cast, it leaves behind a permanent puddle and the room becomes much harder to manage.
Entropic Unraveling Burn Window
- At 100 Energy, the boss locks into Entropic Unraveling for 20 seconds.
- That phase brings heavy raid damage, clockwise-spinning Umbral Beams, and a massive puddle once the cast ends.
- The boss takes 25% increased damage during this window, so this is where DPS cooldowns belong.
- Before the phase begins, the tank should move the boss toward the side of the room so the raid has enough space to rotate with the beams.
- Once Unraveling ends, the boss goes back into Void Convergence and the same loop starts again.
Vaelgor & Ezzorak Boss Strategy
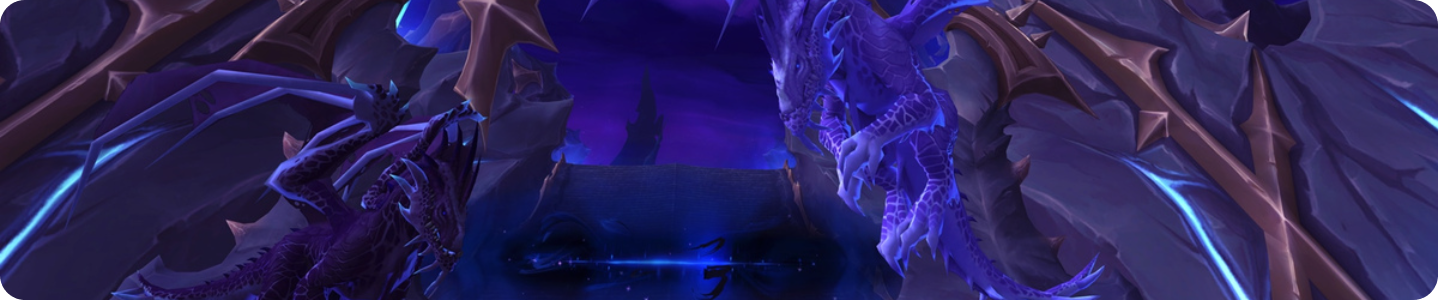
Vaelgor and Ezzorak bring a classic double-dragon setup to The Voidspire, and on Heroic the fight leans hard into that old-school feeling. Two bosses, shared pressure, constant positional punishment, and absolutely no forgiveness for players who drift behind either dragon at the wrong moment. Stand in the wrong place for even a second and you are getting thrown across the room.
The encounter is not just nostalgia bait, though. Beneath the obvious dragon fundamentals, the fight asks the raid to manage two-target pressure cleanly while keeping control of overlapping mechanics that can get messy fast. It is the kind of pull where discipline matters more than flair. If positioning slips, spacing breaks down, or people start treating tail mechanics like background noise, the fight punishes it immediately.
- Fight Style: Two-Target Fight (Multi DoT).
- Recommended Setup: 2 Tanks / 4 Healers / 14 DPS.
- Required Utilities: None.
- Heroism/Bloodlust Usage: On Pull.
There is real promise here. The fight has a few genuinely strong ideas, especially the whole room-shrinking mechanic, which keeps the arena from feeling static and forces the raid to respect space in a way that fits a double-dragon encounter well. When that part is doing its job, the boss finally starts to feel like more than a basic council fight with wings.
Still, a couple of design choices drag it down. The add stacking pressure feels like it quietly favors raid comps with tools such as Mass Grip, even if the fight is technically possible without them, and that leaves the encounter feeling more restrictive than it should. Then there is the intermission, which does not add much beyond visual noise, while the punishment tied to a 10% HP difference between the bosses looks likely to become more irritating as gear improves and raid damage starts desyncing harder.
Core Positioning Rules
- This is a two-boss encounter with separate health pools, so damage needs to stay balanced if you want both targets to fall at roughly the same time.
- Keep them more than 15 yards apart and within 10% HP of each other. If either condition breaks, Twilight Bond gives them a 100% damage boost until you correct it.
- Tank both bosses close to their starting spots, right near the 15-yard limit, so you keep good cleave value without triggering the bond.
- The raid should play between them and attack from the flanks. Do not drift behind either dragon, because Tail Lash will send you flying.
Handling Dread Breath
- If you get targeted by Dread Breath, move out to the side so the cone stays clear of the raid.
- Once the hit goes off, get dispelled immediately.
The Fight's Main Cycle
- The encounter repeats the same three-part sequence every time:
- Void Howl
- Nullbeam / Nullzone
- Gloom around 10 seconds later
- The order never changes, so once your raid learns the flow, the whole encounter becomes much easier to script.
Void Howl and Orb Control
- During Void Howl, stack as tightly as possible without overlapping circles so the spawned orbs land grouped together.
- When Nullzone tethers the raid, everyone except the tank should snap their tether right away.
- The tank snaps last, because the final break is the one that triggers the raid-wide DoT.
- If you have grip tools, use them to stack the orbs fast, then stun and AoE them down before Voidbolt starts getting casts off for free.
Gloom Soak Rotation
- Aim the first Gloom toward the blue marker.
- Have 5 ranged players soak it on the way so the puddle shrinks as much as possible before it lands.
- Rotate both the marker and the soak group for each new cast, because Diminish lasts 1 minute and prevents the same players from safely soaking twice in a row.
When Tanks Swap
- Swap bosses after every Gloom.
- Do not drag the dragons around the room. Just cross over and pick up the other boss cleanly.
- Also keep an eye on the airborne dragon, because that one gains Grappling Maw, which pulls the tank and scales its damage with distance.
Intermission Reset
- At 100 Energy, both bosses lift off and begin casting Midnight Flames.
- Everyone needs to stack inside Radiant Barrier to survive the damage.
- Players marked with purple circles should move out to the side so they do not clip the group.
- Kill Manifestation of Midnight quickly before it ramps into a real problem.
- Once intermission ends, return both bosses to their original tank spots and repeat the same sequence until the fight is over.
Having trouble with Crown of the Cosmos? We can help you out on ANY difficulty!
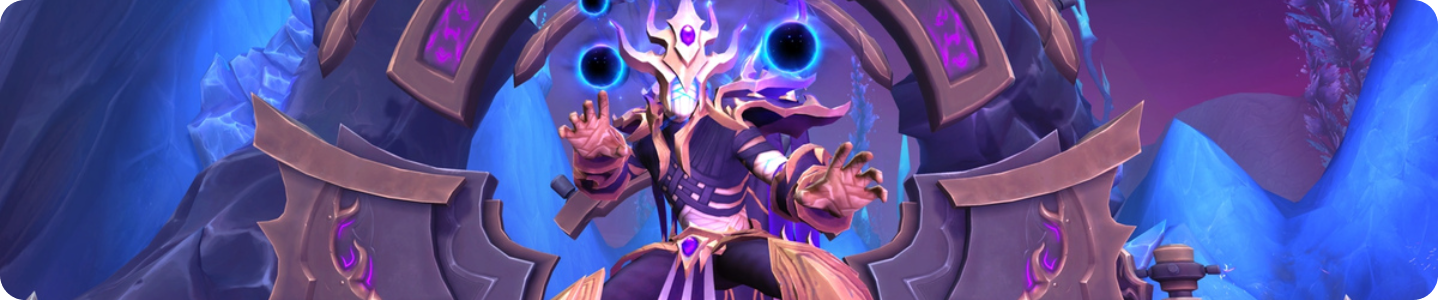
Lightblinded Vanguard Boss Strategy
The Voidspire encounter against the Lightblinded Vanguard is a messy three-man skirmish with no escape button. On Heroic, the room fills with layered holy pressure, shields, disruptive utility, and enough overlapping effects to keep the raid moving almost nonstop. War-Chaplain Senn sets the tone for a fight that is built around disruption rather than raw spectacle.
That is what gives the encounter its identity. This is not a boss you tunnel while healers fix everything behind the scenes. The fight keeps asking for target swaps, movement discipline, quick reactions to defensive layers, and clean handling of repeated control effects. If the raid starts treating mechanics like background noise, the pull gets ugly fast. If everyone stays organized, the chaos becomes manageable instead of overwhelming.
- Fight Style: 3-Target Cleave / Multi-DoT Fight.
- Recommended Setup: 2 Tanks / 4 Healers / 14 DPS.
- Required Utilities: None.
- Heroism/Bloodlust Usage: On Pull.
This is a genuinely good council-style encounter. The bosses lean on familiar paladin-flavored tools, but the fight does not feel like three random health bars stapled together. There is enough interaction between mechanics to create real pacing, and the constant movement gives the pull a sharper rhythm than most council fights usually manage.
The visual clutter and repeated disruption can still wear on people, but the encounter has more personality than most multi-target bosses. It asks the raid to stay awake, keep damage organized, and respect mechanics that would be trivial on their own but become dangerous once they start overlapping. That makes the fight feel active in a good way rather than bloated for the sake of it.
Opening Priorities
- Use Heroism on pull, but do not dump every cooldown immediately. Bellamy and Senn stay bubbled for the first 8 seconds, so early burst into them is mostly wasted.
- Start the fight on Venel, wait out that opening protection window, then commit cooldowns and convert into heavy cleave on all three bosses.
- Keep their health close together. If one boss dies too far ahead of the others, the remaining pair starts ramping damage fast and the fight gets uglier than it needs to.
Tank Swap Triggers
Energy Order and Puddle Control
- The bosses reach 100 Energy in a fixed sequence, starting with Bellamy.
- Whichever boss is about to cap Energy should already be positioned on the outer edge of the room, because once their ultimate starts they stop being movable.
- When that window ends, they leave a permanent Consecration puddle exactly where they were standing. Bad positioning here permanently shrinks your room.
Bellamy's Pressure Pattern
- Aura of Devotion cuts damage taken for allies inside the circle by 75%, so do not tunnel targets sitting in it and expect meaningful value.
- Divine Toll sends shield waves across the room that silence on contact. That matters most for healers, so dodging them cleanly is non-negotiable.
- Avenger's Shield splashes in a small radius, which means players cannot afford to stack tightly on top of each other.
- Light Infused is the fight's constant background damage, and it ramps by 25% every time any boss completes their ultimate.
Venel's Raid Checks
- Execution Sentence marks 3 soak circles. Each one needs multiple players, but the circles must stay separated from each other.
- After the soaks resolve, spiral hammers follow immediately, so do not freeze in place after the impact.
- Sacred Toll is the big unavoidable raid hit in this set. Plan real healer cooldowns for it instead of trying to brute-force it with passive healing.
Senn's Control Mechanics
- Aura of Peace pacifies anyone attacking protected allies, so do not mindlessly hit into that aura.
- Move out of Elekk Charge as soon as the line is readable.
- Sacred Shield has to be burned off first, then Blinding Light must be interrupted or the raid gets hit and disoriented.
- Tyr's Wrath stacks absorbs on the 3 nearest players, so rotate who stands closest instead of letting melee eat every application forever.
- Searing Radiance deals raid damage for 15 seconds straight. This is sustained healing, not a one-tick event.
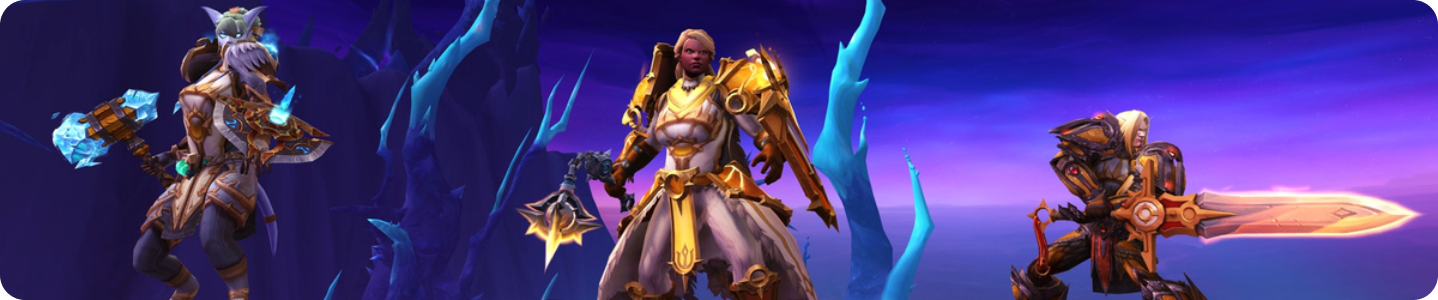
Crown of the Cosmos Boss Strategy

Alleria Windrunner closes The Voidspire with the kind of fight that stops feeling like a boss and starts feeling like a pure raid-wide stress test. On Heroic, the encounter leans on controlled add handling, clean line management, healing absorbs, and a room that gets meaner every minute you stay in it. This is not a simple endboss burn. You are juggling Sentinels, arrow paths, debuffs, and shrinking safe space while the pull keeps tightening around you.
That is what gives the encounter its weight. The early phase is all about keeping the structure intact and using the silver-arrow mechanic with intent instead of firing it through half the raid and hoping for the best. Then the fight starts to squeeze. Add deaths create extra pressure, bad debuff handling snowballs, tanks keep taking real punishment, and the last stretch turns into a pure execution check where movement discipline matters more than greed.
- Fight Style: Single Target fight with heavy add control / movement checks.
- Recommended Setup: 2 Tanks / 4 Healers / 14 DPS.
- Required Utilities: None.
- Heroism/Bloodlust Usage: During final burn.
This is a strong final boss because the pressure feels earned. The mechanic set is busy, but it is not messy for the sake of being messy. Most wipes come from bad arrow lanes, panic dispels, or losing control of space too early, not from the fight hiding what it wants from you. That usually makes for a much better progression experience.
The best part is the escalation. The encounter begins as a coordination problem and ends as a full-room execution squeeze where every earlier mistake is still sitting there waiting to punish someone. The only real drawback is that some of its tension comes from stacking maintenance pressure rather than one unforgettable signature moment, but as a Heroic closer, it lands hard and feels appropriately brutal.
Opening Stage: Break the Sentinels
- Each Undying Sentinel needs a tank in melee. The moment one is left unattended, Echoing Darkness starts punishing the raid.
- You do not get real kill pressure into the Sentinels while Umbral Tether is active. The phase revolves around using Silverstrike Arrow well enough to strip their Void protection without cleaving the raid.
- Null Corona is a heal-through mechanic first and a dispel problem second. Panic-dispelling it just moves the absorb and creates a worse healing pattern.
- Place Void Expulsion toward the edges so the resulting Void Remnants do not carve the room in half before the real fight even starts.
- If someone gets Grasp of Emptiness, move that removal lane away from the raid. You do not want the follow-up beams cutting through tanks or healers.
- Kill Void Droplets away from both the tanks and the raid. Their death splash applies Corrupting Essence, and those stacks turn sloppy cleanup into real deaths.
- The three Sentinels each add their own pressure point: Dark Hand is the tank hit to respect, Interrupting Tremor can ruin casts at the wrong time, and Ravenous Abyss punishes people crowding Vorelus.
Singularity Intermission
- Silverstrike Barrage is the mechanic that kills greedy movement. Spread your lanes, stop crossing through other players, and never assume you can squeeze one more step through an arrow path.
- Stellar Emission keeps amplifying forced movement, which means Orbiting Matter and Singularity Eruption get nastier the longer you hesitate.
- This section is less about damage and more about not panicking. Stay loose, respect the movement scaling, and get through it cleanly instead of trying to optimize uptime in a disaster zone.
Severed Rift Priorities
- The Rift Simulacrum is the priority target as soon as it appears. While it stays alive, Empowering Darkness keeps boosting Alleria and nearby adds.
- Ranger Captain's Mark is a spacing mechanic. Marked players need to fan out before the silver arrow starts bouncing, or the raid eats damage for no reason.
- Call of the Void spawns Undying Voidspawn. Interrupt them, kill them fast, and do not let the add set linger until the room starts choking on extra pressure.
- Voidstalker Sting is the background rot that starts to matter more with every overlap. It is not dramatic, but it quietly raises the healing tax on everything else.
- The Simulacrum tank swap revolves around Rift Slash. Do not sit in stacks and hope externals will fix bad timing.
- Null Corona and Void Expulsion still matter here, which is why this section falls apart fast when the raid tunnels the wrong target.
Final Burn: Space Is the Real Boss
- Aspect of the End is the movement assignment that decides whether the phase stays playable. Marked players need a real lane to move it out cleanly instead of dragging it through traffic.
- Once that debuff is shed, the follow-up collapse launches the target and slams the raid. That is where tanks and marked players need cooldown planning, not improvisation.
- Devouring Cosmos is a dead zone, not a heal check. Step out immediately and stop pretending healers can carry someone through 99% healing reduction.
- Dark Rush feathers can save a pull if you need speed, but the DoT attached to them is real. Use them with intent, not out of panic.
- By the time the boss reaches kill range, old Void Remnants, active Volatile Fissures, returning Grasp of Emptiness, and lingering Voidstalker Sting stacks all compete for the same patch of floor.
- That is why this phase feels so cruel. It is not one mechanic killing you. It is the bill for everything your raid mishandled earlier finally coming due.
