
Unholy Death Knight embodies a dark, tactical playstyle — turning corpses into fuel and spreading plagues across the battlefield. In Season 2, Unholy returns stronger than ever, empowered by key buffs and a new tier set that amplifies its signature burst windows and relentless minion damage.
If you enjoy managing a legion of undead, weaving disease outbreaks into every pull, and unleashing explosive AoE in the moments that matter then Unholy DK will surely deliver a uniquely challenging and rewarding experience. It’s more methodical than Frost, but when everything lines up, few specs can match its raw damage. This guide covers everything you need to master Unholy in Mythic+ and the Liberation of Undermine, from races and stats to rotation, talents, and survival tips.
| Strengths | Weaknesses |
| Explosive AoE Burst. | Low Mobility. |
| Exceptional Cleave & DoT Pressure. | Requires Delicate Setup. |
| Top-Tier Survivability. | Mediocre Pure Single-Target. |
| Unique Utility. | Bad Target Switching. |
Unholy Death Knight in Season 2 stands out for its ability to obliterate packs of enemies with unmatched AoE burst, while keeping steady pressure on bosses and adds through persistent diseases and relentless minion attacks. With a toolkit built around durability and tactical utility, Unholy offers self-healing, group-wide magic defenses, and the game-changing power to reposition enemies at will.
The trade-off? It’s slower and more methodical, demanding setup for maximum impact and requiring sharp positioning due to low mobility. Unholy may not always top single-target charts or bring the broadest utility, but when a fight plays to its strengths, this spec turns every corpse and infection into raw power — rewarding players who can plan ahead and control the chaos.
The War Within brings Hero Talents, a new talent tree where people can choose between two playstyle-defining paths. These talents don’t just add new visuals; they fundamentally enhance how the spec feels and performs, letting you tailor your undead army and plague-spreading gameplay even further!
As Unholy, you’ll pick either Rider of the Apocalypse or San'layn:
Below you’ll find two Unholy DK Raid builds: one tuned for maximum single target DPS and another tailored for heavy cleave encounters with frequent adds. We’ve also included the currently best Mythic+ setup that balances explosive AoE, strong survivability, and valuable group utility:
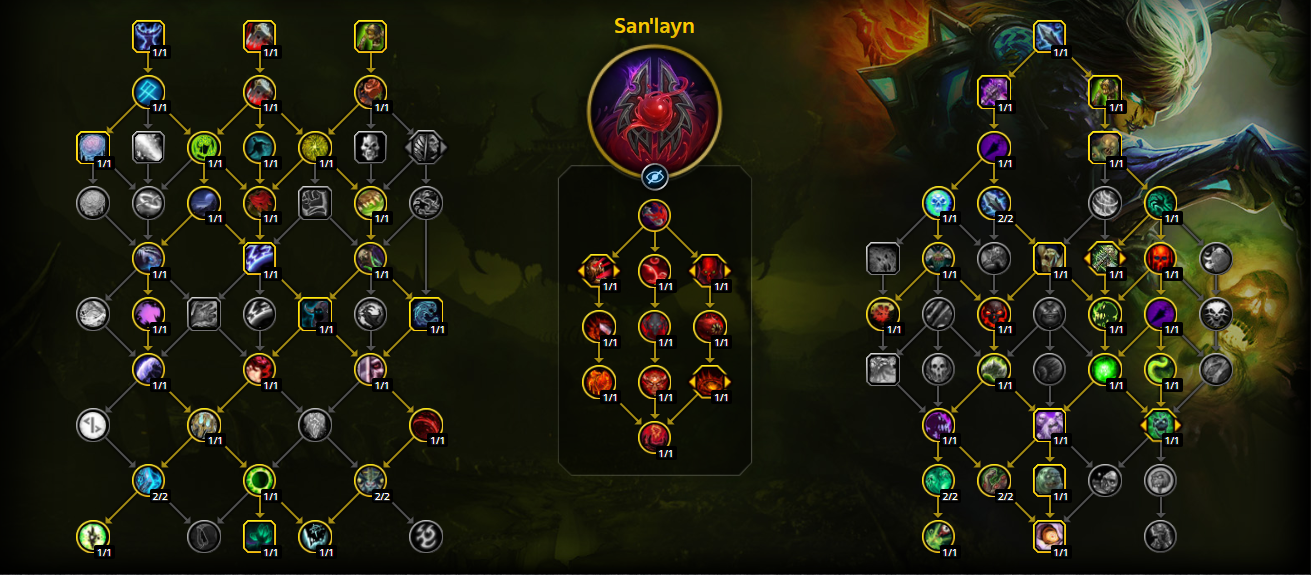
San'layn - Raid Single Target
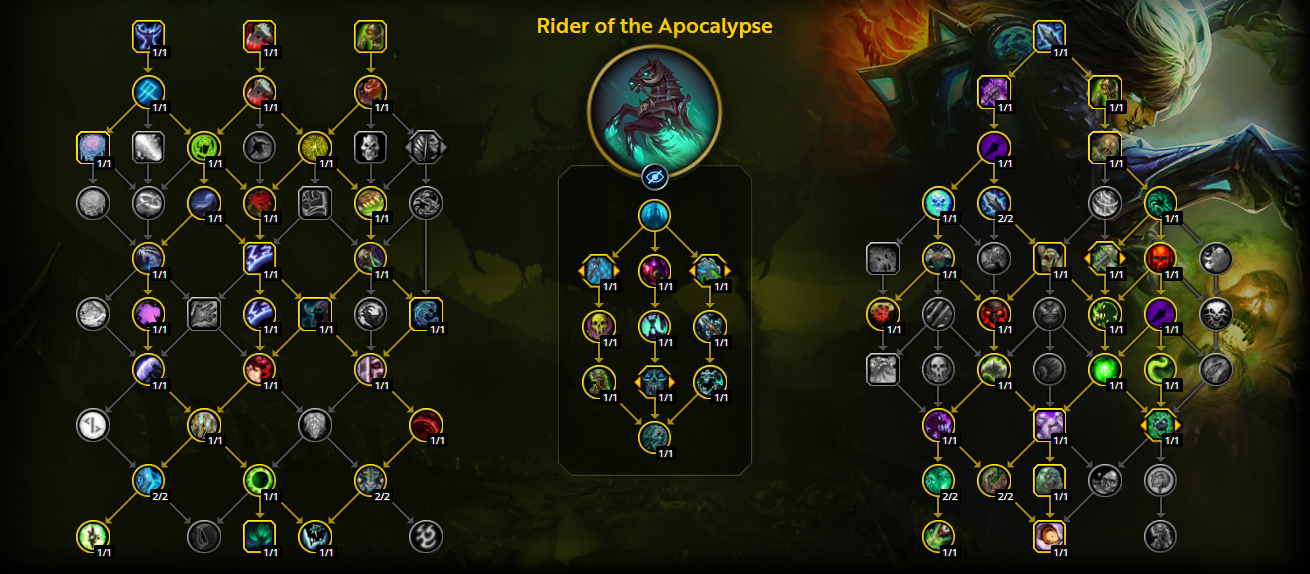
Rider of the Apocalypse - Raid Cleave
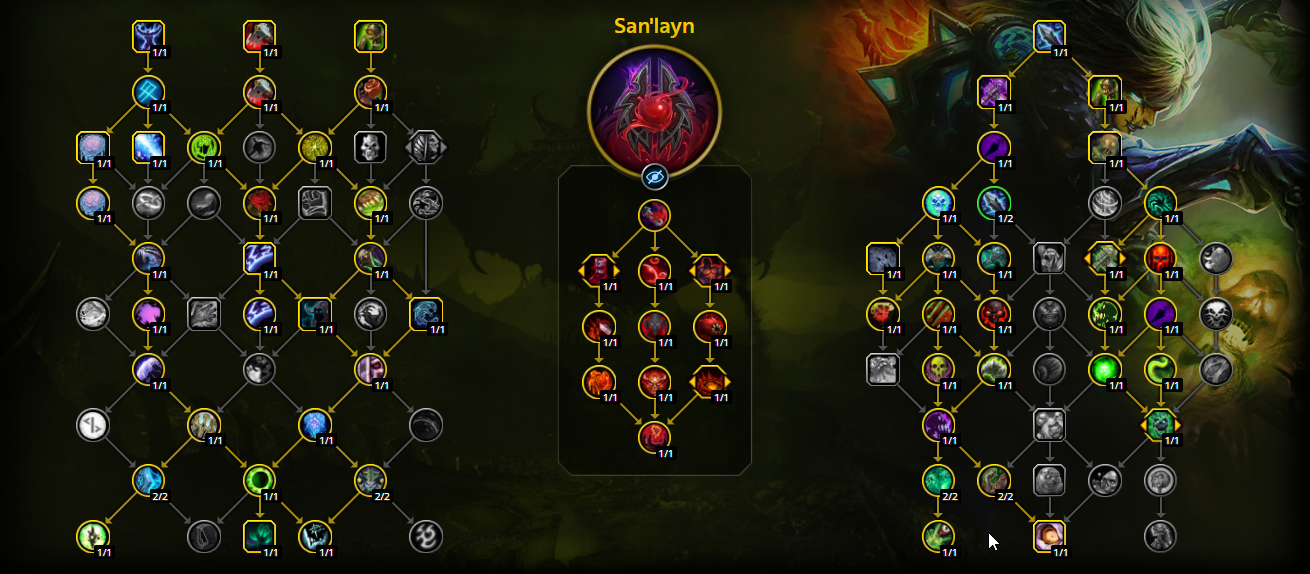
San'layn - Mythic+
CwPAAAAAAAAAAAAAAAAAAAAAAAAzYMjxYYGzMzMNjZmZGzYAAAAAAAAAgZGzYMmBAMbmhZZGzMzMmZGDMwMGNWWAsMYDAmBA
CwPAAAAAAAAAAAAAAAAAAAAAAAAzMjZMGDzYmZmphZmZGzYAAAAAAAAAgZGzYMmBAMbmhZZGzMzMmZGwiZxwQGY2YoxCAMDA
CwPAtbMOTHlnKIwUyAn+DK70SDgZmZMjZYYGjZmphZMzMzYAAAAAAAAAgZYmZMzMDAMbmhZZYmZmHYmxYgBmxoxyGgtJ2AgZA
Each Unholy DK build is flexible and can be tweaked for the encounter at hand. In the Liberation of Undermine, you’ll generally use a single-target setup for boss fights, but it’s common to swap a few talents for better cleave when facing add-heavy encounters — or to switch to a Mythic+ build entirely if the encounter has an enormous amount of adds constantly thrown at your team.
Race choice these days has only a small effect on PvE performance (usually less than 1%). Play what you enjoy, but if you want every possible advantage, a handful of races do have racial abilities that pair well with Unholy’s strengths.
As you can see, both factions have a wide range of competitive races, each offering their own unique advantages for Unholy DK gameplay. While certain racials may provide a small edge in specific scenarios, the difference is minor — so you’re free to pick whichever race you find the most appealing visually or the one whose gameplay perks best fit your personal style. Ultimately, enjoying your character’s look and feel will matter more than a tiny DPS increase, so go with what inspires you or simply feels the most fun to play!
Unholy Death Knight’s rotation centers on priority and careful setup. While the core ability sequence is fairly accessible, maximizing your DPS means lining up major cooldowns, managing Festering Wounds and diseases, and optimizing your minion and resource timing. If you mismanage your setup or let resources cap, your damage will take a hit. Below, we’ll break down the main rotation and share key tips to push your Unholy DK performance even further.
Mastering Unholy Death Knight goes far beyond memorizing an opener or sticking to a basic priority list. The real difference between a solid Unholy DK and a top-tier performer lies in the details — how you manage your resources, optimize your cooldown usage, and adapt your approach to each encounter.
This spec rewards players who think ahead, plan their cooldowns to match fight mechanics, and react quickly when things don’t go as scripted. Knowing when to pool Runic Power, how to set up big AoE bursts, and when to prioritize survival over pure damage can turn close calls into clutch moments for your group. Positioning is also crucial: Unholy’s limited mobility means mistakes can be punishing, so learning boss movement patterns and pre-empting mechanics will set you apart. In this section, we’ll cover essential gameplay tips to help you consistently outperform the average Unholy Death Knight and really master the spec!
Effective cooldown management is one of the biggest keys to excelling as an Unholy Death Knight. Knowing when to unleash your major abilities: like Army of the Dead, Raise Abomination, and Unholy Assault can make or break your damage windows.
| Spell | Cooldown | How to use | Pair with | Notes |
|---|---|---|---|---|
| Abomination Limb | 2 min | Use on cooldown | — | Save if you need extra grips |
| Apocalypse | 45 sec | Use on cooldown | Dark Transformation, Commander of the Dead | Keep in sync for Commander-buffed burst |
| Army of the Dead | 3 min | Use on cooldown | Dark Transformation, Commander of the Dead | Pre-pull for maximum uptime |
| Dark Transformation | 45 sec | Use on cooldown | — | Triggers Commander of the Dead if talented |
| Death and Decay | 30 sec | Use on cooldown in AoE | — | Avoid overlapping existing DnD |
| Defile | 20 sec | Use on cooldown in AoE | Apocalypse (ST) | Cast only if no Defile already active |
| Raise Abomination | 90 sec | Use in appropriate content (PvP/Mythic+) | Unholy Assault (ST), Dark Transformation (AoE) | Alternative to Army for shorter fights |
| Summon Gargoyle | 3 min | Use on cooldown | Army of the Dead, Dark Transformation | Benefit from Commander of the Dead when active |
| Soul Reaper | 6 sec | Use when target will be <35 % HP within 5 sec | — | Executes for burst damage + Runic Corruption |
| Unholy Assault | 90 sec | Use on cooldown | — | Great opener for Festering Wounds stacking |
| Vile Contagion | 45 sec | Use on cooldown in AoE | Unholy Assault | Cast on the target with most Festering Wounds |
Mastering Unholy Death Knight means more than just knowing which abilities to press — you should also be able to "feel" the flow of your rotation and how each mistake can add up to a major loss in damage or utility. Even experienced players can fall into common traps, whether it’s mismanaging wounds, holding cooldowns too long, or letting resources cap. These small missteps can seriously limit your performance, especially in high-pressure Mythic+ and raid environments.
Damage isn’t everything — part of excelling as an Unholy DK is knowing how to leverage your robust defensive kit and unique utilities to survive, support your group, and handle mechanics that kill other specs. Here’s how to get the most from your core utility and defensive abilities in any PvE content:
Mind Freeze is your bread-and-butter interrupt with 15 second cooldown, no resource cost, and essential for shutting down dangerous casts. Use it on priority spells, communicate with your team, and never let key kicks go to waste. Being a reliable kicker makes you invaluable in any dungeon or raid.
Death Grip is the DK signature: instantly pulls a mob to you, interrupts many spellcasts, and is perfect for repositioning casters or ranged mobs into the tank’s AoE. It’s also amazing for high-priority add control in both dungeons and raids. Coordinate with your tank and use it proactively — well-timed grips can save a pull or prevent a wipe.
Gorefiend’s Grasp (if talented) pulls all enemies within 15 yards to your target. This turns chaotic packs into perfect AoE setups, and is incredible for controlling trash in Mythic+ or clustering mobs for mass crowd control. Use it to group up casters, stop scattered mobs, or set up a team nuke on deadly pulls.
Chains of Ice is a heavy snare — great for slowing down dangerous adds, pinning kiting targets, or stopping a mob from running wild. Don’t overlook its value: a single Chains on a loose or enraged mob can make a big difference!
Control Undead lets you charm an undead mob for five minutes, removing it as a threat and even turning it into a temporary ally. In the right dungeon or pull, controlling a dangerous undead can trivialize a mechanic or add extra DPS/debuffs to your group—always be on the lookout for eligible targets.
Death’s Advance is a subtle but powerful tool: a speed boost and total immunity to knockbacks and forced movement for 10 seconds on a short cooldown. Use it to stay planted during boss knockbacks, cross platforms safely, or avoid being repositioned at the wrong time. This is a big part of turning Unholy’s low mobility into a strength when it matters most.
Anti-Magic Zone (AMZ) is a raid utility cooldown that reduces magic damage taken for everyone inside: crucial for saving your team during boss magic bursts or dangerous caster packs. Use it often and don’t be shy as a well-timed AMZ can prevent wipes and boost your group’s chances at clutch kills.
Anti-Magic Shell (AMS) is your personal magic shield — absorbing big hits and converting magic damage into Runic Power. Use AMS proactively to immune deadly curses or spell hits, and you’ll often be the last one standing while others dodge out.
Icebound Fortitude (IBF) is your “oh crap” button — 30% damage reduction and immunity to stuns on a short cooldown. Use IBF to survive boss nukes, big bleeds, unavoidable stuns, or high incoming damage. Let your healers know when you use it as they’ll love you for it!
Mastering these abilities turns Unholy DK into a true raid and dungeon backbone. You’re not just another DPS — you’re the one saving the group with clutch AMZs, never missing an interrupt, and turning rough mechanics into easy wins. Lean into your toolkit and you’ll always have value, no matter the fight!
Properly gearing your Unholy Death Knight is crucial for excelling in both Mythic+ dungeons and raids. Below, we’ll break down Unholy DK’s stat priorities and list some of the best-in-slot (BiS) gear to target in Season 2:
Tip: Try to obtain a balance. Mastery and Haste are your focus – aim to stack those on most of your gear. Keep an eye on your Rune regeneration rate and GCD feel; if things start to feel sluggish, you may need more Haste. Conversely, if you’re doing fine on Haste, leaning harder into Mastery will directly buff the huge portion of your damage that is Shadow. When in doubt, run a simulation of your character to fine-tune exact stat weights (Unholy’s gearing can be nuanced). But the priority above holds true as a reliable guideline for gearing decisions. Always prioritize item level upgrades, and then use enchants/gems to push your Haste/Mastery as high as possible for maximum disease and pet damage.
| Slot | Item | Source |
|---|---|---|
| Head | Cauldron Champion's Crown | Catalyst / Raid / Vault |
| Neck | Strapped Rescue-Keg | Cinderbrew Meadery |
| Shoulders | Cauldron Champion's Screamplate | Catalyst / Raid / Vault |
| Cloak | Consecrated Cloak | Crafting |
| Chest | Cauldron Champion's Ribcage | Catalyst / Raid / Vault |
| Wrist | Everforged Vambraces | Crafting |
| Gloves | Cauldron Champion's Fistguards | Catalyst / Raid / Vault |
| Belt | Coin-Operated Girdle | One-Armed Bandit |
| Legs | Galvanized Oxxein Legguards | Theater of Pain |
| Boots | Cauldron Champion's Greatboots | Catalyst |
| Ring | The Jastor Diamond | Chrome King Gallywix |
| Ring | Miniature Roulette Wheel | One-Armed Bandit |
| Trinket | Mechano-Core Amplifier | Delves / Vault |
| Trinket | House of Cards | One-Armed Bandit |
| Weapon | Best-in-Slots | One-Armed Bandit |
Blasphemous Gem Culminating Blasphemite: +181 Primary Stat + 0.15% Critical Effect per unique Algari Gem color.
Gems that you should buy:
You will always want to use the dual stat gems as they give you more stats overall (example: Masterful Emerald). The best way to find out the best gems for your character is to sim multiple gem combinations!
Gems and Ring enchants heavily depend on your current stat weights and will often fluctuate depending on your current gear. These are the enchants and gems you will generally want to use, but always check Raidbots to see which are currently the most valuable for you.
General Enchants:
Ring Enchants:
Patch 11.1.5 introduces the Puzzling Cartel Chip, a bad luck protection system that lets you buy rare weapons, trinkets, and items from Liberation of Undermine and Season 2 Mythic+ dungeons. Each character can only get 3 Chips, so spend them wisely. Items can reach up to ilvl 671 (Hero Track) or 684 (Myth Track).
Recommended priority for Unholy DK:
Patch 11.1.5 also brings back Corruption Runes, a system that lets you socket a special rune in your head slot for powerful bonuses. There are 6 different Corruption Runes:
Only one rune can be equipped at a time. For Unholy Death Knight, the best choice is:
Greater Rune of the Void Ritual is by far the best for all DPS profiles thanks to the consistency and power of secondary stats. Other options aren't tuned to surpass it.
In modern WoW, professions won’t make or break your DPS, but they can provide practical benefits that align well with the Unholy DK’s needs. Here are the best professions to consider and how each can help your PvE performance:
At the end of the day, professions are a helpful bonus — not a requirement for Unholy DK success. None of these choices will make or break your DPS or hold you back from competing at a high level. Feel free to pick the profession that sounds the most fun or fits your personal goals, whether it’s crafting gear, saving gold on consumables, or just enjoying the utility and flavor they bring.
Why Macros? Unholy Death Knights thrive on tight control over their minions, debuffs, and cooldowns, making every second count when pushing your performance. Macros let you automate targeting (so you don’t lose a crucial enemy mid-fight), chain together abilities with a single press, or swap runes and resources on the fly. This isn’t just about convenience — it’s how you stay in command of your toolkit, managing pets, interrupts, and burst windows without fumbling through multiple keybinds.
This macro casts Raise Ally on your mouseover target if they are a friendly player. Otherwise, it casts Raise Ally on your current target.
#showtooltip Raise Ally
/cast [@mouseover,help][@target]Raise Ally
This macro allows you to interrupt your focus target with Mind Freeze if you have one, or simply interrupt your current target otherwise.
#showtooltip Mind Freeze
/cast [@focus,harm,nodead][] Mind Freeze
This macro will cast Outbreak on your mouseover target.
#showtooltip Outbreak
/cast [@target=mouseover,exists] Outbreak; Outbreak
Helps reduce the number of buttons you need to press in your opener (especially when running Summon Gargoyle).
#showtooltip Summon Gargoyle
/cast Summon Gargoyle
/cast Dark Transformation
Use this macro to cast Unholy Assault and activate your trinket. You can also add a whisper to your Priest for Power Infusion.
#showtooltip Unholy Assault
/cast Unholy Assault
/use 13
This macro allows you to dismiss your pet, which might be required for dungeons, especially if you have All Will Serve talent.
/petdismiss [pet]
These macros allow you to quickly plant your Death and Decay, Anti-Magic Zone or Defile on your cursor.
By working these macros into your routine, you’ll notice your gameplay gets sharper and more fluid. You can interrupt at just the right moment without losing your current target, control your ghoul or A-bomb instantly, and manage cooldowns with less mental clutter. Start by adding one or two essential macros to get comfortable, then layer in more as you go. In the end, macros are there to help you maximize your uptime, reaction speed, and control—crucial for squeezing every bit of power out of your Unholy Death Knight.
#showtooltip Death and Decay
/cast [@cursor] Death and Decay

#showtooltip Anti-magic Zone
/cast [@cursor] Anti-magic Zone
Very good for sniping low health adds without having to switch targets.
#showtooltip Soul Reaper
/cast [@mouseover,exists,harm][@target,exists,harm] Soul Reaper
This works as a mouseover or current target Death Grip macro, but also cancels auto attacks on that target. It’s perfect for gripping adds that are crowd controlled — so you don’t break CC with stray hits.
#showtooltip Death Grip
/stopattack
/cast [@mouseover,exists,harm][@target,exists,harm] Death Grip
Your Dark Transformation gives your pet 100 energy. Auto-cast Claw doesn't fully spend your pet’s energy, but this macro drains it by commanding Claw just before you transform (so you don’t waste any potential damage).
#showtooltip Dark Transformation
/cast Claw
/cast Dark Transformation
/use Blood Fury
Unholy Death Knight is a specialization with a truly distinctive identity – you are the master of decay, the commander of the Scourge, turning battlefields into rotten wastelands and foes into minions. It’s a spec that offers incredible highs when played skillfully: the satisfaction of perfectly executing your rotation and watching a horde of enemies crumble in unison is second to none. Yet, Unholy also demands finesse, foresight, and adaptability; it’s easy to learn the basics, but mastering the full potential of your runes, wounds, and undead army is a journey of continuous improvement. Embrace the challenge and you’ll be rewarded with a playstyle that is both ferocious and resilient, capable of leading damage charts while laughing off dangers that would fell other heroes.
If you’re eager to elevate your Unholy DK gameplay further, don’t hesitate to seek guidance as even the greatest necromancers refine their dark arts with a bit of coaching. ConquestCapped offers expert coaching and support for players just like you, delivered by seasoned Death Knight veterans who know the spec inside and out. Whether you need help with advanced cooldown usage, log reviews to find where you can improve, or one-on-one training sessions, we’re here to help you turn the Unholy Death Knight into a truly unstoppable force.