
Riddler's Mind-Worm is one of the most famous secret mounts ever added to World of Warcraft. Unlike traditional mounts obtained through raids, reputations, or random drops, this mount is rewarded for solving a carefully designed multi-expansion puzzle. It sends players across Azeroth, Outland-era locations, Pandaria, Cataclysm zones, and Legion content, forcing you to think, travel, and pay attention to details rather than simply farming a single activity.
What makes Riddler's Mind-Worm especially desirable among mount collectors is its symbolism. It represents the golden age of Blizzard’s secret design philosophy, where community collaboration, riddles, and lore-driven clues mattered more than brute-force grinding. Visually, the mount stands out as a massive void-infused worm, similar in silhouette to other cosmic mounts but with a distinct Old Gods-inspired aesthetic. For many collectors, obtaining this mount is less about transportation and more about owning a piece of World of Warcraft history.
The Riddler's Mind-Worm is one of the most iconic “secret” mounts in World of Warcraft. You don’t farm a boss, you don’t grind a reputation, and you don’t roll dice every week - instead, you solve a structured scavenger hunt by reading eight hidden pages scattered across Azeroth and several expansions.
This secret was built around riddles inspired by the cosmology chart from World of Warcraft: Chronicle Volume 1. A fun detail for collectors - the first page numbers even line up to form the book’s ISBN: 9781616558451. The community originally solved the full chain on April 11, 2017, and today you can still complete it at your own pace as long as you respect the order.
At any point - even mid-route - you can paste this command into your chat to verify which pages are already “Read” on your character. This is especially useful if you took a break and want to continue without guessing.
You do not have to complete all 8 pages in one play session. However, you MUST complete them in the order listed below. Also note - you must interact with each page (not just stand near it) for the next one to become available.
Below is the complete route in the only sequence that works. Treat it like a checklist: read a page, confirm it’s registered, then move on. Each page also includes its short “riddle fragment” - it doesn’t change the next step today, but it’s part of the original secret flavor.
Your first stop is Legion Dalaran above the Broken Isles. The easiest option is your Dalaran Hearthstone. If you don’t have it handy, use your faction portal room - take the portal to Azsuna and fly south-east until you see the city floating in the sky.
Once you land in Dalaran, head to The Legerdemain Lounge in the northern quadrant of the central circle. Go inside, locate the small nook in the first room, and look for a bookshelf near the only painting. The page is on the second shelf from the top.
/way #626 48.83 42.08 - Page 9
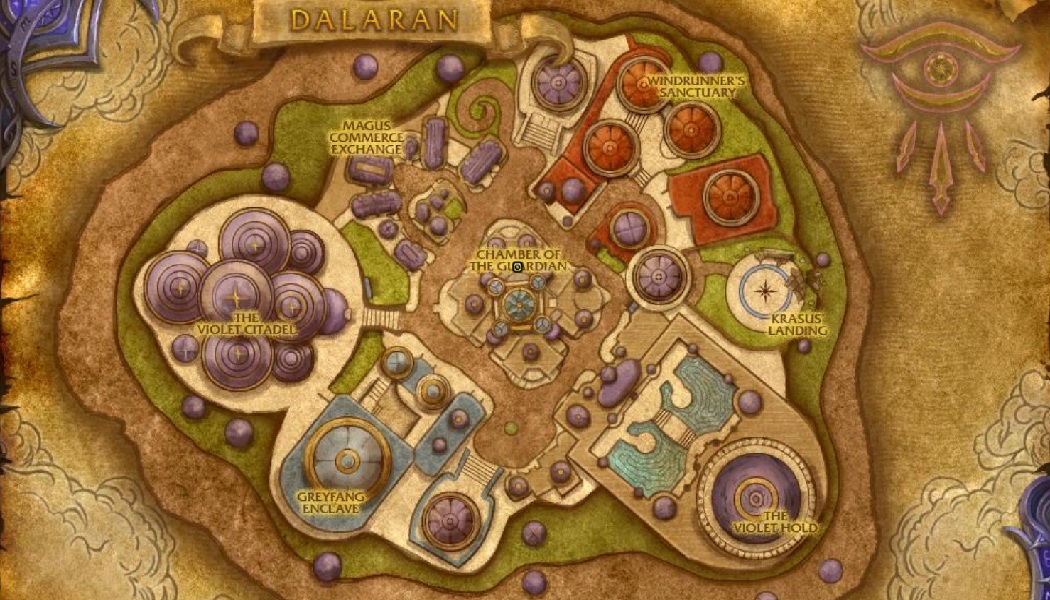
Page 9 map
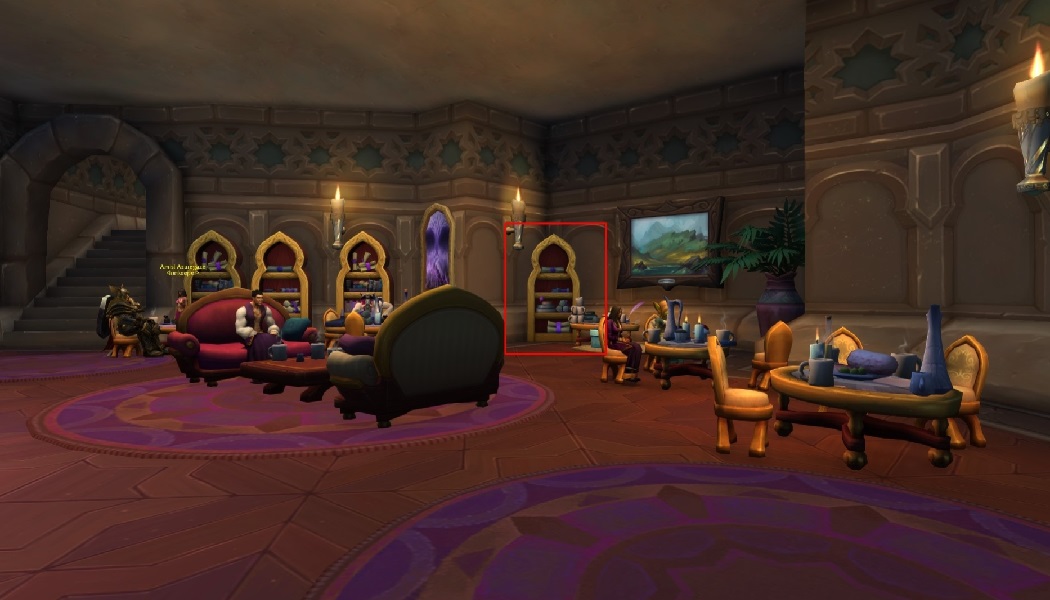
Page 9
Page 9 reads: …of sea, spirit and self…
The second page is in the Twilight Grove in Duskwood. If you’re a Druid, this step is extremely fast - use Dreamwalk and take the Emerald Dreamway portal that leads to Duskwood.
If you’re Alliance, simply fly south-east from Stormwind.
If you’re Horde, take a zeppelin to
Stranglethorn Vale
(first) and then fly north into Duskwood.
/way 52.5 53.2 - zeppelin
In Twilight Grove, look for a small wooden table in front of a moon well - the page is sitting right there.
/way #47 49.22 34.01 - Page 78
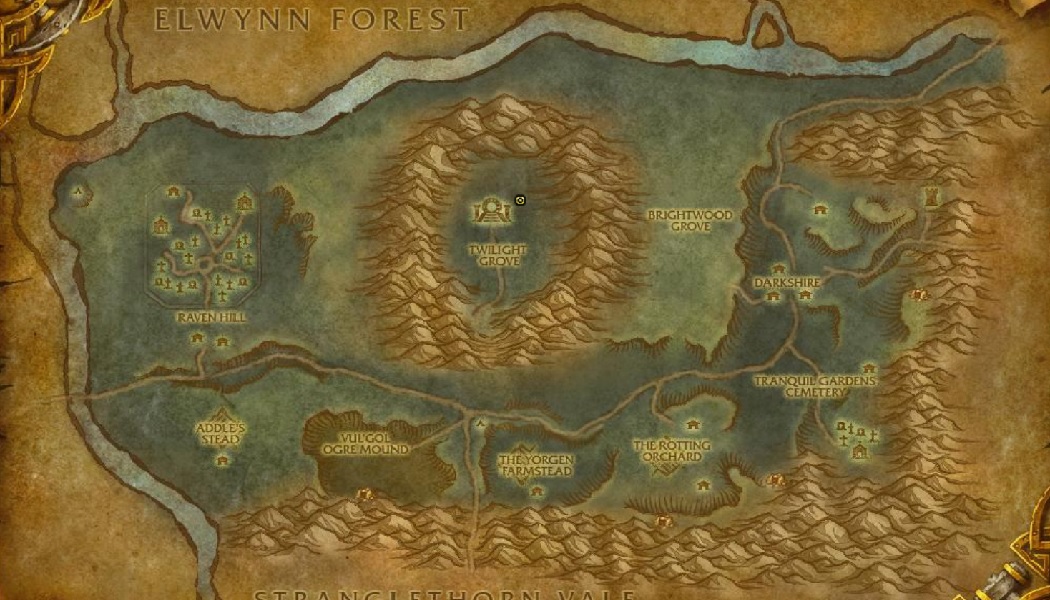
Page 78 map
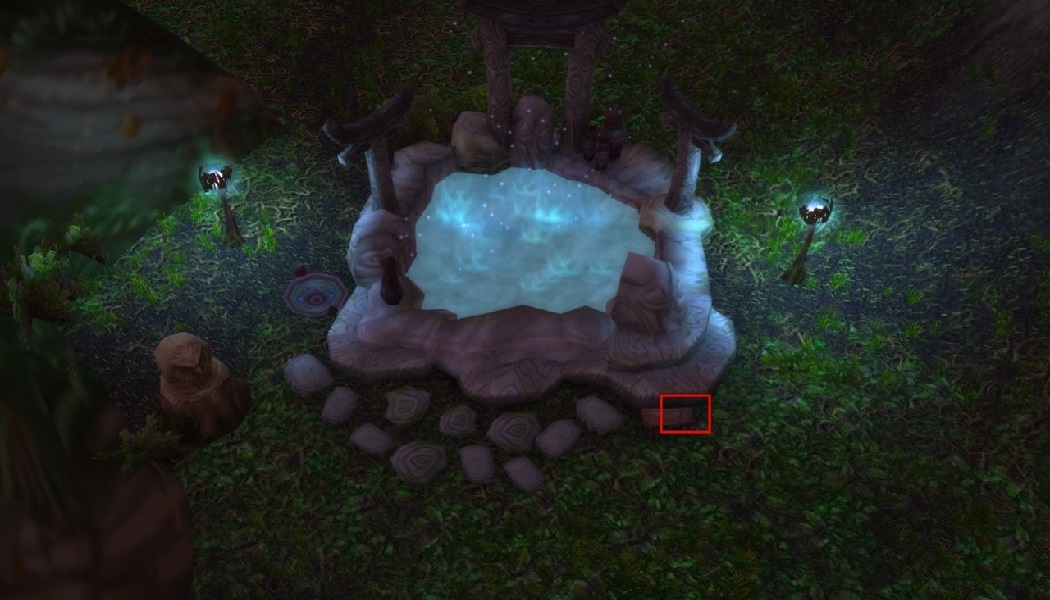
Page 78
Page 78 reads: …first of lords to fall…
Next, you’ll enter the Firelands raid. The entrance is in Mount Hyjal. Both factions can reach Hyjal through the Cataclysm portal section in Orgrimmar or Stormwind. Druids can also Dreamwalk to Mount Hyjal via the Emerald Dreamway.
After arriving in Hyjal, fly to the Firelands entrance on Sulfuron Spire in the southern part of the zone.
/way 47.8 77.7
Enter Firelands on any difficulty. A practical collector tip - running Heroic gives you a bonus reason to be here, since you can also try for Flametalon of Alysrazor and Pureblood Fire Hawk. To reach the page, clear the raid up to the final boss. The page is on the left side of Ragnaros’ platform, in front of a lit brazier.
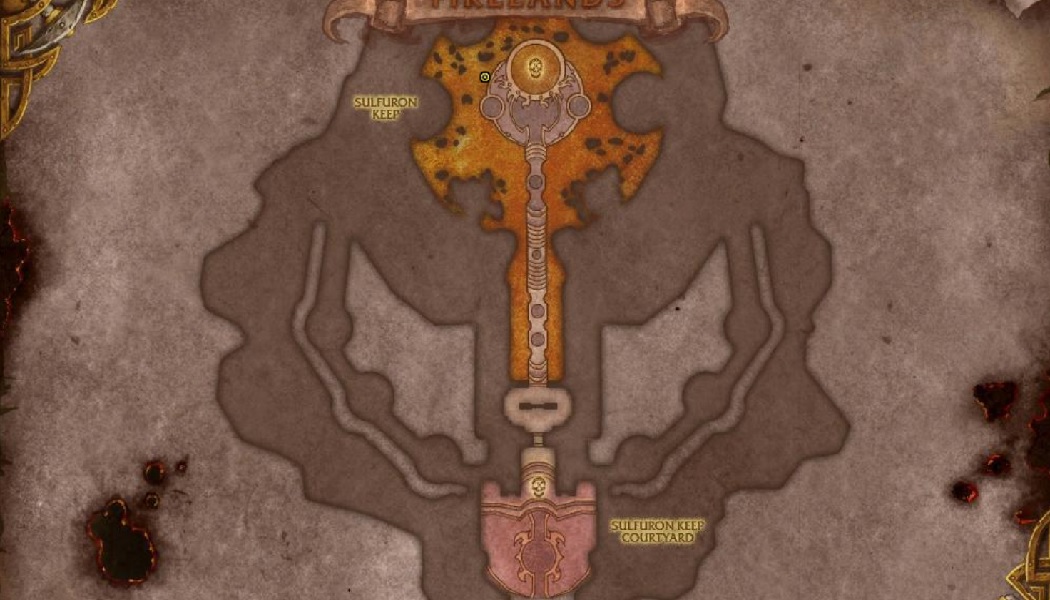
Page 161 map
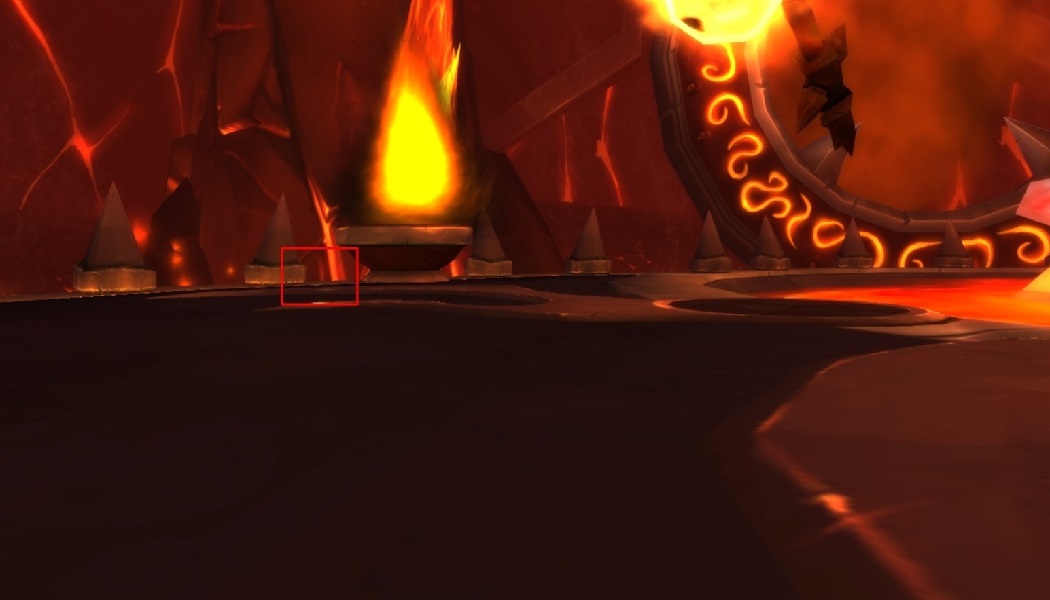
Page 161
Page 161 reads: …the wind, the eye…
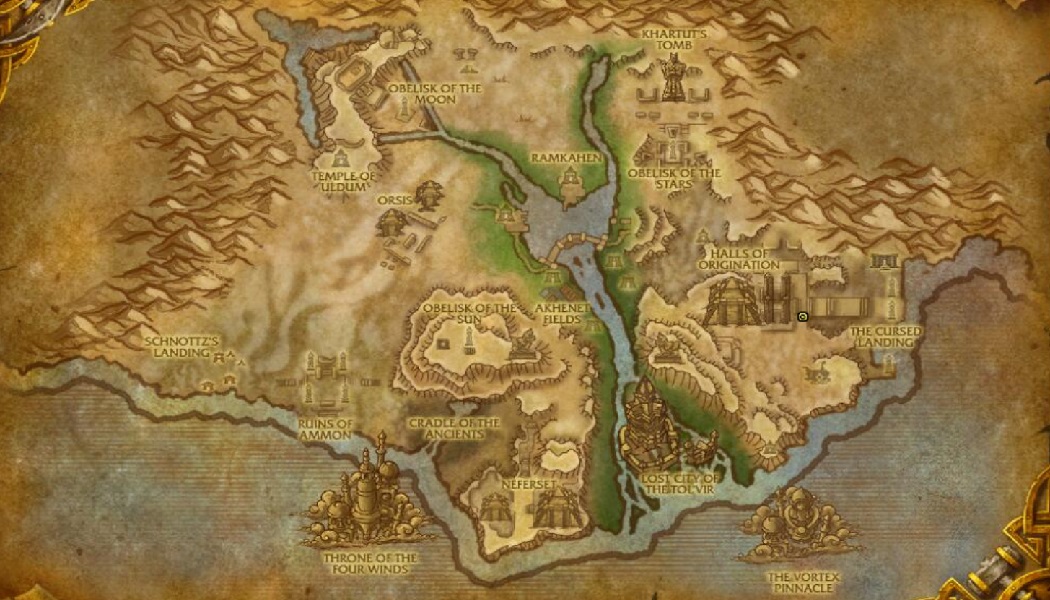
Now you’ll travel to Uldum. Use your capital city portal room again and take the Uldum portal near the other Cataclysm portals (same area as Mount Hyjal).
Important warning: in Uldum you must be in the Cataclysm version, not the 8.3 BFA phase. If the zone looks “wrong” or you can’t see what you’re looking for, speak to Zidormi. She stands in Ramkahen in an alcove slightly forward and to your left after you arrive, and she’s marked by a speech bubble on the map.
Once you’re in the correct phase, head south-east of the Lost City of Tol’vir. The page is positioned between two small palm trees near the coastline.
/way #249 70.46 78.03 - Page 655
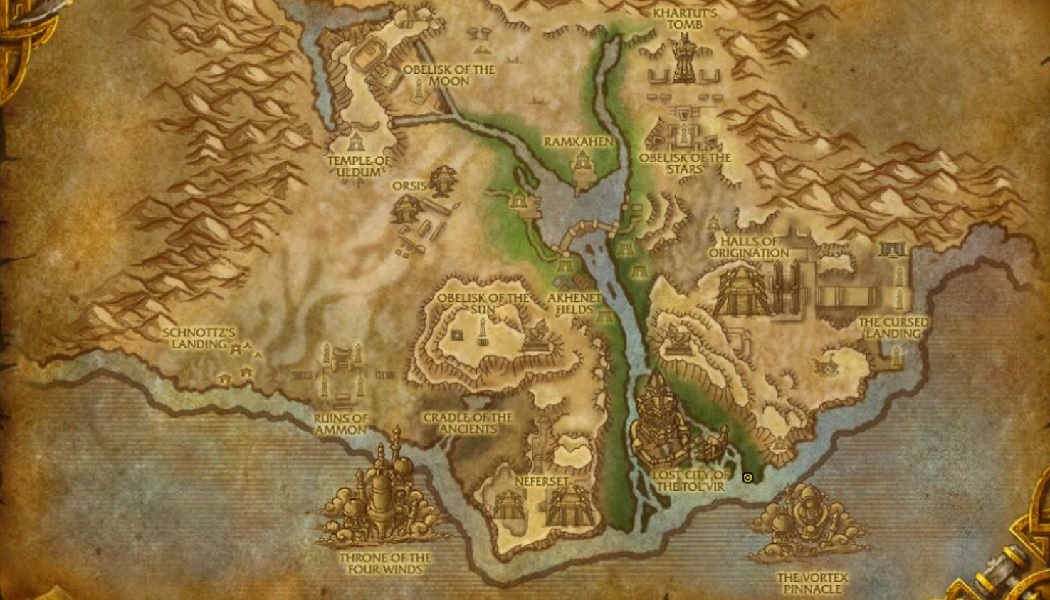
Page 655 map
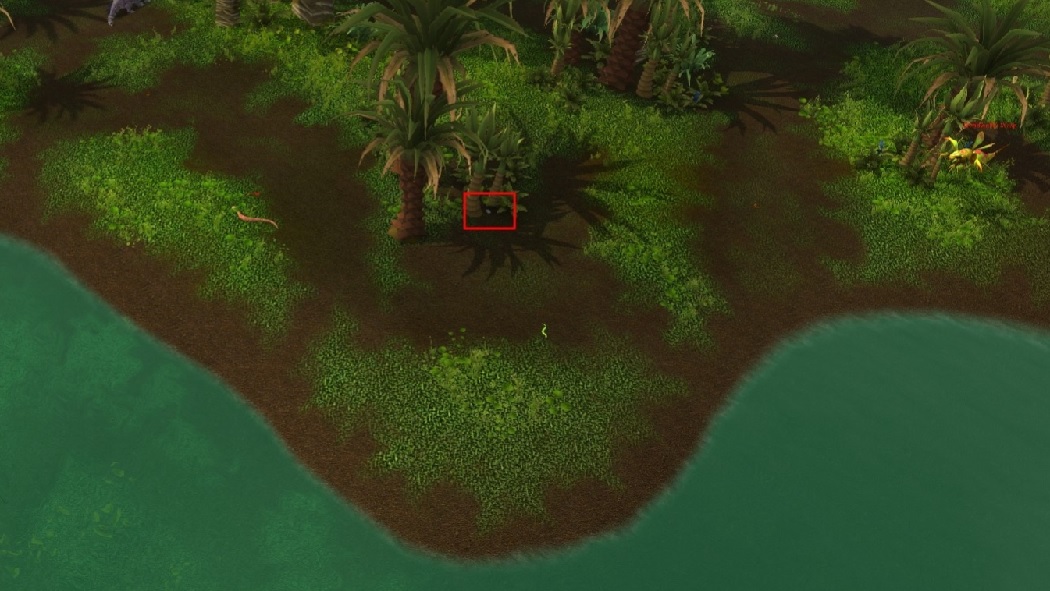
Page 655
Page 665 reads: …the plume, the tomb, a scarab moon…
The next page is inside the Siege of Orgrimmar raid. To get there, take the Jade Forest portal from your portal room (Orgrimmar or Stormwind).
After the portal, travel into the Vale of the Eternal Blossoms and head to the raid entrance near the corrupted Mogu’shan Palace area.
One more phase warning - if you’re in the 8.3 BFA phase, you must switch to the past version to see the entrance.
You can swap phases via
Zidormi,
who is located on the balcony of Mogu’shan Palace.
/way 72.2 44.5
Enter Siege of Orgrimmar on any difficulty. If you enjoy efficient collecting, Mythic is a nice option because you can later continue to Garrosh for a shot at Kor'kron Juggernaut. For the page, you only need to clear up to the fourth boss, Sha of Pride. The page is in the Sha’s room, in the far left corner away from the entrance, behind the portal to Orgrimmar.
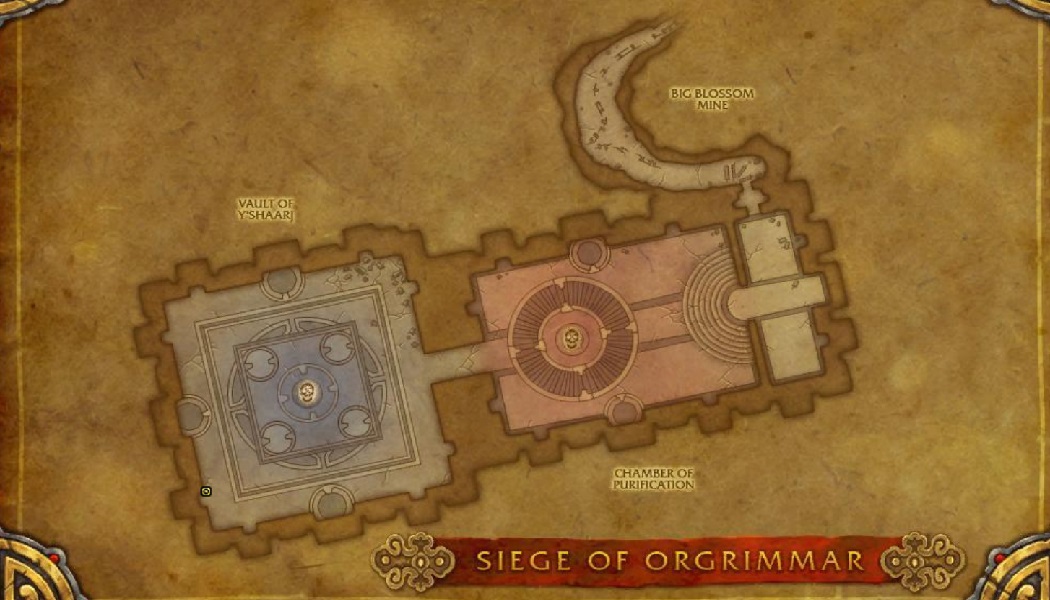
Page 845 map
Page 845
Page 845 reads: …in snow, sand, and stone…
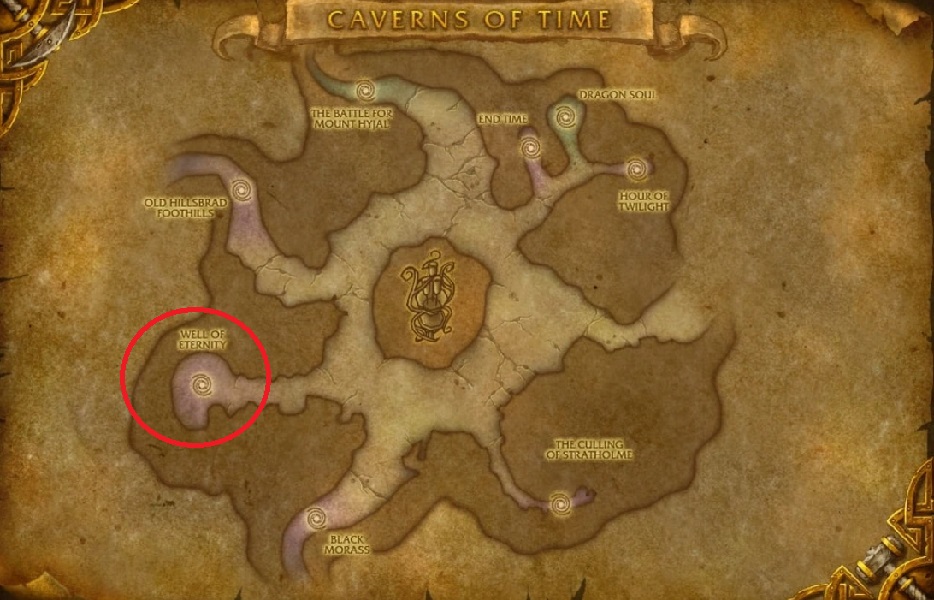
The sixth page is inside the Well of Eternity dungeon, located within the Caverns of Time. Getting to Caverns of Time is simple, but note that portals are not always in the main portal room - they are usually placed in the extra rooms that contain older expansion portals.
Once you reach Caverns of Time, fly down the long tunnel to the very bottom. You will see multiple instance portals - you want the most western one.
As usual, the dungeon difficulty does not matter.
/way 24.4 64.2
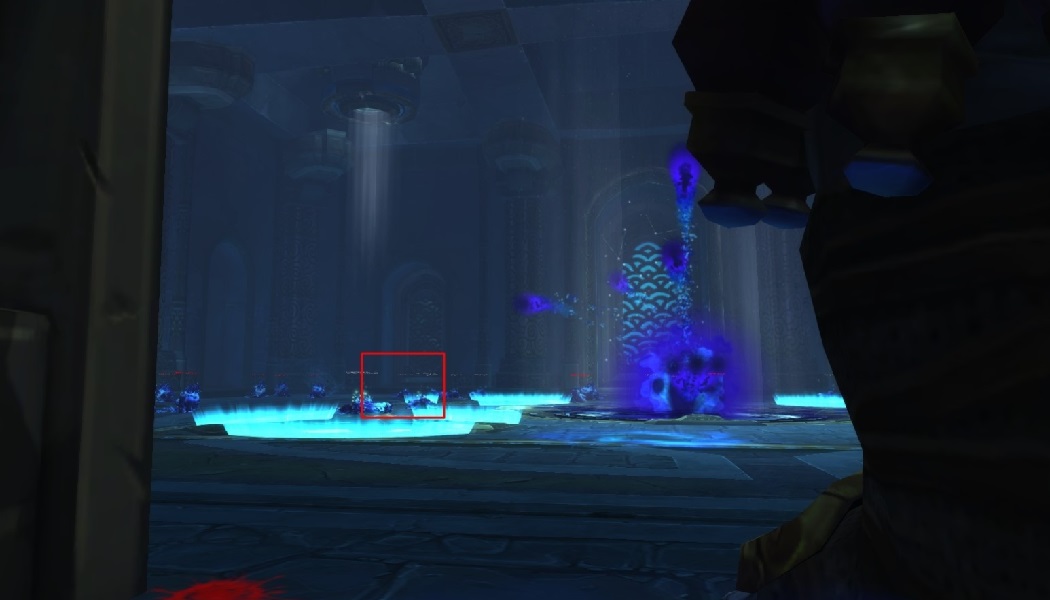
Inside Well of Eternity, progress normally and defeat the first two bosses. After you ride a Bronze Drake and arrive at the grassy area featuring Illidan and Malfurion, walk forward and look for steps leading toward the corrupted Well. The page is placed near a stone-and-gold divider, close enough that TomTom positioning makes it painless.
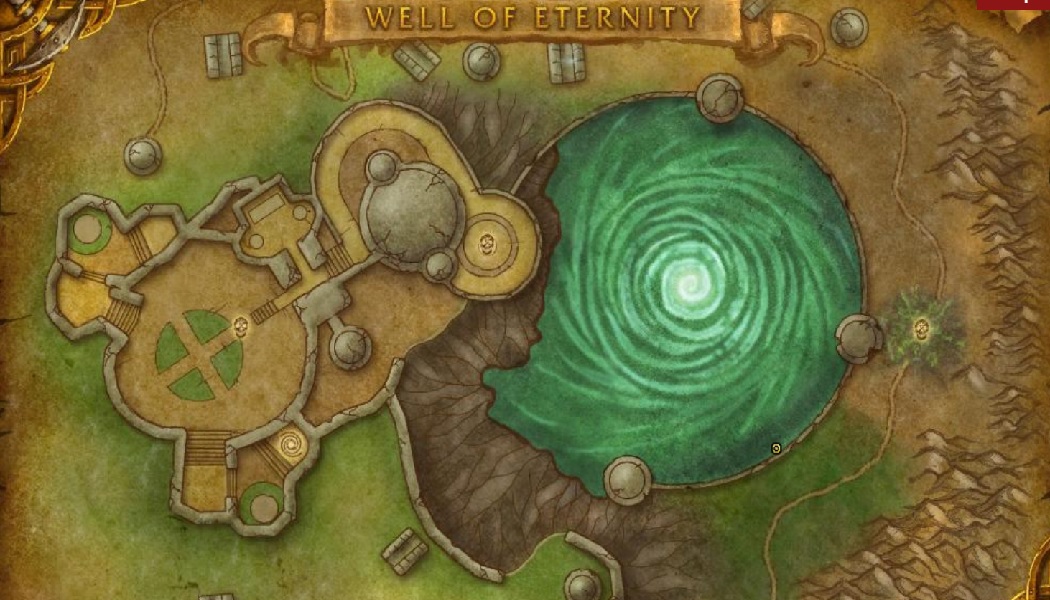
Page 1127 map
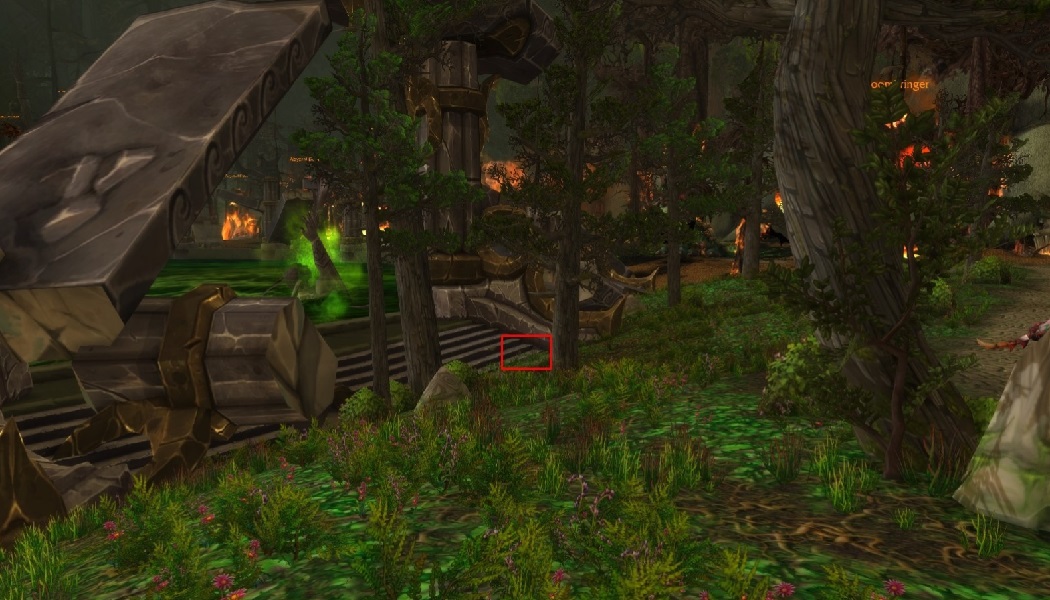
Page 1127
Page 1127 reads: …behold the battle, unblinking…
Your seventh page is found near Shado-Pan Monastery in Kun-Lai Summit. You’ll use the Jade Forest portal again (same as earlier), so you don’t need a new travel trick here - just portal in and ride out.
After exiting in Jade Forest, head west (Horde) or northwest (Alliance) until you reach Kun-Lai Summit. Near the dungeon entrance you’ll see two tiger statues - the page is at the base of the left tiger statue.
/way #379 34.64 50.88 - Page 2351
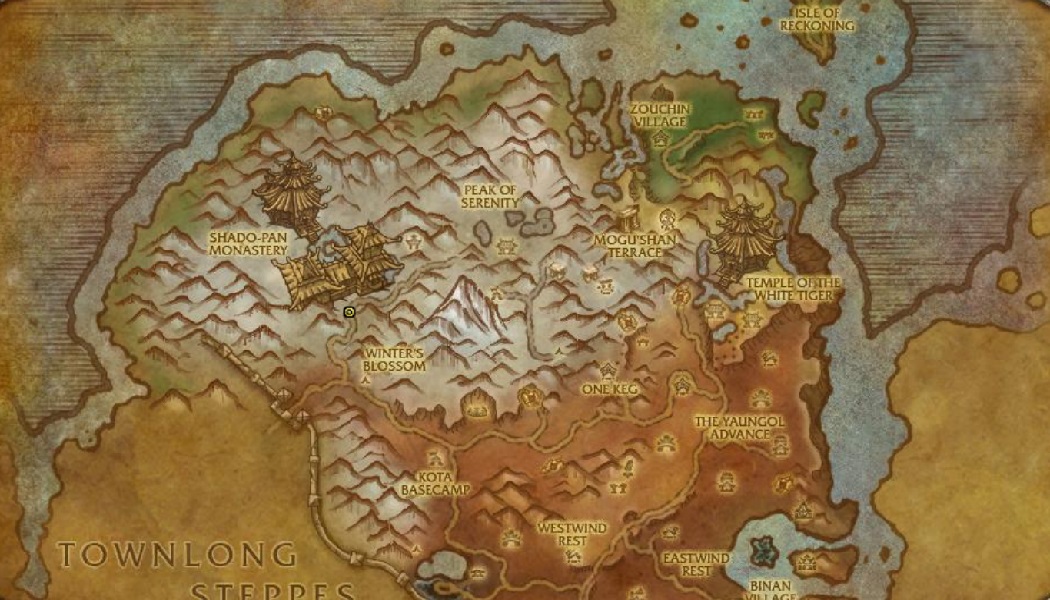
Page 2351 map
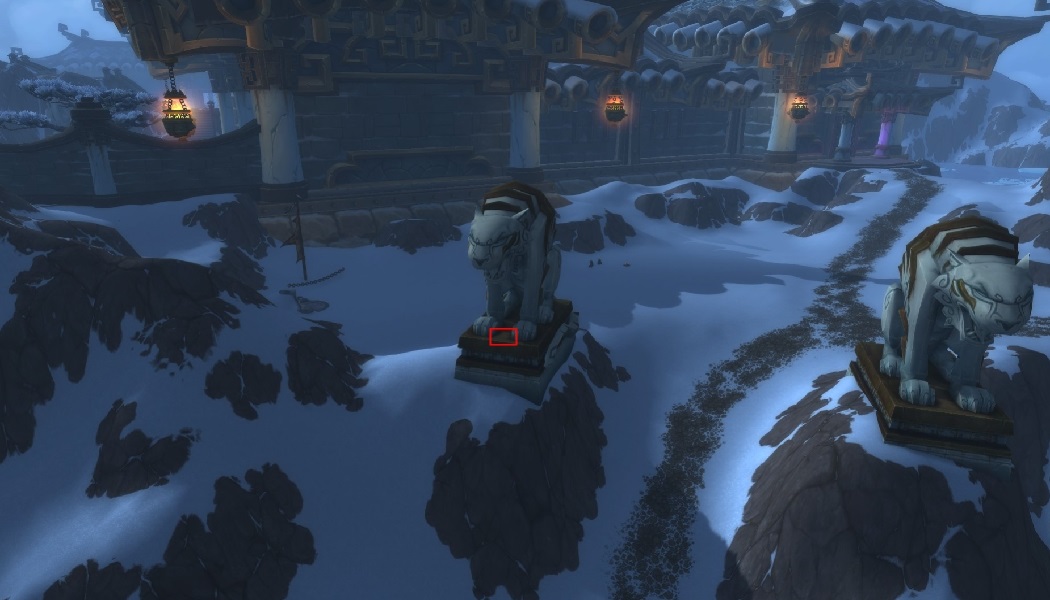
Page 2351
Page 2351 reads: …bejeweled watcher…
The last page sends you back to Uldum. If you already handled Zidormi properly on Page 655, this is mostly a quick revisit - just remember the same rule: you need the Cataclysm phase to see the page.
Once in Uldum, head east of the Halls of Origination dungeon. You’ll find a set of large statues flanking stairways. You are looking for a bull statue holding a gold-and-jade staff. It’s the first statue in the set, on the left side, and the page is placed at the base near the bull’s feet.
/way #249 76.42, 53.62 - Page 5555
Page 5555 map
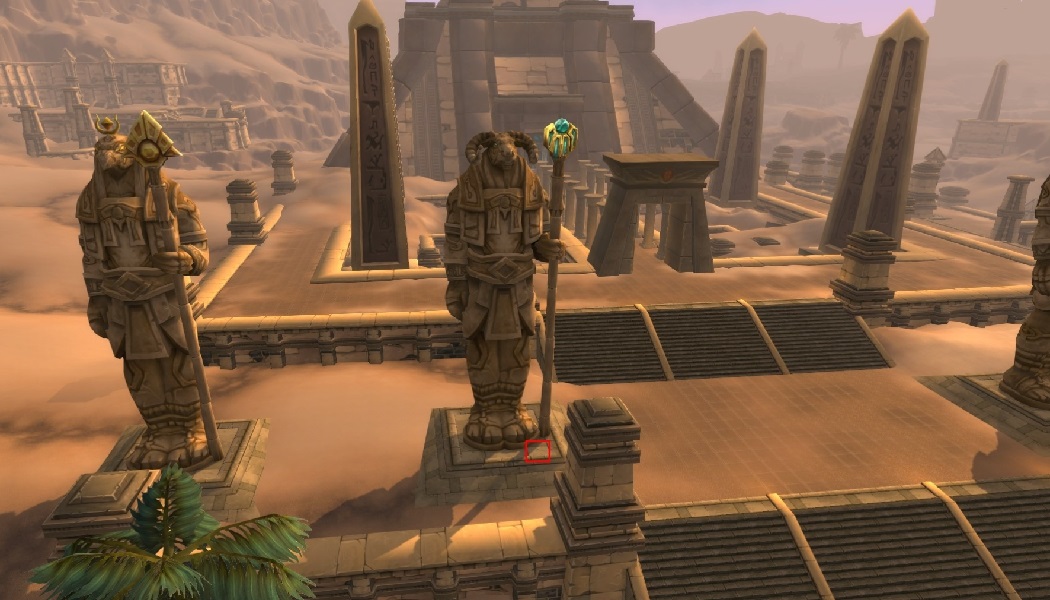
Page 5555
Page 5555 reads: …ray of sunrise…
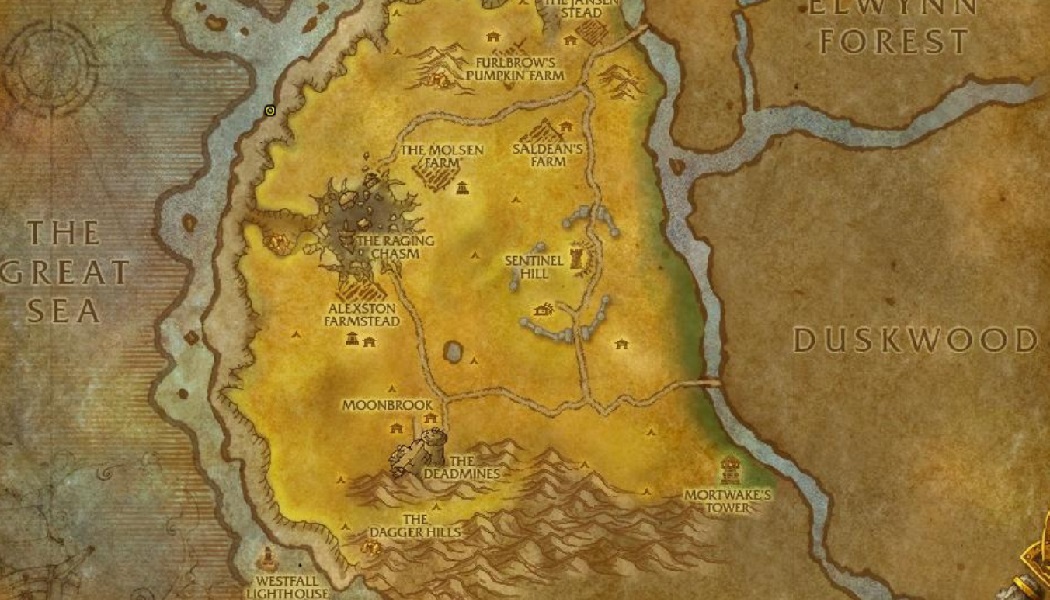
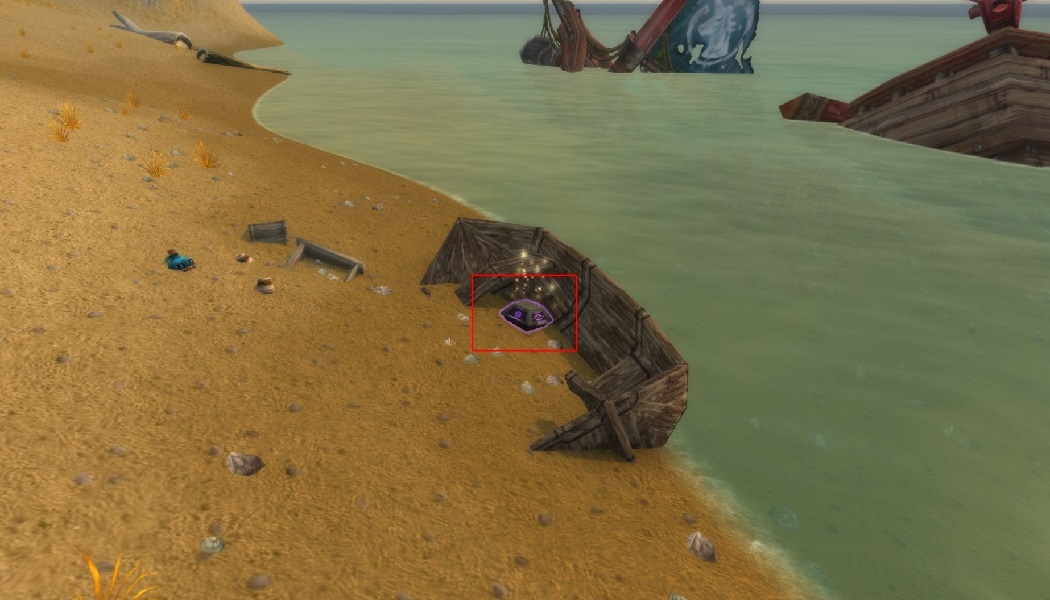
After you’ve read all eight pages in the correct order, the journey ends at the coast of Westfall. Here you’ll find the final loot object: Gift of the Mind-Seekers. Looting it rewards the mount immediately: Riddler's Mind-Worm.
The chest is located within wreckage near the shoreline.
/way #52 30.46, 27.42 - Gift of the Mind-Seekers
Gift of the Mind-Seekers map
Gift of the Mind-Seekers
Even though this mount is “just pages”, a few classic issues still slow people down. Here’s a practical troubleshooting list that keeps the run smooth.
While Riddler's Mind-Worm does not require combat efficiency or high item level, the hunt becomes significantly smoother with the right addons. Since this mount relies heavily on precise locations, long-distance travel, and progress tracking, quality-of-life tools can save you a surprising amount of time.
Mount hunting is one of those World of Warcraft goals that looks simple on paper, but becomes time-consuming because of travel, old content access, and annoying details like zone phasing. We focus on turning that “messy” part into a clear plan: correct routes, correct phases, and the exact order of steps - so progress is consistent.
If you’re collecting across expansions, efficiency matters. The fastest collectors aren’t just lucky - they minimize downtime. That’s the same approach we apply to every mount route, from secret chains like this one to raids, reputations, and time-gated grinds.