
If you've opened this guide, you're probably looking to learn about the best Tanks in the Liberation of Undermine raid. The ones that are the most reliable at handling deadly mechanics, surviving intense damage, and supporting their team with valuable utility? We've got you covered!
In this article, we'll break down the tank specializations that currently excel in the second The War Within raid and those that struggle to keep up, explaining exactly what makes them strong — or why they fall a bit behind.
Before diving into the tier lists themselves, let's first make clear what all these A, B and Cs actually represent:
The difference between the top and bottom tanks is quite narrow, especially compared to some Raid tiers from the past. So while there are still noticeable variations in power, they're much more closely matched now.

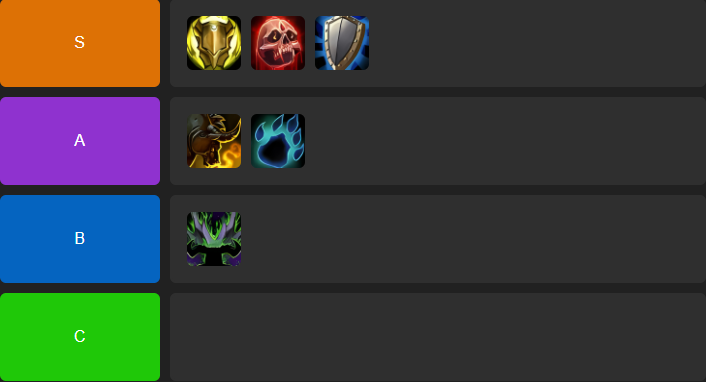
Protection Paladins shine in Liberation of Undermine thanks to their outstanding defensive cooldowns and potent group utility. Abilities like Blessing of Protection and Blessing of Spellwarding can outright negate lethal mechanics, making them incredibly valuable in high-pressure encounters. They also pack a decent punch, so you’re not sacrificing damage when you bring a Prot Paladin. Their self-healing and passive damage reduction help stabilize incoming threats, letting healers focus on the rest of the raid. While they don’t always top the damage charts among tanks, their consistency and raid-saving abilities more than make up for it.
Prot Paladins especially stand out on bosses that demand strong mitigation or clever immunity use. They’re particularly good at handling punishing magic based hits, and their suite of blessing spells can protect allies from powerful single-target or area damage. Recent tweaks have kept them competitive in both durability and output, cementing their place as an S tier pick. The combination of survivability, damage contribution, and raid wide support makes them a prime choice for any progression group.
Blood Death Knight maintains top tier survivability through exceptional self healing. Their Death Strike and related talents allow them to recover significant health after heavy hits, which is invaluable in scenarios with continuous raid damage or unexpected spikes. They also bring useful raid tools like Anti-Magic Zone, helping the team handle dangerous magic damage phases. Though they used to lag a bit in offense, recent buffs have elevated their overall damage to a more competitive level.
In the new Raid, Blood DKs excel at handling large groups of adds, thanks to their grip effects that gather enemies for easy AoE. They’re also great at "tanking through" tricky encounter mechanics by carefully managing their resource-based healing. With solid damage and world-class durability, Blood Death Knights comfortably hold their spot in S Tier. You’ll rarely regret having one anchor the frontline!
Protection Warrior brings HIGH damage potential and fantastic mitigation tools, making them a favorite among many raid groups. With improved talent synergies, they generate rage more reliably, translating to stronger Shield Block and Ignore Pain uptime. They also provide powerful raid utility through their Rallying Cry, boosting everyone’s max health during intense damage moments. Combine that with a near-constant supply of mobility options, and you get a tank that can zip around the battlefield to handle threats wherever they pop up.
In Liberation of Undermine, Prot Warriors shine on bosses that reward active mitigation and raw damage output. They’re well-equipped to handle bursty physical hits, and their group-wide defensive cooldown comes in clutch for healing-intensive phases. While they may not have immunities like Protection Paladins or the same monstrous self-heals as Blood DKs, their balance of offense, defense, and group support secures them a firm place at the top of the tier list.
Brewmaster Monk excels at smoothing out lethal hits, thanks to Stagger turning huge bursts into more manageable damage over time. Their personal defense is consistent, and a well played Brewmaster rarely spikes dangerously enough to worry healers. Recent adjustments have made their rotation a bit more fluid, and their damage is at a decent level — though not as high as some other tanks.
They bring helpful group utility via abilities like Mystic Touch, boosting physical damage taken by enemies, and Ring of Peace for crowd control. In the new raid, they’re reliable, even if they don’t pack as many "wow factors" as the S-tier tanks. Brewmaster remains an excellent all around choice for those who want steady mitigation and useful raid support without needing to hog the spotlight.
Guardian Druids are big, beefy tanks known for huge health pools and strong armor. They can soak physical hits like nobody’s business and have flexible talents that improve healing, mobility, or damage as the situation demands. Recent increases to their single target damage help them stay relevant in Liberation of Undermine, especially in bosses focused on fewer targets.
Their utility includes Stampeding Roar for group speed boosts and Innervate to help healers conserve mana. They also offer Mark of the Wild, a valuable buff for the entire raid. Even though other Druid specializations can bring some of these benefits, a Guardian’s raw tankiness and new damage buffs justify a solid A tier ranking. They might not dominate every encounter, but they’re dependable in nearly all situations.
Vengeance Demon Hunter brings exceptional mobility and flexible crowd-control through their sigils, allowing them to draw enemies together or silence them on demand. They also offer Darkness, a party-wide damage reduction that can be clutch in big damage phases. Though their self-sustain can be solid thanks to soul fragment healing, it typically requires more careful timing compared to the passive sturdiness of other tanks.
Their damage has improved, but their main raid buff (the magic damage increase) is usually covered if a Havoc DH is already in the group, making them less of a must-have pick. In Liberation of Undermine, they still perform fine and can handle most encounters effectively. However, compared to tanks that provide game changing immunities or bigger DPS contributions, Vengeance DH finds itself somewhat lacking. It’s a good spec if you enjoy high mobility and a varied toolkit, but it clearly misses some of the special strengths that make other tanks stand out.