
Welcome to our Liberation of Undermine Guide, the second Raid coming to The War Within expansion!
In this detailed breaktrough we're diving straight into an epic 8-boss showdown! Set in the wild, war-torn streets of the Goblin Trade Empire, this raid throws you face-to-face with the ruthless Chrome King Gallywix and his army of mechanical horrors. It's chaos, it's carnage, and our guide will surely help you conquer it as fast as it gets!
If you're looking for a broader look at the Raid itself and the rewards that it provides, be sure to check out our full Liberation of Undermine Overview, where we cover raid difficulties, new raid rewards, the Gallagio Loyalty Rewards Club, and much more:
Liberation of Undermine Raid OverviewDid you check the overview by clicking the link above? Alright, now let’s get straight to the core, the bosses themselves!
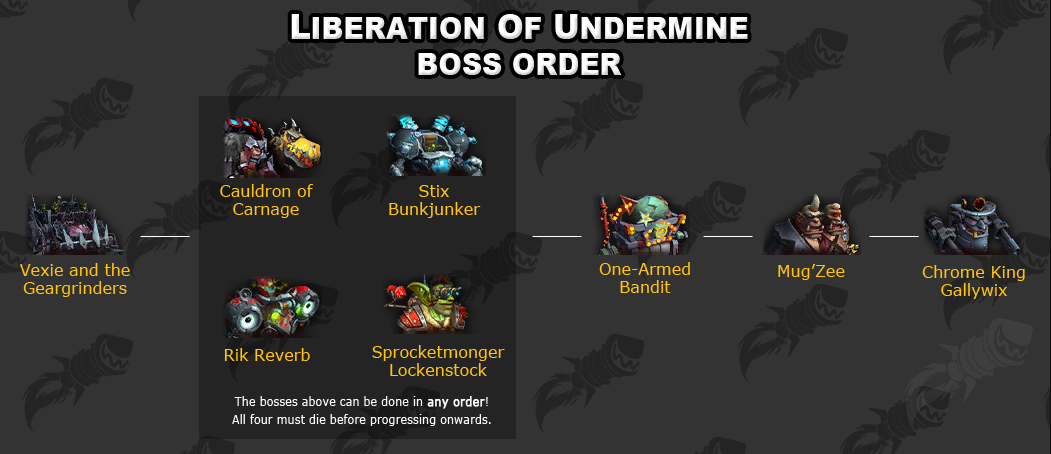
Get ready to face 8 explosive bosses in Liberation of Undermine, each one a perfect blend of chaos and Goblin genius. Here's the list of fierce foes you'll battle as you navigate the high-tech, danger-filled streets of Undermine:
The boss order for Liberation of Undermine is partially flexible. The first encounter (Vexie) is fixed, and the final three bosses will always appear in the same order. However, the four middle bosses can be defeated in any sequence, allowing groups some freedom in how they approach the new Raid:
Our adventure kicks off with with Vexie zooming around on her giant motorcycle, "The Geargrinder", backed by a biker gang. Your main objective is to remove all her Protective Plating before she charges to 100 energy, using bikers own motorcycles as battering rams. Watch out for Oil Slicks, which cause slipping (and on Heroic can stun biker adds), and for Bomb Voyage! fire patches that can easily ignite the oil.
🟦 Biker Adds & Bikes: Bikers rush in a straight line. Lure them into walls to stop them, kill them, then hop on their fallen bikes. A special action button lets you crash these bikes into Vexie, removing one Protective Plating stack per collision.
🟦 Oil Slicks & Fire: Vexie drops Spew Oil puddles. Stepping in oil makes you slide uncontrollably; fire patches from Bomb Voyage! can ignite oil, causing even more chaos.
🟦 Tank Buster & Exhaust Fumes: Vexie’s heavy strike applies a stacking debuff, requiring a taunt swap (usually each stack). It also triggers mild raid-wide damage. On Heroic, each hit spawns another oil puddle at the tank’s position.
🟦 Emergency Interrupt: If Vexie nears 100 energy while still plated, she’ll cast a wipe-level AoE. Any remaining bike can remove the final plates and stagger her cast — timing is everything.
Once her plating is gone, the Geargrinder collapses, knocking Vexie off and stunning her for up to 45 seconds. During this window, she takes 100% increased damage. Use big DPS cooldowns here, but watch for:
🟦 Pit Mechanics: Goblins that try to repair Vexie’s bike, shortening the stun if left uninterrupted. Stun, knock, or grip them together and kill them quickly.
🟦 Burning Shrapnel: Fire patches appear randomly. Avoid standing in them as you nuke Vexie.
🟦 Backfire: Continuous raid-wide damage during the intermission. Healers should be ready to use throughput cooldowns.
With the Geargrinder destroyed, Vexie Fullthrottle herself jumps into the fray on foot. At this stage she has no more Protective Plating, so you can finally damage her normally. Vexie doesn’t have new abilities of her own once dismounted – the main threat was the bike. But don’t get complacent: you still need to mop up the fight cleanly:
Kill Vexie: Burn her down before she can devise any new tricks. All the Phase 1 abilities (bikers, oil, etc.) should be over now. This is typically a short phase if you took good advantage of the burn window. If Vexie has a lot of health left due to a scuffed intermission, keep an eye out in case she reuses a simpler version of Bomb Voyage or so (generally not the case on Normal/Heroic – she should be nearly done).
Mechanics Cleanup: Make sure no one steps in leftover Oil Slicks or Shrapnel pools that persisted. If any Oil Slicks remain, they won’t magically vanish – so avoid them while finishing off Vexie. Tank swaps for Tank Buster should continue if she managed to cast another (unlikely by this point). Healers keep the raid stable if Backfire left any lingering damage over time.
Our adventure continues with Stix, the menacing goblin, who throws bombs and dirt around, terrorizing the helpless residents while hiding behind his mechanical minion.
The battle kicks off with a simple single-target phase, where tanks should position Stix Bunkjunker at the center for easy access to melee DPS and healers. Keep an eye out for Incinerator, which forces players to spread out to prevent overlapping damage zones. Early on, players will encounter the ball transformation mechanic and bomb management.
Six players are chosen to transform into Rolling Rubbish balls. While a ball, you should:
🟦 Keep rolling over small piles of garbage to make yourself larger.
🟦 Steadily progess through small, medium and large ball stages by simply collecting garbage.
🟦 Upon reaching full Charge, either collide with the boss to deal a substantial damage to him or strike a bomb to neutralize it.
Large bombs will periodically appear and must be deactivated by players in their larger ball form. The first bomb is typically managed by the tanks, while other designated players take care of additional bombs as the fight progresses. Failing to neutralize the bombs will lead to a raid wipe.
As the fight advances, Territorial Bombshells tethered to garbage piles will spawn. These really need to be dealt with swiftly:
🟦 Players must free the adds by reducing their health to 75%, breaking their tether, and then finishing them off within 30 seconds.
🟦 Failing to do so will trigger explosions, causing significant raid-wide damage.
🔔 During Overdrive, Stix Bunkjunker becomes untargetable and flies into the air, dealing raid-wide damage and unleashing abilities like Trash Compactor, which knocks players back. Position carefully to avoid being knocked into hazards. After Overdrive, the boss returns with increased attack speed and more frequent bomb spawns, escalating the fight's intensity.
⚡ Bombs Away: Assign tanks and specific players to handle bombs during both phases, making sure no bomb gets left behind.

⚡ Ad Control is Key: Stay on top of Territorial Bombshells by prioritizing them and managing clusters with cleave damage.

⚡ Healers, Stay Alert: Keep a close eye on raid-wide damage during Overdrive and the stacking debuff from ignited garbage piles.

⚡ DPS: Maximize boss uptime during calm phases, but be ready to swiftly switch to adds when needed.

⚡ Avoid the Fire: Steer clear of igniting garbage piles with Incinerator Circles, as they make bomb management harder and add extra stress to the group.
Sprocketmonger Lockenstock presents a fast-paced, mechanically demanding encounter. With conveyor belts, explosive mines, and increasingly complex weapon mechanics, this battle tests players ability to handle overlapping hazards with precision. To help your team succeed, here’s a complete guide to the fight. Let’s first start by examining the arena hazards, as understanding them is crucial for this encounter.
The Sprocketmonger encounter stands out due to the critical role the terrain plays throughout the fight. To help you navigate this challenging battle, let’s dive into the two key terrain mechanics that will be pivotal to your success against this boss:
The arena features several conveyor belts with unique hazards to navigate:
🟦 Central Belts: Filled with traps and holes, these belts are highly dangerous. Avoid stepping on them, as they can knock players back or even result in instant death.
🟦 Side Belts: Often safer, these belts can act as reliable safe zones during specific phases. Use them strategically to stay out of harm’s way.
🟦 Holes: These gaps are difficult to spot but can cause instant death or disrupt your positioning. Stay vigilant and steer clear of them to remain effective in the fight.
Sprocketmonger periodically places four mines on the ground:
🟦 These mines need to be detonated one at a time to prevent raid-wide damage.
🟦 (Heroic) Players must organize into groups to stagger mine detonations, ensuring that multiple explosions don’t occur simultaneously.
🟦 Failing to coordinate detonations properly can result in overlapping debuffs, excessive damage, and avoidable player deaths. Clear communication is key!
Alright, now we can proceed to the phases, of which there are many!
Starting Point
As the battle begins, players need to spread out and establish clear positions to manage Foot Blaster Mines effectively. Sprocketmonger will deploy mines that must be detonated strategically to prevent excessive raid-wide damage. Divide your raid into groups and assign each group to a specific mine to stagger the detonations. This ensures that the stacking debuff doesn’t overwhelm the raid.
Avoid Central Conveyor Belts
During this phase, steer clear of the central conveyor belts, as they are filled with traps and holes that can knock players into hazardous areas or cause instant death if misstepped. Use the edges of the arena for safer positioning, and stay mobile to dodge any additional threats.
Tank Mechanics
Tanks need to be prepared for the Tank Bomb Mechanic, which places a slowing debuff and a bomb on the active tank. The affected tank must move away from the group to avoid spreading the damage. Coordinate taunt swaps efficiently to manage this mechanic and minimize its impact on the raid.
At this stage, the boss pushes players toward the central conveyor belts, which become electrified, adding a layer of danger and forcing constant movement. Stick to the edges of the belts to minimize damage and steer clear of debuff zones, which can reduce healing effectiveness and cause dazes. Additionally, the belts are riddled with lightning hazards that must be dodged, so stay alert and keep moving to avoid unnecessary damage.
This phase is all about survival. Healers should prioritize keeping the raid stable while players reposition and dodge hazards. Use any downtime to regroup, recover from earlier mistakes, and prepare for the challenges in the next phase. Staying focused and coordinated is key to making it through this stage successfully.
As the fight progresses, Sprocketmonger introduces increasingly dangerous weapon mechanics, escalating the intensity of the encounter:
With the mechanics escalating, players must adapt quickly, maintain focus, and communicate effectively to survive the chaos and keep the fight under control.
As the battle intensifies, overlapping mechanics push the raid to its limits. Mines, lasers, rockets, and magnetic pulls can activate together, creating chaotic and dangerous moments. To overcome this phase, your team must stay sharp and execute flawlessly:
Clear heads, quick reactions, and strong teamwork are essential to navigating this phase and securing a path to victory.
During the final phase, the boss uses an upgraded version of the Conveyor Survival Mechanic, electrifying the belts and knocking players back. Players must carefully navigate the belts, staying near the edges for safer and faster movement while dodging lightning zones.
The objective is to survive the hazards and quickly return to the boss to resume dealing damage. Melee players can use the side belts to maintain uptime on the boss, while ranged players should prioritize finding safe zones to free-cast while avoiding hazards.
The boss also enhances earlier mechanics, introducing larger beams and faster rockets, making the fight more challenging. Discipline and avoiding unnecessary deaths are critical to securing victory.
Cauldron of Carnage is a two boss encounter featuring Flarendo — a fiery elemental riding a flametank, and Torq, an electrical gorilla with thunderous attacks. They must be kept apart because if they come too close, they empower each other and nearly nullify incoming damage. Therefore, your raid splits into two balanced teams so that each boss is handled separately.
Throughout the fight, both bosses apply stacking damage debuffs on your raid, gradually making healing more challenging. At around 50% health (or after a fixed duration), an intermission occurs: the bosses charge toward the center of the arena, collide, and swap sides. This collision resets all stacking debuffs as targets change, forcing each team to immediately adapt to the new mechanics. On one side, you face Flarendo’s fiery assaults; on the other, Torq’s relentless lightning attacks.
On Flarendo’s side, every player begins to accumulate Blistering Spite — a fire based damage-over-time effect that intensifies the longer you remain in the area. This debuff effectively acts as a soft enrage, forcing healers to work harder over time. However, when the teams swap during the intermission, all Blistering Spite stacks are reset to zero, offering temporary relief.
Periodically, Flarendo casts Eruption Stomp. During this attack, the boss winds up before slamming the ground, sending out a series of fiery shockwaves from the tank’s position. Tanks must immediately step aside (while still staying in tanking range) to avoid the full impact of the shockwaves. Once the danger passes, they can reposition quickly to resume tanking responsibilities.
This is Flarendo’s signature mechanic and involves a tightly coordinated sequence:
Additional Tips: Ranged DPS and healers are advised to remain in near-melee range or only slightly further away. Staying close ensures that players can quickly regroup to soak the Scrapbomb damage, minimizing the risk of leaving someone isolated and taking excessive damage.
Galvanized Spite (Healing Debuff):
Much like Blistering Spite on the fire side, Galvanized Spite is a nature-based damage-over-time effect that steadily stacks on all players on Torq’s side. Its intensity grows over time during the phase but is reset when the teams swap targets during the intermission.
Static Charge (Movement Mechanic):
On Torq’s side, every movement contributes to filling a Static Charge meter. The more you move, the faster the charge accumulates; if it ever reaches 100%, the affected player is stunned for 6 seconds by a burst of electricity. Because of this, controlled and minimal movement is crucial—players should only adjust their positions slightly to avoid overcharging.
Thunderdrum Salvo (Lightning Pools):
Torq’s Thunderdrum Salvo causes repeated lightning pools to form beneath players over a period of about 6 seconds. Instead of allowing the pools to scatter chaotically, the recommended strategy is to briefly pause movement so that 1–2 pools form in one spot. Then, players should carefully reposition to avoid overlapping the pools, thereby reducing the cumulative damage from these hazards.
Lightning Bash (Tank Mechanic):
Lightning Bash is a sudden, heavy burst of physical and nature damage aimed at the current target of Torq. Tanks must be vigilant during this attack and use cooldowns or active mitigation measures, especially when the Static Charge is nearing its limit.
Voltaic Images (Heroic Only):
On Heroic difficulty, Torq spawns Voltaic Images — electrical clones that fixate on a random player for about 12 seconds. When a Voltaic Image is active, the affected player must kite it away while teammates avoid its path to prevent a damaging discharge. This additional mechanic increases the need for precise movement and coordination on the lightning side.
At roughly 50% health (or after a predetermined time), the encounter reaches a critical intermission phase. Here, both bosses charge toward the center of the arena and collide in a dramatic impact. The collision creates a massive explosion with shockwaves that generate mixed fire and lightning pools across the center. These hazardous zones deal raid-wide damage and eliminate the usual benefits of proximity-based damage reduction.
During the intermission, the stacking debuffs (Blistering Spite and Galvanized Spite) are reset as the bosses swap sides. The fire team now faces Torq, and the lightning team takes on Flarendo. This sudden switch forces both teams to adapt quickly to the opposite boss’s mechanics and marks a pivotal turning point in the encounter.
After the intermission, the fight resumes with the same core mechanics as in Phase 1, but with each team now engaging the opposite boss:
🟦 New Flarendo Side: The team now fighting Flarendo begins accumulating Blistering Spite once more and must execute the Bomb & Beam combo under renewed pressure.
🟦 New Torq Side: Simultaneously, the team facing Torq resets its Galvanized Spite and must manage a fresh buildup of Static Charge alongside recurring Thunderdrum Salvo attacks.
A key to success in Phase 2 is balancing DPS between the two bosses. If one boss lingers with significantly higher health, its mechanics can overwhelm the raid — potentially even triggering a berserk enrage. Therefore, coordinated damage, precise timing of cooldowns, and vigilant monitoring of each boss’s health are essential to bring them down in tandem.
Rik Reverb is a flashy DJ themed boss — a goblin DJ with huge speakers (who assaults the raid with sonic attacks and energy amplifiers). The encounter centers on managing four stationary Amplifiers placed around the battlefield. These devices charge up over time and, if not drained, will blast the raid with some lethal sound.
During the main phase, the raid must drain energy from the Amplifiers to prevent them from going Haywire while also dealing with Rik’s frontal sonic attacks and random lightning zaps. Periodically, Rik becomes immune and triggers a massive "drop-the-bass" intermission: he unleashes a giant sound wave (the Blaring Drop) covering the arena. To survive, you intentionally let one Amplifier go Haywire so it explodes and launches players over the deadly wave. In short, control the speakers, dodge the beats, and use the stage mechanics to your advantage.
During Phase 1, Rik Reverb is attackable and periodically spawns Amplifiers: large, speaker-like devices that appear in pairs (one near him and one near a random ranged player). These devices show an energy bar and begin charging immediately; if an Amplifier reaches full energy (100), it goes Haywire and deals massive damage.
🟦 Sonic Blast & Tinnitus: Rik’s basic attack is a frontal cone Sonic Blast that applies a stacking debuff called Tinnitus, increasing damage taken (and likely causing ringing ears). Tanks: Keep Rik facing away from the raid; only tanks should be hit by Sonic Blast. Swap tanks when Tinnitus reaches about 5 stacks so the debuff can drop. Melee DPS: Stay behind or to the side of Rik to avoid accidental hits. Tanks should position Rik in a central area that allows ranged players to reach the Amplifiers while also providing room to kite if needed.
Amplifiers – Primary Mechanic
Overall, Phase 1 is a balancing act: drain Amplifiers to prevent them from going Haywire, dodge Echoes and Zap splashes, and manage Rik’s frontal attacks and Tinnitus. Phase 1 lasts until Rik reaches a certain energy or health threshold (often around 100 energy or 70% health), at which point he initiates the intermission.
At a predetermined moment, Rik shouts a cue like “Crank it to 11!” and gains near-immunity, signaling the start of the Blaring Drop intermission.
🟦 Blaring Drop: Rik moves to the center and channels a giant, circular shockwave that covers the entire arena — there’s no way to simply outrun it. If caught in the wave, you risk severe damage or death.
🟦 Haywire Amplifier "Ride": One Amplifier is forced to go Haywire on purpose — indicated by a glowing ring on the ground. When the intermission begins, everyone must rush to that marked Amplifier. As the sound wave reaches it, the Amplifier explodes, launching all nearby players into the air and granting them brief immunity as they ride over the wave.
🟦 Positioning & Timing: Stack directly next to the marked Amplifier and cease all actions; do not move or jump prematurely, as the explosion is what propels you safely over the shockwave. Meanwhile, be alert for any Resonant Echoes from other Amplifiers that continue to fly across the arena.
After the intermission, the fight resumes similarly to Phase 1 but with some changes:
Phase 2 continues until Rik’s health drops to zero. At that point, any remaining Amplifiers power down and the encounter ends in victory.
The One-Armed Bandit brings a casino-inspired twist to the raid. With slot machine mechanics, casino chips, and tokens in play, this encounter challenges players to carefully balance their priorities while managing increasingly complex overlapping mechanics. We’ll start by breaking down the boss’s abilities, followed by phase-specific tactics and strategies to guide your team to victory:
| Ability | Description | Strategy |
| Casino Tokens | Rolls blue casino chips that stun players hit for 8 seconds but grant a haste buff if avoided properly. | Stand close enough to avoid the stun and receive the haste buff or destroy them to avoid risks. |
| Slot Machine Adds | Three types of adds spawn at full energy: Coin Assistant, Shock Assistant, and Flame Assistant. Each drops a token upon death. | Quickly nuke the adds and collect two unique tokens to deposit into the boss. |
| Token Combinations | Depositing tokens into the boss triggers specific mechanics depending on the combination. | Rotate through unique token combos to manage mechanics and avoid repeating a combo. |
| Shocking Fields | Tank mechanic that leaves electric fields on the ground with each tank hit. | Tanks can clear fields by activating coils, which spawn additional mechanics. |
| Beam Coil Mechanic | The boss spawns a coil and creates a deadly beam between the coil and itself. | Avoid the beam at all costs; players marked for beams must position carefully to avoid wiping the raid. |
| Fixating Bomb Adds | Adds spawned from specific token combos that fixate on players and explode if not killed. | Cleave the adds quickly and stay away from their target paths. |
| Phase 2 Mechanics | In the final phase, the boss randomly chooses mechanics while applying heavy raid-wide damage. | Prioritize survival and damage output to defeat the boss before reaching enrage. |
The battle starts with the boss cycling through its core mechanics, which involve adds, tokens, and casino chips. Successful coordination is crucial for surviving this phase.
Once the boss reaches full energy, it spawns three adds: Coin, Shock, and Flame. Each add drops a specific token when defeated.
Players need to gather two tokens and deposit them into the boss using an extra action button.
🟦 Each pair of tokens activates a unique mechanic that the raid must manage. The six possible combinations are:
🟦 The boss throws casino chips, creating a high-risk, high-reward mechanic:
Players must decide whether to shoot the chips into the raid for buffs or safely direct them toward the walls to minimize risk.
The boss starts randomly selecting previously activated mechanics and combining them with the ongoing raid damage:
Beam Coils: Coils connect to the boss with deadly beams that must be avoided.
Fixating Adds: Adds chase players, demanding quick coordination to manage safely.
Scattered Payout: Raid-wide damage escalates quickly, pushing healers to their limits.
The randomness of add spawns and token combinations makes every attempt at the Boss rather unpredictable.
By Phase 2, electric fields from the tank mechanic will cover most of the arena. Players must navigate through these fields while managing beams, casino chips, and other mechanics, ensuring they maintain safe zones for movement.
As the boss nears the end, it triggers Scattered Payout, causing massive raid-wide damage. The fight turns into a DPS race to defeat the boss before the final mechanic, which leads to an instant wipe.
Mug'Zee is a two-headed enforcer guarding the penultimate chamber of the raid. This encounter is dynamic and chaotic, with mechanics split across two modes based on which side of the room the raid favors. Each head presents its own unique challenges, demanding precise coordination, positional awareness, and adaptability to succeed. Mug brings explosive chaos, while Zee introduces icy discipline, leading to an intense final phase where both sets of mechanics overlap.
The encounter begins with Mug’s mechanics dominating the battlefield. The raid must focus on managing mines, soaks, and tank mechanics.
Mug periodically spawns Unstable Crawler Mines that fixate on random players. To handle these, the fixated player must intentionally allow the mine to reach them and detonate. Upon detonation, the mine spawns Cluster Bombs, creating several small soak zones that the raid must cover.
🟦 Assign players to specific mines or designate a high-mobility tank or DPS to detonate multiple mines if possible.
🟦 All cluster bomb soak zones must be covered quickly, as even a single missed soak can result in catastrophic raid-wide damage.
Mug targets a random player with a high-damage beam. The tank must intercept the beam by stepping in front of the targeted player, minimizing the damage they receive.
🟦 Make sure the targeted player stops moving to allow the tank to position properly.
🟦 The player hit by the beam gains a bomb debuff, which must be dropped away from the group.
Mug delivers a frontal cone attack. The boss must always be faced away from the raid to prevent unnecessary damage to the group. Clear as many mines and cluster bombs as possible before moving to Zee’s side to minimize leftover mechanics that could complicate the next phase. Players should start positioning themselves near the center of the room once Mug reaches 50% energy.
Switching to Zee introduces a completely new set of mechanics that demand precise coordination and controlled movement.
Or.. If you’re still struggling after several attempts, don’t hesitate to ask for help from our PROs!
Two players (one melee and one ranged) are chosen to soak Jail Wall Zones, which create line-of-sight barriers. These zones trap the players inside with two adds that must be defeated in order to escape.
🟦 Assign high-DPS players to these roles to ensure the adds are killed quickly.
🟦 Players outside the jails should focus on managing external mechanics while the trapped players deal with the adds.
Players outside the jails are targeted by Ice Spears, which must be redirected to hit barriers (such as walls, leftover bombs, or the jails) to prevent lethal damage.
🟦 Targeted players should carefully plan their movement to ensure the Ice Spears hit valid barriers while avoiding other group members.
🟦 If barriers are used effectively, the spears can also help manage leftover mechanics, such as mines or bombs.
Tanks must manage a debuff that drops harmful golden pools on the ground.
Kite Zee around the room to place the pools in low-traffic areas, ensuring they don’t block group movement or create danger zones during transitions. After handling two cycles of Zee’s mechanics, the group must transition back to Mug. Clear any golden pools near the center of the room to maintain a clear and safe path during the transition.
In the final phase, Mug and Zee merge their mechanics, resulting in a chaotic overlap of all previous abilities. Coordination becomes crucial for survival.
🟦 Mines and Cluster Bombs from Mug’s side will overlap with Zee’s Ice Spears and Jail Walls. Assign clear roles for each mechanic to avoid duplication of efforts.
🟦 Tanks must continue managing Golden Drip while ensuring the Intercept Beam is properly mitigated.
🟦 Healers should stagger cooldowns to handle the escalating raid-wide damage caused by the overlap of Mug’s and Zee’s mechanics.
🟦 DPS players should maximize their output while prioritizing survival, as the phase has a hard enrage.
This phase requires flawless execution of mechanics learned in the first two phases, leaving little room for error. Assign roles clearly and focus on surviving until the boss is defeated.
Chrome King Gallywix, the ostentatious trade prince of mayhem, stands as the final arbiter of your raid’s fate. In a dazzling display of hubris, he leaps into a colossal chrome-plated mech — a gleaming juggernaut of merciless power — and unleashes an onslaught so wild that even the kitchen sink is flung amidst the chaos. This epic encounter unfolds over three dramatic stages:
In Phase 1, Chrome King Gallywix pilots his chrome-plated mech, which is not yet fully activated. He unleashes a barrage of explosive attacks on the raid while summoning his cronies—Darkfuse Technicians and Sharpshot Sentries—to add to the chaos. Gallywix frequently targets his main tank with a frontal cone attack called Scatterblast Canisters. This attack deals massive physical damage and applies the Mechengineer’s Canister debuff—a healing absorb effect that forces tanks and one sturdy player to form a small soak group. When the debuff stacks reach about five, a tank swap is required to prevent even one extra stack on non-tanks from proving fatal.
At the same time, a rain of bombs begins to fall across the arena. Small bombs, indicated by red circles, detonate after a few seconds, dealing moderate fire damage and applying a stacking Blast Burns DoT. Some bombs are "Delayed Bad Booms" with longer fuses, so players must avoid lingering near unexploded devices. Additionally, a few players will have a Sapper’s Satchel attached (marked by an overhead icon), which explodes in a 7-yard radius after five seconds; anyone with a Satchel must immediately move away from the group.
A further threat comes from the enormous 1500-pound "Dud". This massive, spiked mortar shell lands on the field and, if not handled, will eventually detonate for catastrophic damage. To mitigate this, a designated "Dud Soaker" — typically a tank or a durable DPS with strong defensive cooldowns — must interact with the Dud to force an immediate, localized explosion. Failure to do so results in a heavy Focused Detonation DoT and significant knockback.
Moreover, the bomb barrage triggers a swarm of mini rockets known as the Zagging Zizzler. These small projectiles zig-zag unpredictably around the room, dealing continuous fire damage; constant movement is essential to avoid their cumulative effect.
Alongside the bomb mechanics, add waves complicate the fight. Darkfuse Technicians spawn near the edges of the arena and, upon death, drop Charged Giga Bombs that will later be used to sabotage the mech’s Giga Coil controls. In contrast, Sharpshot Sentries appear as turret-like structures that channel a Shock Barrage—requiring rapid elimination to prevent excessive raid-wide damage.
Finally, two massive Giga Coils with attached control consoles materialize around the room. Since the raid cannot damage the coils directly, the focus shifts to sabotaging the control consoles using the Charged Giga Bombs. It’s critical for bomb carriers to be positioned near these consoles toward the end of Phase 1, preparing the raid for the next phase.
In summary, Phase 1 demands that the raid:
Phase 1 concludes when Gallywix reaches 100 energy (or a set HP threshold), triggering the transition to Phase 2.
As Gallywix’s chrome plated mech roars to life, the arena crackles with raw energy. You’ve survived his initial barrage of bombs and cronies in Phase 1, but now he throws the real switch: the colossal Giga Coils come online. These towering devices unleash a torrent of electrical power that batters the raid with relentless ticking damage. With the mech’s defenses climbing to new heights, you must act swiftly to sabotage the very heart of his power before your raid is overwhelmed.
🟦 Coil Activation: Once the Giga Coils power up, they generate a stacking Nature damage aura that intensifies with each active coil. With both coils online, the raid suffers a brutal double dose of ticking damage — an onslaught that healers must manage through coordinated cooldowns. The longer the coils remain active, the more unsustainable the incoming damage becomes.
🟦 New Attack – Giga Blast: In this phase, Gallywix reveals a lethal new weapon: Giga Blast. He fires a massive electrical beam that inflicts heavy Nature damage and applies a stacking DoT to anyone caught in its path. The twist is that if Giga Blast strikes a Charged Giga Bomb on the ground, it triggers a "Giga BOOM!" — an instant, large-scale detonation that can be used to your advantage when sabotaging the coil consoles.
🟦 Sabotaging the Coils: You’ll rely on the Charged Giga Bombs collected from fallen Darkfuse Technicians in Phase 1 to disable each coil’s control console.
Method: A bomb carrier rushes to the coil’s control panel and places the bomb. Waiting out its full fuse is risky, so the raid often coordinates Giga Blast to detonate the bomb immediately, causing massive damage to the console. One well-timed explosion can destroy a control panel on Normal/Heroic.
Result: When a console is sabotaged, its respective coil shuts down, ending that portion of the ticking aura. In some difficulties, the coil’s failure may also momentarily stun or stagger Gallywix. Once both consoles are wrecked, the Giga Coils overload, and Stage Two rapidly concludes.
🟦 Fused Canisters: Throughout this sabotage process, Gallywix deploys Fused Canisters — bombs that arm themselves beneath players and explode after a short countdown. Each canister demands a coordinated soak by several players to split the heavy blast damage. Those who soak it gain a healing absorb debuff, similar to Phase 1’s Scatterblast mechanic, so healers must respond quickly to clear it before it detonates or escalates into a raid-threatening chain reaction.
Phase 2 ends the moment both coil consoles are sabotaged. Freed from the constant coil damage, you gain a brief reprieve — yet Gallywix has one final gambit in store. The transition to Phase 3 marks the beginning of his ultimate onslaught, where the mech’s entire arsenal is unleashed in a desperate bid to maintain control.
With the Giga Coils disabled, Gallywix enters his final, unrestrained phase. In Phase 3, his chrome-plated mech becomes a whirlwind of chaos as he unleashes every remaining weapon. The battlefield transforms into a maelstrom of explosions, rocket barrages, and overlapping area attacks, forcing the raid to operate on a razor's edge between survival and annihilation.
At this stage, Gallywix targets the tank with a colossal bomb — a devastating attack known as the Bigger Badder Bomb Blast. Within about five seconds, this bomb detonates over a massive radius, inflicting catastrophic damage. Tanks must immediately vacate the area and swap roles to avoid being repeatedly hit, as the affected tank becomes increasingly vulnerable for a significant duration.
In addition to the massive bomb, smaller bombs continue to fall, and a volley of overloaded rockets is triggered. These rockets, though not individually devastating, create a dangerous web of projectiles that the raid must dodge while maintaining focus on soaking the blasts.
Key Mechanics:
Throughout Phase 3, the raid is locked in a battle of attrition. Tanks must coordinate swift swaps to handle the massive bomb blasts, while designated soak groups and all other players maintain constant vigilance against the barrage of smaller bombs and rockets. DPS must seize every opportunity to push down Gallywix’s health during brief windows of lower damage, and healers must be ready to counter sudden spikes in raid damage.
In essence, Phase 3 is a battle of attrition where every mechanic overlaps in a chaotic dance of destruction. The raid must survive the onslaught long enough to deliver the final blow to Gallywix, ending his reign of chrome-fueled terror once and for all. The stakes are high, and every move counts as you fight to prevail against his ultimate, unbridled assault.