
Horrific Visions throw players into an eerie, corrupted reflection of Azeroth’s most iconic capitals, where everything familiar is warped by N’Zoth’s dark power. In Stormwind’s vision, the once-proud city is now a maze of shadows, crawling with horrors and twisted echoes of its people. Your main objective is to challenge Alleria Windrunner at the heart of the Cathedral, but true mastery of the Vision means pushing deeper — clearing every district and overcoming every challenge the city has to offer to maximize your rewards.
Success in Stormwind’s Horrific Vision isn’t just about raw combat prowess: you’ll need to balance speed, efficiency, and careful planning as you race against your ever-draining Sanity bar, all while contending with unpredictable Madness effects. This guide will walk you through a strategic path across each district, highlighting efficient routes, key dangers, and useful tips, so you can make the most out of each run.
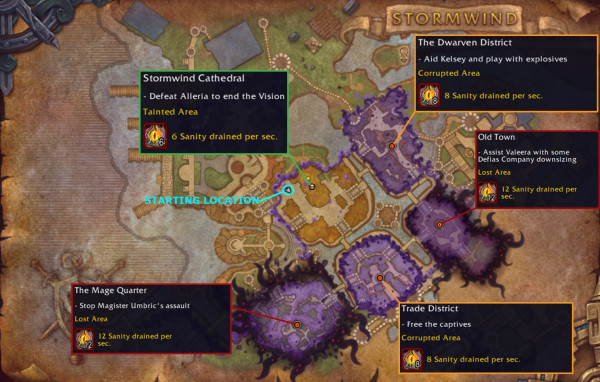
You begin your journey in Cathedral Square on the west side of Stormwind’s grand Cathedral, the only Tainted zone of this vision. This starting area has the lowest ambient sanity drain (about 6 sanity per second), but there are several key preparatory steps to set yourself up for success. Before rushing ahead, make sure to:
Also, don't forget to check out our complete Guide for Odd Crystals locations in both Stormwind and Orgrimmar:
Odd Crystals LocationsOnce these tasks are done and the area’s minor enemies are dispatched, you’ll be ready to move on. The Cathedral District’s objective is simply to start the scenario; Alleria awaits here at the end, but you should leave her for last. A handy portal will remain here to quickly return after clearing other zones. Now, venture into the city proper following our recommended path.
The Mage Quarter is the first Lost Area we suggest tackling. Lost areas are more challenging, with higher passive sanity drain – about 10 sanity per second here without research upgrades. Entering the Mage Quarter plunges you into a warped arcane district shrouded in void. Your task in this zone is twofold: close all 5 Void Portals scattered around the quarter, and defeat the area’s boss, Magister Umbric, inside the mage tower.
Begin by methodically moving through the narrow streets to shut down the portals. Each portal is guarded by a pack of enemies that must be defeated to close it. We recommend a clockwise route around the quarter (as indicated in the map above) to efficiently cover all portal locations without backtracking. Notably, when you reach the westernmost portal, you’ll encounter Zardeth the Black Claw, a mini-boss warlock guarding it.
Be prepared for Zardeth’s abilities:
With Zardeth down and that portal closed, continue deeper into the quarter. In the central plaza of the Mage Quarter, there are two portals in close proximity. Try to clear the enemies and close both portals before dealing with the giant aberration patrolling nearby. That aberration is the Boundless Corruption, a hefty void horror whose fight can be nasty, especially for melee fighters. If possible, pull other nearby trash first so you can face the Boundless Corruption one-on-one. When you’re ready, engage it and watch out for:
After defeating the Boundless Corruption and closing any remaining portals in the vicinity, only one portal should remain. Head to the last portal, tucked inside a building to the north. Clear it, and you’ll activate the final stage of this district: the showdown with Magister Umbric in the Mage Tower at the quarter’s center.
Entering the tower, Umbric will confront you with a mix of frost and void magic. This can be one of the trickier fights in Stormwind’s vision, because Umbric periodically becomes untargetable while assaulting you with spells that test your positioning and reaction time. Key mechanics to handle include:
Frozen Storm: At 80%, 45%, and 25% health, Umbric teleports to one end of the long hall and begins channeling a devastating blizzard down the length of the room. While he channels, frosty missiles cascade in straight lines. These Frostbolts deal moderate damage and drain about 30 sanity if they hit you. You can’t hurt Umbric from afar during this phase – you must chase him. The strategy is to quickly dodge or sidestep the patterns of bolts (they fire in intervals so watch the gaps) and run toward Umbric. Once you get within melee range (about 6 yards), you can hit him and interrupt the channel. Ranged players still need to move up somewhat, as line of sight might be an issue; essentially, push through the barrage to stop the channel ASAP. Avoiding or minimizing hits here is crucial to preserving sanity.
Entropic Missiles: This is a channeled spell Umbric will cast on you at random intervals. It inflicts continuous shadow damage and drains about 15 sanity per second for 3 seconds if not stopped. The good news: it’s interruptible. Treat this as a high-priority interrupt whenever it comes. If you’re silenced or unable to interrupt, use a defensive cooldown to mitigate the damage and sanity loss.
Tainted Polymorph: Umbric occasionally attempts to transform you into a helpless sheep for 4 seconds. If it lands, you’ll wander around, unable to act: a potentially deadly scenario if other spells or mobs target you. This cast must be interrupted or otherwise prevented (stuns or immunity effects can also stop it). If you’re playing solo and get Poly’d, there’s no ally to break you out, so be extra vigilant in stopping this cast.
Between these phases, whittle down Umbric’s health. Once you finally defeat him, the Mage Quarter is complete. A portal will appear just outside the mage tower, conveniently teleporting you back to Cathedral Square. Take a breather – two zones down, three to go. Back in Cathedral Square, replenish your sanity if needed (this might be a good moment to use a Sanity Restoration Orb, if your run has that resource available, or to simply catch your breath). When ready, head toward the Trade District.
Leaving Cathedral Square through the middle eastern gate will put you in the Trade District, a Tier 2 Corrupted Area with a moderate sanity drain of about 8 per second. The Trade District’s once-bustling marketplace is now filled with imprisoned citizens and crazed foes. The objectives here are: slay two mini-bosses and rescue 8 captured citizens. You can accomplish these in any order, but an efficient approach is to follow a looping path that naturally frees captives as you kill the minibosses.
On entering the district, you’ll notice immediately that many shops and the bank are engulfed in void corruption. Progress carefully down the main thoroughfare. We recommend entering from the north side (the gate from Cathedral) and then bearing right, following the street that curves toward the Auction House. As you go keep an eye out in the Stormwind Counting House (Bank) on your right. If the front door is open, you can duck inside briefly to find a Neglected Guild Bank. Defeating it grants you a 10% Critical Strike chance buff for the rest of the vision. It’s a free DPS boost – grab it if available (and if the bank door is closed in the vision, don’t worry, it just means that bonus isn’t up this run).
Proceed along the street. You’ll soon come across the first miniboss, Inquisitor Darkspeak, lurking near the flight master’s platform and auction house green. Darkspeak is a hostile faceless caster who specializes in shadow mind attacks. Key abilities to watch for:
Burn down Darkspeak and continue onward. As you push deeper, you’ll notice caged Stormwind citizens scattered around. You can start freeing them once nearby enemies are cleared. To free a captive, interact with their cage; there’s a short casting bar to pick the lock. Importantly, any damage you take interrupts the freeing process, so make sure the area is safe before channeling on a cage. You can save most cages for after the minibosses are dead, or free them one by one as you clear – just ensure you’re not under attack while doing it.
The second miniboss, Slavemaster Ul’rok, patrols near the center of the Trade District (by the fountain or where the Blacksmith shop would be). Ul’rok is the final objective here, a bulky ogre-taskmaster infused with N’Zoth’s corruption. He must be defeated after freeing all 8 captives, but in practice you can kill him whenever you find him and then finish clicking cages if any remain. Ul’rok has a couple of notable abilities:
Ul’rok hits hard, so use a defensive cooldown if needed and don’t be afraid to kite him around a bit, especially if you’re melee and need to dodge tentacles. Once Slavemaster Ul’rok lies dead and you’ve freed all 8 prisoners, the Trade District objective is complete. A portal will open back near the district’s entrance, but since you came from Cathedral, you’ll likely just exit the way you entered. Now it’s time to enter the looming Old Town.
Old Town is the second Lost Area in Stormwind’s vision, draining sanity at roughly 12 per second – the highest rate in this city. It’s a dark, tangled quarter of narrow alleys where the city’s rogues and soldiers once trained. In the vision, Alleria’s brother-in-law Mathias Shaw has become the powerful corrupt boss here, but you’ll need to get through a gauntlet of sub-objectives first.
As you enter Old Town from the Trade District side, you’ll be joined by Valeera Sanguinar, the stealthy Blood Elf rogue, who assists you in this area’s quest. Old Town’s task is to collect two hidden keys and then use them to unlock the stronghold where Shaw awaits. Valeera’s presence is mainly for story flavor – she’ll accompany and help a bit with enemies, and crucially, if you’re solo she will handle one of the two locks for you when it’s time to open Shaw’s gate.
Follow the twisting lane into Old Town. Our suggested route leads you first to Armsmaster Terenson, the zone’s first miniboss, who is typically found sparring in an open courtyard (where training dummies usually stand). Terenson is a former Knight of Stormwind turned murderous thrall of N’Zoth. She has a couple of highly dangerous melee attacks:
Upon defeating Armsmaster Terenson, the first key automatically drops into your inventory (you won’t need to loot it manually). With one key secured, proceed further into Old Town. Around the bend, near the area where SI:7 operatives once trained, you’ll encounter Alx’kov the Infested, the second miniboss. Alx’kov is a grotesque abomination pulsating with void insects. He doesn’t have a weapon like Terenson, but he has his own bag of nasty tricks:
When Alx’kov falls, you gain the second key for this area. Now it’s time to unlock the boss’s lair. A short distance ahead, you’ll find two large locks on a fortified door. If you’re alone, click one lock and Valeera will automatically run to the other and sync with you. (In a group, you’ll need a bit of coordination: have two people click simultaneously, or count down to ensure both keys turn at once). With a satisfying thunk, the door opens and you can step into the training grounds of SI:7, where Overlord Mathias Shaw awaits.
Mathias Shaw, master of spies, has been twisted into a formidable adversary by the void’s power. He opens the fight in stealth, so don’t be surprised if you don’t see him immediately – he’ll likely get the first strike in by design. This encounter can feel like fighting a rogue with Old God enhancements. Shaw’s critical abilities include:
Throughout the fight, keep the Eyes of Chaos under control and dodge those swirl puddles, and Shaw will eventually fall. Upon his defeat, you have conquered Old Town. Another portal will materialize to send you back to the Cathedral District fountain. Take a moment – at this point, you’ve cleared the two hardest areas (Mage Quarter and Old Town). Only one side-district remains before you face Alleria, and it’s comparatively a bit easier.
The Dwarven District is the final Stormwind zone on our route, a Corrupted Area with an ambient sanity drain of roughly 8 per second. Even in the vision, this district retains its industrial flavor: expect forges, machinery, and some explosive surprises. The objective here is to plant 8 bombs at specific locations throughout the district, then defeat the area’s boss, Therum Deepforge.
Upon entering the Dwarven District from Cathedral Square, you’ll immediately encounter an event: three Brainwashed Gnomes attacking Kelsey Steelspark (a gnome NPC ally). Quickly dispatch these crazed gnomes to "rescue" Kelsey. She doesn’t accompany you afterward in any significant way, but freeing her is required to proceed and she might toss a bit of flavor commentary. With Kelsey safe, the path into the district opens and the bomb-planting quest begins.
The bombs are large, sparkling explosive charges that you need to interact with at various points in the Dwarven District. Essentially, you must make a circuit of the area, clearing hostile groups and clicking each bomb placement. We suggest a clockwise route following the outer edges and then the inner areas of the district, ensuring you don’t miss any bomb spots. The locations are typically at key structures (forge entrances, near stacks of barrels, etc.). A handy tip: you can plant bombs while out of combat, so if you clear a pack near a bomb, plant it immediately to save time.
One notable foe in the central workshop is Forge-Guard Hururl, a large anvil-wielding warrior. Hururl is technically optional as you don’t need to kill him to plant all bombs – but practically, he stands right next to one of the bomb sites, so you’ll likely have to engage him. If you can slip by or distract him you might skip the fight, but most players end up facing Hururl. His abilities:
Once Forge-Guard Hururl (if engaged) is dealt with and you’ve placed all 8 bombs, get to a safe spot because Therum Deepforge will emerge. Therum, a deranged Ironforge dwarf, is the bomb specialist who serves as the Dwarven District’s final boss. He appears near the south end of the district (not far from the tram entrance). Fighting him is a dynamic dance of fire and dodging:
Keep chipping away at Therum’s health while nimbly avoiding the barrel bombs, and he will eventually blow himself up (figuratively). With Therum Deepforge defeated, the Dwarven District is clear. A final portal appears to take you back to Cathedral Square’s starting midpoint. Take a deep breath – all four side districts (Mage, Trade, Old Town, Dwarven) have been completed. It’s now time for the ultimate confrontation in Stormwind’s vision.
Returning once more to the Cathedral, you can now enter the Cathedral itself to face Alleria Windrunner, who awaits within as the climactic boss of the Horrific Vision of Stormwind. Be prepared: Alleria gains strength from each district you cleared. For every side area completed, she receives a 10% increase to her health and unlocks an additional ability themed after that area’s boss. If you cleared everything (which yields the best rewards), Alleria will have four extra powers on top of her base kit. The fight is challenging, but knowing her mechanics will allow you to emerge victorious.
Alleria’s baseline abilities (present in every fight) are rooted in void magic and can rapidly drain your sanity if not handled properly:
If you did not clear a particular side area, Alleria simply won’t have the corresponding ability, making her slightly easier. Assuming a full clear, however, here are the extra abilities she gains (and how to handle each):
Alleria will cycle through these abilities, making the fight a final exam on all the mechanics you’ve learned: interrupt dangerous casts, move out of AoEs, break line-of-sight when required, and keep control of adds like the Eye. With each area’s power she wields, recall the tactic that countered it and you’ll gradually bring her down. It’s a tough, hectic battle – don’t hesitate to use offensive cooldowns to burn her quickly and defensive abilities or even a sanity orb (if available) to survive through her high-damage phases.
After a grueling showdown, if Alleria falls, congratulations – you have completed the Horrific Vision of Stormwind! Loot the Corrupted Chest reward, savor the moment, and get ready to head to Orgrimmar for the next challenge (or just bask in your victory if you’re done for the day).
The Stormwind vision demands a balance of speed and caution (especially for a solo player). By following a smart route and keeping an eye on the most dangerous mechanics (those big sanity-draining attacks), you can systematically conquer each district. Remember to use buffs and restoration items to your advantage, and don’t be afraid to take a second to reposition or recover: better to play it safe than lose all sanity to one bad pull. Over time, you’ll get familiar with each enemy’s patterns, and Stormwind’s twisted streets will feel almost routine. Persistence and planning are key. Good luck, and may the whispers of N’Zoth fall upon deaf ears as you claim victory in the vision of Stormwind.
And if you’re looking to dive deeper into the Horrific Visions event itself — whether you want to understand its unique progression systems, discover what’s changed since the original 2020 version, or explore the wide range of new rewards now up for grabs — be sure to check out our comprehensive Horrific Visions Revisited guide. There, you’ll find everything you need to get started, tips for maximizing your runs, and a detailed breakdown of all the fresh features and loot that make this revamped event worth your time:
Horrific Visions Guide