Orgrimmar’s Horrific Vision offers a nightmarish dive into the heart of the Horde’s capital, where Thrall sits enthroned as the final boss within the corrupted Grommash Hold, but you’ll need to carve a path through the city’s war-torn valleys and narrow alleys to reach him. The once-bustling stronghold now bristles with twisted enemies, environmental hazards, and obstacles that will test your patience and precision at every turn.
Orgrimmar’s layout is rugged and can be unforgiving, yet with the right approach, you can methodically clear every objective and make the most out of your run. This strategy guide will walk you through each area in an efficient order, highlighting key threats, useful tips, and optimal routing to help you succeed. As always, sanity management and constant awareness are paramount — many foes here can drain your mind as quickly as they deplete your health, so plan ahead and keep your wits about you as you push deeper into the vision.
Starting Area: Valley of Strength
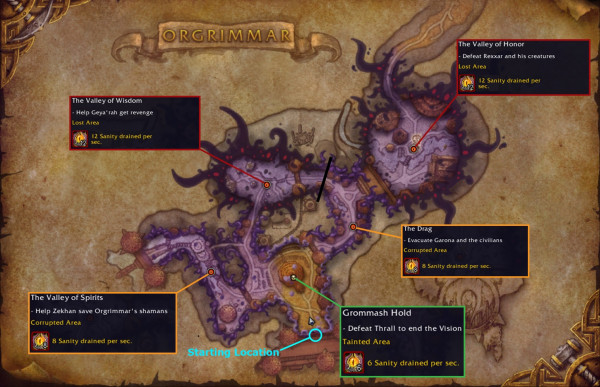
You enter the vision in the Valley of Strength, the central hub of Orgrimmar. This is the sole Tainted Area in Orgrimmar’s vision, with a relatively low passive sanity drain (around 6 per second) and no side objectives apart from reaching Thrall’s gate. Think of Valley of Strength as your staging ground: a place to gather buffs and info before heading into tougher zones. Here’s what to do at the outset:
- Find the Bad Potion: Immediately upon starting, head to the left (western) side of the valley. Inside a small hut by the forge, you’ll find the corpse of a Voidbound Ravager with a potion next to it. That potion’s color is the sanity-draining poison for this run – do not drink potions of that color for the rest of the vision. Any other colored potions you come across in Orgrimmar will provide positive effects (healing, buffs, even sanity restoration), so identifying the one to avoid is crucial. Mark the bad color in your mind (or jot it down) and you can confidently quaff the others as needed.
- Secure a Buff from Gamon or Naros: As in Stormwind, one of two helpful NPCs will spawn here per instance. Check the buildings: If the famous tauren Gamon is brawling in the inn, defeat him and you’ll receive a 10% maximum health buff that lasts an hour. If instead the blacksmith Naros is active at the forge, slay him to gain a 10% damage increase buff for an hour. Only one of these two will be present on a given run, so take whichever boon is offered. A bit of extra durability or damage at the start can make a noticeable difference in how smoothly you handle upcoming fights.
- Plan Odd Crystal Turn-in: The Valley of Strength also houses Zarhaal, the odd crystal trade ethereal. He usually stands near the central area (by the AH or bank area). If you’re aiming to collect Odd Crystals throughout Orgrimmar, remember you can swing back here to turn them in. The conversion rates are the same: the more you turn in at once, the better the reward. Often, you’ll naturally end up back in Valley of Strength after clearing an outlying zone (because each zone completion teleports you here), so that’s a convenient time to dump any crystals you’ve gathered. Just ensure you do so before entering Thrall’s hold at the end.
- Note on Thrall’s Entrance: You will see Grommash Hold looming ahead, guarded by two elite Voidbound Honor Guards at the top of the steps. That’s Thrall’s throne room. It’s tempting to charge in, but you shouldn’t (unless you intentionally plan a partial run). To fully clear the vision, you’ll return here after clearing the other zones. However, one practical tip: you might kill the two Honor Guard mobs now or on a pass-through later, just so they don’t interfere during the final fight. They have a fear ability that can be annoying if you accidentally pull them with Thrall. Clearing them at some point beforehand (they don’t respawn) ensures a clean final arena.
Also, don't forget to check out our complete Guide for Odd Crystals locations in both Stormwind and Orgrimmar:
Odd Crystals Locations
Once you’ve done your initial prep in Valley of Strength: identified the bad potion, snagged your stat buff, and plotted your route, then it’s time to head out to the first real challenge. We recommend going to the Valley of Wisdom, accessible via the path on the northwest side of the Valley of Strength. As you move, keep your eyes open for any mailbox tentacles (if you’re hunting the rare Mail Muncher mount) and additional potions or chests, but don’t get too distracted. Onward!
Valley of Wisdom
The Valley of Wisdom is our first target zone, classified as a Lost Area – expect the highest sanity drain here (around 12 per second without research buffs). This ancient Tauren enclave has been twisted into a bloody battleground. Red-tinged rivers and void growths set a grim scene. You have two objectives: fill a progress bar to 100% (by killing enemies) and then defeat the miniboss Vez’okk the Lightless who spawns when the bar is full.
Upon entering, you’ll see the progress bar for “Enemies Slain” appear. Essentially, clear the area of hostiles (almost everything contributes), and you’ll need to kill most of the mobs in the valley to reach 100%. There are a few particularly tough enemies to prioritize: first of all, we suggest heading to Coagulated Horror, the large blood elemental. It’s often found in one of the shallow pools of blood. The Coagulated Horror has two abilities:
- Sanguine Residue: It lobs globs of blood at players, which splatter into pools on the ground. These pools are extremely dangerous – standing in one will deal heavy shadow damage and drain 30 sanity per second, and to make it worse, any damage you take from them heals the Coagulated Horror. In practice, treat the red pools like lava: don’t step in them. Kite the Horror out of any puddles it creates so it doesn’t heal itself, and range it down if possible while dodging the projectiles.
- Visceral Fluid: A frontal cone spew of corrupted fluid. If you are hit by this, it causes high damage and a 60 sanity loss. This is an ability you want to sidestep – watch the Horror’s front and when it rears back, move out of the cone. As with other cone attacks, positioning yourself behind or to the side of the monster will help.
Defeat the Coagulated Horror quickly; its healing mechanic can prolong the fight, costing time and sanity, so avoid those puddles and burn it down. Next, you’ll likely encounter Voidcrazed Hulk, the massive void-added orc brute stomping around the inner valley. The Voidcrazed Hulk hits very hard and has its own nasty moves:
- Explosive Leap: The Hulk will target you, briefly pause, then grab you (smashing anyone in melee) and leap into the air. He then slams down on your location. The initial grab inflicts about 40 sanity damage immediately, and the leap impact does heavy physical damage plus another 60 sanity drain if it lands on you. To counter this, once you see him preparing to leap, keep moving – don’t be at the point of impact. Often he’ll throw you and then jump to that exact spot, so as soon as you’re flung, try to run out of the landing zone. If you time a movement ability right (like Blink or a well-timed sidestep with immunity frames), you might avoid the slam entirely.
- Howling Pain: An unearthly howl that causes a minor AoE pulse of damage and will interrupt any casts you’re in the middle of. This isn’t too dangerous by itself, but it can screw up a crucial heal or cast if timed badly. Just be aware it can happen so maybe don’t channel a long spell when the Hulk is above 50% health, or use instant casts. If you’re a caster, try to bait the Howling Pain, then cast after it’s done.
The Hulk’s high damage makes it a good candidate for using cooldowns. If you have offensive CDs ready or a bloodlust-like effect, this is a fine time – better to end the Hulk quickly than risk multiple explosive leaps.
By the time you’ve slain the Horror, the Hulk, and assorted lesser void creatures in the Valley of Wisdom, your kill progress bar should be nearing completion. Mop up any remaining enemies (don’t forget to check tucked-away corners or inside that little cave hut: there might be a few trolls or oozes hiding) to hit 100%. The moment the bar fills, Vez’okk the Lightless will spawn near the entrance of the valley. Vez’okk is a hulking void revenant and the culmination of this area. We strongly recommend using any big damage cooldowns or consumables left to burst him down, because he has significantly more health than the previous two mini-bosses and can eat up your sanity if the fight drags on. Vez’okk’s abilities are as follows:
- Defiled Ground: A brutal frontal smash attack. If you’re in front of Vez’okk when he brings his weapon down, you’ll take very heavy damage, lose about 60 sanity, and get stunned for 3 seconds. Needless to say, do not get hit by this. This can be treated similarly to other cone or frontal attacks – dodge to the side or get behind him. If you’re melee, strafe through him to his back when you see him winding up. The stun can be a death sentence if followed by another mechanic, so avoid this at all costs.
- Unleash Corruption: Vez’okk creates a sizable void circle centered on himself. After a short delay, it erupts – any player caught inside the circle when it goes off will take a chunk of damage and lose 60 sanity. The tell is clear: a dark ring expanding on the ground around Vez’okk’s feet. Run out of its radius as soon as you see it. If you’re ranged, you should already be at a safe distance; if melee, pull back immediately when it starts. You can re-engage after the explosion.
- Ring of Chaos: Vez’okk’s signature move where he summons multiple void circles in a ring around him, which then rapidly shoot outward like ripples. If you are struck by one of these moving rings, it deals shadow damage, drains 60 sanity, and stuns you for 3 seconds. The pattern usually has gaps; this is a spatial awareness test. Find a gap between the circles and position yourself there as the rings expand. You may have to move with the wave to stay in the safe zone until it passes you. Alternatively, if you’re very close to Vez’okk when he casts it, you might slip through before the rings grow too large. However, that’s risky – it’s often safer to back off a bit, watch the ring formation, and sidestep through an opening.
Focus on dodging these moves while pouring damage into Vez’okk. If you’ve saved an extra sanity restorative (like an orb) for this fight and need it, don’t hesitate as it's better to use it than to lose the run here. When Vez’okk finally goes down, the Valley of Wisdom is complete. A portal will appear to take you back to the Valley of Strength entrance. Step through and catch your breath back in the relative safety of the starting area.
Now you can plot your next move. We will proceed to the Valley of Spirits next. If your sanity is low, this is a great time to use a restoration orb (the next areas are a bit easier than what you just did, but you don’t want to start them nearly empty). When ready, head east from Valley of Strength toward the troll-infested Valley of Spirits.
Valley of Spirits
The Valley of Spirits is a Corrupted Area (medium difficulty with 8 sanity/sec drain) that takes you through Orgrimmar’s troll quarter. Here, the echoes of dark hexes fill the air. The primary mission is to rescue the Troll shamans being held in thrall by corrupted totems and then slay the area’s elemental boss. There are effectively two phases: first, gain access by defeating a gatekeeper, then free four shamans and defeat the final boss.
As you cross into the Valley of Spirits, your way is immediately blocked by Decimator Shiq’voth, a hulking faceless aggressor guarding the narrow entry. You must defeat Shiq’voth to move deeper. He has two notable attacks:
- Surging Fist: Shiq’voth charges forward with a massive punch. This is a targeted charge at a player; if it hits, it deals a chunk of physical damage and knocks you back. What makes it dangerous is that it’s always followed up by his next move, Decimator. The key is to sidestep the charge if you can – it’s a straightforward rush, so dodge left or right out of its path. Even if you get hit and knocked away, be ready for what comes next.
- Decimator: After a Surging Fist, Shiq’voth lobs a shadowy missile at you. This projectile does a bit of damage on impact, then boomerangs back toward the boss’s position. If you’re caught by the returning shot, it deals additional damage and a huge 120 sanity drain. In other words, getting hit by Decimator on the rebound is absolutely devastating to your sanity. The good news: if you avoided or got knocked back by Surging Fist, you’re likely out of position for the return hit. Still, keep moving unpredictably after the charge to make sure the returning projectile doesn’t clip you. Visually, you’ll see a dark orb go out and then streak back so do your best to not be in its path on the way back. Ranged players can backpedal further away after the initial cast; melee might consider disengaging after the charge to avoid the follow-up.
Bring down Decimator Shiq’voth quickly. Once he falls, the main yard of the Valley of Spirits opens up for exploration. Inside, ghostly echoes of the Darkspear tribe roam under the Old God’s sway. Here’s your game plan:
- Check for Bwemba: Off to one side (often to the right of the entrance path), you might find Bwemba, a friendly troll spirit, under attack or standing corrupted. If Bwemba is present, defeat her and you’ll earn a buff granting 10% Haste and 10% movement speed for an hour. Bwemba’s abilities are minor – she’ll cast Hex (turning you into a frog for 4 seconds; it’s instant so you can’t always avoid it), and Twisted Lightning (a 3-second chain lightning cast you should interrupt to minimize damage).
- Free the Shamans: Scattered around the Valley of Spirits are four large Corrupted Totems, each pinning a troll shaman in a hexed state. Your objective is to cleanse all four. To do so, you must defeat the group of enemies guarding each totem, then click the totem itself to free the shaman. It doesn’t matter the order in which you tackle them, but a systematic sweep of the area works well (for example, start from the right and circle around). The enemies near each totem can include corrupted trolls, serpents, or elemental spawns. None are individually boss-level threats, but be wary of their combined damage, especially if madness affixes (like those that buff mobs if close together) are active. Clear one totem camp at a time, and immediately interact with the totem after each fight. Freeing a shaman not only checks off an objective, but each freed shaman will give you a small sanity restore or buff (in the BFA version they gave a little sanity back; in the revisited version they may just disappear – even if they don’t restore sanity now, freeing them ensures fewer hostiles around).
- Beware of Hydras: The water canals through this area sometimes harbor hydra-esque creatures or Void elementals that spew AoE damage. If you see swirls of water or void on the ground, dodge them as you go from totem to totem.
Once all four shamans are rescued, the final boss of Valley of Spirits, the Oblivion Elemental, will spawn, usually appearing near the back of the area or central altar once the last totem is cleansed. The Oblivion Elemental is a large void elemental that embodies despair. Two primary things to manage in this fight:
- Waves of Oblivion: While you’re in combat with the elemental, it will continuously emanate slow-moving shadowy waves that ripple outward across the ground. If you touch a wave, it deals a bit of damage and drains some sanity (minor compared to other attacks, but it adds up). Fortunately, the waves have gaps; they’re often lined up like horizontal bars moving toward you. Weave between them, or step forward and back as needed to let them pass. Keep an eye on the elemental as well so don’t kite yourself into a corner just to avoid waves, or you might get hit by its melee attacks.
- Hopelessness: At 80% and 40% health, the Oblivion Elemental will cast Hopelessness. This sinister spell causes golden orbs to spawn out of each player (or just you, if solo) and float a short distance away. Simultaneously, you’ll be afflicted with a heavy pacify effect – you are silenced and unable to use abilities until you remove it by touching your golden orb. Essentially, your hope (the orb) is literally escaping you, and you must chase it down to regain your fighting spirit. The moment Hopelessness is cast, locate the glowing orb (they’re usually only a few yards away) and run through it. This will cleanse the debuff, returning control to you. Be quick, because being silenced while waves are rolling at you or the elemental is still attacking can be dangerous. In a group, each player has to grab their own orb. The orbs last up to 10 seconds; if somehow you don’t collect yours in time, the pacification will wear off anyway, but you’ll have wasted precious time. Generally the mechanic is straightforward: break line for a second to snatch the orb, then resume the fight.
Beyond those, the Oblivion Elemental will melee and possibly cast some basic shadow bolt-type spells, but nothing extraordinary. Once you’ve mastered the dance of dodging waves and quickly clearing Hopelessness, this boss will fall without too much trouble. When it dies, you’ve completed Valley of Spirits. Another portal pad will spawn, taking you back to the Valley of Strength.
At this juncture, you’ve done two side areas (Wisdom and Spirits). Your sanity might be running a bit low, but you’re also more than halfway through the city. Use the hub to regroup. Use your second sanity orb here if needed. The next zone, The Drag, awaits – it’s a corrupted area with some twists and turns, but notably also offers another buff you can grab. When ready, head into the Drag from Valley of Strength’s eastern exit.
The Drag
The Drag is a winding marketplace that cuts through Orgrimmar’s center – in this vision it’s a Corrupted Area (around 8 sanity per second drain) and thematically all about searching cluttered shops for survivors. It’s a bit less open than other zones, essentially a curving tunnel of buildings. Your goal here is to "find survivors" (a mechanic where you check various shops) and then defeat the boss Inquisitor Gnshal who appears once the search is complete. The Drag can be confusing to navigate, so follow our steps for an efficient clear!
As you enter The Drag, you’ll be stopped almost immediately by Annihilator Lak’hal, a void berserker guarding the entrance. Lak’hal isn’t very mobile, but he hits hard with ranged attacks:
- Orb of Annihilation: Lak’hal summons a crackling dark orb a short distance in front of him. After a moment, the orb detonates in a spherical blast. If you’re caught in the explosion, it deals heavy shadow damage and drains 60 sanity. This ability is similar to a floating mine: the orb appears, giving you about a second to move, then boom. The best counter is to fight Lak’hal at range or be ready to strafe as soon as you see an orb form. The orb always spawns in front of him, so if you’re melee, you’re inherently at risk; consider stepping out after a few hits to bait an orb, then dive back in once it’s exploded harmlessly.
- Dark Force: Lak’hal locks onto a target and channels a dark beam at that location. It’s effectively a tracking beam that will follow you for a short duration, dealing damage if it touches you and knocking you back. Think of it as a spotlight of doom – you want to keep moving to avoid the beam. It starts where you were when cast began, then follows, but you can outrun or outmaneuver it. Use a zigzag pattern or a quick movement ability to break its line. If you get knocked back, it’s not the end of the world, but it could fling you into an unseen pack of mobs or just waste time. So play keep-away with the beam until it stops.
After crushing Lak’hal, proceed into The Drag proper. Almost immediately, you’ll see Garona Halforcen – she’ll be standing by, and you should talk to Garona to "rally" her. Once you speak with her, the event to find survivors begins. Now, move through The Drag checking each open shop or side-room. The interface might mark certain doorways or you might just have to physically go in and look around. Here’s what to watch for:
- Closed vs. Open Shops: Not every shop can be entered; some are just decorative closed doors. Typically, ones with survivors (or other events) will either be ajar or have a distinct marking. Clear any mobs in the street as you advance as you don’t want them piling on you while you’re poking around inside.
- Ethereal Portal: Partway through the Drag on the right side, there’s the Transmog shop (Warpweaver’s store). Inside, you might find a shimmering Ethereal Portal. Click it, and Warpweaver Dushar (an ethereal trader turned hostile) will appear. Defeat Dushar and you earn a 10% Critical Strike buff for an hour. Dushar himself isn’t too tough; he casts some void bolts and blinks around, but it’s worth the few seconds to kill him for that crit buff. If you don’t see a portal in the transmog shop, that means he didn’t spawn this run, so don’t worry – just continue on.
- Other Shops: The Drag has an Alchemy shop, an Auctioneer area, and other little nooks. In practice, just sweep through and look for Kegful of tauren, goblin tinkers, or other NPCs that might be cowering or turn hostile. Most "survivors" in Horrific Visions end up actually being enemies you have to kill to check the building off. Use Garona’s presence – she’ll often say something or help attack if you’re in the right spot.
Eventually, after you’ve entered all the key buildings, you’ll trigger the completion of the search (the game will usually emote something like "All survivors found" or Garona will shout that the path is clear). At that point, Inquisitor Gnshal spawns at the end of The Drag, near the gate leading to Valley of Honor. Gnshal is a faceless inquisitor (similar model to Darkspeak from Stormwind) with a penchant for void magic and shields. Get ready for a fight with two main phases:
- Void Torrent: Gnshal will fixate on a player and channel a barrage of void missiles at them. If these hit, they not only deal damage but also stun you and inflict a 4-second sanity degeneration (30 sanity per second). The missiles come one after another over a few seconds. The trick here is constant movement – as soon as he begins casting Void Torrent, start running in one direction (or zigzag). The void projectiles can be dodged; think of it like dodging slow-moving fireballs. As long as you keep moving, especially in a circular or side-to-side fashion, many of the missiles will miss their mark, drastically reducing the effect. If you have a personal dispel or immunity and you do get tagged by one, pop it to break the stun early. But ideally, don’t get hit at all. Keep mobile!
- Cries of the Void: At 65% and 30% health, Gnshal will shield himself in a dark barrier, gaining a buff that absorbs damage equal to 25% of his max health. While the shield holds (it lasts up to 6 seconds or until you break it by dealing that much damage), he channels an incantation. If the shield is still up when the channel finishes, it will explode, dealing harm to you and draining sanity proportional to the remaining shield strength. In other words, you need to burn through the shield quickly to avoid a big hit. Unload burst damage when you see Cries of the Void cast: use trinkets, high-damage abilities, anything to shatter the shield before the 6-second timer. If you’re in a group, everyone should swap to the shield. If you fail to break it in time, brace yourself – the less remaining shield, the less the backlash, so even partial damage is helpful. He’ll do this twice (at roughly two health thresholds), so save at least one strong cooldown or major attack for each shield phase.
Apart from those, Gnshal will swipe and cast minor void spells, but those are the defining mechanics. After you crack his second shield and push through his final health, Gnshal will fall. The Drag is now complete. Once again, a portal will appear back at the Valley of Strength entrance. Step through and take stock: only one zone remains, the formidable Valley of Honor – widely considered one of the most challenging parts of Horrific Visions, especially solo.
Valley of Honor
Ah, the Valley of Honor. In better times, this was where Horde warriors honed their skills and beastmasters trained animals. In the vision, it’s a hellscape of combat trials. The Valley of Honor is a Lost Area with a high sanity drain (around 12 per sec) and it holds only a single, but very tough, objective: defeat Rexxar. However, getting to Rexxar is an ordeal in itself, as his loyal companion and other hazards block your way. If you have any sanity restoration or last buffs left, be ready to use them here. This area will test your combat prowess and your ability to triage threats quickly.
As you pass into the Valley of Honor from The Drag, you’ll almost immediately be confronted by Misha, Rexxar’s giant bear companion. Misha stands in the gateway, refusing to budge, so you must defeat her to proceed. Misha functions like a mini-boss with a few abilities reminiscent of a bear’s ferocity and a touch of void corruption:
- Desperate Retching: Misha vomits out blighted bile, inflicting a disease DoT on you if it connects. This disease does nature damage over time. Additionally, each retch leaves behind a pool of toxic bile on the ground that will deal damage and drain about 30 sanity per second to anyone standing in it. The pattern is similar to other pool mechanics: you’ll see a cone or line where she’s spewing, so dodge aside to avoid the initial hit, and definitely step clear of any green puddles on the ground afterward. If you do get diseased, use a cleanse if you have one, or heal through it quickly. The pools can make the narrow gate area dangerous, so you might kite Misha out of the chokepoint slightly, into a more open area, to give yourself room to maneuver around the bile patches.
- Maddening Roar: At close range, Misha unleashes a terrifying roar. This is an AoE around her (small radius) that deals massive damage and rips away 120 sanity if you’re caught in it. Think of it as a point-blank shockwave of insanity. The key is to never stand too close to Misha for too long, especially when she’s low on health (some mobs use big moves at low HP; not sure if Misha has a trigger, but best to be cautious). If you see her rear up or a cast bar for Maddening Roar, try to get out of melee range immediately. A 120 sanity hit is brutal – likely more than half your bar! Ranged players should naturally avoid being near her; melee should stick and move. You can also use stuns or heavy damage to push her through the phase quickly so she maybe only gets one roar off.
- Summon Aqir Scarabs: Upon Misha’s death, she doesn’t go quietly with her corrupted body birthing a swarm of Aqir scarabs. These are small beetle adds that don’t hit hard individually, but can be a distraction and nibble at your ankles if ignored. As soon as Misha dies, prepare for AoE – cast a quick area spell or two to wipe out the scarabs. One caution: scarabs will spawn from any corpse you step on in this zone (a unique quirk in Valley of Honor). This means after killing any mobs, avoid running over their bodies, or you’ll spawn more scarabs. If you do spawn extra, just AoE them down; they’re mostly a sanity/time tax.
With Misha defeated and her scarabs squashed, the path to Rexxar is open – physically, at least. The Valley of Honor is a long slope that goes up to the city’s upper terrace. Now is a critical time to consider sanity: if you’re extremely low, you might use your final sanity orb here before proceeding, because Rexxar is a very involved fight. Alternatively, you could try to push through and use an orb right before Thrall. Gauge your confidence and remaining sanity as a full clear run often uses the last orb just before Rexxar or right as you engage him, to ensure you can also handle Thrall after.
Moving onward, you’ll notice the Valley of Honor is crawling with enemies, but you do not need to kill all of them. In fact, it’s wise to avoid as many as possible. Trash mobs here can be more trouble than they’re worth (each kill doesn’t give much besides a bit of sanity back if you have the Gift of the Titans talent unlocked, but that’s variable). Some tips for avoidance:
- Stick to the sides of the valley where possible, and look for gaps in patrol patterns. There might be packs of ogres or corrupted grunts – if you can slip by without aggroing, do so. Using an Invisibility potion or similar ability here can help if you have one available.
- Avoid standing on corpses of anything you do kill (reiterating the scarab point). If you fight one mob and it dies, sidestep the body to not spawn scarabs. The whole valley is basically a bug nest because of this mechanic.
In the center of the valley, a particularly dangerous elite called an Aqir Mindhunter lurks. It’s a large insectoid caster. If you can skirt around it with careful movement or a diversion, do so – fighting it is not mandatory and is quite dangerous. However, if it does catch you or you choose to eliminate it preemptively (say, it pathed into you or you have strong burst to take it out fast), here’s what to expect:
- Toxic Breath: A frontal cone of noxious gas. It deals nature damage and applies stacks of Aqiri Mind Toxin if it hits you. These stacks impair you, and at 5 stacks, you become stunned for 3 seconds. The strategy is straightforward: don’t get hit by multiple breaths. Ideally, don’t get hit at all. If you do engage the Mindhunter, dodge its cone like you would others. If you see a toxin debuff stacking, you know you got dipped – be extra careful to avoid subsequent ones or you’ll find yourself stunned at a very bad time.
- Toxic Volley: The Mindhunter also fires off a spread of venomous projectiles into the air. They land as green circles on the ground. Each explosion deals a chunk of damage and drains 30 sanity if you’re in it. It will pepper a wide area with these, so you’ll need to be quick on your feet, weaving between the impact zones. It’s similar to Alleria’s Darkened Sky in concept with constant move or suffer.
At the far top of the valley, across a bridge, you’ll reach a plateau in front of a cave-like structure, this is where Rexxar awaits. Champion of the Horde has succumbed to N’Zoth’s whispers and now stands as one of the most formidable encounters in Horrific Visions. He is a beastmaster, so expect multiple threats at once. This fight is arguably even harder than Thrall if you’re solo with no masks, so treat it with respect. Make sure you have cooldowns ready; if you popped a sanity orb, you should be near full sanity – you’ll need as much as possible. When you step onto Rexxar’s platform, he’ll engage.
Rexxar’s fight can be broken into phases dictated by his health percentage, but he also has a constant mechanic of summoning boar minions as the fight goes on. Here’s the breakdown:
- Mind Traps: As the battle begins, Rexxar immediately litters the area with several Void traps on the ground. These look like dark, runed circles. If you step on a trap, it will snap, dealing shadow damage, stunning you for 4 seconds, and draining 120 sanity. In short, do not touch the traps at any cost. They often are placed in a cluster or scattered around where you were standing at the pull. Before you do anything else, quickly assess and clear a safe path. You might even want to start the fight by carefully pulling Rexxar toward one side of the area, so all traps end up behind him (if you trigger him at max range, he might drop them where you were). Once the traps are down, fight near the edges or between them. Remember where they are; the last thing you want is to backpedal into one later while dodging something else. If kiting Rexxar, lead him around the traps, not over them.
- Stampeding Corruption: At about 40% health, Rexxar will call upon one of his hallmark moves. This ability summons a stampede of void-infused beasts that charge in a line across the arena. The line of beasts covers a broad lane – being hit by the stampede will deal shadow damage and drain 60 sanity per hit. The stampeding animals come in a train; if you get knocked by one, you might get hit by another. The best approach: the moment Rexxar starts channeling or roaring for Stampeding Corruption, run perpendicular to the direction of the charge to get out of their path. If you’re not sure where they’ll come from, watch the ground: typically there’s an emerging effect or direction. You may also use movement boosts or even immunity if you fear you’ll be trampled. Missing this entirely is ideal; getting clipped by one won’t end you, but it will hurt. Keep in mind the stampede might also plow through where traps are, but the traps won’t trigger from them as they’re still waiting for you.
- Summon Void Boars: Throughout the fight, Rexxar will periodically summon his boar companions corrupted by void energy. These Void Boars spawn one by one as Rexxar’s health drops and by the end, there could be several if you don’t kill them. Each boar has an attack called Void Quills, a spell they cast repeatedly that fires quills dealing shadow damage and causing a 30 sanity drain per hit. Individually, the boars don’t have a ton of health, but if left alone, they will overwhelm you with quill barrages. Priority: Kill the boars as soon as they appear. If you have multi-target damage or cleave, try to hit Rexxar and boars together, but never ignore boars. It’s easy to become fixated on Rexxar’s health and forget a new boar spawned behind you – suddenly you’re eating quills from two angles.
Dealing with all this simultaneously is what makes Rexxar tough: you must avoid traps, position for stampedes, and constantly clear boars – all while Rexxar himself is hitting you with his axes and maybe minor abilities. It’s a lot to juggle. Use personal defensives liberally here; it’s often better to mitigate damage and stay healthy so you can focus on mechanics. If you have a bloodlust effect or DPS potion, unleashing it at the start on Rexxar can shorten the fight drastically, meaning fewer waves of boars and maybe only one stampede to deal with. Just ensure you don’t blow all cooldowns and then die to a trap – mechanics first, then DPS.
After an intense battle, if you manage to bring down Rexxar, give yourself a pat on the back as many consider that the most harrowing part of a full clear. Rexxar’s defeat signals that all objectives in Orgrimmar’s vision except Thrall are now done. You should see the completion notice for Valley of Honor. A portal will spawn allowing you to return to the Valley of Strength one final time.
This is it – time to face Thrall, Warchief of the Horde and final boss of the Horrific Vision of Orgrimmar. Before you engage Thrall, take stock: Your sanity is probably low after Rexxar. If you somehow still have a sanity orb or any emergency sanity potion, now is the absolute last chance to use it. Thrall is deadly, especially with all side areas cleared (he will have gained extra abilities from each, similar to Alleria). Ensure your health is topped and cooldowns are ready. When you are prepared, head up the steps of Grommash Hold. The Honor Guards outside, if still alive, will need to be killed so quickly CC or interrupt their Horrifying Shout and avoid their frontal cleave, which can hit hard. Once they’re down, you can enter the throne room and confront Thrall.
Thrall (End Boss)
Thrall, Son of Durotan, corrupted by N’Zoth’s influence, stands as the final hurdle. In game terms, Thrall is akin to Alleria in that he inherits abilities from each area you’ve cleared. For each of the four side zones completed, Thrall’s health is increased by 10% and he gains one of that zone’s boss abilities. A full clear run means Thrall will have four extra moves on top of a base skillset. The fight takes place inside Grommash Hold, which is a circular indoor room with some pillars and limited space. Use the room’s layout to your advantage when possible.
Thrall’s base abilities (always present):
- Surging Darkness: Thrall leaps to the center of the room and channels a void empowerment that creates a series of expanding ring-shaped void zones across the floor. Essentially, you’ll see either a void ring start under Thrall’s feet and then additional rings radiating outward, or the inverse (starting at the walls and moving inward). The pattern alternates and can vary. Getting hit by these void rings deals massive damage and costs 60 sanity per hit. Your task is to find the safe spots between the rings quickly. If the void zones start at Thrall and expand outward, the safe zone initially is far, then as the first ring fades and second appears further out, move inward to where the first was, etc. If they start at the edges and move in, do the opposite – start near Thrall, then move outward. Keep a cool head and move methodically; use the visual cues on the ground. If needed, you can also time a movement ability to clear multiple rings. Surging Darkness is one of Thrall’s deadliest moves because of the sanity threat, so focus on mastering this dance.
- Seismic Slam: Thrall smashes the ground in a small area (often a cone directly in front of him). This deals decent damage and will stun you for 2 seconds and drain 30 sanity if you’re hit. By itself, Seismic Slam isn’t too bad as it’s like a mini shockwave. Don’t stand right in front of Thrall when he’s doing it. Two seconds stun is not great, but survivable unless it causes you to then eat a follow-up mechanic. Just avoid the obvious crack in the ground when he slams.
Now, the bonus abilities Thrall gains from each area (assuming full clear):
- Defiled Ground (from Valley of Wisdom): Thrall incorporates Vez’okk’s frontal smash, but with a twist. Instead of using Seismic Slam as normal, Thrall will replace it with Defiled Ground if you cleared Valley of Wisdom. Defiled Ground has the same effect as Vez’okk’s version: a heavy frontal attack that leaves a lingering void zone. Avoid the frontal cone to not get damaged/stunned, and now that spot on the ground will be covered in void goo for a while, which will harm and drain sanity if you stand in it. As the fight goes on, if Thrall does multiple Defiled Grounds, parts of the room can become persistent danger zones. Try to bait Thrall into using Defiled Ground at the edges of the room, so the void patch doesn’t cut off your movement in the center. And absolutely don’t kite Thrall through those patches – keep the fight area as clean as you can. This essentially just forces you to be aware of the environment. Luckily, Grommash Hold is not huge, but there’s enough space to move around the void zones if you place them smartly.
- Hopelessness (from Valley of Spirits): At 80% and 40% health, Thrall will cast Hopelessness just like the Oblivion Elemental did. This silences all players and spawns a golden orb of hope for each, somewhere in the throne room. You must run and collect your orb to break the effect, otherwise you’ll be silenced for 10 seconds. In a solo scenario, it’s straightforward: the moment you see Hopelessness cast, quickly look around for the orb (it usually spawns a short distance away, not too far). Run over it to regain your abilities. The room’s pillars can sometimes obscure the orb, so check behind things if you don’t immediately see it. Also note, Thrall might still be moving or attacking while you’re silenced. In any event, once you’re silenced, finding that orb is your top priority. In group runs, everyone needs to fetch their own orbs.
- Cries of the Void (from The Drag): At around 55% health, Thrall will mimic Gnshal’s shielding trick. He places a shield on himself absorbing 25% of his max health and begins a 6-second cast. If you don’t break the shield in time, it explodes, dealing damage and sanity loss based on the remaining shield, just like Gnshal’s version. The strategy: burn that shield down. Hopefully, you saved some burst for this moment. If you have Bloodlust or major DPS cooldowns ready, pop them when Thrall hits ~60% to push through the shield phase fast. If in a group, all switch to the shield. You ideally want it gone in under 6 seconds. If you can’t break it fully, at least weaken it as much as possible to minimize the backlash. The explosion, if it happens at full strength, is extremely punishing. Treat this like a mini enrage – it’s worth using potions or offensive trinkets here!
- Void Boars (from Valley of Honor): Upon Rexxar’s defeat, Thrall learned how to summon his own boar minions. Shortly after engaging, and periodically during the fight, two Void Boars will join Thrall. These are identical to Rexxar’s boars with the Void Quills ability. They have relatively low health. The recommendation is the same as before: kill the Void Boars quickly. If you have an AoE stun or slows, use them to control the boars briefly, and burst them down. Because Thrall himself is a single target, sometimes people save multi-target attacks specifically for when boars spawn. Don’t ignore Thrall entirely, but shifting focus to clear adds is usually the right move to prevent being overwhelmed.
All together, Thrall’s fight is about multitasking: dodge the ring waves, kill adds, avoid void zones, break shields, fetch orbs (all while keeping some damage on Thrall himself so the fight doesn’t go too long). It’s the ultimate culmination of everything you’ve learned. A few general tips to close out:
- Use the Pillars wisely: If you mistime and find yourself in a bad spot for the ring waves, you might use a pillar to LoS some of them, but generally you can’t hide from that; you must dodge. However, pillars are still useful to LoS Thrall’s abilities and to corral boars perhaps. Just be careful not to LoS your view of the golden Hopelessness orb inadvertently or get trapped by a void zone.
- Maintain Health and Sanity: If you have any health potions or sanity restorative items left, use them when needed. There’s no point holding back now. A common scenario: you might drop a Gift of the Titans proc during Thrall then use that invulnerability window to aggressively push for damage.
When Thrall’s health finally hits zero, you’ve done it – you’ve conquered the Horrific Vision of Orgrimmar at its fullest! The scenario ends with Thrall’s defeat, porting you out to collect your loot from the chest Wrathion provides.
Final Thoughts
Orgrimmar’s vision is a marathon of clutch moments, especially for solo adventurers. The key is to approach each section with a plan – know which fights to blitz and which to slow-play safely. Small buffs and efficient potion use can tilt the odds in your favor. By the time you face Rexxar and Thrall, you should be confident in your ability to dodge telegraphed attacks and prioritize threats. Don’t be discouraged by early failures; each run teaches you something, whether it’s a trap location or a reminder to save an interrupt for that one spell. Keep a cool head, maintain control of the fight pace, and you’ll soon triumph over the darkness in Orgrimmar’s streets.
If you’re eager to learn more about the Horrific Visions event itself (from its revamped progression systems and the latest updates since the 2020 original, to the impressive lineup of new rewards on offer) then don’t miss our Horrific Visions Revisited Guide. Inside, you’ll uncover everything from beginner basics to advanced tips, along with a full breakdown of all the new features and loot that make this renewed event very worthwhile. Whether you’re a returning player or tackling Horrific Visions for the first time, our guide has all the info you need to get the most out of every run:
Horrific Visions Guide
