
Fury Warrior is pure chaos — the good kind. Think nonstop action, zero downtime, and a whirlwind of rage-fueled destruction. You’re constantly on the move, hammering out a relentless rotation that builds rage fast and spends it even faster on an explosive Rampage that leaves nothing standing.
If you crave speed, aggression, and the kind of gameplay that keeps both your fingers and your adrenaline pumping, Fury is it. Nothing else in the game delivers this level of raw, unfiltered fun. This guide breaks down the essentials and dives into the juicy details that’ll help you truly unleash the beast.
While the spec retained a relatively simple rotation in the new expansion, the associated haste buffs make Fury one of the highest actions-per-minute specializations in the game, proving that gameplay does not necessarily need to be complex in order to be engaging. In addition to a well-rounded offensive toolkit, Fury enjoys high mobility, moderate self-healing, and one of the few raid-wide defensive cooldowns in the game.
| Strengths | Weaknesses |
| Great against small packs of 4-6 targets. | Suffers greatly from any downtime having no range attacks or passive rage generators. |
| Massive AOE-burst windows every 45 and 90 seconds. | Weak sustained single target damage and only mediocre uncapped multitarget. |
| Strong gap closers and mobility. | Melee to its core, meaning you'll often have to dodge numerous mechanics or risk losing most of your damage. |
| Awesome personal defensives and overall tankiness. | Lack of any damage immunity or cheat death mechanics. |
| High-Intensity, Simple Rotation. | Limited Talent Variety. |
Overall, Fury remains a high-APM juggernaut in TWW Season 2 – it’s easy to pick up, hard to put down, but requires consistency to maximize the damage during burst windows.
The War Within introduced Hero Talents to the game, giving players a choice between 2 separate paths that not only add cool visuals to your spec but also impact the way you play it!
Fury gets to choose between Slayer and Mountain Thane:
There are numerous Fury Warrior builds that are being shared on the internet, with most of them being either outdated or outright bad in Patch 11.1. Here we gathered for you 2 awesome Raid builds (one for pure ST and the other one for cleaving down bosses & adds)and 1 build for Mythic+ that combines a great mix of raw damage, personal defensives and party utility.
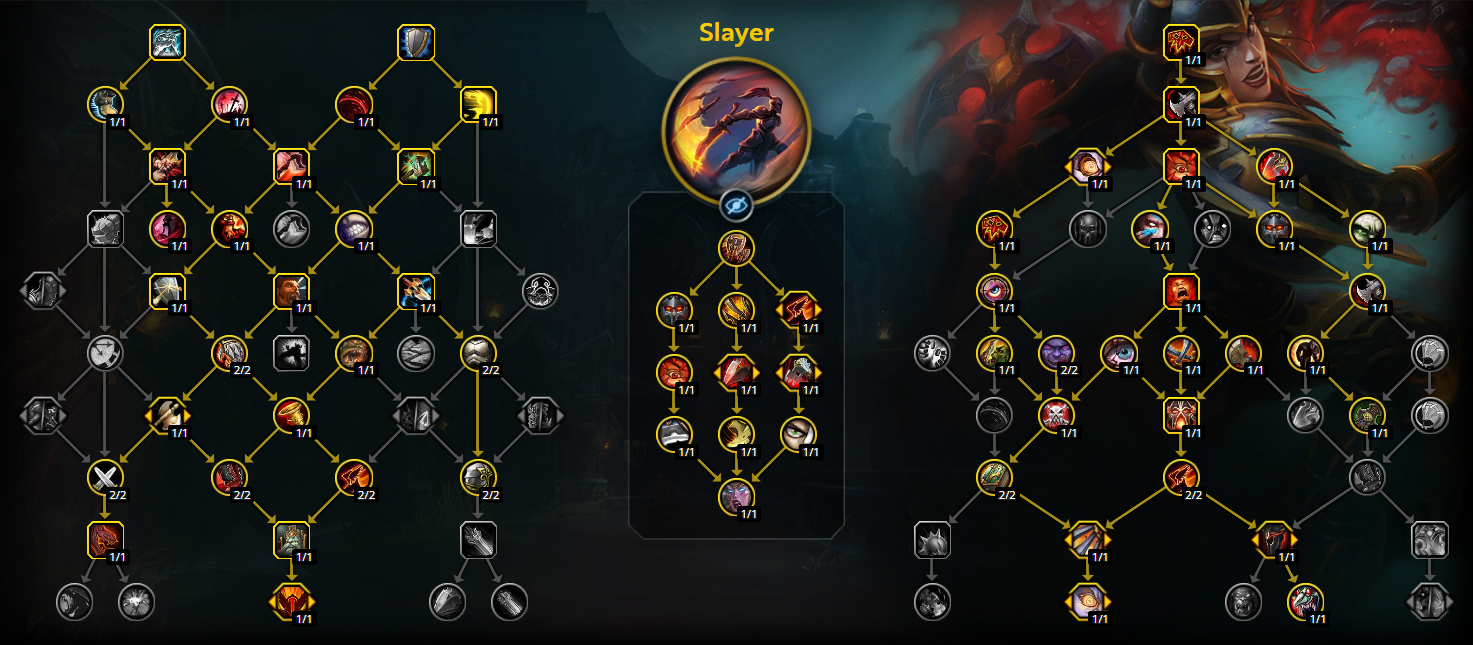
Slayer - Raid Single Target
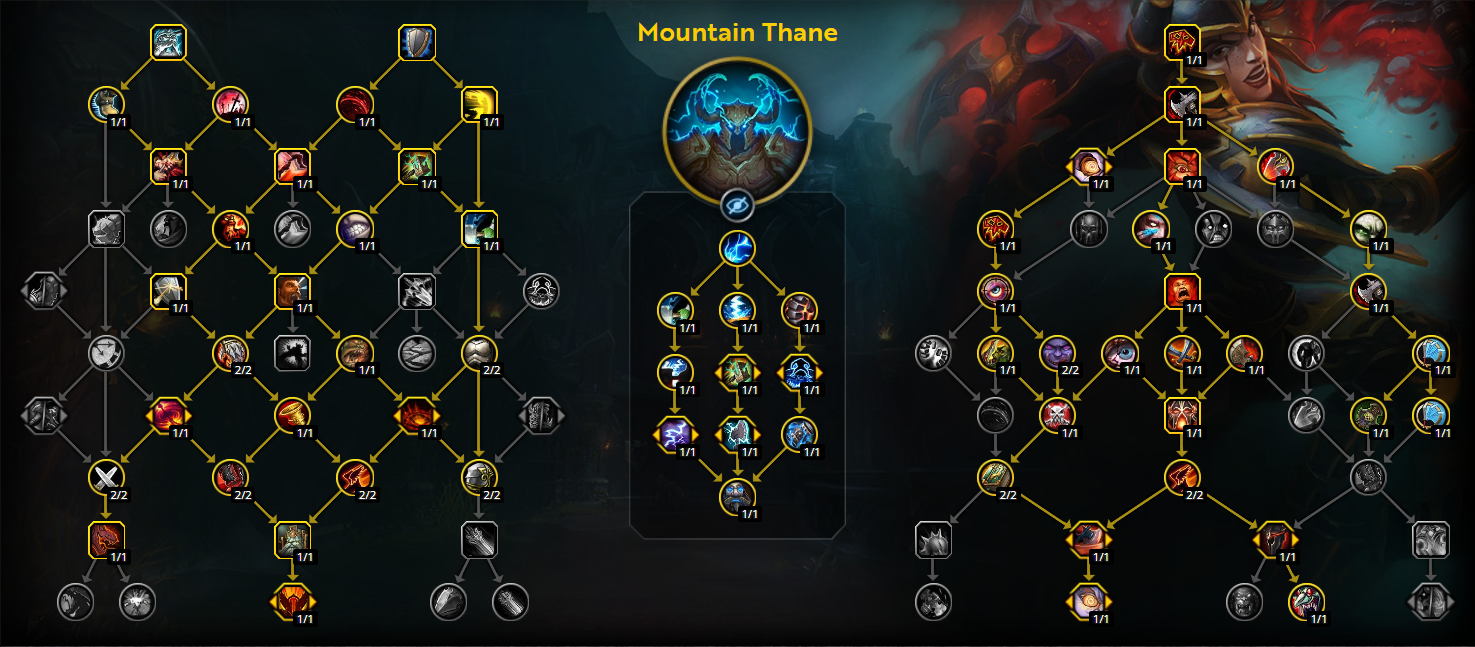
Thane - Raid Cleave
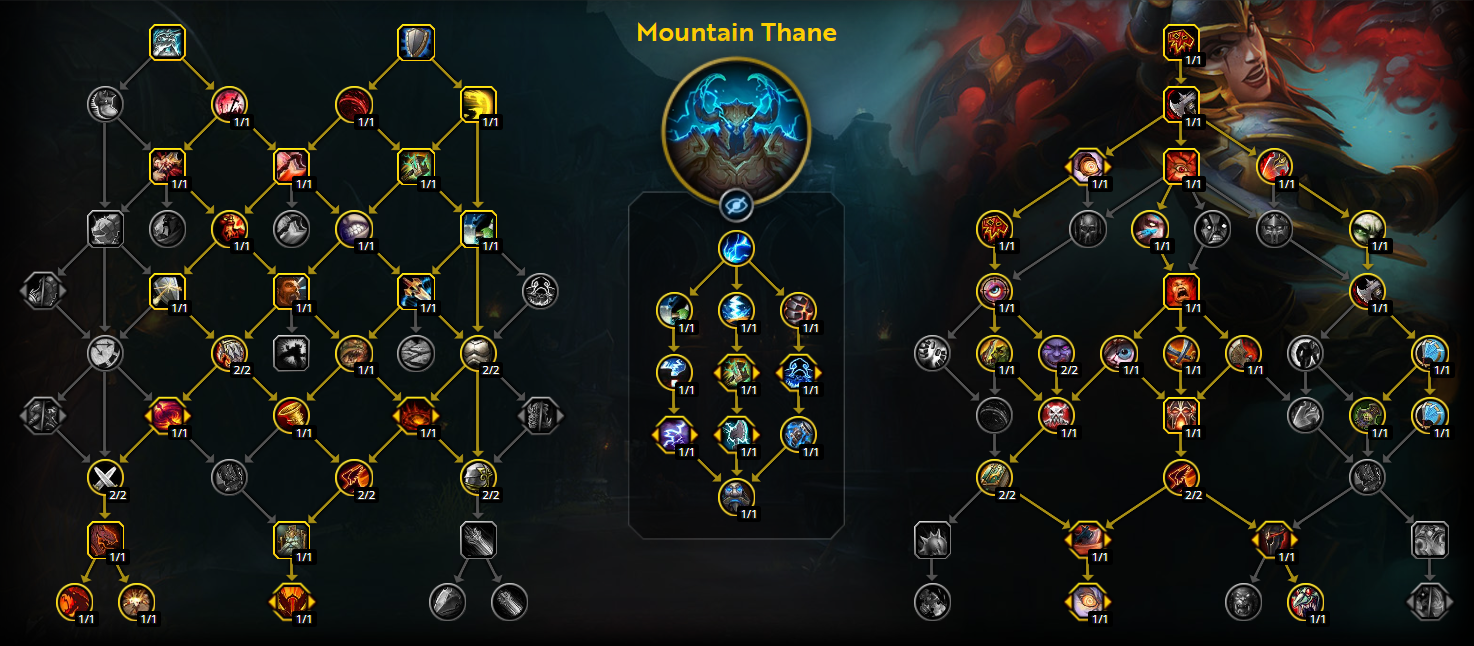
Thane - Mythic+
CgEAAAAAAAAAAAAAAAAAAAAAAAAAAAAAAAA0YGzMbmZYGwMLMzMjZYGmZbbMmZmFMzMzMjZGLDDMzAAAAxYbZgFwEMDTgBbA
CgEAAAAAAAAAAAAAAAAAAAAAAAAAAAAAAAA0YGjZZmZYmFYmFmZmhhZYmltZGzMzCmZmZGmZsMMYGDAAAEGYDWWMaMDIzCwC
CgEAAAAAAAAAAAAAAAAAAAAAAAAAAAAAAAA0YGjZZMDzswMzswMzMmBDzssNzYmZWwMzMzwMjlhBzYAAAgwAbwyiRjZAZWAWA
Each build can be further tweaked for specific situations. For example, in Liberation of Undermine raid, most Fury Warriors will run Slayer for bosses, but still swap a couple talents for add-heavy fights or just consider Mountain Thane build on AoE-centric encounters.
Nowadays race choice has only a minor impact on Fury’s PvE performance (often <1% DPS difference). So, unless you're aiming for the highest results in M+ and Raids just pick the race that you vibe with.
Lets be honest, the rotation for Fury is extremely simple both to remember and execute, but you still need to know the proper order as the spec is rather punishing when you mess it up even slightly.
Slayer (with Anger Management)
Slayer (with Reckless Abandon)
Mountain Thane (with Reckless Abandon)
Mountain Thane (with Anger Management)
Slayer
With Slayer builds try to ignore Enrage. early on, as you are trying to build as many Slaughtering Strikes stacks as possible for the Brutal Finishers via buffed Rampages.
Mountain Thane
AoE Rotation for Fury Warriors is among the simplest in the game:
Slayer
Mountain Thane
Alright, now we've covered the very basics. Let's move to the more nuanced stuff that you should still cautious about if you eager to improve as Fury Warrior!
Minimizing Downtime
While relevant for most classes, minimizing downtime is especially critical for Fury Warriors given their reliance on auto-attacks for rage generation and damage. Any time spent off target is lost damage, with minimal means to recoup lost resources, unlike energy-based classes which will continue regenerating their resource up to its cap. Due to the high mobility innate to the Warrior class, it is possible to play around boss mechanics and minimize downtime. If the boss is casting an area effect which requires players to run a certain distance away, a Warrior can instead continue attacking until the last few seconds, Heroic Leap away, and immediately then Charge back as soon as the danger has passed.
As a Haste-driven specialization, ensuring you are always casting abilities as close to the global cooldown as possible is paramount to maximizing Fury Warrior damage. Even when only an autoattack away from being able to use Rampage, it is better to fill the global cooldown with something, rather than letting that time go to waste.
Overcapping Rage
Because Rage can be generated quite quickly, particularly during Recklessness, it is important to be aware of how much Rage you have, and how much each ability will generate, as well as the impact of autoattacks, which can come quite quickly while under the effects of Enrage. For example, if you currently have 75 Rage and are trying to build up to 85 Rage to cast Rampage, it may be a good idea to cast Raging Blow, pushing you up to 87 Rage.
On the other hand, if you are under the effects of Recklessness, casting that Raging Blow would instead generate 24 Rage, which has a much higher likelihood of an autoattack swing pushing you beyond 100 and wasting Rage. Due to the emphasis on Rampage damage, being cognizant of your Rage cap will help minimize waste, maximize Rampage casts, and increase your DPS over the course of an encounter.
That said, being able to cast Rampage sooner is more important than wasting single-digit amounts of Rage. Being too fearful of overcapping and taking two global cooldowns to build enough Rage to cast Rampage instead of one can be just as, if not more, detrimental.
Maintaining Enrage
Maintain Enrage as much as possible: it's uptime should be very high (ideally 90%+ on a single-target fight). If your Enrage uptime is low, you’re either not Rampaging enough or you had too much downtime. Aim to Rampage at least every ~8 seconds or sooner (with decent haste). Check logs for Enrage uptime – if it’s, say, 75%, you have huge room to improve by adjusting your Rampage frequency or Rage generation. In multi-target, Enrage uptime can dip if you’re Whirlwinding a lot without enough Rage.
Managing GCD Lock
Fury is almost always pressing something, but try not to queue abilities too fast and "clip" the global cooldown. If you find yourself mashing and sometimes a Bloodthirst doesn’t go off, you might be overshooting the GCD. Clean, rhythmic inputs (basically press an ability each time the GCD finishes) tend to work better than spamming 10 clicks per second. High haste can make the GCD ~1s or less, so it’s fast – but practice a tempo that matches it. This ensures every ability actually fires and you’re not losing DPS by inadvertently skipping a cast due to input overlap.
Practice Target Swaps and Cleave
Fury can sometimes lose DPS when swapping targets a lot (ramp-up for Enrage). To improve on add fights, try to carry over Enrage from one target to the next. For example, when an add is about to die, make sure you’re Enraged (use a Rampage or a Bloodthirst crit) so that when you swap to the new add you’re already buffed. Also, try to have Whirlwind cleave buff up before new adds spawn, so your first attacks hit all of them. On two-target fights, manage your Whirlwind buff uptimes religiously. A mistake is to tunnel one target and forget to Whirlwind, losing tons of cleave damage. If trying to improve, record yourself or use a combat log to see if you dropped the Whirlwind buff; aim to keep it 100% during multi-target portions.
Properly equipping your character can massively boost your success in both Mythic+ and Raids, so we've gathered all the info you need about Fury Warrior's best stats to help you pump out the highest numbers possible.
Explanation: Mastery increases all damage done while Enraged – with high Enrage uptime (90%+), Mastery scales almost all your damage. Haste speeds up your global cooldown and auto-attacks and reduces cooldown on key generators, smoothing the rotation. Versatility is a flat damage increase (and damage taken reduction) – good overall, but per point it’s weaker than Mastery for damage. Crit is least valuable since Fury has Recklessness for crit and no special crit-scaling interactions, making it the lowest priority.
Remember to always prioritize higher item level (as it gives you strength and stamina) on gear, but lean towards pieces with Mastery/Haste when possible. These priorities hold equally for both single-target and AoE in 11.1, though Haste gains a bit more value in high AoE situations for Rage generation.
While playing the game, you'll come across an endless variety of items — many of them decent, but only a few are the GOATs that you can rely on until the end of the Season.
| Slot | Best Overall | Best Alternative |
| Mainhand Weapon | Item. | Item. |
| Off hand Weapon | Item. | Item. |
| Head | Item. | Item. |
| Neck | Item. | Item. |
| Shoulders | Item. | Item. |
| Back | Item. | Item. |
| Chest | Item. | Item. |
| Wrist | Item. | Item. |
| Hands | Item. | Item. |
| Waist | Item. | Item. |
| Legs | Item. | Item. |
| Feet | Item. | Item. |
| Ring 1 | Item. | Item. |
| Ring 2 | Item. | Item. |
| Trinket 1 | Item. | Item. |
| Trinket 2 | Item. | Item. |
Having the right gear is just the beginning — upgrading it with the best enchants is what truly makes the difference by making you hit certain caps or just increase your overall POWER. Here's a list of the top enchants that you should be aiming for:
Here's the list of what you should buy as a Fury Warrior to amplify both your damage dealt and your survivability:
Because it's not just enchants and consumables that make your character stronger:
In Dragonflight and The War Within, professions don’t give direct DPS increases like they used to back in thr day. However, choosing the right professions can still benefit a Fury Warrior's journey in the game by providing better gear access, useful tools, or economic gains. For Season 2 Fury Warrior, the most optimal professions are:
All in all, while professions no longer boost your damage directly, they still offer strong benefits that can enhance your overall experience as a Fury Warrior. Whether it’s the utility of Engineering, the efficiency of Alchemy, or the self-sufficiency and gold from Enchanting, picking the right combo can make your gameplay smoother, more convenient, and a bit more rewarding.
Why Macros? Fury’s frenetic playstyle means anything that saves you a split-second or simplifies a task will greately improve your performance. Macros can automate targeting (so you don’t lose your current target), combine abilities (so you hit one key instead of two), or quickly switch between multiple abilities tied to a single bind. They are especially handy for Warriors to manage utility skills without fumbling target swaps. Now, let’s go through some top Fury macros:
With this you can swap stances while using only 1 keybind.
/cast [stance:2] Defensive Stance; stance:[3] Berserker Stance
Automatically leaps at your mouse cursor location. This saves you from the extra click normally needed for ground-target abilities.
/cast [@cursor] Heroic Leap
Charge your target, unless your mouse is over another enemy, then it targets that enemy and uses Charge.
/target [@mouseover, harm, nodead]
/cast Charge
If you have both abilities talented, then Champion's Spear is prioritized, and if you have Champion's Spear talented, it is cast on your cursor.
/cast [known:376079,@cursor] Champion's Spear; Thunderous Roar
If your cursor is over an enemy that has 20% or below health points, pressing this macro will Execute that enemy. If no valid mouseover, it does nothing. This macro is especially great for things like killing an Explosive orb or finishing off an add while staying on the boss.
#showtooltip Execute
/cast [@mouseover,harm,nodead] Execute
This macro casts Charge if you’re out of melee range and Victory Rush if you’re in melee range. It will also cancel Bladestorm to allow quick movement.
#showtooltip
/cast Charge
/cast Victory Rush
/cancelaura Bladestorm
Presses all your burst abilities, trinkets and a racial to inflict an absolutely massive damage upon your foes.
#showtooltip Recklessness
/cast Recklessness
/cast Avatar
/use Blood Fury
/use Berserking
/use Ancestral Call
/use 13
/use 14
Using the macros above will make your Fury play more fluid. For instance, you’ll seamlessly interrupt while staying on target, leap without losing time, and stack cooldowns with one key press. Start by incorporating one or two macros into your gameplay and get comfortable with them. Over time, you’ll likely use a whole suite of macros such as these to streamline your Warrior’s rampage. Remember, the goal is to maximize your uptime and reaction speed – macros are there to help you do just that.
This guide should arm you with the knowledge needed to rage into Season 2 with confidence. Fury has evolved since the old expansions, but its core loop of build Rage, spend Rage, go berserk remains as fun as ever. Now get out there, grab those two big weapons, and get ready to show people who's the real boss!