
The Dreamrift is Midnight Season 1’s “one-boss raid” — a single encounter designed to feel like a full raid night compressed into one room. No long route, no wing hopping, no “trash pacing”. You zone in, you pull, and the fight immediately starts taxing the raid on swaps, add control, and discipline. It’s the first time in a looong time the expansion drops a raid with just one boss, and the tuning leans closer to a mid-tier check from The Voidspire than just a cosmetic side stop.
The identity of The Dreamrift is repetition under pressure. The loop is simple, but it punishes anything messy: late target swaps, missed stops, bad dispel positioning, or even one add slipping through at the wrong moment. It’s the kind of fight where the mechanics aren’t the problem — your DPS & timing are.
Everything about the Raid is explained here: how the raid rewards scale by difficulty, which crest tier drops where, how tier tokens split by armor type, and what the boss can drop in terms of gear, profession recipes, and housing decor. The goal is simple — fast lookup when you’re planning your week, and enough context to know what’s actually worth targeting instead of just rolling the dice.
Chimaerus is the single encounter of The Dreamrift raid. The fight is built around clean execution: understanding what the mechanics do, reacting on time, and keeping the raid’s calls consistent when the room gets busy.
The encounter is chaotic in a very specific way: single-target boss damage stays relevant, but adds demand constant attention and fast target changes. Once people stop standing still and start moving with intent, the chaos becomes manageable rather than random.
Week of March 17: Raid Finder, Normal, and Heroic become available.
Week of March 24: Mythic unlocks.
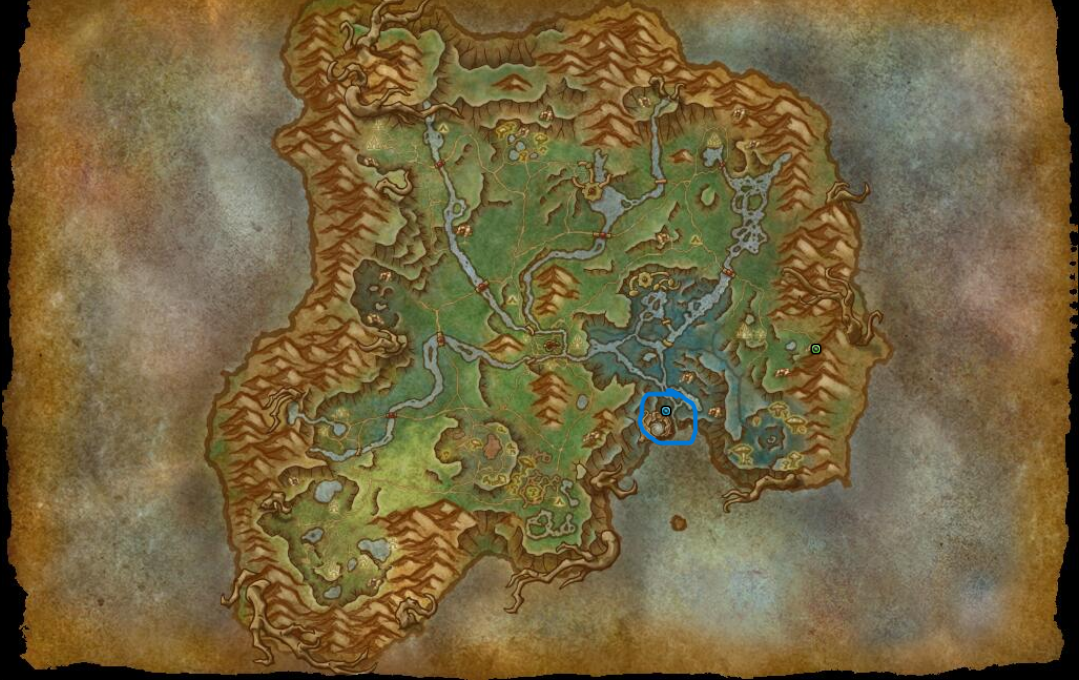
The Dreamrift raid is located in Harandar, positioned close to where the Rootway to Harandar places you when you arrive in the zone. If you’re already doing campaign progression in this area, the entrance is essentially on your natural path rather than tucked away behind a long detour.
The fastest access is a portal from Silvermoon City. It brings you into Harandar at /way #2393 36.8 68.4, which puts you near the raid’s location and saves you from crossing the zone manually.
If the Harandar portal isn’t available yet, it’s a progression lock. Continue the Midnight campaign until you complete The Root Cause, then check Silvermoon City again.
The table below lists the item level of The Dreamrift loot by difficulty. Defeating the boss also awards Dawncrests, with the crest type scaling up with the difficulty.
| Difficulty | Item Level of Drops | Crest Dropped |
|---|---|---|
| LFR | 237 | Veteran Dawncrest |
| Normal | 250 | Champion Dawncrest |
| Heroic | 263 | Hero Dawncrest |
| Mythic | 276 | Myth Dawncrest |
Chimaerus, the Undreamt God also drops chest tier armor via raid tier tokens. These tokens are shared by armor class for The Dreamrift raid, so the same token can be used by multiple classes.
| Item | Classes |
|---|---|
| Alnwoven Riftbloom |
Warlock Priest Mage |
| Alncured Riftbloom |
Demon Hunter Rogue Monk Druid |
| Alncast Riftbloom |
Evoker Hunter Shaman |
| Alnforged Riftbloom |
Death Knight Paladin Warrior |
The table below lists the full set of gear drops from The Dreamrift raid, including armor, weapons, trinkets, and tier chest tokens.
| Item | Armor Slot |
|---|---|
| Dream-Scorched Striders | Cloth Armor: Feet |
| Scorn-Scarred Shul'ka's Belt | Leather Armor: Waist |
| Scornbane Waistguard | Mail Armor: Waist |
| Greaves of the Unformed | Plate Armor: Feet |
| Alnscorned Spire | Two-Hand: Staff |
| Tome of Alnscorned Regret | Off-Hand: Weapon |
| Gaze of the Alnseer | Trinket |
| Undreamt God's Oozing Vestige | Trinket |
| Alnwoven Riftbloom | Cloth Armor Tier: Chest |
| Alncured Riftbloom | Leather Armor Tier: Chest |
| Alncast Riftbloom | Mail Armor Tier: Chest |
| Alnforged Riftbloom | Plate Armor Tier: Chest |
There are two profession recipes that can drop in The Dreamrift. The table below lists each recipe and the profession it belongs to.
| Recipe | Profession |
|---|---|
| Formula: Enchant Weapon - Worldsoul Cradle | Enchanting |
| Pattern: World Tender's Barkclasp | Leatherworking |
Chimaerus, the Undreamt God drops several Player Housing decor pieces: one available on all difficulties, and three trophy variants tied to Normal, Heroic, and Mythic difficulty.
| Decor Item | Boss Drop | Difficulty |
|---|---|---|
| Eerie Iridescent Riftshroom | Chimaerus | All difficulties |
| Dreamrift Vanquisher's Argent Trophy | Chimaerus | Normal |
| Dreamrift Vanquisher's Aureate Trophy | Chimaerus | Heroic |
| Dreamrift Vanquisher's Gleaming Trophy | Chimaerus | Mythic |

This (Heroic version) fight looks straightforward on paper, but it’s a trap for any raid that plays loose. The mechanic count is low, so there’s nowhere for errors to hide: one bad overlap, one missed button, one late reaction, and the encounter immediately snowballs into lost control and a wipe.
Before the pull, split the raid into two equal groups, each with 1 Tank, 2 Healers, and 7 DPS. Keep the groups consistent for the entire attempt so responsibilities stay clear and the pacing stays stable from cycle to cycle.
Right after the pull, the fight wastes no time: you’ll see the first Aldust Upheaval very early. Treat it as a positioning check more than anything else. Drop the soak circle off to the side of the room so the assigned players can step in, soak, and step back out without the effect drifting through the raid stack.
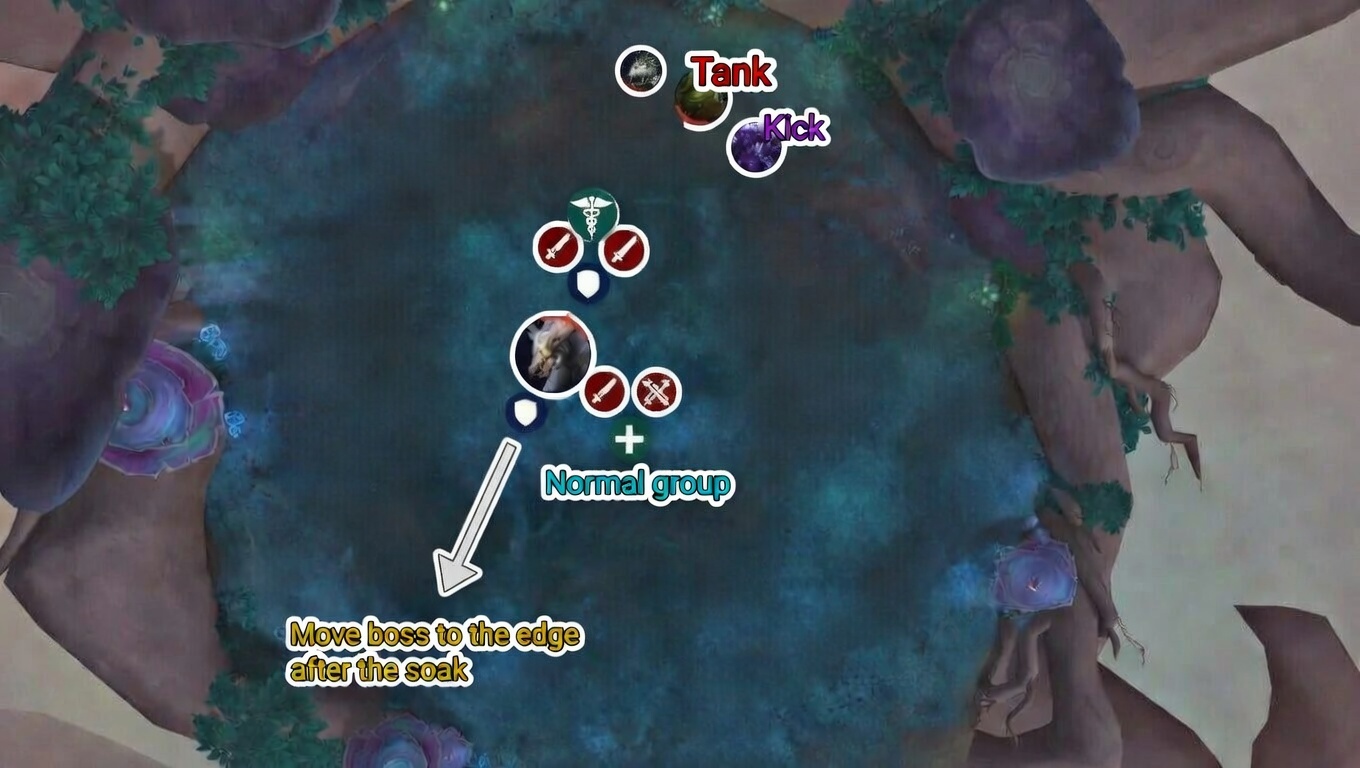
From here, Phase 1 is basically two parallel jobs happening at the same time. One group goes down to manage adds and control the pacing, while the rest stays up to keep boss damage stable and prevent the room from turning into a mess. If both groups do their part on schedule, the phase stays predictable.
When your group goes down, move with the tank toward the large add and commit to it first. The biggest mistake here is “tagging everything” too early. Leave the smaller adds alone initially and let them naturally clump near the big add so your cleave actually has value and you aren’t chasing targets around the space.
The small adds only start drifting toward the boss once their absorb shields are broken. That’s why opening on the large add first matters: it keeps the pack centralized while shields are being removed, and it reduces the chance that one small add peels off at a bad time and turns into a scramble.
Interrupt coverage is also non-negotiable. Assign multiple players to handle Haunting Essence so missed kicks don’t snowball into damage spikes or lost tempo. Rotate interrupts like you mean it, not like you’re hoping one person carries it.
The normal group stays on the boss at the start and keeps the pull clean: steady damage, clean movement, and no unnecessary drifting. You’re basically holding the “main lane” of the fight while the other team handles the side objective.
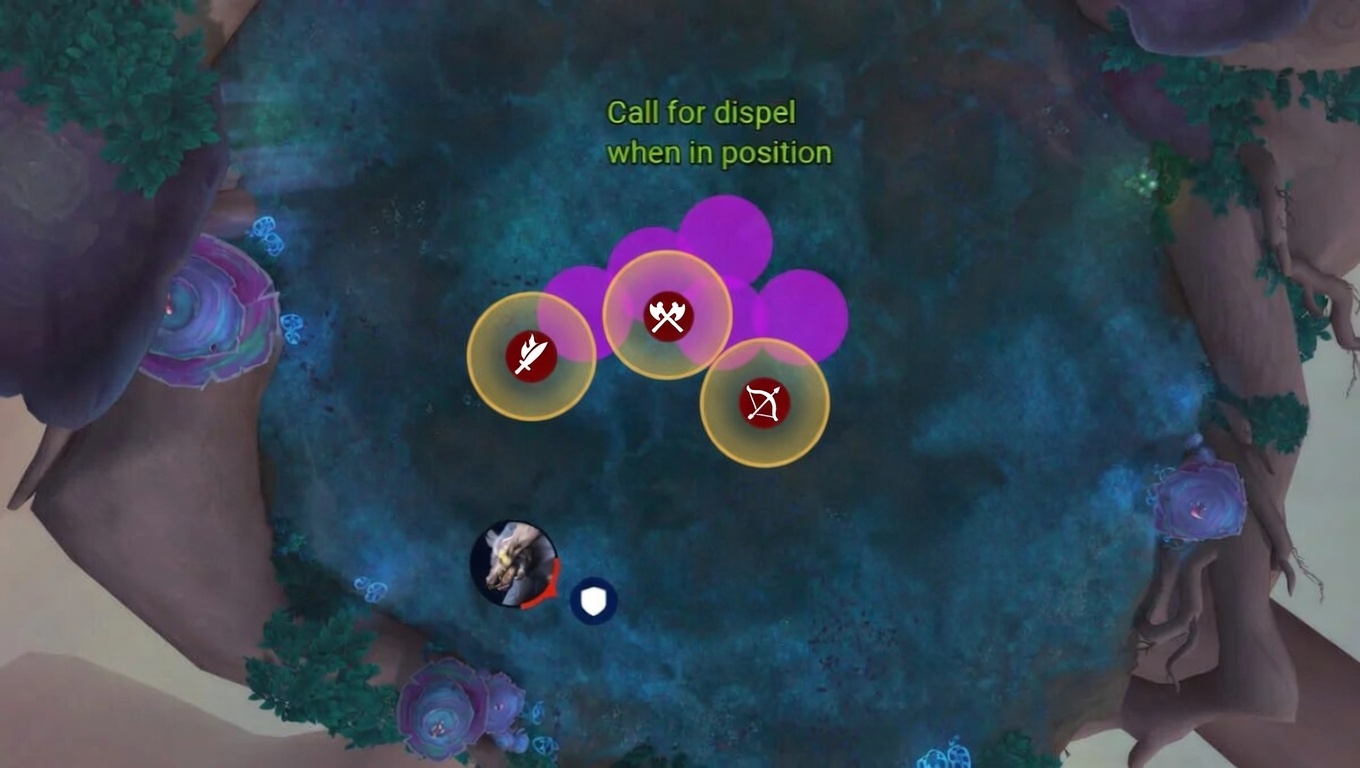
When several players get Consuming Miasma, move to a puddle together and call for a dispel. Don’t overthink the positioning: your circle only needs to barely touch the puddle to clear, so you can edge it and move on. Standing in the middle is just wasted space and extra risk if anything overlaps.
Some players will be targeted by the frontal. Treat it like standard discipline: spot it early, sidestep, and keep the boss stable so you don’t force awkward movement for everyone else.
As the phase progresses, the adds become targetable in the normal realm. That’s your cue to swap immediately and delete them. You’re not “padding” here; even a single add reaching the boss can be lethal, so kills need to be fast and deliberate.
The overall goal is to clear all adds before the next group needs to go down again. If you’re late, the cycle slips and everything gets harder for no reason. When the next Aldust Upheaval happens, you repeat the same sequence: place it clean, soak it clean, keep responsibilities separated.
Eventually the boss reaches 100 energy and casts Consume. Any remaining adds get eaten even if they aren’t physically at the boss yet, and the raid gets knocked back as the intermission begins. If you’ve managed the add timing properly, this transition is controlled instead of chaotic.
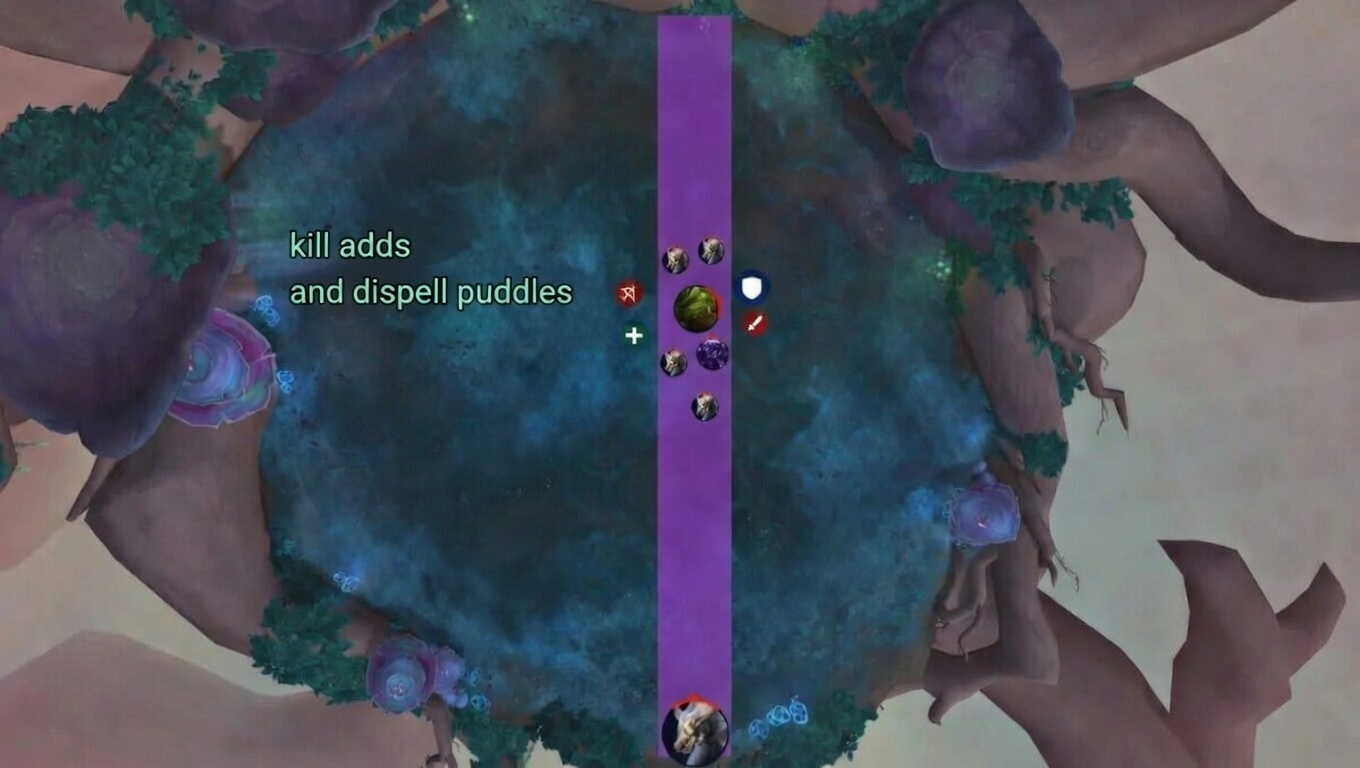
This is a simple, repeatable reset window. The boss marks a long lane across the platform and then flies through it, spawning Manifestations as it travels and leaving puddles behind.
Your job here is blunt and mechanical: kill the Manifestations quickly, and keep the floor under control by clearing puddles with the same dispel interaction used in Phase 1. If puddles stack up, movement tightens, dispel timing gets messy, and the next cycle starts in a bad spot.
Eventually, the boss casts Ravenous Dive and slams into the ground. Make sure all adds are dead before this happens; otherwise they get consumed and you lose control of the cycle.
After that, the fight restarts and you run the same Phase 1 + Intermission loop again until the boss goes down.
This is the condensed checklist for the encounter: the core mechanics and failure points that actually matter. Use it as a quick pre-pull reminder of what to watch, what to call, and what cannot be allowed to slip.
ALWAYS Use Hero/Lust on pull, and split the raid into two even groups before you start: Group A (1 tank, 2 healers, 7 DPS) and Group B (1 tank, 2 healers, 7 DPS). Keep those groups consistent so responsibilities stay clear across repeats.
The first Aldust Upheaval happens early. Place the circle off to the side, and have the assigned players soak together to gain Alnsight.
During the boss phase, the Alnsight group goes down, follows their tank, and starts on the big add. Let the small adds gather near it so you can AoE them together, and keep Haunting Essence casts under control with kicks and dispels so the raid doesn’t unravel.
The normal group starts on the boss and swaps to adds the moment they become properly killable. The single biggest rule is simple: do not let adds reach the boss. One leak can flip the attempt instantly.
If you get Consuming Miasma, move to a puddle, call for a dispel, and clip the puddle with your circle to clear it. Do not get dispelled inside the raid stack, because the removal splashes damage to nearby players.
If Rending Tear is aimed at you, step out and keep it off the group. At 100 energy the boss casts Consume, knocks everyone back, and the intermission starts.
In intermission, dodge the fly-through line (Corrupted Devastation), avoid the puddles it leaves, and kill Manifestations while continuing to clear puddles with the Miasma dispels. Make sure adds are dead before Ravenous Dive, then you restart Phase 1 and repeat the same loop until the boss dies.
This section is the full Heroic mechanic sheet for Chimaerus. Knowing exactly what each ability does — and what it does not do — makes the fight predictable: you can anticipate timing windows, recognize real danger overlaps, and stop wasting movement or cooldowns on the wrong things.
Use it like a reference page. If a pull goes sideways, come back here, match the wipe moment to the mechanic, and tighten the one step that actually caused the collapse. When calls get noisy mid-fight, this is the clean reset: the names, the effects, and the real priorities in one place.
The boss targets the current tank and creates a soak circle. It deals heavy Nature damage that is split between all players standing inside the circle, so soaking with the assigned group is required to keep the hit survivable.
Players who soak get knocked up and gain Alnsight, which allows them to attack Manifestations for 40 seconds. When Alnsight expires, those players gain Rift Vulnerability, causing them to take heavy damage from Aldust Upheaval for 1.5 minutes.
The practical outcome is forced rotation: the same players cannot safely soak every cast, so soak groups must alternate to avoid stacking Rift Vulnerability with the next Aldust Upheaval.
Spawns Manifestations and applies a raid-wide absorb effect called Rift Sickness. Treat this as a throughput check that can line up with other damage sources, so healers should be ready to stabilize quickly instead of letting the absorb linger.
This also applies Alnshroud to the adds as an absorb shield. Breaking Alnshroud is what makes Manifestations targetable for players without Aldust effects as well, so shield break timing directly affects how fast the raid can start cleaning up adds.
Each add death leaves a puddle behind. Standing in it applies a 50% slow and deals damage over time. These puddles mainly matter as space denial: they restrict movement and punish anyone who has to dodge other mechanics through bad ground.
A tank add that must be actively tanked. It ramps up and hits harder over time with each strike, so tanks should be prepared for increasing damage the longer it stays alive.
Casts Fearsome Cry, which fears several players. This can be dispelled and interrupted, so it should be treated as a priority stop when it lines up with other pressure.
It also casts Essence Bolt, flat damage on a player. This can be interrupted as well, and letting multiple casts through adds avoidable healing load.
No notable abilities. Its threat is purely positional: it tries to reach the boss, and if it gets there it creates the kind of failure cascade that ends pulls quickly. Kill or control it before it slips through.
The boss consumes any Manifestation that reaches him. Each time this happens, it triggers three effects at once: raid-wide damage, a large self-heal based on the Manifestation’s missing health, and a 100% increase to the boss’s damage done.
This stacks. If multiple Manifestations reach the boss in a short window, the combination of raid damage, boss healing, and damage amplification usually ends the pull immediately.
Several players receive a large circle that deals damage every 1.5 seconds for 1 minute unless dispelled. This is sustained pressure that becomes dangerous if the targets are forced to move through puddles or take additional avoidable hits.
When dispelled, it clears puddles left behind from adds if the player is standing in them. The removal also deals damage to nearby players, so do not stack tightly when a dispel is about to happen.
A raid-wide damage-over-time effect that lasts 12 seconds. This is mostly a healing check that becomes dangerous when it overlaps with other mechanics or when players are already low from avoidable hits. Plan spot healing and defensives around overlap windows instead of trying to “catch up” afterward.
A frontal cone aimed at a random player. It deals heavy damage and applies a bleed to anyone hit. Treat it as a pure avoid mechanic: the goal is zero hits, because taking the cone plus the bleed creates unnecessary pressure on healers and can force cooldowns early.
At 100 energy, the boss consumes any remaining Manifestations, even if they are not at the boss yet. This also knocks everyone away and starts the intermission. If Manifestations are still up at this point, the transition becomes more chaotic and harder to stabilize.
A breath-style line mechanic where the boss flies through the area in a straight path. Anyone hit takes very high damage and gets stunned. The flight also spawns Manifestations and leaves a puddle behind, so each cast adds both immediate danger (the line) and lingering space pressure (puddles + adds).
During this phase, the boss takes 99% reduced damage. Boss DPS is effectively irrelevant here; treat the intermission as a control phase where the priority is clearing Manifestations and managing puddles so the next Phase 1 restart is clean.
The boss crashes into the ground, knocks everyone up, and consumes any remaining Manifestations. After the slam resolves, Phase 1 begins again. The cleaner the board is before this happens, the smoother the loop restarts.