
The Dastardly Duos is a six-week boss-rush extravaganza introduced arriving in Patch 11.1.5 of The War Within. This limited-time event lets players face off against pairs of familiar bosses in a chaotic arena showdown, complete with power-ups, score multipliers, and also an energetic announcer hyping the action!
It’s a fresh spin on WoW’s content: part nostalgic reunion with past villains, part arcade challenge – all wrapped up in a game-show flair. Whether you’re a solo adventurer or coming in with a full party, this guide will walk you through what to expect and how to make the most of Dastardly Duos.
Dastardly Duos is essentially a timed boss rush set in the Dastardly Dome, where you’ll fight two bosses at once drawn from classic WoW dungeons. These aren’t ordinary encounters – they’re "animatronic" recreations of famous bosses rigged up for a challenge spectacle. And the goal isn’t just to win, but to win with style: you’re chasing high scores for bragging rights by chaining kills fast, avoiding deaths, and even dialing up the difficulty for extra points. A bit like Mythic+, ye?
Unlike a standard dungeon, Dastardly Duos is all about speed and combinations. Every fight pits you against pairs of bosses simultaneously, mixing abilities you’d normally never see together. Imagine dodging two different bosses mechanics at once – it’s chaotic, unpredictable, and extremely fun once you get the hang of it. Better yet, you can activate power-ups and gimmicks mid-fight to turn the tide or boost your score.
Another thing that sets this event apart is its progressive nature. It runs only for six weeks (from June 3 to July 15, 2025) and introduces new boss pairs each week, up to a total of ten unique bosses by the finale. That means the roster of encounters expands over time – each week you’ll face some new combinations, keeping things fresh. If you’re a competitive player, there are achievements that unlock extra perks inside the event as you accomplish certain feats. Overall, Dastardly Duos stands out as a high-energy, replayable challenge that rewards skill, speed, and a willingness to push your limits for rewards and glory.
Level and item level requirements: While there’s no explicit level gate mentioned in-game, the event is tuned for max-level characters due to the scaling of bosses and the gear rewards. Gear-wise, you don’t need raid-level gear to participate, but having decent endgame gear will help you survive the dual boss mechanics. If you’re freshly leveled or undergeared, consider taking on the event with friends or letting the event’s adjustable difficulty work in your favor (you can choose not to take on the optional handicaps, for instance).
Where is the event hub? The main gathering point is at the Gates of Dornogal in the new expansion zone. If traveling there is inconvenient, don’t worry – Vinnie Sweets and his crew also set up camp in Stormwind and Orgrimmar. In fact, you can find the Dastardly Duos NPCs on a platform just outside the gates of Orgrimmar and above the entrance of Stormwind, complete with banners and lights, so both factions have easy access. Simply head to one of these locations; you’ll spot the festive stage with Vinnie (the "fight promoter") and his associates:
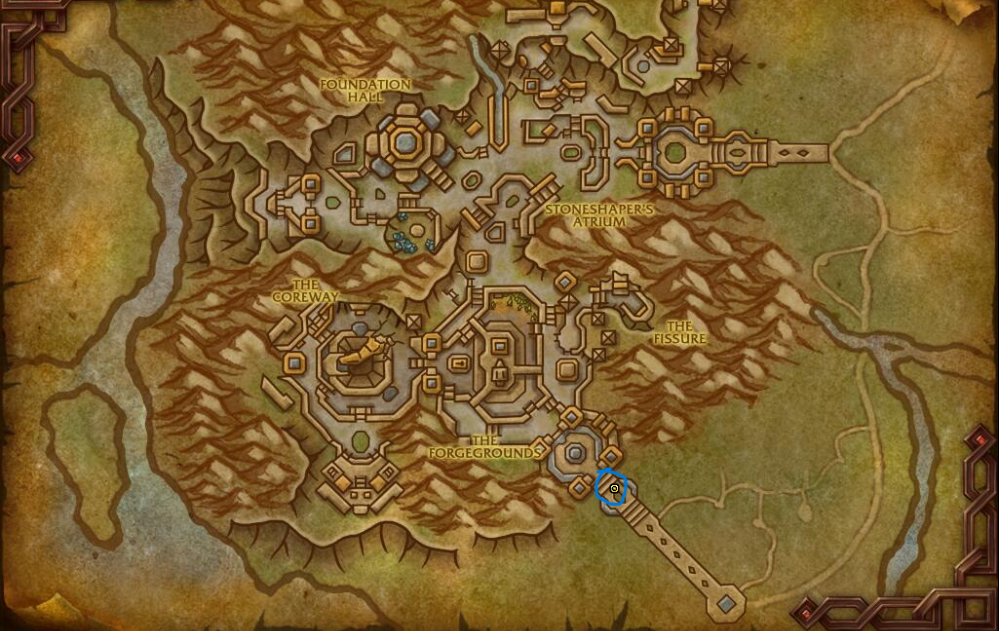
Dornogal Location
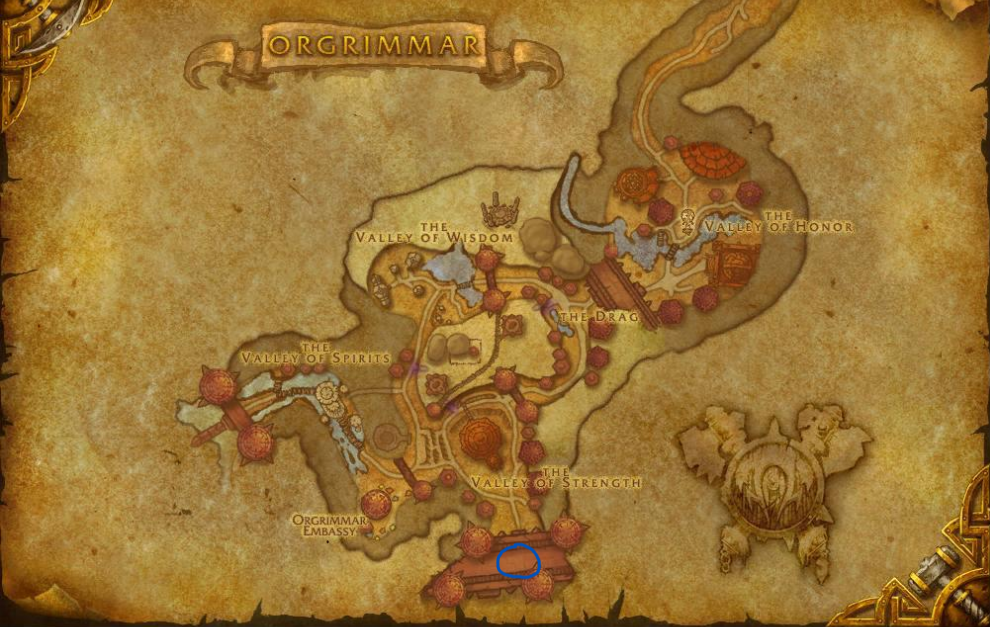
Orgrimmar Location
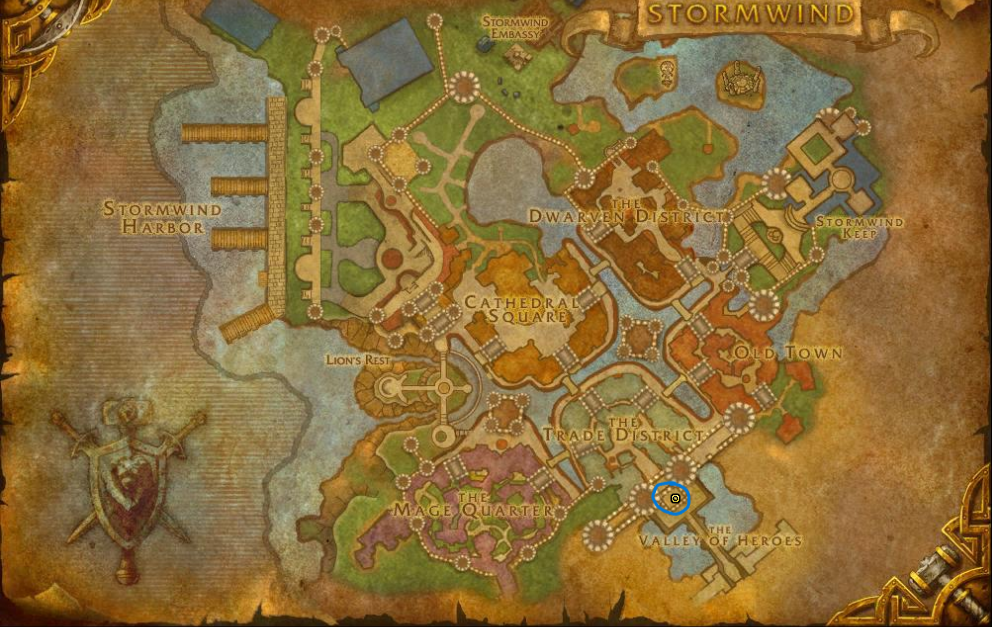
Stormwind Location
Exact coordinates for each of the Dastardly Duos Camps:
At the event hub, talk to Vinnie Sweets first. He’s the showrunner and will offer you a weekly quest before you start. This weekly quest is important – it rewards a piece of Champion-track loot gear upon completion, and sometimes has extra objectives and rewards. Grab this quest every week so you don’t miss out on free loot. Once you’ve done that, the actual entry to the event is handled by Xyggie Marou, the goblin queue master. Speak with Xyggie to queue up and she’ll transport you into the Demolition Dome instance when your party is ready. There’s no lengthy matchmaking if you’re solo because it’s an instance, not a dungeon finder, so you either go in alone or with a premade group of up to five.
Once you tell Xyggie you’re ready and get ported into the Dastardly Dome, you’ll find yourself in a special instanced arena built for this event. The Dome is essentially a circular battleground littered with props, and around the edges you’ll see some useful stations. Take your time in the preparation area – the fight won’t start until you physically step into the arena floor, and there’s no time limit while you prepare. Use this phase to get all set before you "enter the dome" and trigger the countdown.
Here’s what you should do before the match starts:
Here’s a complete list of all the food and drink buffs currently available to players in this event. Each offers unique effects that can help you turn the tide in battle or give you a tactical edge, so be sure to choose wisely:
Food Buffs:
Drink Buffs:
The Dastardly Duos encounter follows a fixed structure with three phases each run. You have a base timer of 5 minutes to work with, but you can extend it with certain items if needed. The structure is as follows:
Phase 1 – Trash Cleanup. As the match starts, you’ll first face a swarm of trash mobs scattered around the Dome. Your objective is simple: kill all the trash as fast as possible. These could be any mix of weaker enemies so think of them as warm-up foes. They don’t hit particularly hard individually, but there can be quite a few of them. AoE them down quickly to clear the arena. The faster you wipe out the trash packs, the more time you’ll have for the boss phases (since any time left carries over). Pro tip: If you obtained the Dastardly Banner toy reward from Week 1, you can use it at the start of Phase 1 to instantly pull all trash mobs at once to you. This can save time by letting you mass-AoE, but only do this if you’re confident you won’t get overwhelmed by the big pull.
Phase 2 – First Boss Duo. As soon as the last trash mob falls, the first pair of bosses spawns in the arena. These are two of the ten possible bosses featured in the event. They do not share health, and there’s no special gimmick tying them together (you won’t need to kill them simultaneously or anything) – they’re essentially two separate boss fights happening at once. You can focus them one at a time or split damage as you see fit, though usually burning down one boss quickly is safer. Each boss will use a selection of its signature mechanics from the original dungeon encounter, so be ready for a mix of abilities. For example, if Watchkeeper Gargolmar is in, expect his frontal Mortal Strike and healer adds, and if Hydromancer Thespia appears, watch out for her Lightning Cloud AoE on the ground. All the while, Vinnie Sweets will be commentating over a loudspeaker, which only adds to the fun atmosphere. And once you defeat both bosses, you’ll move to the next phase.
Phase 3 – Second Boss Duo. The final wave brings another two bosses into the fray, often even more chaotic than the first duo. It could be a fresh combination or, later in the event, possibly bosses you saw in prior weeks. Again, your task is to take down both. If you defeat this second duo before the timer expires, you’ve essentially "won" the run – the event ends in success, and you’ll get to see your final score and loot chest. (If time runs out mid-fight, the event just stops and you get whatever chest you earned up to that point; it’s not a wipe or failure in the traditional sense, but you won’t get full credit if bosses remain alive).
All the while, a 5-minute countdown timer is ticking at the top of your screen. You’ll also see a running score counter. Every action you do contributes to your score: killing trash, damaging bosses, even breaking props all give points. Three main factors determine your score at the end: how much damage you dealt (mobs + props), how much time was left (if any), and how few deaths your party had. The game will tally a Base Score from those, then add Bonus Score from any multipliers you triggered (like using the spotlights or taking challenge food). Don’t worry too much about the math: just know that faster clears with zero deaths and good use of bonuses will land you a higher total!

In Dastardly Duos, brute force alone won’t get you very far. This mode is all about understanding the unique mechanics, adapting to unpredictable boss patterns, and staying sharp under pressure. Each encounter brings its own blend of chaos, from dangerous debuffs to sudden area effects, and only those who can read the room (and their foes) will survive the onslaught.
Time extensions: Five minutes can feel tight, especially on later weeks with tougher bosses. Luckily, you can earn Burner Clocks (30-second extensions) and Big Burner Clock (60-second extensions) to add time during a run. These come from the reward chest or weekly quests as consumables. Also, keep an eye out for cogwheel drops on the ground during fights – clicking these gears can randomly either extend the timer or spawn an extra boss, acting similar to consumables. Use time-extensions when you know you’ll need a bit more margin to finish off a boss rather than letting the clock hit zero.
Cheery Bombs and Spotlights: This event has a unique scoring gadget (Cheery Bombs). As you destroy props and kill enemies, you can trigger Cheery Bomb "cheers" to appear – essentially little bombs with green circles around them. If you kick a Cheery Bomb, you’ll boot it across the floor, and any enemies killed within that green circle charge up a "cheer" meter. Once a bomb accumulates enough cheers (typically 6000 cheer points) it will turn into a Spotlight, creating a glowing area on the floor. Any enemies (bosses or adds) you then kill while standing in that spotlight yield 2× score. The arena always spawns one fixed Spotlight in Phase 2 and 3 as well (you’ll see it usually in one quadrant of the arena), and you can potentially get up to two more via the bombs. Maximizing your score means luring bosses into these spotlight zones before landing the killing blow. However, doing this is optional: if you’re struggling to survive, don’t risk positioning bosses awkwardly just for points. Focus on the kill; you can ignore the bomb gimmick entirely and still complete the event. That said, once you’re comfortable, learn to kick those Cheery Bombs near where you’re tanking the bosses so you can double-dip on score. Just note that NPC tanks won’t position bosses for spotlights, so if you’re running solo with AI helpers, you’ll personally need to drag the bosses into the green circles.
Extra bosses (for the daring): Normally you face 4 bosses per run (two waves of two). But if you want an even bigger challenge (and score), the event provides Bullhorns of Calling – consumables that let you spawn an extra boss mid-fight. Using a bullhorn during Phase 2 or 3 will immediately call forth one of the remaining bosses from the roster, adding it to the current wave. You could theoretically end up fighting three bosses at once! Each extra boss killed will boost your score significantly. There’s no hard limit on how many times you can use a bullhorn, aside from the number of bosses available – once you’ve summoned and defeated all unique bosses in the pool, further bullhorn uses will just spawn more trash mobs instead. Only attempt this if you’re very confident; adding bosses can quickly overwhelm even a good group. But this is the way to go for record high scores once all 10 bosses are unlocked in Week 6. It’s also a way to see all the different boss combos in one run if you’re curious. Remember, you’ll need to have the time extensions to support fighting extra bosses, otherwise the clock will expire before you can down them all.
Recovery and deaths: If you die in Dastardly Duos, it’s not the end. There’s no limited lives – you can release and you’ll respawn in the prep area, able to run back into the fight immediately. This is forgiving in the sense that a mistake doesn’t force a restart, but dying will cost you time and also reduce your score (one of the score components is avoiding player deaths). So try to minimize deaths, especially if going for a high score. Upon death you might notice a quirky mechanic: a goblin with a blue circle may appear, zapping players who come near (it's meant to mock you for dying). It can be ignored or killed if it bothers you. More importantly, when a teammate dies, the rest of the group should try to kite the bosses away briefly if possible so the deceased can run back without immediately getting smacked again. Use defensives and healthstones freely – staying alive is priority number one.
With 10 different bosses in the pool, you’ll see a variety of pairs by the end of the event. Each boss carries its own mechanics from their origin dungeon, and some combinations can be trickier than others. Here are a few especially interesting (challenging) duos and tips for handling them:
Chrono-Lord Epoch + Foe Reaper 5000: This combo is a time-twisted nightmare. Epoch (from Culling of Stratholme) will periodically freeze the group in a Time Stop, rendering you unable to move or act for a moment. Meanwhile, Foe Reaper 5000 (from Deadmines) might target someone with its Harvest ability – a spinning whirl of death that chases a player. If Epoch freezes you at the wrong moment, the Reaper’s spinning blades can shred an immobilized group. What to do: Try to burn down Chrono-Lord Epoch first to reduce how often you get stunned. Spread out a bit so that if Foe Reaper fixates someone, not everyone is in its path. If you get caught in a Time Stop during Foe Reaper’s spin, pop a defensive cooldown (like a Divine Shield) or use a health potion preemptively so you survive the hit. Once Epoch is down, Foe Reaper alone is much easier – just avoid the front of the robot and kite it when it starts whirring.
Mekgineer Steamrigger + Watchkeeper Gargolmar: This is an add-heavy duo that can overwhelm unprepared groups. Steamrigger (from The Steamvault) will frequently summon repair bots that heal him; Gargolmar (from Hellfire Ramparts) comes with two healer minions at the start of his fight, and he’ll also charge and knock down his tank target. Together, that’s a lot of extra bodies on the field. What to do: Kill the adds quickly. At the start of the phase, have DPS switch to Gargolmar’s two healer adds and take them out fast, to stop them from healing or buffing the Watchkeeper. When Steamrigger’s mechanized helpers spawn, AOE them down or use crowd control before they restore too much of his health. It helps to focus-fire one boss at a time here: many groups kill Gargolmar first since he’s weaker and his death removes his periodic knockdown ability, then turn all attention to Steamrigger. A tank should be mindful to avoid Gargolmar’s frontal cleave and try to pick up all the little bots so they don’t swarm a healer. This pairing stresses multitasking: manage those adds, interrupt any heals, and it’ll fall into place.
Lord Walden + Hydromancer Thespia: Here you’re dealing with heavy AoE dangers. Lord Walden (from Shadowfang Keep) is notorious for his Toxic Coagulant and Frozen Bomb – one forces you to keep moving to avoid lethal damage, and the other forces you to stop moving. Meanwhile, Hydromancer Thespia (Steamvault again) loves to cast Lightning Cloud, a nasty static tornado that deals high damage if you stand in it. She also summons water elementals occasionally. What to do: This duo tests your awareness and positioning. Pay close attention to Walden’s debuff announcements (they were color-coded in SFK – red means move constantly, green means freeze in place). You must adapt on the fly: if Walden throws a "Freeze" debuff on everyone (don’t move!) but Thespia drops a Lightning Cloud under your feet, you have a split-second decision – better to move out of the cloud (taking the DoT from Walden’s debuff) than to sit in a huge AoE and die. Healers should dispel Walden’s poisons if possible to make it easier. Focus down Walden first if your group tends to mess up the debuff mechanic, as his removal simplifies things. If you focus Thespia first, be absolutely sure to dodge her clouds and interrupt her Lung Burst or Water Bolt if those become troublesome. This pairing is all about communication: call out "stop moving!" or "move now!" to keep everyone in sync when Walden’s mixtures hit, and don’t get so distracted that you eat a Lightning Cloud to the face.
Rattlegore + Baron Silverlaine: This is an odd combo of sustained damage and add spawns. Rattlegore (from Scholomance) has an aura that inflicts damage over time while Baron Silverlaine (from Shadowfang Keep) will periodically summon spectral allies (ghostly versions of other SFK bosses) that harass the party. The combination means you’re under pressure from constant damage and periodically distracted by adds. What to do: If bone piles or Bone Armor buff is present in the arena, grab the Bone Armor to mitigate Rattlegore’s aura. If not, be ready with healing cooldowns or personals to withstand the ticking damage. Prioritize Baron Silverlaine’s adds when they spawn – take them out quickly so they don’t overwhelm your healer. Generally, you’ll want to kill Silverlaine first in this pair, because the sooner his hauntings stop, the easier it is to finish off Rattlegore while managing the aura. Rattlegore himself is mostly a tank-and-spank once you aren’t bogged down by other threats. Tanks should keep Rattlegore and any summoned adds away from squishier allies, and everyone should avoid standing in any nasty ground effects (if Rattlegore does his Bone Spike area attacks, sidestep those). This duo isn’t as bursty as some others, but it will test your group’s healing endurance!
Keep in mind, those are just a few examples. Any duo can become dangerous if you ignore their mechanics. The key is to remember the basics of each boss from old dungeons – if one had a one-shot ability or an important interrupt, do the same here. The event’s difficulty ramps up slightly as new bosses unlock in later weeks, but by then you’ll likely have learned tricks to handle them. Adaptability is crucial: recognize which two bosses you’ve got and adjust your gameplan accordingly (who to kill first, whether to spread out or stack, etc.). The variety of combinations is what makes Dastardly Duos exciting, so embrace the madness and you’ll come out on top.
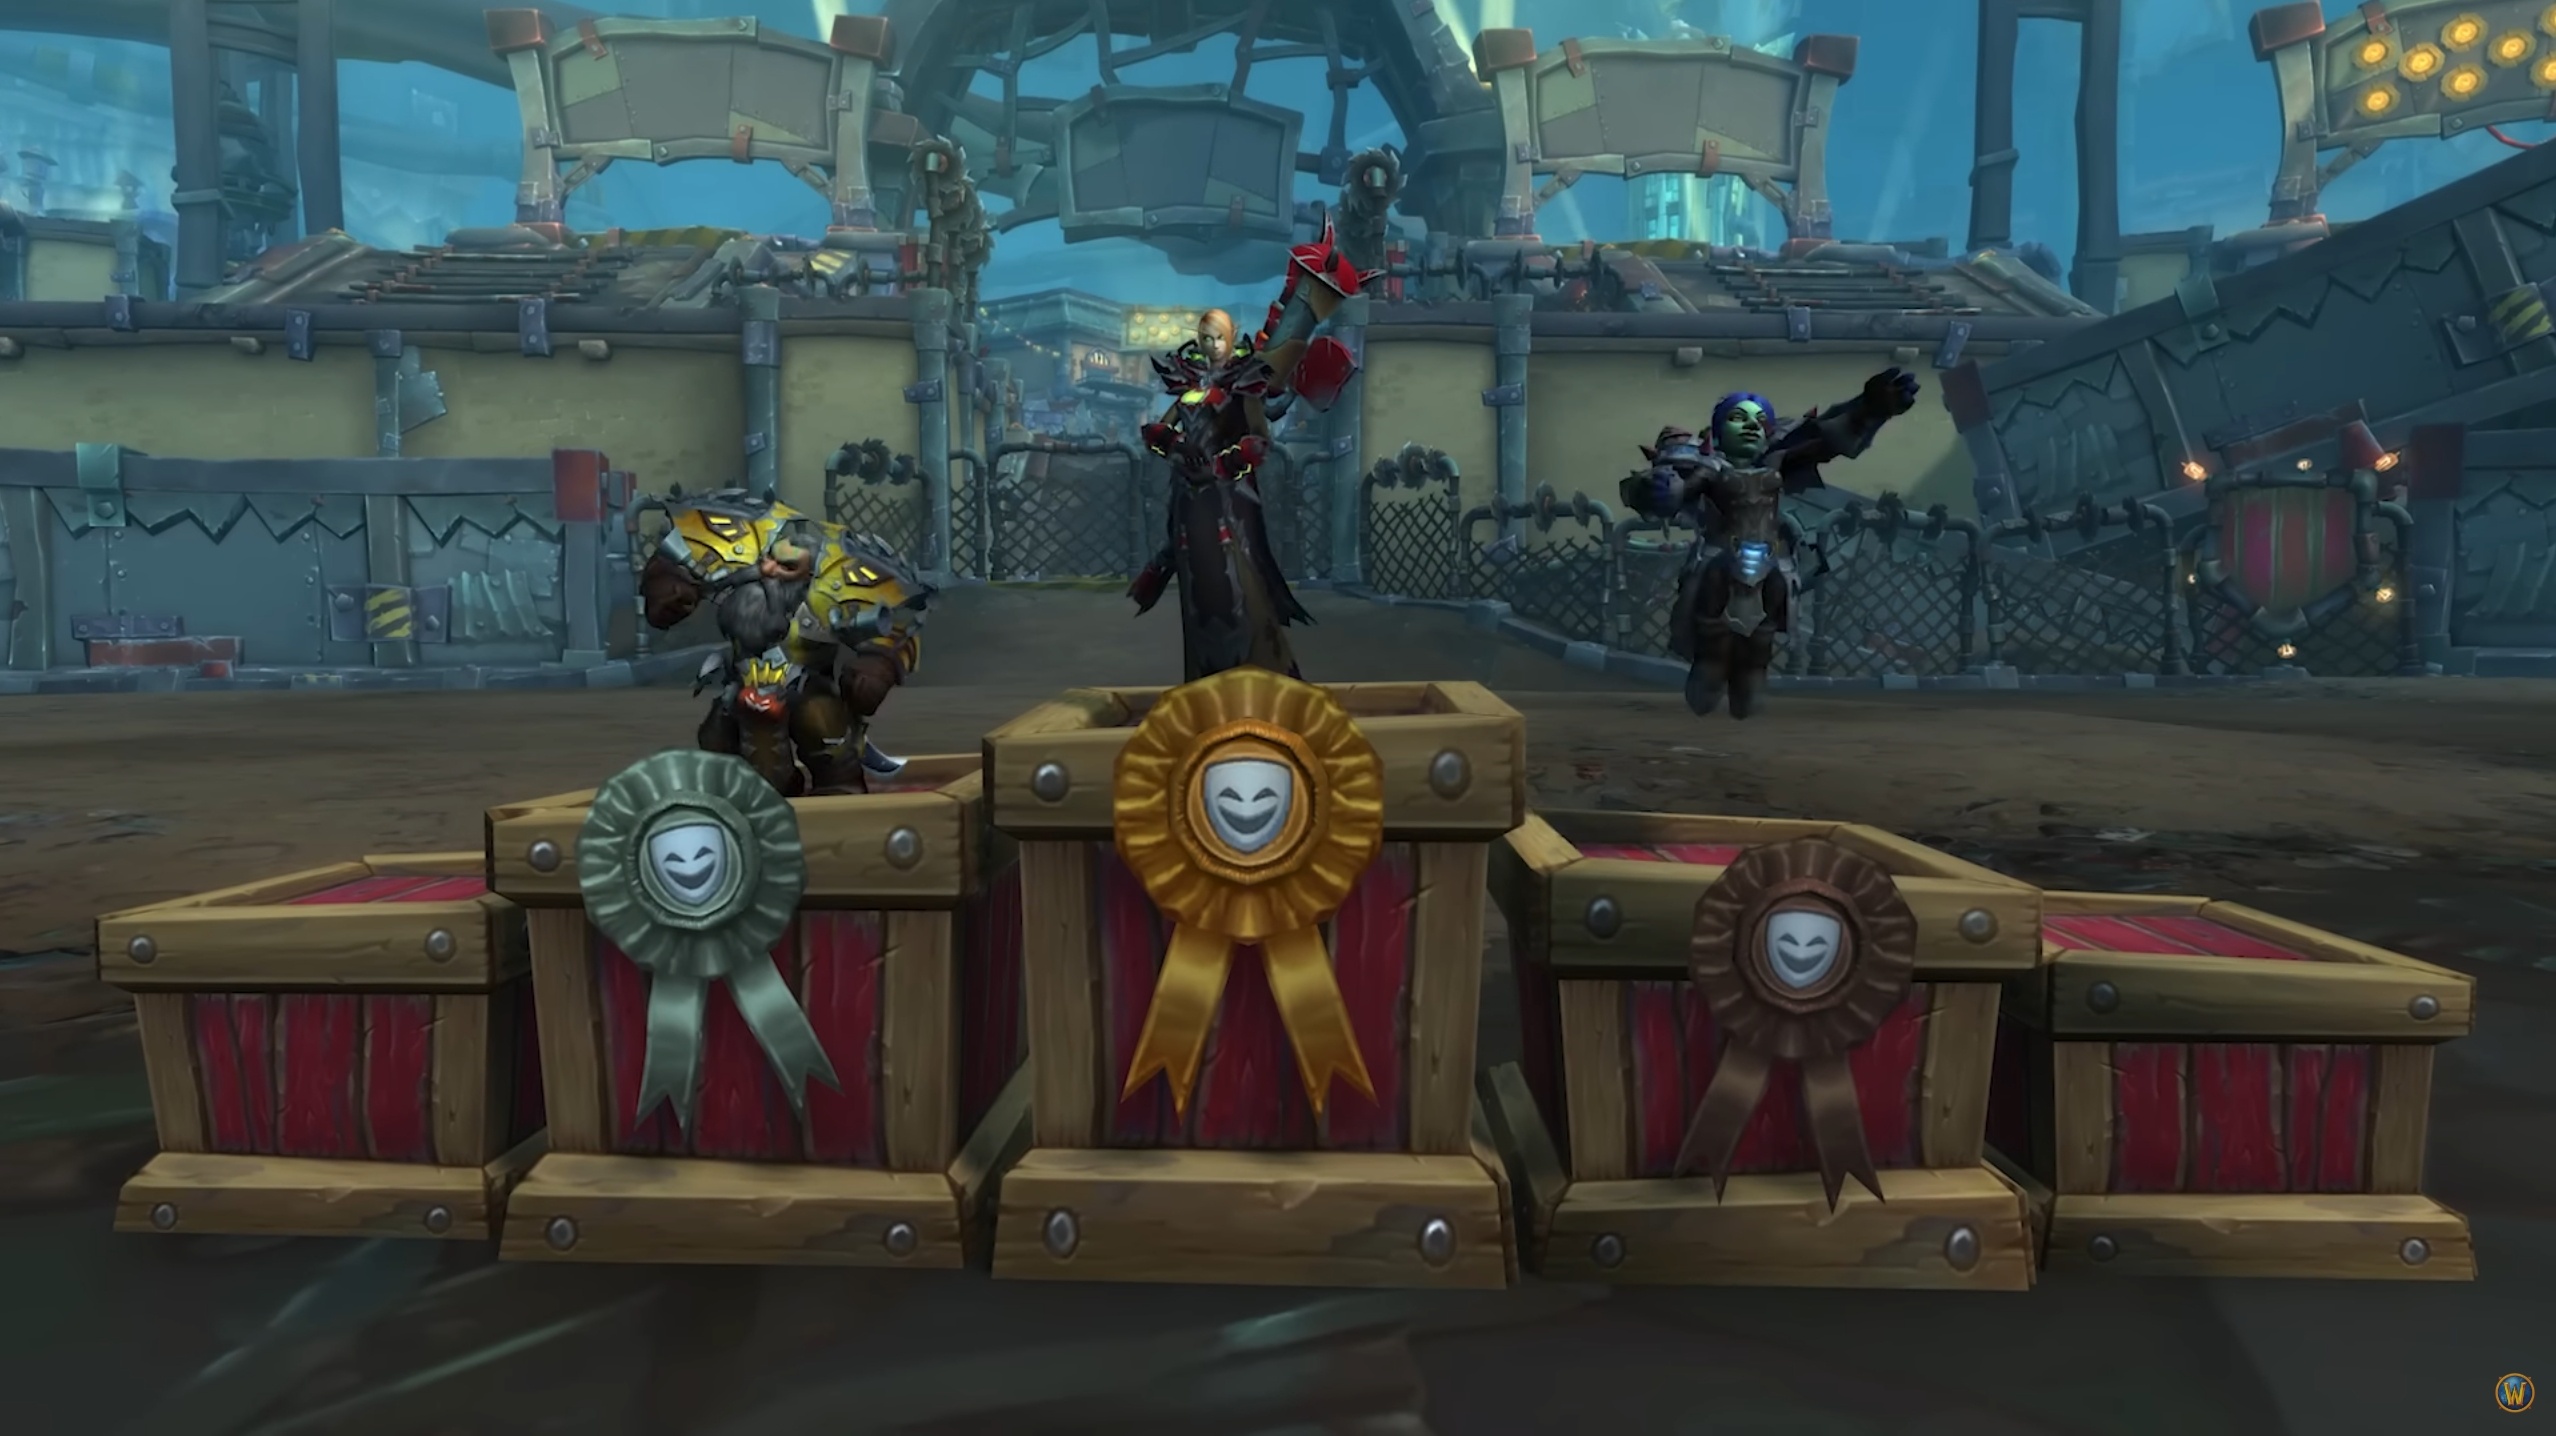
One big reason to dive into Dastardly Duos (aside from the fun) is the reward haul. Blizzard has packed this event with a mix of gear and collectibles, including a new mount, toys, a pet, and transmog. Here’s what you can get:
Unique Event Collectibles: Each week of the six-week event grants a special reward for completing that week’s content (usually tied to the weekly quest completion).
All of the above are time-limited exclusives – if you don’t earn them during the event, there’s no guarantee they’ll be obtainable later. Blizzard might bring the event back in the future or put rewards elsewhere, but it’s not certain.
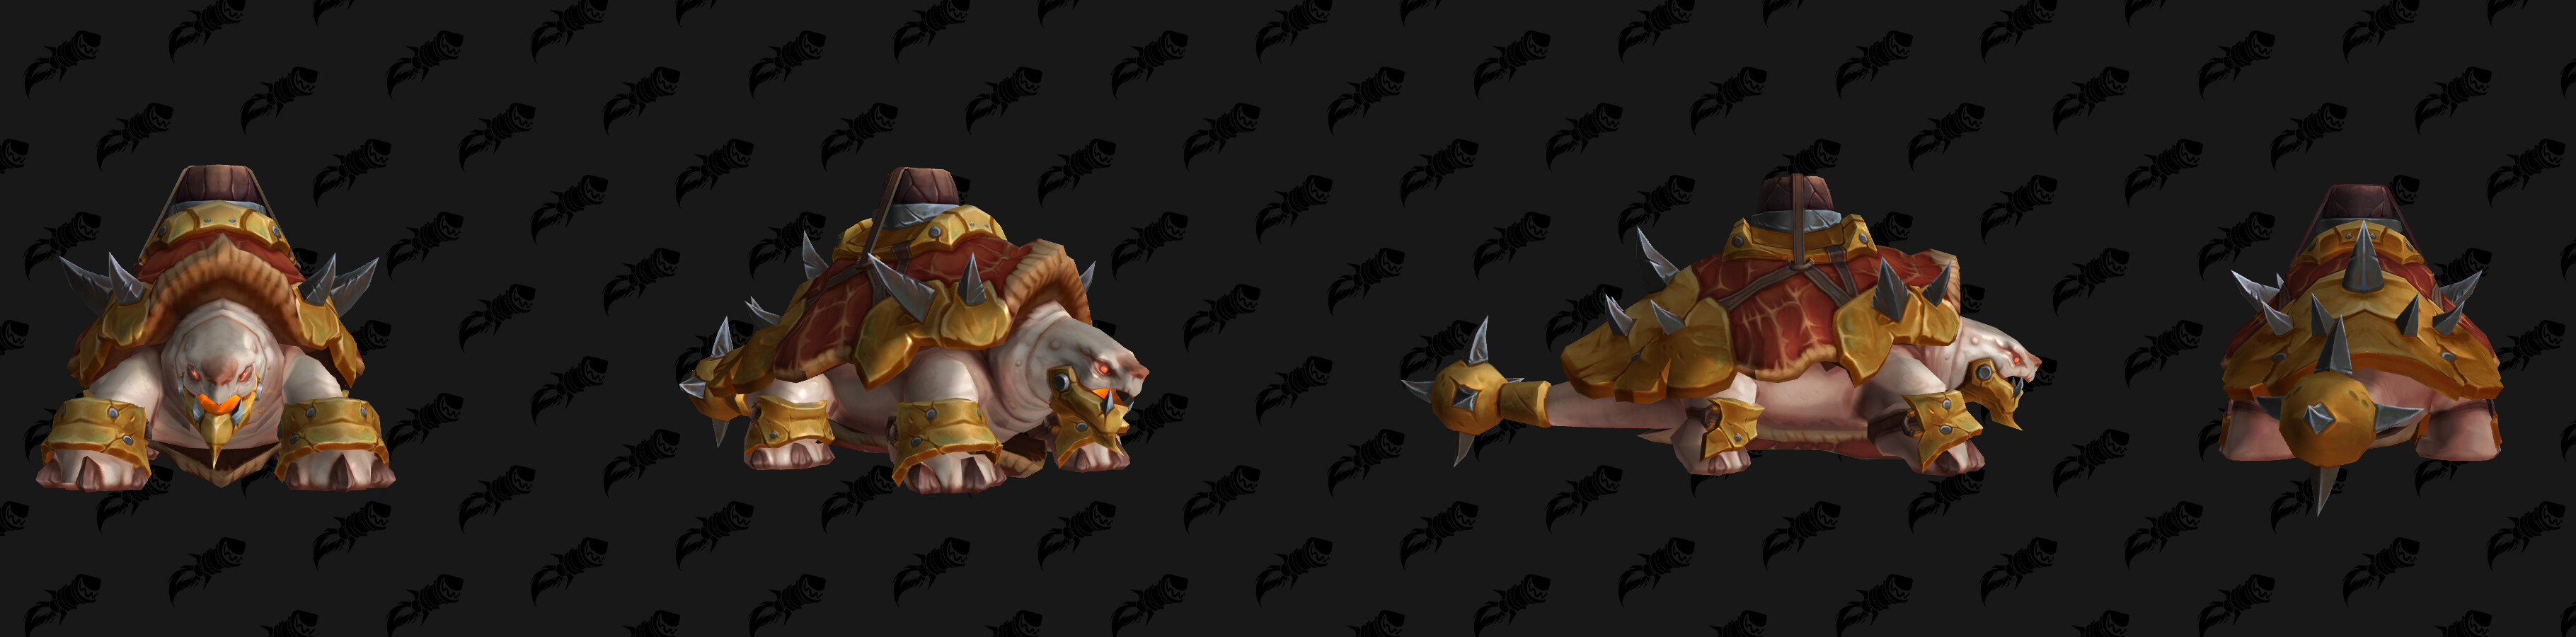
So, plan to get the awesome Tyrannotort now!
Every time you successfully complete a run (defeat at least the final boss wave before time runs out), a reward chest will spawn in the arena. This chest contains one piece of gear for a random slot. The gear is Veteran-track, item level 632 (at 4/8 upgrade level) by default, and comes as Warbound-Until-Equipped (meaning you can’t auction it, but you can send it to alts if not equipped).
What’s cool is these items are actually pieces of loot that originally dropped from the bosses you fought – a bit of nostalgia for transmog collectors. They do not have new models, so for example if you get a sword from this chest that is based on Rattlegore’s loot, it will look like that old Scholomance sword (if you already have that appearance, it won’t be new to your wardrobe). You can farm this chest as many times as you want each week – there’s no lockout on re-running the event for loot. So if you enjoy the mode, you could potentially fill gaps in your gear by running it repeatedly. Just keep in mind the loot is randomized among the bosses’ drop tables.
Weekly Quest Reward: As mentioned earlier, the weekly quest from Vinnie Sweets awards one piece of Champion-track gear each week. This is typically equivalent to Normal mode raid loot, making it very valuable for early gearing. The item you get is also themed to the bosses (and is Bind-on-Pickup for you). If you’re unlucky with dungeon drops or just gearing an alt, don’t skip these weekly quests – six weeks of quests means six guaranteed Champion items, a nice boost to any poorly geared character. Fortunately, if you miss a week or start late, you can do multiple weekly quests in subsequent weeks as long as the event is still running. This catch-up means even if you join by Week 5, you could do all Week 1–5 quests in that week (though that's a lot of runs back-to-back).
Wodin the Troll-Servant is your go-to reward vendor for this event. You’ll find a selection of cosmetic shoulder pads in a variety of colors, plus a unique two-handed staff cosmetic, all available for purchase with Resonance Crystal:
| Item | Type | Cost |
|---|---|---|
| Yellow Dastardly Epaulet | Cosmetic | 500 Resonance Crystals |
| Red Dastardly Epaulet | Cosmetic | 500 Resonance Crystals |
| https://www.wowhead.com/item=239505/purple-dastardly-epaulet | Cosmetic | 500 Resonance Crystals |
| Green Dastardly Epaulet | Cosmetic | 500 Resonance Crystals |
| Blue Dastardly Epaulet | Cosmetic | 500 Resonance Crystals |
| Black Dastardly Epaulet | Cosmetic | 500 Resonance Crystals |
| Dastardly Pinchzapper | Cosmetic | 500 Resonance Crystals |
Dastardly Duos is a breath of fresh air in modern WoW’s endgame – a wild, wacky gauntlet that blends nostalgia with a modern twist. It dares you to revisit old foes in a completely new context: two-at-a-time, turbo-charged, and wrapped in a competitive scoring system. The event’s design, with its weekly unlocks and ever-expanding roster of boss encounters, will surely keep players coming back for "just one more run", whether it’s to beat their high score or to snag that awesome Tyrannotort mount.
Despite the event's overall lighthearted tone (who doesn’t love a goblin hype-man shouting your praises or mocking your missteps?), the challenge can get very real – especially if you opt into the harder modifiers. In many ways, Dastardly Duos feels like a celebration of WoW’s dungeon history, repackaged as a zany game show where you’re the contestant and old Azeroth’s baddies are the obstacles.
For the savvy player, this event is also a chance to test your skill and coordination in a setting outside the tiresome Raid/Mythic+ grind. It’s focus on efficiency, strategy, and a bit of daring – pulling off stunts like juggling bosses in spotlights or beating the clock with seconds to spare is really fun and engaging. And unlike "one-and-done" content, the built-in leaderboard mentality means you can always challenge yourself to do better, especially if competing with your friends for the top score. At the same time, even if you’re not into the competitive aspect, Dastardly Duos can be accessible and rewarding for virtually everyone. You hop in casually each week, have a blast facing these "dastardly" bastards, and walk away with loot and unique collectibles to mark the occasion.
Well done, Blizzard?