
Belo'ren, Child of Al'ar is a single-target fight with heavy add pressure and constant target swaps, but the real check is not raw damage. The encounter is built around color discipline, and once that starts breaking down, everything else follows fast. Light Feather and Void Feather decide how players interact with nearly every major mechanic, so bad positioning, late movement, or taking the wrong-colored effect quickly turns otherwise stable pulls into messy recoveries.
What makes the fight work is how many moving parts it stacks into that core rule. You are placing Light Dive and Void Dive puddles without collapsing space, swapping into Embers and their eggs on time, catching the correct Infused Quills, and using Radiant Echoes cleanly so the room stays playable for the next overlap. The main pressure spike comes in the egg phase, where damage cooldowns and Heroism or Bloodlust get the most value, and the fight keeps tightening after that as healing gets weaker and later cycles add even more strain through extra Embers and harsher overlap patterns.
Belo'ren, Child of Al'ar is the phoenix boss you face right before the end of the tier, and the fight clearly wants to drill one lesson into your raid before the finale: colors matter, and losing focus gets punished fast. It is a single-target encounter with heavy add pressure and frequent target swaps, but the real check is whether your group can stay organized once the room starts filling up and overlaps begin to stack.
Fight Style: Single-target fight with heavy add pressure and frequent target swaps.
Recommended Setup: 2x Tanks / 4x Healers / 14x DPS.
Recommended Utility: Warlock Gateway.
Heroism/Bloodlust: During the egg phase, around 30%.
This boss is also a fairly straightforward gear check, but not in a bad way. The core question is simple: do you have enough damage and healing to keep the fight under control before it starts putting real strain on the raid. If your group is strong enough, you can push very hard in the first egg phase and cut off a lot of the danger before the encounter fully ramps up.
That works because the fight is mostly fair. The color system drives nearly every important mechanic, but the rules stay readable, so wipes usually come from execution errors rather than random nonsense. The pressure comes from handling the room cleanly, controlling add waves, and keeping space playable as the fight goes on, which makes the encounter feel hectic in a good way instead of just annoying.
It also helps that opposite colors are not turned into a pure proximity panic mechanic. The fight still demands coordination, but it does it through actual handling and positioning rather than cheap overlap punishment just for standing near the wrong person. The result is a Heroic encounter that starts clean, ramps naturally, and gets much sharper once the egg phase and later cycles begin to stack real pressure on the raid.
By the way, don't forget to check out the March on Quel'Danas Raid Overview:
March on Quel'Danas Raid OverviewThis cast resets the color game for the whole raid. Belo'ren, Child of Al'ar channels for 6 seconds, deals repeated raid-wide damage, and then assigns every player either Light Feather or Void Feather.
That assignment decides what you are allowed to handle cleanly. Light Feather cuts Holy damage taken, while Void Feather cuts Shadow damage taken, so the encounter keeps asking players to take mechanics that match their own polarity instead of the opposite one.
This is the passive raid pressure that never really goes away. Belo'ren, Child of Al'ar keeps pulsing damage into the raid at regular intervals, which means healers are always spending globals even when nothing flashy is happening.
The important part is that this background damage becomes harsher during Rebirth. Egg phases are not just burn windows, they are also the point where healing gets taxed much harder.
These adds are the main source of the fight's constant swap pressure. Belo'ren, Child of Al'ar summons both Light and Void Embers, and while their toolkit stays functionally the same, the damage school changes with the add's color.
Because your feather only protects you against one side of the mechanic set, the raid naturally has to divide responsibility. Players want to cover the Ember that matches their own polarity instead of brute-forcing both sides carelessly.
This is how new Embers enter the fight. One random Light player and one random Void player get large soak circles that deal heavy split damage when they go off.
The mechanic is meant to be covered by matching-color players only. Soaking the wrong circle is still technically possible, but it is much riskier because you lose the built-in damage reduction the encounter expects you to have.
This is the Ember's direct shot into a random player. It is a straightforward targeted hit, but it is still avoidable raid strain because the cast can be kicked.
On its own it is not the fight's scariest event, but missed interrupts stack useless damage onto a pull that already has plenty going on.
This is the Ember cast that threatens the entire raid if it goes through. The key rule is that only players with the matching feather can actually stop the cast.
That makes this more of an assignment check than a raw reaction check. A fast interrupt from the wrong color still fails, so the raid needs the correct polarity on the correct add every time.
When an Ember dies, that is not the end of the add. It collapses into an egg that continues pressuring the raid and will hatch again shortly if your group ignores it.
That means the real kill sequence is always two steps. First you finish the Ember, then you swap immediately and destroy the egg before the add comes back and forces you to repeat the same problem.
These orbs drift across the room and burst when touched. The point is not to let the wave pass untouched, but to deliberately break openings in it so the raid keeps usable paths through the arena.
The danger comes from color mismatch. A player who pops the opposite color does not just take the contact hit, they also get slammed by a long follow-up damage effect, which is why the orb walls need controlled, color-matched clears.
This is the tank check of the encounter. Belo'ren, Child of Al'ar sends out Light and Void cone attacks, and each tank is supposed to catch the cone that lines up with their current polarity.
The fight punishes failures hard here. If one of those frontals is not properly taken, Belo'ren, Child of Al'ar gains a large temporary damage increase, and repeated misses snowball quickly into lethal boss damage.
Light Edict and Void Edict are the actual cone hits you are matching and soaking.
This mechanic puts a heavy healing absorb on players and keeps dealing damage until healers force their way through it.
Instead of asking for movement or control, it directly stresses healing throughput. The raid stays under real pressure until those burns are fully healed off, so this is one of the places where healer stabilization matters more than raw DPS.
A random player gets targeted, then a beam fires after a short delay and hits the first player standing in its path. The mechanic is designed to be intercepted on purpose rather than allowed to land wherever it wants.
The clean answer is to have the matching color step in front of it. When the wrong polarity takes the hit, the beam stops being manageable damage and turns into avoidable punishment.
Once phoenix form is depleted, Belo'ren, Child of Al'ar rises up and crashes into the arena, dealing heavy Physical damage and launching the raid upward.
This is one of the few mechanics where raw position matters more than polarity. The farther you are from the impact point, the easier the crash is to live through and recover from.
For 30 seconds, Belo'ren, Child of Al'ar withdraws into an egg. That egg is the boss's real kill target, so this phase is where your meaningful boss damage actually happens.
This is also where the encounter starts tightening. Burning Heart keeps ticking faster here, so raid damage ramps up while everyone is trying to maximize burn damage at the same time.
Every completed Rebirth also leaves behind Ashen Benediction, a permanent healing reduction debuff that makes each later cycle harder to stabilize than the previous one.

Phase 1 is the repeating phoenix-form portion of the fight, and that repetition is what makes it dangerous. The structure itself stays simple, but the same sequence becomes less forgiving the longer the pull goes on because you are handling it with worse healing, tighter space, and less room for sloppy execution.
You begin by fighting Belo'ren, Child of Al'ar in phoenix form, but this is not the part of the encounter where the boss actually dies. Because of that, you generally do not want to spend Heroism, Bloodlust, or major DPS cooldowns here if they will not be available again for the egg burn. Depending on timing, it can even be worth easing off near the end of the phoenix health bar so your cooldowns line up better for the real damage phase.
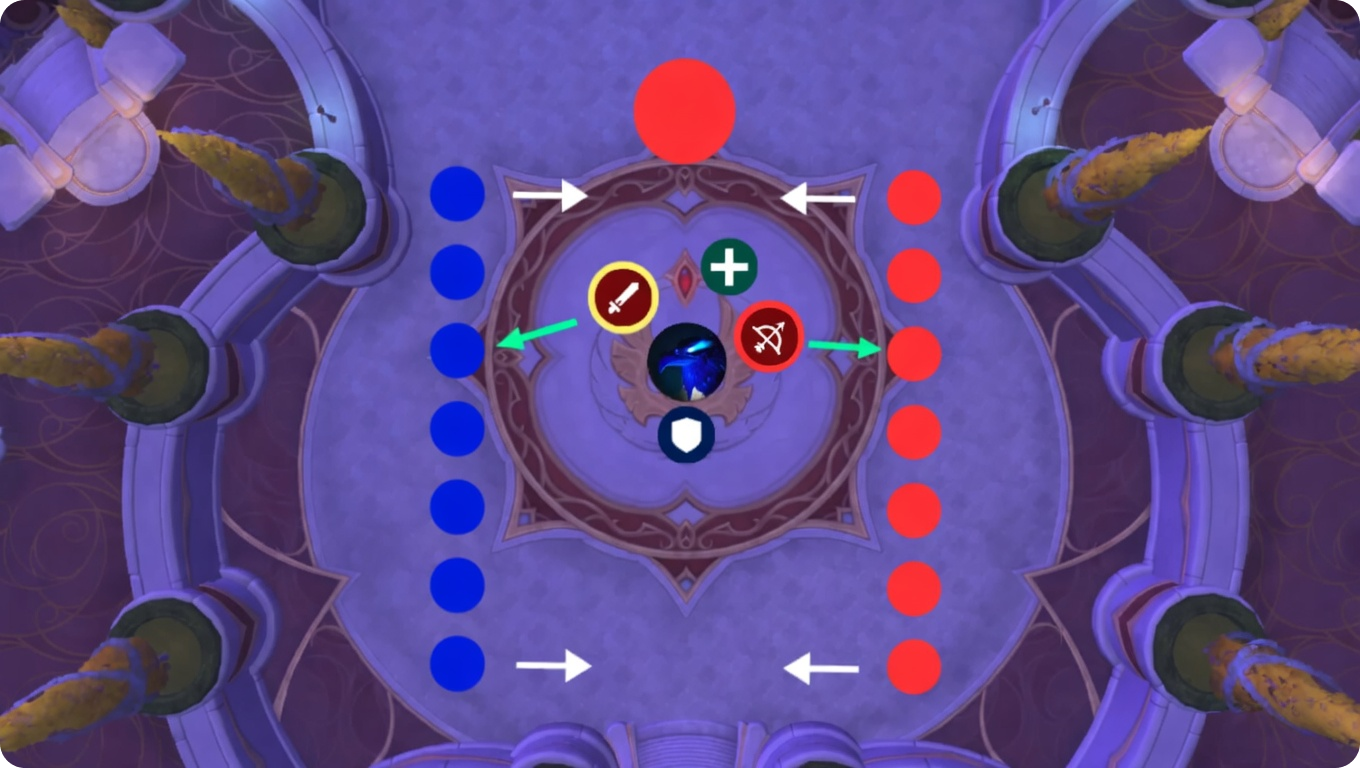
Light Feather and Void Feather are assigned randomly, usually in a fairly even split across the raid, while the tanks are always given opposite colors. From there, the entire phase is governed by one rule: never get hit by the opposite color.
That is also why the phase is more readable than it first looks. Players can move through each other freely, stack when needed, and do not need to panic just because opposite colors are standing near each other. The fight is not punishing proximity here. The real failure point is simply taking the wrong-colored mechanic.
Set fixed markers around the room before the pull and use them every time. Right after the fight starts, one player gets targeted by Light Dive or Void Dive. That player moves to the assigned marker, matching-color players soak it, and the boss can be brought there as well if the raid can turn the movement into clean cleave.
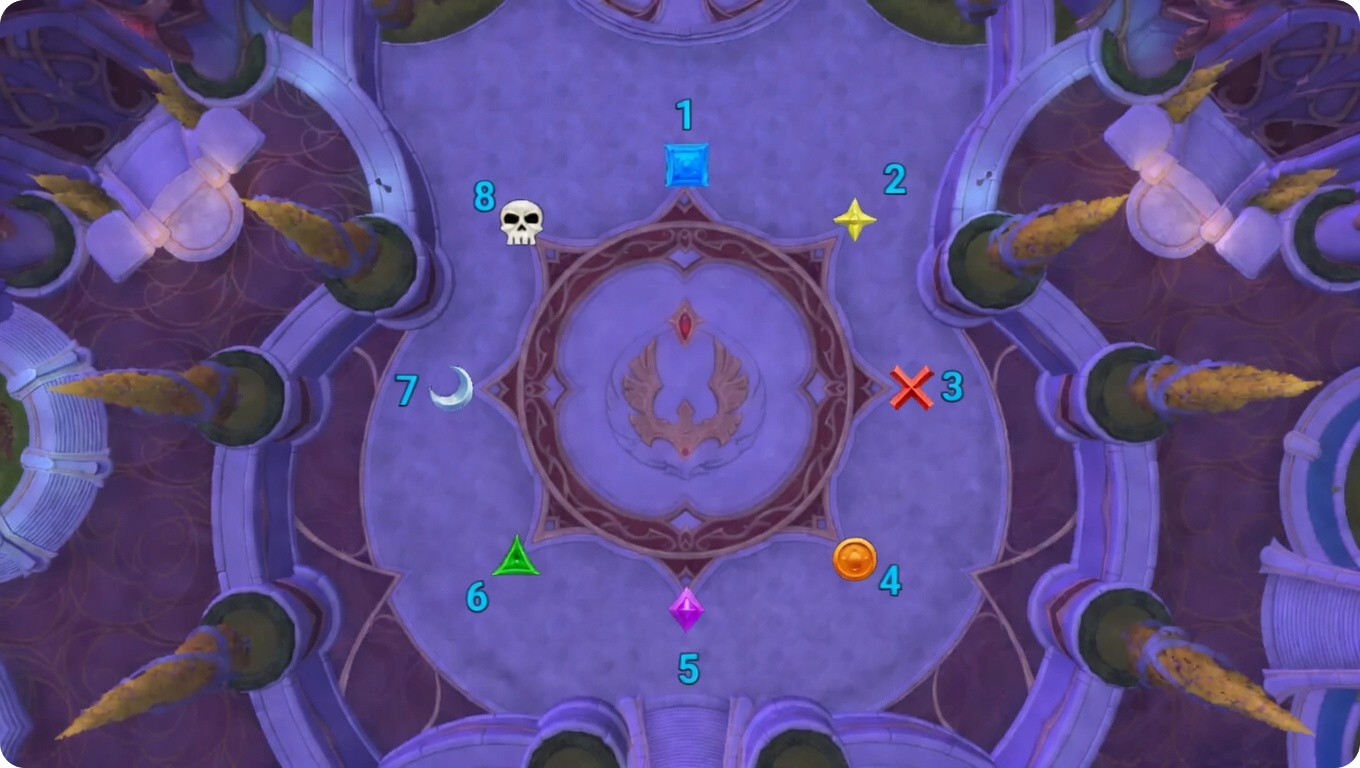
This part matters more than it looks, because every Dive leaves behind a permanent puddle that keeps expanding over time. If those puddles are dropped loosely, the room starts closing much earlier than it should, and other mechanics become harder for no good reason. Clean marker discipline is what keeps the phase playable later on.
Once the Dive resolves, the Ember becomes the immediate priority target. Kill it, then swap straight to the egg and single-target it down before it can Rebirth. The clean way to think about this is as one continuous job rather than two separate ones. The add is not really handled until both the Ember and the egg are gone.
If the raid is slow on the swap and the Ember respawns, you are repeating the same mechanic package while the room keeps getting worse around you. That is exactly how a phase that looked controlled a few seconds earlier starts slipping out of control.
Infused Quills targets a random player and creates a beam that needs to be intercepted by a player with the matching color. That player takes the hit with the intended 50% reduction, while the wrong color absorbs far more damage than necessary. It is a simple mechanic, but it becomes expensive very quickly if the interception is lazy or mismatched.

Radiant Echoes sends orbs across the room, and touching one destroys it to create a usable gap. The goal is not to avoid the line forever, but to open safe space on purpose. As always, the correct color should be the one doing it. If the opposite color pops an orb, that player gets hit with a heavy 20-second damage effect, which is where avoidable deaths start happening.
The last repeating check is the tank frontal sequence. Belo'ren, Child of Al'ar fires several Light and Void frontals, and each tank needs to be clipped by the frontal that matches their current color. If one of those frontals hits nobody, the boss gains a 30% damage buff for 30 seconds. Those buffs stack, so repeated misses turn the phase from stable into lethal very fast.
That is the full rhythm of Phase 1: place the Dive correctly, kill the Ember, kill the egg, and keep Quills, Echoes, and tank frontals clean while the room slowly gets worse. The phase does not become difficult because it changes a lot. It becomes difficult because it keeps asking for the same clean execution without giving the raid much slack.
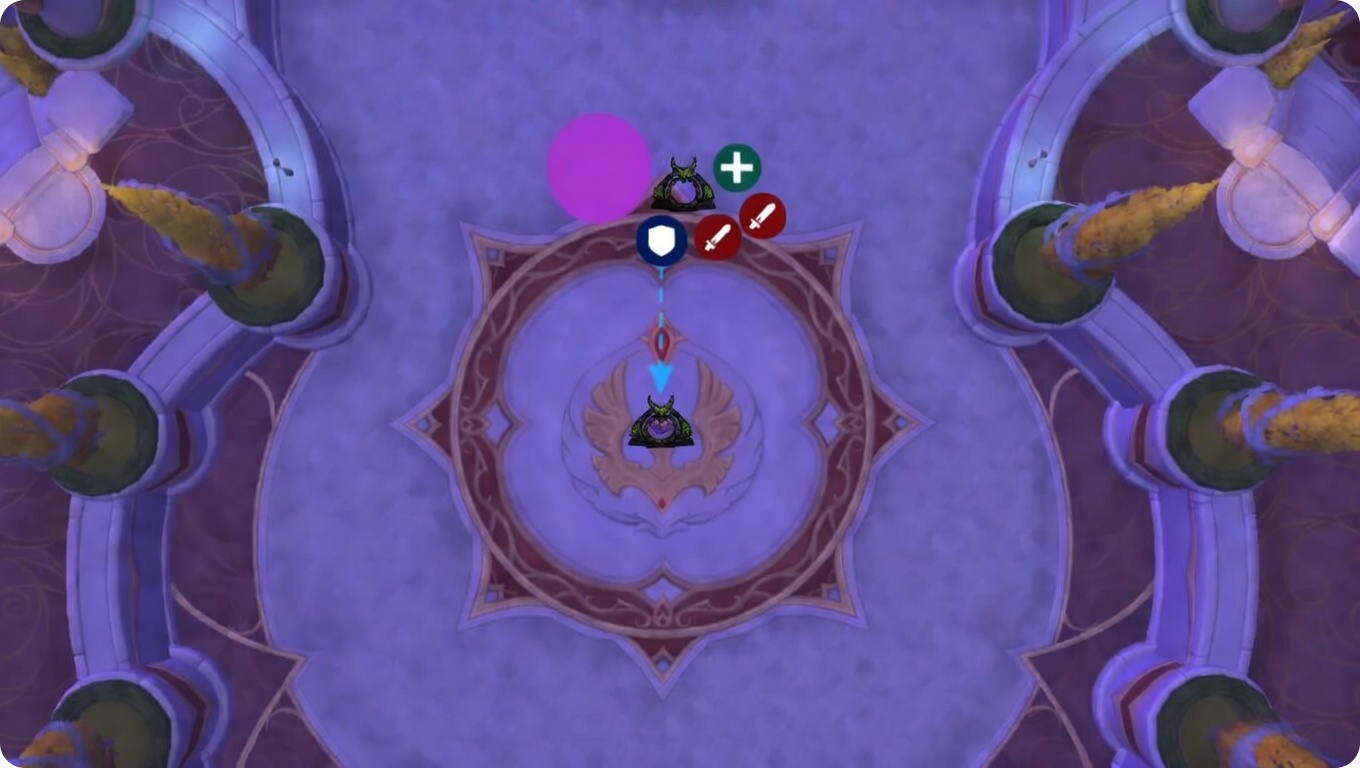
Phase 2 begins once Belo'ren, Child of Al'ar reaches 0% in phoenix form and starts Death Drop. This is the real burn phase of the encounter, but the transition matters just as much as the damage. If the raid enters it cleanly, the phase feels controlled. If the crash and reposition are messy, the room can become awkward immediately.
As soon as Death Drop starts, move toward the most recent puddle and set a Warlock Gateway there. The plan is simple: once the boss slams back down, take the gateway instantly. This helps break up the knock-up and gets the raid repositioned fast enough to start the Phase 2 movement pattern without wasting time recovering from the landing.
From there, the phase becomes much cleaner mechanically than Phase 1, but it still punishes hesitation. The main job is to keep respecting the color rule while pushing as much damage into the egg as possible. Players need to take the cone that matches their own color, stay alert for Radiant Echoes, and use those orbs to open safe gaps when the pattern starts closing off space.
The important part is that the pattern here is completely random. There is no fixed sequence to memorize, so the phase is mostly about fast recognition and clean reactions. If the raid handles the cones correctly and keeps making usable openings with Radiant Echoes, the phase stays stable enough for everyone to focus on boss damage instead of scrambling just to survive.
This is where your strongest DPS cooldowns belong. Phase 2 is the part of the encounter where that damage actually matters, so this is the natural burn window. Heroism or Bloodlust is also best used here, ideally once your group has a reliable timer for it and preferably a little later in the phase when execute damage starts adding even more value.
After 30 seconds, Phase 2 ends and the fight resets back into phoenix form. The structure repeats, but the next cycle is not the same as the first one. Every completed egg phase adds Ashen Benediction, a permanent healing reduction debuff that keeps stacking, so later returns become harder to stabilize even if the raid is still playing correctly.
The next Phase 1 also comes back with more add pressure. Light Dive and Void Dive now target two players instead of one, which means two Embers spawn instead of a single add. That is the point where the fight starts getting much tighter, because the same control loop comes back with less healing, more swaps, and far less room for mistakes.
Belo'ren, Child of Al'ar is a color-based fight, and the quick version is simple: match your color to the mechanic and save real damage for the egg phase. If your raid stays disciplined on that one rule, the encounter is much cleaner than it first looks. If players start taking opposite-color mechanics, the fight falls apart fast.
Light Feather and Void Feather are assigned throughout the encounter, and that color decides what you are supposed to handle. Take mechanics that match your own color, and avoid the opposite one whenever possible. Tanks will always be opposite colors, so their assignments stay naturally split.
Do not use Heroism or Bloodlust in phoenix form. The important damage window is the egg burn, so that is where your biggest raid cooldown should go. It also helps to set your room markers before the pull and reuse the same pattern every time, because consistent placement makes the later cycles much easier to manage.
Right after the pull, be ready for the first Light Dive or Void Dive. The targeted player moves to the correct marker, matching-color players soak it, and the boss can be brought there too if the positioning is clean enough to turn it into free cleave. That placement matters, because the puddle stays for the rest of the fight and keeps expanding.
Once the Ember spawns, kill it and then swap straight to the egg. Do not treat that as optional cleanup. You want the egg dead before it gets a Rebirth, otherwise you are repeating the same add problem while the room keeps getting worse.
Infused Quills should be intercepted by a player with the matching color, and Radiant Echoes should also be popped by the correct color to open safe paths through the room. The tank frontal works the same way in practice: each tank needs to take the frontal that matches their own color, because if one misses entirely, the boss gets a stacking damage buff for 30 seconds.
When the boss reaches 0% in phoenix form, Death Drop starts the transition. Everyone should move near the last puddle, place a Warlock Gateway there, and take it right after the crash to break the knock-up and reposition quickly.
During the egg phase, keep handling only your matching-color mechanics, use Radiant Echoes to make gaps, and commit your major DPS cooldowns here. This is the part of the fight where boss damage actually matters, so it is the correct place for Heroism or Bloodlust as well.
Each egg phase leaves behind a permanent 10% healing reduction, so every later cycle becomes harder to recover even if your raid is still playing correctly. On top of that, later phoenix phases spawn two Embers instead of one, which raises the add pressure and makes clean swaps much more important than they were at the start of the fight.