
Choosing your Ascendancy is one of the most pivotal moments in your character's progression. These powerful specializations are far more than simple passive bonuses; they are unique skill trees that fundamentally reshape your playstyle and unlock a build's true potential. An Ascendancy is so transformative that it often becomes the central pillar of a character's identity, influencing every gear choice and skill selection that follows.
This comprehensive guide serves as your complete roadmap to mastering the Ascendancy system. We will walk you through every step of the journey, from earning your first points in the campaign's Trial of the Sekhemas to securing your final passives in challenging endgame content. Whether you're seeking the most efficient path, strategic advice for the trials, or need to understand the intricate process of changing your specialization, you'll find all the answers you need right here.
An Ascendancy is a powerful specialization represented by a unique, class-specific passive skill tree. These skills are designed to dramatically enhance your character's capabilities and fundamentally alter their playstyle. The passives granted by an Ascendancy are so transformative that they often become the central pillar of an entire build, introducing new mechanics or supercharging existing abilities. This makes the choice of an Ascendancy arguably more crucial than your initial class selection, as players often pick a base class specifically to access one of its powerful specializations.
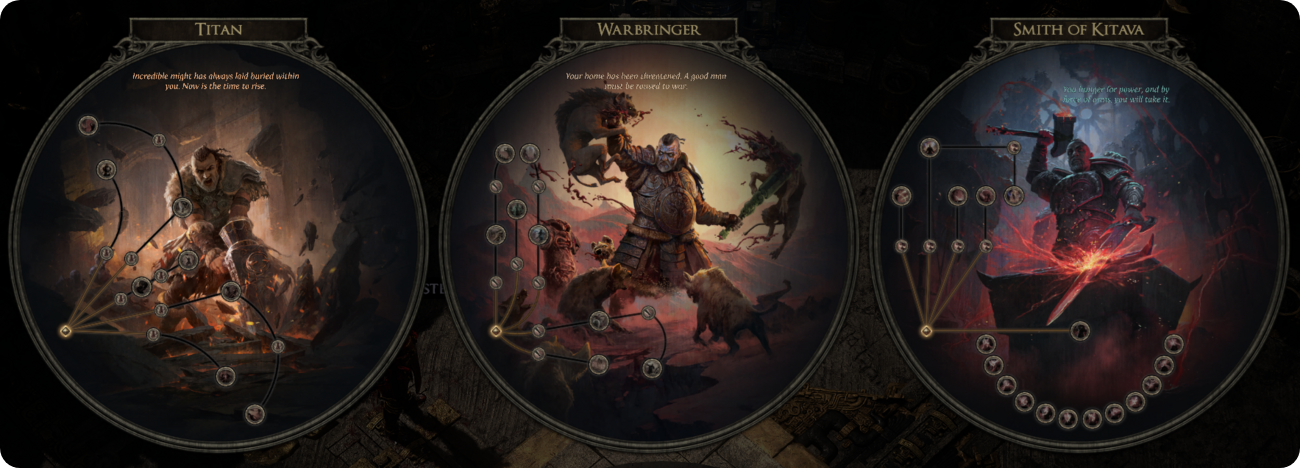
While the game is in Early Access, each class offers at least two distinct Ascendancy paths, providing a solid foundation for strategic diversity right from the start. The developers intend to expand this system further, with the goal of providing three unique Ascendancies for every class by the time of the official launch. This commitment promises to create an even richer landscape for theory-crafting and ensures significant long-term replayability.
It's also important to note that your initial choice is not set in stone. The system is designed with flexibility in mind, acknowledging that playstyles evolve. If you wish to experiment with a different powerful build or adapt your strategy, you will have the ability to change your Ascendancy later on. This freedom allows you to adapt your character without starting over, with the only restriction being that your new selection must be one of the other Ascendancies available to your original class.
Your first step towards transforming your character into a powerhouse is to choose an Ascendancy and grab its initial, game-changing points. The game makes this a memorable part of your adventure by weaving it directly into the story campaign. As you progress, you'll be introduced to two crucial tests designed to challenge your skills. This process secures your first four Ascendancy points - two from the Trial of the Sekhemas and two from the Trial of Chaos - cementing your build's identity. The quest for the final four points, however, begins only after the main story is complete, challenging you in the endgame.
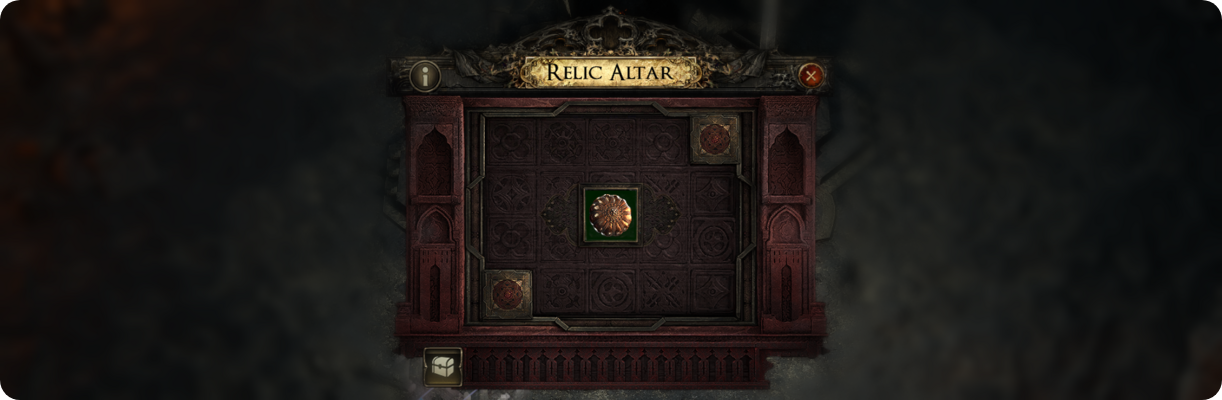
You will have your first opportunity to choose an Ascendancy and earn its first two passive points during Act 2. To begin, you must find and defeat the boss Balbala, the Traitor, located in the Traitor's Passage area. This boss will drop a key item, Balbala's Barya, and picking it up will grant you the "Ascent to Power" quest. To proceed, speak with Zarka, who will direct you to the Trial of the Sekhemas. You can travel there using the Desert Map. Once you arrive at the location, interact with the Relic Altar and place Balbala's Barya inside. After doing so, Balbala will give you your first Relic, which has a significant impact on the run and can be used immediately.
The Trial of the Sekhemas is a series of different challenges, ranging from simply killing monsters in a Ritual to finding the exit of a room while navigating traps in a Gauntlet. In addition to your normal Life, your character will also have Honour, which you must manage very carefully because if its level drops to zero, the trial will fail. You will also have a special currency, Sacred Water, which you can spend to purchase various bonuses during the run.
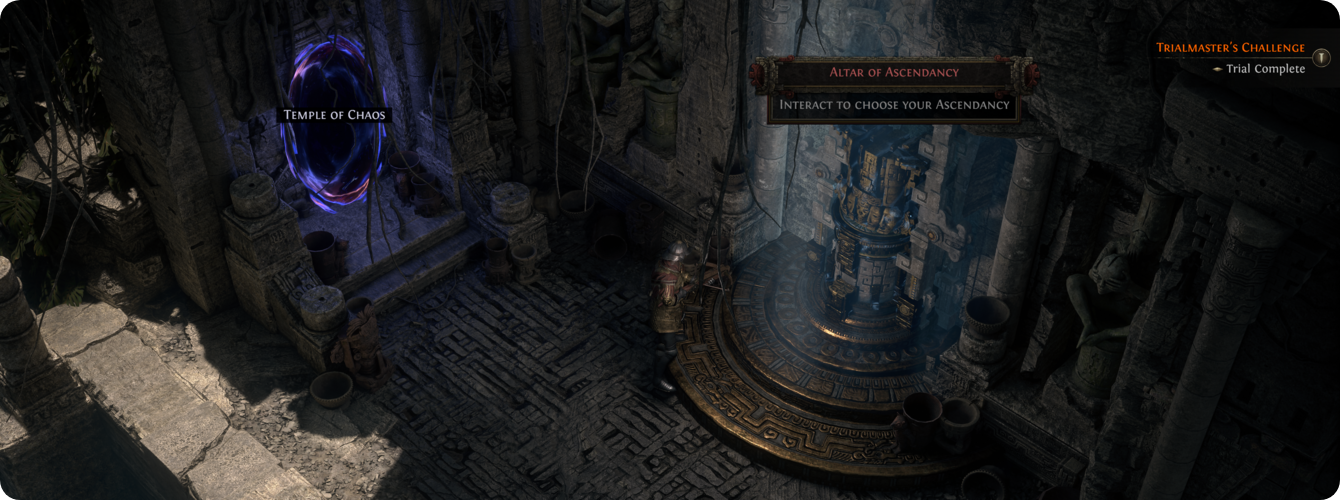
To earn your first two Ascendancy points, you don't need to complete the entire Trial. Your objective is to clear the first floor and defeat its boss, Rattlecage, the Earthbreaker. After your victory, it is crucial that you interact with the Altar of Ascendancy to officially select your specialization and claim your points. Although you have unlimited attempts to complete the trial with the quest version of Balbala's Barya, the challenge can still be difficult depending on the strength of your build.
To avoid getting stuck, we recommend checking out our detailed guide on the Trial of the Sekhemas, where we break down all of its unique mechanics in detail:

After you have chosen your Ascendancy and received your first points, your next opportunity will arise in Act 3. There, in the Chimeral Wetlands, you will need to face the boss, Xyclucian, the Chimera. Defeating him will reward you with the Chimeral Inscribed Ultimatum. Similar to Djinn Barya, this item starts the Trial of Chaos, whose entrance is in the same area. It works the same way, meaning the number of attempts to successfully complete the trial using the quest Ultimatum is unlimited.
The Trial of Chaos consists of a series of rooms, randomly selected from a pool, that you must complete. Before each room, you will choose a modifier that will affect your run in various ways. Some modifiers strengthen monsters, others weaken your character, and some add new mechanics to the rooms, such as statues that petrify you if you linger in front of them, or a Shade that pursues you and will end your run if it lands seven successful attacks. Also, before choosing a modifier, you will see the reward you will receive for completing that room at the end of the trial.
To obtain your 3rd and 4th Ascendancy points, much like with the Trial of the Sekhemas, you will need to complete a shortened version of the trial. In this version, you must successfully complete four rounds, the last of which culminates in a fight against one of three randomly selected bosses. For a detailed breakdown of the Trial of Chaos and all its mechanics, be sure to check out our comprehensive guide:

Currently, you only receive the first 4 Ascendancy points by completing the campaign. Afterward, the game gives you the freedom to choose how you will obtain the remaining ones. To get them, you will still need to complete either the Trial of the Sekhemas or the Trial of Chaos, but in a more complete version for points 5-6. To get the final 7-8 points, you will need to complete one of these trials in its entirety.
To start the trials, you will need the corresponding items: Djinn Barya and Inscribed Ultimatum, which are random drops that you can find from any type of content as you play the game. To obtain points 5-6, you will need to start the Trial of the Sekhemas using a level 60+ Djinn Barya and clear three floors of this trial, or start the Trial of Chaos using a level 75+ Inscribed Ultimatum and successfully complete 10 Rounds.
To obtain the 7th and 8th Ascendancy points, you will need to start the Trial of the Sekhemas using a level 75+ Djinn Barya, clear four floors of the trial, and defeat the final Pinnacle boss, Zarokh, the Temporal. Alternatively, you can start the Trial of Chaos using a level 75+ Inscribed Ultimatum, successfully complete 10 Rounds, and defeat the final Pinnacle boss, The Trialmaster. To gain access to him, you will need to collect or acquire from other players all three fragments that drop from the boss in the 10th round: Cowardly Fate, Deadly Fate, and Victorious Fate.
You can easily tell if a trial will grant you Ascendancy points by checking the item description, as shown in the image above. To help you keep everything straight, the table below breaks down the specific requirements for earning each set of Ascendancy points:
| 1-2 Ascendancy Points | 3-4 Ascendancy Points | 5-6 Ascendancy Points | 7-8 Ascendancy Points |
|---|---|---|---|
| Trial of the Sekhemas Balbala's Barya Complete the first floor |
Trial of Chaos Chimeral Inscribed Ultimatum Complete 4 Rounds |
Djinn Barya 60+ level or Inscribed Ultimatum 75+ level Complete three floors or Complete 10 Rounds |
Djinn Barya 75+ level or Inscribed Ultimatum 75+ level Complete four floors and defeat Zarokh, the Temporal or Complete 10 Rounds and defeat The Trialmaster |
The most effective method for obtaining the first four Ascendancy points is obvious: you simply complete the Trial of the Sekhemas and the Trial of Chaos using the quest "entry items" that provide an infinite number of attempts. Furthermore, you don't have to complete the trials as soon as you gain access to them. Often, a more time-efficient method is to wait a bit for your character to become stronger. With a few more passive skill points and some new items, you will pass these trials like a hot knife through butter.
As for the remaining points, things are a bit more complicated. Given that you will have to complete the trial fully, or almost fully, combined with the fact that the monsters will be close to their maximum level, you may run into problems. It's difficult to give a definitive answer on where it's more effective to get the last Ascendancy points, as much depends on the build you are playing and how strong it is.
Completing the Trial of the Sekhemas is more popular because you can significantly ease the run by using Relics, and also obtain very powerful Boons during the run that can greatly strengthen your character and weaken the monsters. To simplify the Trial of the Sekhemas, it is recommended to first ensure that your Honour Resistance is capped at 75%. You can farm the corresponding Relics yourself or purchase them from other players. Also, pay attention to other useful affixes, for example, "Bosses take increased Damage" if you feel that only bosses might pose a problem for your build, or "Monsters take increased Damage" if you understand that problems may arise while clearing the floor rather than in the boss fight.
Regarding Boons and Afflictions, always try to buy ones like Ornate Dagger, which increases your damage by 50%, as well as Silver Tongue, which reduces prices at Balbala by 50%. And try to avoid receiving any Afflictions if you want to have the smoothest run possible.
To change your Ascendancy, you will need to complete one of the Trials at a difficulty level that corresponds to your current number of points. For example, if you have 6 out of 8 points, you will need to complete a trial using at least a level 60+ Djinn Barya or a level 75+ Inscribed Ultimatum.
After successfully completing one of the Trials, you will be able to use the Altar of Ascendancy to change your Ascendancy within your class. Be careful, because before switching, you will need to refund all of your allocated Ascendancy points, which costs five times more gold than refunding a regular passive skill. For instance, at level 95, refunding a single point costs 39,475 gold. You can refund your allocated points at the end of the run by talking to the Trialmaster or Balbala, depending on which trial you were completing.