
Fury Warrior is the closest thing WoW has to Diablo 2’s berserker — a whirlwind of rage, dual-wielding massive axes, and leaving nothing but carnage behind.
If you live for those explosive moments where you smash all your burst buttons at once to down an enemy from 100 to 0 in mere seconds then there is no reason for you not to play Fury! Our guide will help you get a solid grasp of both the basics and the lesser-known nuances of the specialization in PvP.
| Strengths | Weaknesses |
| Relentless Sustained Damage | Vulnerable to Kiting and CC |
| Explosive Burst Windows | Limited Utility & Control |
| Strong Self-Healing & Durability | Countered entirely by Disarm |
| High Mobility & Uptime | Lack of Damage Immunity abilities |
Fury Warriors thrive on relentless aggression, launching into combat with unyielding pressure and enough self-healing to keep the pain train rolling. They excel at locking down targets and forcing opponents onto the back foot through staggering burst windows and lightning-fast gap closers.
However, Fury’s success hinges on maintaining uptime — once you lose momentum, it’s tough to regain control. Crowd control and heavy kiting can stifle your onslaught, forcing you to play smart and pick your moments. Despite these challenges, Fury Warriors remain a lethal threat to anyone who underestimates them.
The War Within introduced Hero Talents to the game, giving players a choice between 2 separate paths that not only add cool visuals to your spec but also impact the way you play it!
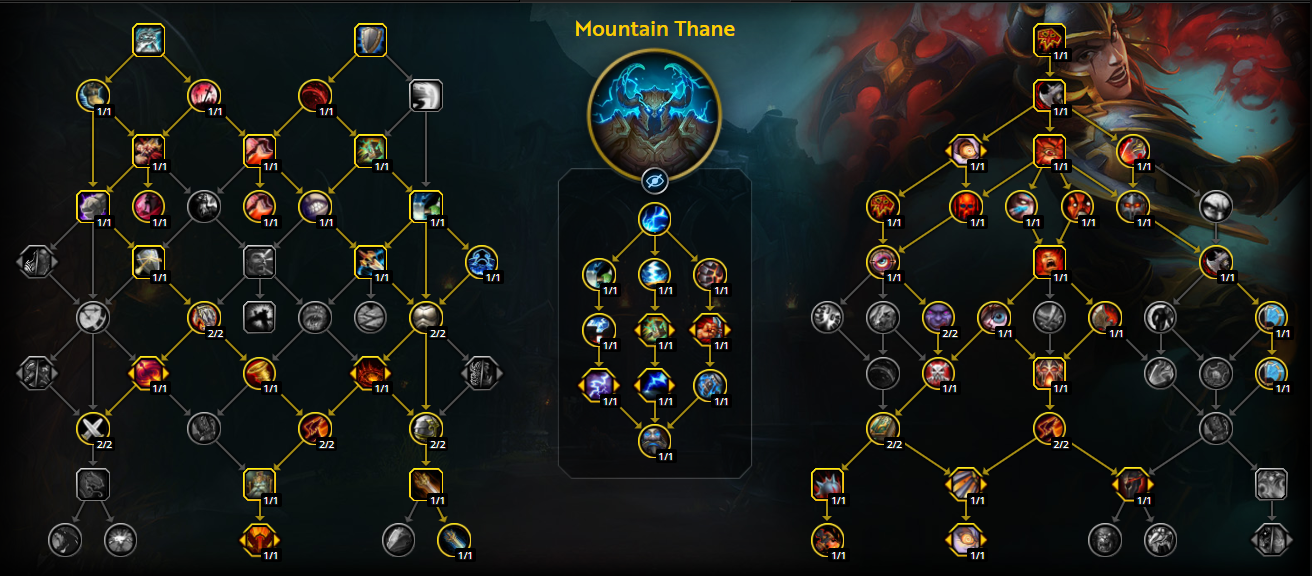
Fury gets to choose between Slayer and Mountain Thane:
In short: Both are viable in Solo Shuffle and 3v3, with Mountain Thane slightly ahead for multi-target cleave pressure. Mountain Thane focuses on Thunder Clap and Improved Whirlwind, causing your attacks to cleave nearby targets for heavy spread pressure. The Slayer build, by contrast, centers on Raging Blow talents and consistent single-target damage. In practice, both builds perform similarly in 3v3 and Shuffle; Mountain Thane’s extra AoE shines in the chaotic Solo Shuffle melees, while Slayer is slightly simpler for pure single-target burst. Many top Fury players still run the Slayer build, but some use Mountain Thane in cleave-heavy lobbies – pick what fits your playstyle, knowing neither will disappoint:
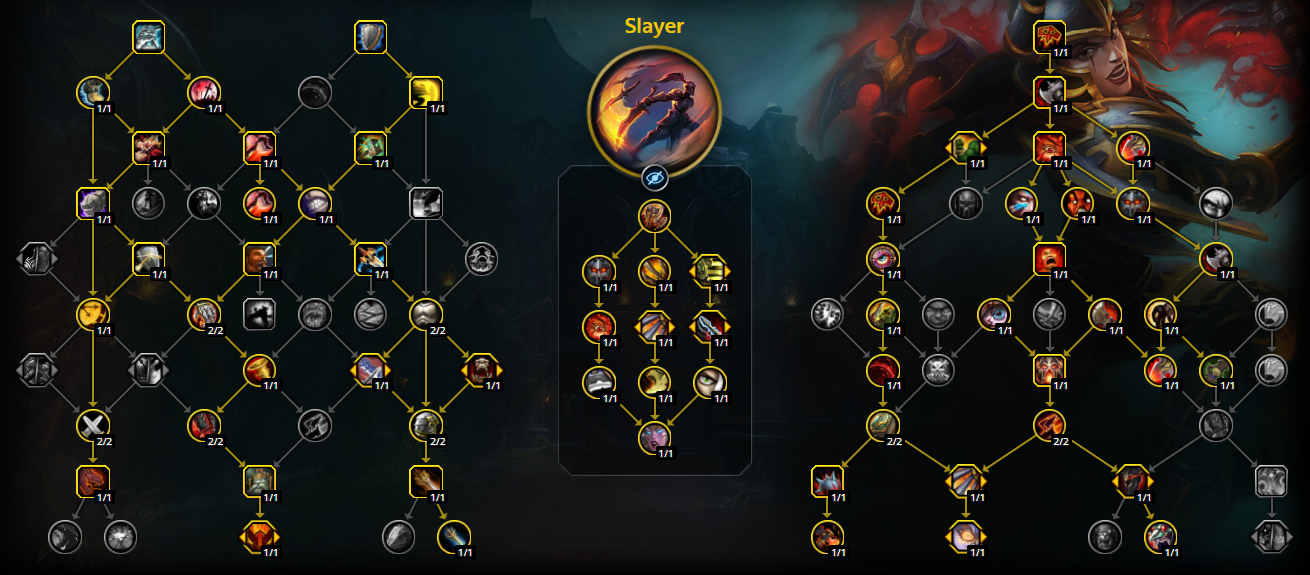
Single Target Build

Cleave Build
Battlegrounds Build
CgEAO9DBjZzKcjSu6RJDto0RCCAAAAAAAAAjGzYMMzsxsNYswMjxwMjZmttxMzMzGzMMmZmZsMMzgZAAAgYmltxGbWWMTjZmhJzGzwG
CgEAO9DBjZzKcjSu6RJDto0RCCAAAAAAAAAjGzYmZZMzCjBmFmZMGGjZmttZmZmZ2gxMGmZsMMzYmZAAAgwAbwymRjZAZ2gxC
CgEAO9DBjZzKcjSu6RJDto0RCCAAAAAAAAAjGDmZZmZwsMwswMzMGGjZstNzMzMzygZmxwMsMMzYMDAAAEGYBW2MaMDIzCMWA
In the current meta, the strongest Fury PvP talent setup typically features Slaughterhouse, Battlefield Commander and Enduring Rage.
Depending on the matchups, you can also replace Battlefield Commander and Enduring Rage for the following talents:
Before diving into your rotation, it is important to understand how to optimize the damage output of a Fury Warrior. The bulk of Fury Warrior's damage comes from Enrage. To maximize your effectiveness, ensure this buff remains active as much as possible. In addition to maintaining Enrage, your most powerful damaging ability is Rampage, which requires building up a large amount of Rage through other abilities. Using Rampage will also apply Slaughterhouse, a critical debuff that reduces enemy healing. Thus, spending Rage wisely is not a concern, as Rampage is your sole Rage-consuming ability.
Recklessness serves as your primary offensive cooldown, granting 20% increased critical strike chance on your abilities while also doubling Rage generation. While it does not alter your rotation, it enables more frequent use of Rampage, amplifying your overall damage output significantly.
For cleaving, this is done passively after using Whirlwind. If you have Improved Whirlwind talented, this ability enhances your cleave damage. To prepare for cleaving, ensure you use Whirlwind immediately before unleashing Rampage to maximize efficiency.
The opener is critical for establishing your team's CC chain and dealing early damage right as the match begins. The primary goal is to force the enemy team to burn their defensive cooldowns. If the enemy healer or kill target is forced to use their trinket during this phase, they will be in trouble later on. Use your team’s CC chain and burst abilities to build momentum — holding cooldowns at the start is usually not advised.
When the enemy healer is crowd-controlled and you are focusing on eliminating an enemy, use the following burst rotation:
Before the Gates Open
Coordinate with your team to identify the primary kill target and discuss potential target swaps. As a Fury Warrior, you often dictate the focus of your team's offensive efforts. Plan the use of your crowd control abilities, such as Intimidating Shout and Storm Bolt, to maximize offensive pressure. Utilizing these abilities effectively can create kill opportunities and disrupt enemy strategies.
Surviving the Enemy Damage
Enraged Regeneration is your core defensive cooldown, providing a significant 30% damage reduction and empowering Bloodthirst to heal you for 23% of your health per use. However, be cautious of enemies using Disarm, as it will completely negate the healing from this ability. If you anticipate a large amount of incoming damage, do not hesitate to use this cooldown early to mitigate damage rather than attempting to recover from it later.
Rallying Cry is an extremely valuable defensive ability for both you and your team. Be mindful, however, that the health granted by this ability will disappear at the end of its duration, which could lead to sudden deaths for you or your teammates.
Heroic Leap is primarily used to chase down fleeing enemies. However, it can also be a lifesaver in situations where survival is a higher priority than applying pressure. Use it to reposition or escape incoming damage when you are under heavy focus.
Intervene can be a game-changing ability, allowing you to intercept all melee and ranged attacks aimed at a chosen teammate. It is best utilized when one of your allies is being focused. Just be cautious, as redirecting damage to yourself can be risky. Pairing it with Enraged Regeneration can mitigate the redirected damage effectively.
Spell Reflection – use this spell to bounce back powerful spells or avoid CC. Reflect Polymorph, Chaos Bolt, Hexes etc. A cheeky move is to intervene your healer and Spell Reflect immediately, which can cause an incoming CC (like Cyclone) to reflect from your healer to the enemy caster.
Piercing Howl - use it to keep multiple enemies (for example, both DPS in a shuffle match) slowed so they can't kill you or your healer. It’s especially useful to stop things like a Rogue’s Vanish re-stealth – you can howl immediately after a vanish to try to catch them before they get away!
Defensive Stance gives 20% damage reduction at the cost of 10% damage done. If you take it, stance dance appropriately – sit Defensive Stance when you know you’re the kill target and your damage output isn’t crucial, then swap to Battle Stance to resume full damage when you’re safe. Avoid staying in Defensive stance the whole fight, or you’ll harm your pressure.
Good Bladestorm / Avatar Usage
Bladestorm and Avatar are not only exceptional burst cooldowns but also invaluable for their anti-crowd control (CC) capabilities. Against classes like Mages, Druids or Shamans, it might be more effective to use these cooldowns to break out of roots rather than for burst damage. Familiarizing yourself with enemy root cooldowns will help you decide whether to use these abilities offensively or to cleanse yourself.
Bladestorm also makes you immune to all CC effects and can be highly effective at disrupting enemy attempts to kill you with abilities like Kidney Shot. Correct timing is critical, as you have a brief 0.25-second grace window to use Bladestorm after being hit by CC to break out of it.
Intervene
Intervene is one of the most valuable tools in a Fury Warrior's arsenal for team utility. It allows you to reposition to a chosen teammate and redirect all melee and ranged attacks to yourself. Keep in mind that Intervene does not work against spells, so use it primarily to counter physical damage. Use this ability frequently to protect teammates under heavy focus, but be mindful of your own squishiness. When you anticipate significant redirected damage, combine Intervene with Enraged Regeneration for added survivability.
Awareness & Teamplay
Always track enemy cooldowns and plan accordingly! If the enemy has Disarm available, be cautious about when you use Enraged Regen. Watch for big enemy cooldowns (like Icy Veins or DH's The Hunt) – respond with your defensives or kiting. Fury can peel for teammates too: don’t hesitate to Intimidating Shout to peel an enemy off your healer, or use Disarm on a DPS popping their offensive CDs. Your job isn’t only dealing damage – it’s also preventing the enemy from killing your team.
Tunnel Vision
Many Fury Warriors love the "WAAAAGH!" playstyle (and it is fun), but tunnel visioning can cost games. If you never look at what’s happening to your healer or ignore an enemy freecasting at you, you’ll lose winnable matches. Awareness means tracking not just your rotation but the overall state: enemy healer CC’d or not, who’s low on health, who has cooldowns available etc.
Consciously widen your focus: check party frames every few seconds, especially after you’ve done your big burst sequence (that’s a good time to support your team). Keybind party member targeting or use macros for Intervene on party1/2 so you can quickly react. Use addons to call out when your healer is stunned or in trouble (e.g. GladiatorlosSA or BigDebuffs). The more you train yourself to be aware, the more you’ll catch opportunities to turn the tables – like intercepting a Crowd Control on your healer, or fearing the DPS off them. Fury isn’t just a brainless zugzug; higher-rated players balance damage with smart teamplay.
Unlike in PvE, when it comes to Player-versus-Player interactions race choices still play a major role in boosting your character's performance. So let's have a look at what each faction has to offer:
Unfortunately (for Horde enjoyers) Alliance currently dominates in the field of the best racials for Fury Warrior as Tauren isn’t seen much for Fury in arena – the War Stomp stun is okay, but Fury already has a stun and lacks synergy with a 2s casted stomp. Troll offers Berserking which is decent for Fury’s rage generation, but stun reduction is usually superior. Mag’har Orc gives a small stat bonus racial (Ancestral Call) but lacks the stun reduction of true Orcs.
Properly equipping your character can massively boost your success in all PvP content, so we've gathered all the info you need about Fury Warrior's best stats to help you pump out the highest numbers possible.
Strength is your primary stat and scales all your damage. Versatility is crucial in PvP for its damage boost and damage reduction. Aim for ~30%+ Versatility. Mastery increases damage done while Enraged – since you aim to be Enraged nearly all the time, this is very valuable. Haste smooths your rage generation and GCDs and Fury benefits from Haste for more Rampages and faster rotation, and currently Haste is only slightly behind Mastery in output. You ideally want a balance of Mastery and Haste (favoring Mastery just a bit) – and if you’re running 20% Haste and 25% Mastery, that’s a good mix. Crit is least important due to Recklessness providing crit and the overall lesser value of crit in PvP (as crits do 150% damage in PvP instead of 200%).
Full Prized Gladiator Gear (Conquest Gear) for Season 2 is your goal, as it scales to ilvl 450 in PvP combat. Prioritize pieces with Versatility and Mastery/Haste. Every other slot, use the highest ilvl PvP piece available. If you have access to Mythic raid weapons higher ilvl, those can surpass PvP weapons, but in Season 2 the PvP weapons max out at 450 which is near Mythic raid ilvl anyway.
Always use 2 PvP trinkets to activate the +12% Strength (Gladiator’s Distinction) set bonus!
Because it's not just enchants and consumables that make your character stronger in Arenas:
Consumables do not work in any Rated PvP. But if you're eager to "own noobs" in Open World or Random Battlegrounds, consider using the following:
Macros are Warrior’s best friends in PvP. They allow you to execute actions faster and even target more efficiently than manual targeting. Below are some useful macros that Fury Warriors (and warriors in general) use to gain an edge. These macros will help you CC enemies without changing target, intervene allies quickly, and manage abilities like Bladestorm.
With this you can easily swap between stances while using only just 1 keybind.
/cast [stance:2] Defensive Stance; stance:[3] Berserker Stance
Leap on your cursor without the extra mouse click.
/cast [@cursor] Heroic Leap
Crucial for kicking healers and casters nearby without needing to change targets.
#showtooltip
/cast [@focus] Pummel
Same usage as the macro above, but now for your range targeted stun!
#showtooltip
/cast [@focus] Storm Bolt
Cancels your Bladestorm and fears the focus target.
#showtooltip
/cancelaura Bladestorm
/cast [@focus] Intimidating Shout
This macro allows you to cancel buffs and perform an action immediately after. It’s primarily used to cancel Bladestorm or Blessing of Protection. For example, sometimes you Bladestorm offensively but need to stop spinning to quickly kick or use HP shout. This macro will cancel Bladestorm and then cast Execute in one button press (you can substitute Execute with any ability you want to use immediately after canceling).
#showtooltip Execute
/cancelaura Bladestorm
/cancelaura Blessing of Protection
/cast Execute
This macro combines 2 of your essential gap closers into 1 mouseover bind: when pressed over an enemy you'll use Charge, and if used on a teammate you'll Intervene.
#showtooltip Charge
/cancelaura Bladestorm
/cast [@mouseover, exists, help, nodead] Intervene
/cast [exists, nodead, harm] Charge
/cast Hamstring
Literally presses all your burst abilities, trinkets and a racial to inflict an absolutely massive damage upon your foes. Be careful - you might get Fury Warriors nerfed!
#showtooltip Recklessness
/cast Recklessness
/cast Avatar
/use Blood Fury
/use Berserking
/use Ancestral Call
/use 13
/use 14
Using these macros above make your Fury Warrior both smoother and deadlier in PvP. You’ll interrupt without losing your target, leap instantly, and stack cooldowns with one key. Start with one or two, get used to them, and build up your excellence.
That's it, Warrior — you're now armed with everything you need to dominate in Season 2 of The War Within. Remember, becoming a great Fury Warrior isn’t about perfecting just your rotation or your gear — it's about embracing the relentless, unstoppable mentality of the spec itself. Every arena loss is a lesson; every victory, confirmation you're growing stronger.
This guide provides all the core information you need to begin your journey as a Fury Warrior in PvP. However, some finer details and advanced techniques are well beyond its scope. Our expert boosters, highly skilled in both Battlegrounds and Arenas, can help you master these nuances and unlock your full potential as a Fury Warrior!