
In PvP, Arms Warrior is all about pressure and precision. You’re not here to mindlessly spam buttons — you’re here to control the pace, punish mistakes, and turn a single window into a win.
With Colossus Smash breaking armor and Mortal Strike cutting healing, Arms chips away at enemy teams until there’s nothing left. It’s a spec that rewards some planning: hold cooldowns, line up the kill, and explode when the time is right. No wasted movement, no panic — just clean, surgical damage.
| Strengths | Weaknesses |
| Relentless single target pressure. | Very limited by crowd control or kiting. |
| Great mobility spells available. | Linear and predictable burst windows. |
| Extremely powerful burst. | Generally more fragile than Fury. |
| Decent team utility. | Limited AoE burst. |
Arms Warrior thrives on pressure and precise burst. It’s a spec that rewards smart positioning and cooldown management, with strong team utility and solid defensive tools. In the current meta, Arms feels more threatening than ever, capable of turning a single burst window into a game-winning moment. That's why it's a dependable melee pick for players who value control, coordination, and clean execution.
The downside? Arms is all about momentum. Lose uptime, and your damage collapses. It lacks self-sustain, relies heavily on teammates for peel, and its big hits are predictable enough for skilled opponents to shut down. It’s less forgiving than Fury and demands good awareness to stay alive and land kills. Fall behind, and you’ll feel it — Arms doesn’t have many tools to catch up.
The War Within introduces Hero Talents — a new layer of customization that lets Warriors pick between two unique paths, each reshaping how your spec plays. It’s more than just flair: these trees bring real gameplay depth and identity to your build.
Arms Warriors get to choose between Slayer and Colossus paths:
Most players favor Slayer for its consistency and ease of use. It delivers steady pressure without relying on perfect timing or setup, making it a safer pick in fast-paced or disorganized matches. With frequent Execute and Bladestorm procs, Slayer rewards uptime and lets you stay aggressive without sacrificing mobility — a very key advantage in 3v3 and Solo Shuffle.
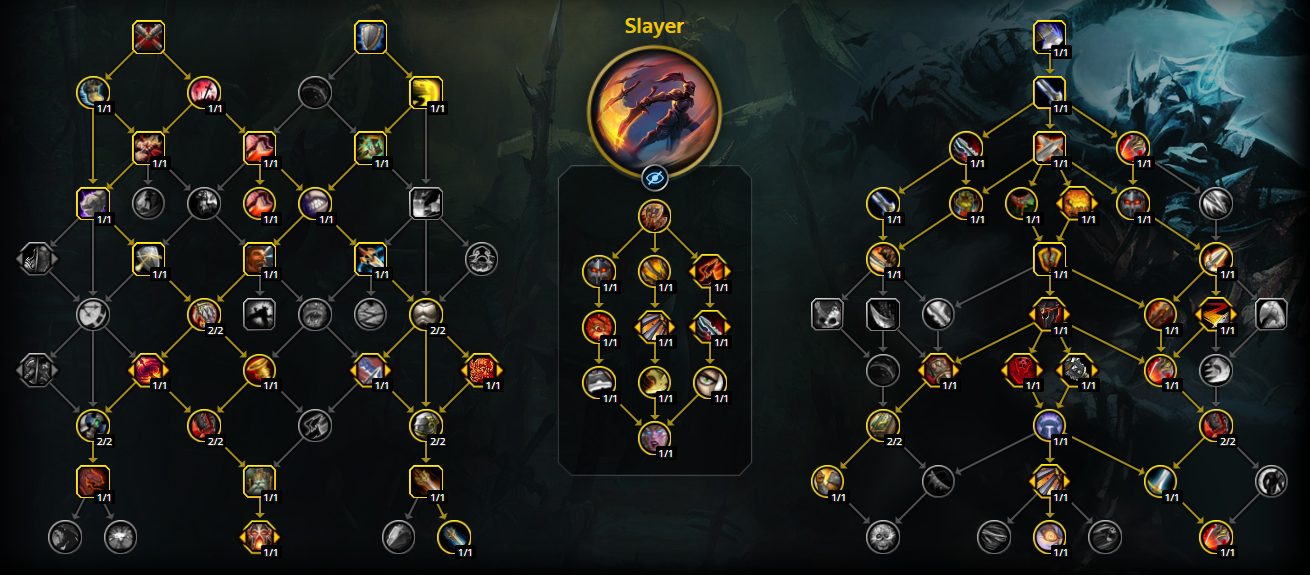
Slayer - Arena Build
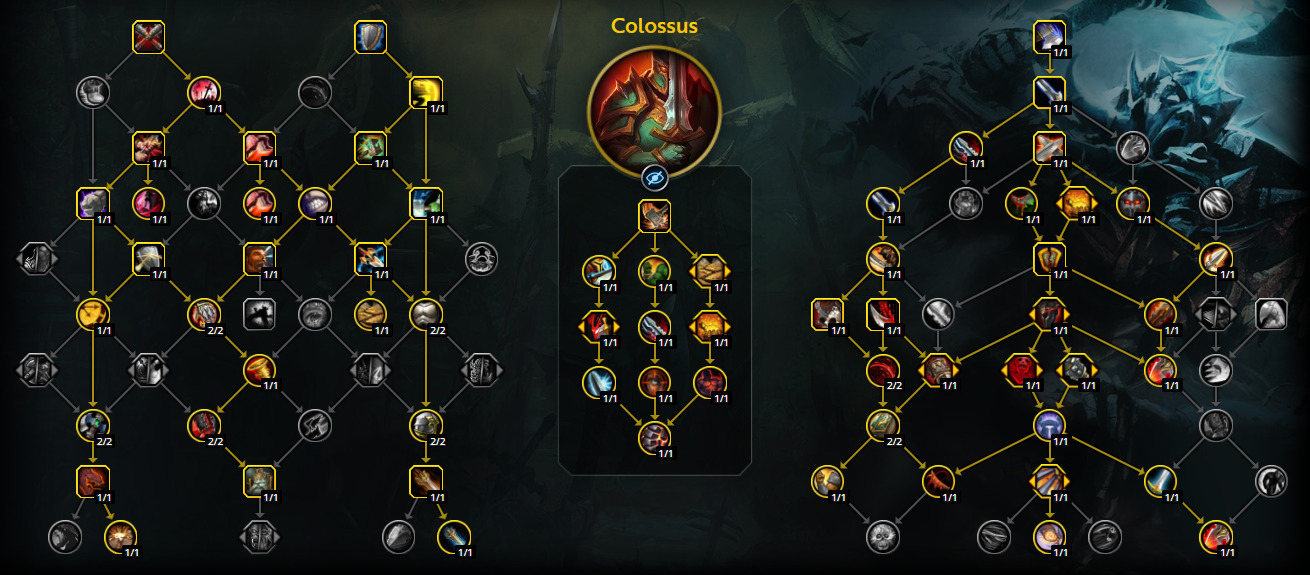
Colossus - Arena Build
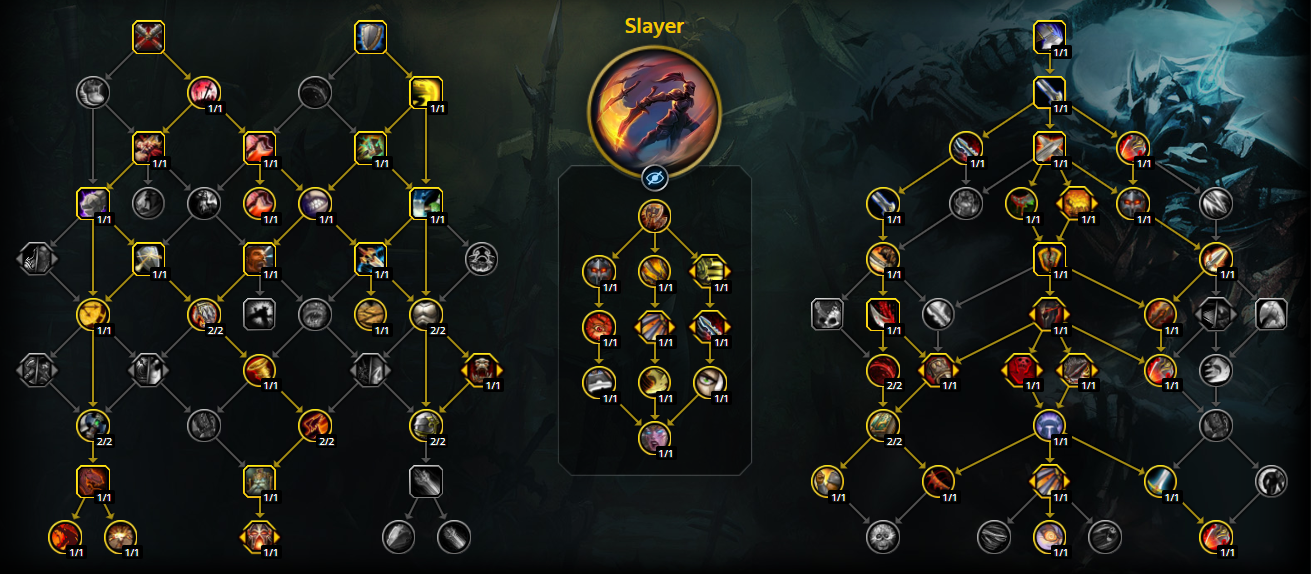
Slayer - Battlegrounds Build
CcEAO9DBjZzKcjSu6RJDto0RCCYbGzMzMjhtZZZZmBAAAAzw0MGziZmFmtBDbmZwwMjZAAAAAAAYYWmZMALxMW2mFzsMsZYYmZmWoZgN
CcEAO9DBjZzKcjSu6RJDto0RCCYbGmZMzMzsNLLLzMAAAAYGmmxMjxMYMMDMzwMMzYGAAAAAAAmxsMGDgYGbbzmZWG2MMMzMTL0MDWA
CcEAO9DBjZzKcjSu6RJDto0RCCYbGzMjZMzsNbLLzMAAAAYw0MGjxMbMGzMjNzMMDMmBAAAAAAgZMLjxAImxy2sYmthNDYmZmWoZGsB
Each Arms Warrior build can shift depending on the matchup. Most players go with Slayer — it’s more forgiving, keeps pressure up even when positioning is rough, and doesn’t rely on big setup windows. But in structured comps where you can land full Demolish channels, Colossus becomes a strong pick. It’s less fluid, but when it works, it hits truly hard.
Arms also gets to choose three PvP-specific talents to use in arenas and battlegrounds. In 11.1, the default PvP talent loadout for Arms is usually: Storm of Destruction, Sharpen Blade and Battlefield Commander. These three cover your bases for damage, healing reduction, and team utility:
These three are the go-to, but you have flexible slots based on matchups. You can swap out Storm of Destruction or Battlefield Commander if the situation calls for it:
Other PvP talents exist (like Warbringer causing Charge to deal AoE damage and slow, or Duel to reduce a target’s damage to others by 50%), but they see less play. Death Sentence isn’t as needed now that mobility is decent, and Sharpen/Storm/Commander cover the most important needs. Generally stick to the defaults and only swap in Disarm or Berserker Roar when appropriate.
Arms Warrior’s rotation in PvP is all about applying constant pressure with Mortal Strike and bleeds, while executing a deadly burst combo when the moment is right. Your gameplan is to wear down the enemy with sustained damage, then explode with burst to force kills.
The opener sets the tone. It’s your chance to land crowd control, push early damage, and force cooldowns. If you can draw a trinket from the healer or kill target right away, you’re in a strong position for the next go. Don’t hold back — most comps want to press their cooldowns early and build momentum from the start:
When the enemy healer is crowd-controlled (or vulnerable to your switch) and you’re going for a kill, that’s when you unleash your burst.
In short: Before the gates open, make sure you’re in Battle Stance and ready to engage. Once the round begins, use Charge to close the gap and start building momentum. Apply Mortal Strike early to reduce healing on your kill target, and if talented into Rend, get your bleeds rolling for consistent pressure. The opener is all about gaining control and forcing cooldowns — the faster you can apply pressure, the better your chances of snowballing the match.
Throughout the fight, your core loop is about maintaining uptime, using Overpower to empower your Mortal Strikes, and weaving in Execute procs when they appear. Use Skullsplitter to recover Rage and reset bleeds when needed. If you're getting focused, always swap briefly into Defensive Stance. Arms is all about momentum — keep the pace high, punish gaps, and land your burst when the healer is locked out.
Good Bladestorm / Avatar Usage
Bladestorm and Avatar are not only exceptional burst cooldowns but also invaluable for their anti-crowd control (CC) capabilities. Against classes like Mages, Druids or Shamans, it might be more effective to use these cooldowns to break out of roots rather than for burst damage. Familiarizing yourself with enemy root cooldowns will help you decide whether to use these abilities offensively or to cleanse yourself.
Bladestorm also makes you immune to all CC effects and can be highly effective at disrupting enemy attempts to kill you with abilities like Kidney Shot. Correct timing is critical, as you have a brief 0.25-second grace window to use Bladestorm after being hit by CC to break out of it.
Overcapping Rage
Arms has a max rage of 100 (130 with the talent). Avoid hitting max – always spend on Mortal Strike or Execute to keep output going. In 11.1 the rage flow is smoother and you’re less often resource starved, but in long exchanges be mindful to not waste potential damage by sitting at full rage.
Always apply Mortal Wounds
This cannot be stressed enough – keep that Healing Reduction debuff up on whichever target your team is focusing. Arms is brought to PvP largely for this debuff. If you ever let Mortal Wounds fall off during a key moment, the enemy healer will have an easy time recovering. Even when you’re being kited or CC’d, look for any opportunity to refresh Mortal Wounds (e.g. throw a Hamstring -> Mortal on a target as you reconnect). Pairing Sharpen Blade with this makes it even more devastating – call out to your team when you Sharpen so they know to pile damage into the target who’s getting 50% reduced healing.
Tunnel Vision
Many Arms Warriors just love the "WAAAAGH!" playstyle (and it is fun), but tunnel visioning can cost games. If you never look at what’s happening to your healer or ignore an enemy freecasting at you, you’ll lose winnable matches. Awareness means tracking not just your rotation but the overall state: enemy healer CC’d or not, who’s low on health, who has cooldowns available etc.
Consciously widen your focus: check party frames every few seconds, especially after you’ve done your big burst sequence (that’s a good time to support your team). Keybind party member targeting or use macros for Intervene on party1/2 so you can quickly react. Use addons to call out when your healer is stunned or in trouble (e.g. GladiatorlosSA or BigDebuffs). The more you train yourself to be aware, the more you’ll catch opportunities to turn the tables – like intercepting a Crowd Control on your healer, or fearing the DPS off them. Arms isn’t just a brainless zugzug; higher-rated players balance damage with smart teamplay.
Awareness & Teamplay
Always track enemy cooldowns and plan accordingly! If the enemy has Disarm available, be cautious about when you use Enraged Regen. Watch for big enemy cooldowns (like Icy Veins or DH's The Hunt) – respond with your defensives or kiting. Arms can peel for teammates too: don’t hesitate to Intimidating Shout to peel an enemy off your healer, or use Disarm on a DPS popping their offensive CDs. Your job isn’t only dealing damage – it’s also preventing the enemy from killing your team.
Utility & Defensive Utility
Intervene: Use it on an ally being focused to redirect hits to yourself — sometimes it's even good to pair it with or Die by the Sword. It can also intercept crowd control like Polymorph or Hunter's trap if timed right!
Spell Reflect: Use to reflect key spells like Polymorph, Fear, or Chaos Bolt back at the caster. It can even reflect certain crowd control spells like Blind if perfectly timed, turning the pressure back on your opponent.
Disarm: If talented, use it at the right moment — e.g., disarm a Rogue during Shadow Dance or a Warrior during Avatar. By the way, even some of the experienced players don't know that, but it can also stop Hunters from using Kill Shot and Aimed Shot, as they require a weapon.
Rallying Cry: Use it as a defensive for your team or to break roots on yourself (if talented with Battlefield Commander). It’s clutch if your healer is in CC and your partner is about to die — Rally can buy time until healing is back online.
Intervene
Intervene is one of the most valuable tools in a Warrior's arsenal for team utility. It allows you to reposition to a chosen teammate and redirect all melee and ranged attacks to yourself. Keep in mind that Intervene does not work against spells, so use it primarily to counter physical damage. Use this ability frequently to protect teammates under heavy focus, but be mindful of your own squishiness. When you anticipate significant redirected damage, combine Intervene with Enraged Regeneration for added survivability.
Unlike PvE, race choice still matters a lot in PvP — it can directly impact your performance. Here’s a quick look at what each faction brings to the table:
Right now, Alliance has a slight edge in racial options for Arms Warrior due to the utility and control they provide. Tauren brings War Stomp, which can interrupt or stun briefly in clutch moments, but the 0.5-second cast time and lack of synergy with Arms’ fast playstyle hold it back. Troll offers Berserking for a burst of Haste — not bad, but generally weaker than stun reduction in PvP. As for Mag’har Orc, their Ancestral Call provides a random stat boost, but lacks any strong defensive or utility value. All in all, if you’re playing Horde and want results, regular Orc is still the go-to — but Alliance offers more flexibility overall.
Properly equipping your character can massively boost your success in all PvP content, so we've gathered all the info you need about Arms Warrior's best stats to help you pump out the highest numbers possible.
Explanation: Arms absolutely loves Versatility – it increases all damage done and reduces damage taken, a no-brainer for PvP. Aim for at least ~30% Vers (which is easy since almost all PvP gear comes with Vers). Haste is next most valuable, as it speeds up your rotation: more auto-attacks (more rage), faster GCDs, shorter Mortal Strike cooldown and faster tick rate on bleeds. This results in smoother, more relentless damage output. After stacking those, Mastery adds extra oomph to your sustained damage – Arms Mastery puts a DoT on targets and makes you deal increased damage to them, which scales with mastery. It’s solid once you have good Vers/Haste. Crit is least important; while crits are nice, the spec doesn’t rely on RNG crits and gains more consistent benefit from the other stats. So in summary: stack Versatility and Haste on every piece possible, get some Mastery in leftover slots, and don’t worry much about Crit.
Your gear will be a mix of PvP Conquest pieces and Tier Set pieces for the 2-set/4-set bonus. In 11.1, the Warrior tier set Enforcer’s Backalley Brawlplate provides a buff called Winning Streak that increases your damage, and when it ends, buffs your haste and Mortal Strike damage further – very worthwhile in PvP. We’ll use 4 pieces of tier and PvP items for the rest.
Remember to always use 2 PvP trinkets to activate the +12% Strength (Gladiator’s Distinction) set bonus!
As it's not just enchants and consumables that make your character way stronger in Arenas:
Consumables do not work in any Rated PvP. But if you're down to "own noobs" in Open World or Random Battlegrounds, consider using these:
In PvP, macros are essential for Warriors. They let you react faster, stay locked on your target, and handle multiple tasks at once — something manual play just can’t match. Whether you're using them to crowd control without swapping targets, protect teammates with a quick Intervene, or cleanly activate/cancel abilities like Bladestorm, good macros can give you a real edge. Below are some of the most common and effective macros Arms Warriors use to stay sharp under pressure.
With this you can easily swap between stances while using only just 1 keybind.
/cast [stance:2] Defensive Stance; stance:[3] Berserker Stance
Leap on your cursor without the extra mouse click.
/cast [@cursor] Heroic Leap
Crucial for kicking healers and casters nearby without needing to change targets.
#showtooltip
/cast [@focus] Pummel
Same usage as the macro above, but now for your range targeted stun!
#showtooltip
/cast [@focus] Storm Bolt
Cancels your Bladestorm and fears the focus target.
#showtooltip
/cancelaura Bladestorm
/cast [@focus] Intimidating Shout
This macro allows you to cancel buffs and perform an action immediately after. It’s primarily used to cancel Bladestorm or Blessing of Protection. For example, sometimes you Bladestorm offensively but need to stop spinning to quickly kick or use HP shout. This macro will cancel Bladestorm and then cast Execute in one button press (you can substitute Execute with any ability you want to use immediately after canceling).
#showtooltip Execute
/cancelaura Bladestorm
/cancelaura Blessing of Protection
/cast Execute
This macro combines 2 of your essential gap closers into 1 mouseover bind: when pressed over an enemy you'll use Charge, and if used on a teammate you'll Intervene.
#showtooltip Charge
/cancelaura Bladestorm
/cast [@mouseover, exists, help, nodead] Intervene
/cast [exists, nodead, harm] Charge
/cast Hamstring
Literally presses all your burst abilities, trinkets and a racial to inflict an absolutely massive damage upon your foes. Be careful - you might get Arms Warriors nerfed!
#showtooltip Recklessness
/cast Recklessness
/cast Avatar
/use Blood Fury
/use Berserking
/use Ancestral Call
/use 13
/use 14
Once you've gotten used to these macros, you’ll notice your control over the flow of battle is much improved – you become the master of interrupts and swaps, not just a zugzug melee tunneling one target. With the right macro setup and keybinds, an Arms Warrior becomes a truly fearsome PvP juggernaut, capable of peel, pressure, and plays that are humanly impossible without them.
That wraps it up. You’ve got the tools, the mindset, and the build to start swinging hard in Season 2 of TWW. Arms is all about momentum — knowing when to push, when to peel, and when to strike with precision. It rewards patience, punishes mistakes, and thrives in the hands of players who don’t just react — they control the fight.
This guide lays the groundwork, but the real growth happens in the arena. Whether you're climbing through Solo Shuffle or queuing with a seasoned team, every game sharpens your instincts. And if you're looking to fast-track that climb, our top tier PvP coaches can help refine your gameplay and unlock the full potential of your Warrior: