Le Temple du Serpent de jade semble calme en surface – pierre polie, eau claire, piles de parchemins silencieuses – mais ses salles sont exiguës, ses groupes d'ennemis denses, et les erreurs résonnent. Des statues de serpent marquent des virages serrés, les bibliothèques vous canalisent dans des combats étroits, et les groupes de la cour punissent les interruptions négligentes. C'est un lieu qui récompense les déplacements propres, les annonces claires et le respect des petites salles.
Dans ce guide, nous allons décortiquer la version en mode Défi de ce donjon: comment fonctionne la mise à l'échelle, comment le chronomètre façonne votre rythme, et comment les routes, les raccourcis et les temps de recharge s'articulent. Attendez-vous à un chemin pratique à travers la bibliothèque et les jardins, des notes sur les passages en invisibilité et le nombre d'ennemis à tuer, et des plans ciblés pour les boss: contrôler l'eau du sage Mari, gérer les phases de Liu Cœur de Flamme, et maintenir la discipline contre le Sha du doute. Nous vous montrerons où pousser, où attendre, et comment atteindre le chronomètre d'or sans perdre de temps.
Le Temple du Serpent de jade se situe généralement dans la catégorie facile à moyenne des modes Défi: abordable à apprendre, mais peu indulgent si vous vous précipitez. Des couloirs étroits, des lignes de vue courtes, des groupes d'ennemis rapprochés et un chronomètre serré dictent le rythme; la progression vient de déplacements délibérés, d'un positionnement soigné et de la minimisation des temps morts plutôt que d'un simple DPS brut.
Ce qui le distingue davantage, c'est la façon dont une planification propre se traduit directement en temps gagné. Des itinéraires réfléchis, des raccourcis sélectifs et une gestion intelligente des temps de recharge créent un élan fluide, tandis que le contrôle et la communication maintiennent les salles suffisamment ordonnées pour rester dans les temps. Avec un plan bien rodé et des annonces claires, il devient une tentative fiable pour l'or – un test ciblé des fondamentaux qui prépare un groupe pour des donjons en mode Défi plus difficiles.
Avant de nous plonger dans les itinéraires nuancés, la planification des groupes d'ennemis et la gestion des temps de recharge nécessaires pour terminer rapidement le donjon et obtenir une médaille d’or, examinons d'abord de plus près ce que sont les modes Défi en général – leurs règles de mise à l'échelle, la pression du chronomètre qui impose le rythme, et les fondamentaux qui façonnent chaque tentative.
Nouveau de notre créateur Poizy : (en anglais) une vidéo claire, étape par étape, du mode Défi du Temple du Serpent de jade qui montre précisément comment décrocher la médaille d’or. Regardez l’itinéraire complet en action — pulls optimisés, skips sûrs, timings avisés des CDs et de la BL, stratégies propres pour les boss, et conseils pratiques pour garder le timer au vert. Tout est à l’écran et facile à suivre, afin que vous puissiez reproduire le run avec votre propre groupe.
Vous voulez le même résultat? Commencez par la vidéo. Vous préférez lire? Faites défiler la page pour des explications détaillées, au format texte, de chaque pull, de chaque boss et du skip d’invisibilité.
Les modes Défi, précurseurs des donjons Mythique+ d'aujourd'hui, ont fait leurs débuts dans Mists of Pandaria. Ils ont été conçus pour être exigeants dès le départ, avec des chronomètres serrés, des groupes d'ennemis denses et un accent sur l'exécution pure plutôt que sur le niveau d'objet brut. Le format a établi une norme claire que le Mythique+ a développée par la suite.
Pour maintenir une difficulté constante à travers les patchs et les paliers, Blizzard a fixé les statistiques des joueurs à un niveau de base et a quelque peu imposé des règles d'itinéraire (liées au nombre d'ennemis). On ne pouvait pas surclasser le défi avec l'équipement des paliers ultérieurs ou des objets légendaires; le succès dépendait de la planification, de la coordination et d'un jeu précis.
Terminer un mode Défi de MoP n'accorde pas d'équipement épique; à la place, il octroie des ensembles d'armure distinctifs, des montures et un titre. Pour un aperçu complet des règles, des restrictions et des récompenses, consultez nos guides complets sur le mode Défi dans Pandaria Classic:
Vous avez lu l'aperçu et la liste des récompenses? Parfait – vous savez maintenant ce que sont les modes Défi, comment ils fonctionnent et pourquoi ils sont si géniaux dans MoP. Passons à la partie pratique et décortiquons le donjon du jour: Temple du Serpent de jade.

L'entrée du Temple du Serpent de jade se trouve du côté est de la forêt de Jade. Le portail est à l'intérieur du bâtiment principal du temple, aux coordonnées approximatives /way 56.2, 57.8. Vous verrez la pierre de rencontre devant et les portes de l'instance flanquant le foyer.
Pour activer la version en mode Défi du donjon, vous devrez former un groupe et vous rendre à l'entrée du donjon, où vous verrez une console du mode Défi, une nouveauté de MoP Classic qui permet aux groupes de démarrer le mode Défi plus rapidement qu'en 2012.
Les tentatives en mode Défi dépendent entièrement du chronomètre, et le Temple du Serpent de jade ne fait pas exception. Le bronze et l'argent offrent des marges généreuses: suivez un itinéraire stable, minimisez les morts, et vous les réussirez sans avoir besoin d'une exécution au millimètre près. Ils tolèrent facilement quelques hésitations, un groupe d'ennemis supplémentaire ou un temps de recharge mal synchronisé sans faire échouer la tentative.
L'or est différent. À quinze minutes, vous devez vous déplacer avec intention – un cheminement serré, un temps mort minimal, des groupes d'ennemis engagés à dessein et une utilisation propre des utilitaires. Le succès vient de la planification et de la discipline (et des dégâts bruts, bien sûr).
| Médaille | Chronomètre | Récompense |
| Or | 00:15:00 | 60 Points de vaillance |
| Argent | 00:25:00 | 50 Points de vaillance |
| Bronze | 00:45:00 | 40 Points de vaillance |
Au-delà de la médaille elle-même, les tentatives terminées accordent également des Points de vaillance, les médailles supérieures en octroyant davantage. Cela signifie que même les essais contribuent à votre progression, tandis qu'un itinéraire peaufiné peut transformer la répétition en confiance et en une médaille d'or constante.

Il est temps d'aborder le cœur de ce guide: une stratégie claire et pratique pour chaque groupe d'ennemis et chaque boss. Voyez cela comme la transformation du chaos en chorégraphie – des itinéraires qui font gagner du temps, des raccourcis intelligents, des signaux pour les temps de recharge, et une exécution propre qui maintient le chronomètre dans le vert.
Comme la plupart des lecteurs ne sont pas ici juste pour finir à temps mais pour obtenir la médaille d’or, tout ce qui suit suppose des décisions axées sur la vitesse – l'asymptote d'une tentative propre: un cheminement serré, un temps mort minimal, un contrôle discipliné.
Voyons ce qu'il faut faire exactement pour réussir au Temple du Serpent de jade:
Une fois le chronomètre lancé, il n'y a pas de point de contrôle ni de seconde chance. Vous vous en tenez à votre itinéraire, exécutez proprement, et vous ajustez rapidement lorsque les choses tournent mal. Voyons maintenant une stratégie d'itinéraire efficace que la plupart des groupes dévoués peuvent suivre – pas seulement les équipes de calibre MDI.
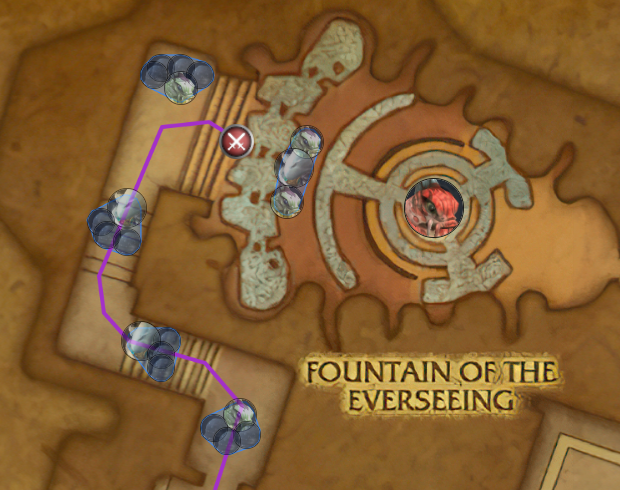
Dès que le mode Défi commence, le tank doit sprinter vers la gauche et récupérer tous les monstres sur le chemin du sage Mari, en utilisant les outils de déplacement et les provocations dès que possible pour maintenir la menace stable pendant que le groupe reste serré derrière. Annoncez les étourdissements et les repoussements pour tous les lanceurs de sorts dangereux que vous ramassez en chemin, et assignez à l'avance les interruptions pour que rien ne ralentisse le train. Lorsque le tank engage les quatre derniers limons, amenez tout le monde dans un endroit sûr et ouvert avec de l'espace pour se disperser, puis plantez-vous et engagez-vous dans l'AoE.
Lors du regroupement, serrez-vous bien pour que le cleave des mêlées touche et que les distances puissent lancer leurs sorts librement, mais soyez prêts à esquiver les flaques laissées par les gros adds à leur mort – elles infligent des dégâts d'Ombre modérés et puniront quiconque se focalise trop. Utilisez les défensifs personnels lorsque tout le groupe d'ennemis est rassemblé, et prévoyez un temps de recharge de soigneur pour le plus grand chevauchement. UTILISEZ TOUJOURS Héroïsme ici; cela se traduit directement par du temps gagné, et vous pourrez l'avoir de nouveau pour le dernier boss.
À mesure que le groupe d'ennemis s'amenuise, nettoyez les traînards, régénérez votre mana si nécessaire, et glissez-vous en position pour le sage Mari. S'il ne reste que quelques monstres à faible santé et qu'il n'y a pas de nouvelles flaques sous vos pieds, vous pouvez commencer le boss tout en les finissant pour gagner quelques secondes; sinon, jouez la sécurité, regroupez-vous, et engagez le sage Mari ensemble.

Le sage Mari est un combat en deux phases, dont la majeure partie de l'action se déroule en phase une. En mode Défi, restez à environ 10 mètres sur sa plateforme; être plus loin inflige des dégâts périodiques qui font perdre du temps au chronomètre. Ne restez jamais dans l'eau, et faites attention à l'Hydrolance et aux explosions de zone occasionnelles. Si une flaque d'eau scintille de vase noire, éloignez-vous d'au moins 3 mètres et hors de son chemin vers le boss.
Pendant la phase une, Mari devient immunisé et invoque de l'Eau vivante corrompue. Tuez chaque gros add, puis les petits qu'il fait apparaître, et faites-le en les tankant loin du groupe pour éviter les flaques. Prévoyez des temps de recharge pour éliminer rapidement les quatre gros adds, maintenez le groupe en mouvement comme une seule unité, et pré-positionnez-vous pour que les éruptions ne brisent pas votre formation.
Lorsque le quatrième gros add meurt, Mari termine son sort et déclenche Éclatement de bulle, une projection d'environ 15 mètres – préparez-vous et repositionnez-vous. La phase deux commence avec le rayon Lavage qui inflige des dégâts massifs; il se déplace aussi plus vite en mode Défi, alors collez-vous à l'anneau le plus intérieur, courez dans le sens des aiguilles d'une montre pour maintenir votre activité, et évitez le rayon. Des déplacements propres et zéro mort protègent le chronomètre et préparent une fin confortable.
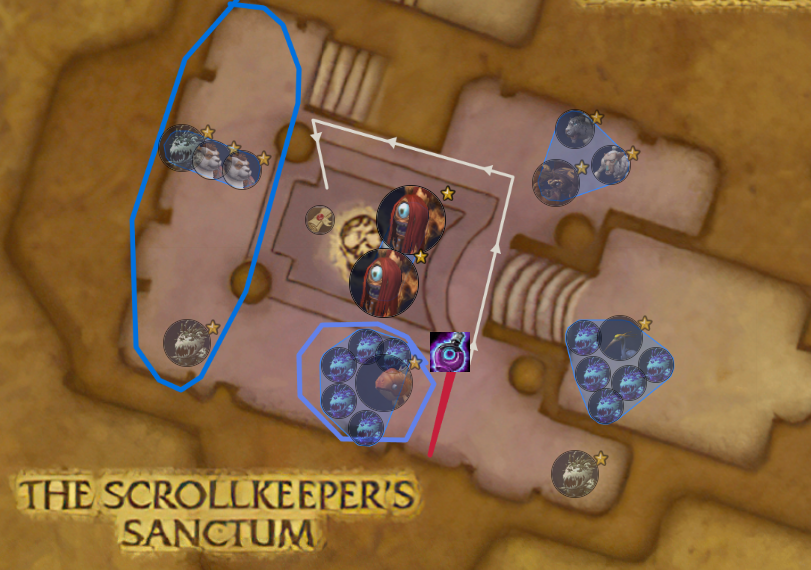
Maintenant, votre groupe doit courir aussi vite que possible vers la zone de départ et aller tout droit, ce qui vous mènera à la Bibliothèque. Attirez le trio à proximité: deux Pandarens (Xiang et Jiang), un Sha envoûtant puis le Sha envoûtant solitaire dans le coin le plus éloigné. Engagez ensuite le groupe suivant composé de Le Poisson-qui-parle et de 6x Sha inférieur (utilisez tous vos temps de recharge DPS et défensifs sur ce groupe car il est coriace mais aussi nécessaire pour le compte de monstres). Une fois qu'ils sont morts, demandez à tout le monde de préparer des potions d'invisibilité.
Utilisez une Potion d’invisibilité sur la ligne rouge pour éviter les ennemis agaçants (et non nécessaires) et courez vers le niveau inférieur où le prochain boss apparaît. Si votre groupe a des augmentations de vitesse de déplacement comme le Rugissement de débandade, vous devriez les utiliser avant de devenir invisible. Le tank garde ses temps de recharge de déplacement, quitte l'invisibilité à mi-chemin, engage les deux groupes près de la grue plus le scarabée et le tigre, puis les amène à l'équipe. Tous les autres quittent l'invisibilité ensemble et éliminent le groupe combiné.
À environ 30% de PV, amenez le groupe vers le Parchemin corrompu, nettoyez les ennemis restants, et tuez le Parchemin corrompu pour faire apparaître le boss. Vous aurez environ 15 à 20 secondes pour vous réinitialiser, boire, marquer les positions et commencer le combat.

Le Chroniqueur Pas-de-Pierre est essentiellement une rencontre d'équilibre où vous combattez ses représentants, Discorde et Péril en même temps, avec presque aucun changement mécanique par rapport à l'Héroïque, mais des punitions plus sévères en mode Défi.
Le combat tourne autour de trois capacités. Agonie est une simple attaque d'Ombre à soigner. Intensité s'accumule chaque fois qu'un boss subit des coups uniques; à 10 charges, ce boss devient immunisé et inflige de lourds dégâts – c'est là que la plupart des échecs se produisent. Dissipation diminue les charges lorsque vous arrêtez d'attaquer un boss, mais un temps mort excessif fait perdre du temps, les changements de cible doivent donc être nets.
Commencez sur Discorde et accumulez l'Intensité jusqu'à environ 5-6, puis passez à Péril et répétez, en gardant leurs barres de vie proches. Une charge d'Intensité est accordée par des coups uniques sur un temps de recharge interne d'environ 2 à 2,5 secondes, ce qui signifie que vous pouvez appliquer en toute sécurité des DoTs autour de 5 charges – les ticks suivants n'ajouteront pas de charges pendant cette fenêtre. Si la vie devient déséquilibrée, dépensez des temps de recharge sur la cible ayant le plus de vie pendant votre fenêtre de DPS pour rééquilibrer, et utilisez le cleave avec précaution pour ne pas trop avancer un boss par rapport à l'autre.
Quand les deux sont bas en vie, annoncez un engagement total. Finissez-en un tout en vous assurant que l'autre meurt quelques secondes plus tard; ne laissez jamais l'un ou l'autre atteindre 10 charges. Cette rencontre est plus une question de contrôle que de dégâts bruts: des changements de cible disciplinés, un temps d'activité élevé et un temps mort minimal sont tout ce dont vous aurez besoin ici.
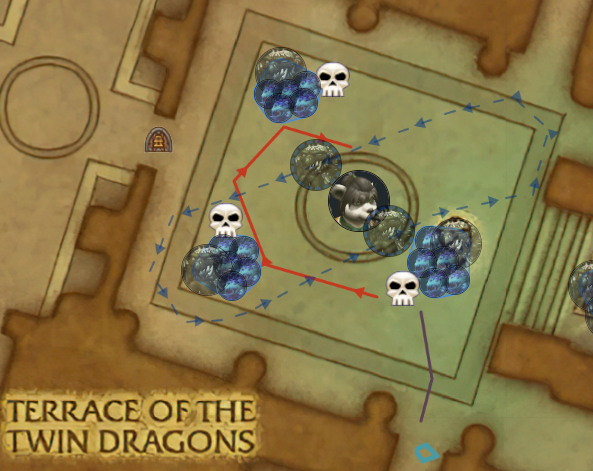
Depuis le Chroniqueur Pas-de-Pierre, sortez de la bibliothèque en allant tout droit et prenez le couloir de droite vers Liu Cœur de Flamme où vous devrez d'abord nettoyer 3 grands et dangereux groupes d'ennemis.
Ces groupes de couloir frappent fort et mettront votre soigneur à l'épreuve, alors établissez une cadence régulière. Commencez avec un seul groupe statique et un grand Sha en patrouille lorsqu'il s'aligne; combattez dans un endroit avec de l'espace pour esquiver et un coin que vous pouvez utiliser pour la ligne de vue afin d'attirer les lanceurs de sorts. Concentrez-vous sur le grand Sha jusqu'à environ 10–20% de PV, puis stabilisez et finissez les petits; répétez avec le patrouilleur suivant et le groupe suivant. Faites tourner les interruptions et les étourdissements pour que les sorts dangereux ne se chevauchent jamais, et faites en sorte que le tank planifie des défensifs pour chaque fenêtre de grand Sha plutôt que tous en même temps.
INTERROMPEZ TOUJOURS Résolution brisée du serviteur du doute car cela peut facilement vous faire échouer ou ralentir massivement votre progression.
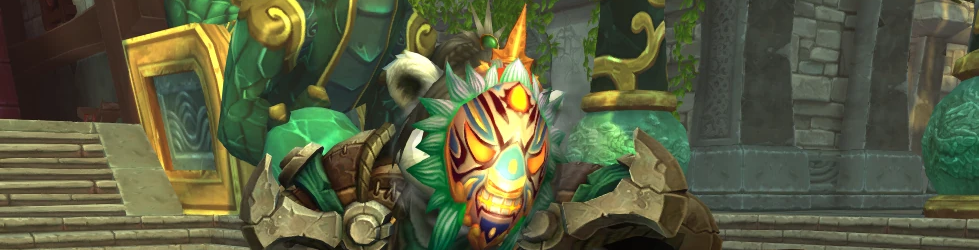
Liu Cœur de Flamme se joue presque de la même manière qu'en Héroïque, mais les erreurs sont beaucoup plus pénalisantes en mode Défi – la Vague de serpent peut tuer en un coup les joueurs inattentifs, et la pression sur le soigneur augmente rapidement. La phase 1 comprend la Frappe du serpent sur le tank avec un effet de brûlure, le Coup de pied du serpent comme une petite attaque à 360°, et la Vague de serpent envoyant trois vagues de feu dans différentes directions.
Gardez le boss immobile, réagissez à la brûlure sur le tank, écartez-vous juste assez pour atténuer le Coup de pied du serpent, et traitez la Vague de serpent comme une esquive impérative: bougez tôt et maintenez votre activité tout en naviguant entre les voies. Évitez d'engager de longs temps de recharge ici; gardez tout ce qui est supérieur à deux minutes. Note pour les tanks: lorsque Liu Cœur de Flamme apparaît, la table d'aggro est réinitialisée, alors provoquez-la dès que possible!
À 70% elle se renforce pour la Phase 2. La Frappe du serpent devient Frappe du serpent de jade et ajoute une absorption de soins qui doit être dissipée rapidement; demandez des soins ciblés et des aides externes si nécessaire. Le Coup de pied du serpent devient Coup de pied du serpent de jade, infligeant plus de dégâts et une projection – contrôlez votre positionnement pour ne pas être projeté dans une mauvaise zone. La Vague de serpent devient Vague du serpent de jade et laisse maintenant des traînées de feu; continuez de bouger et évitez de croiser des chemins qui bloquent votre groupe. Le combat consiste à garder une longueur d'avance sur le feu, à garder une vision claire et à dépenser les temps de recharge en Phase 2 où les dégâts augmentent.
À 30% Yu’lon se joint pour la Phase 3. Liu et le dragon sont brièvement immunisés pendant quelques secondes – ne gaspillez pas de DoTs ou de temps de recharge avant qu'ils ne soient ciblables. Yu’lon utilise Feu de jade pour cibler un joueur aléatoire et créer une flaque de feu; sortez-en immédiatement. Restez attentif au cône frontal du dragon, maintenez une légère dispersion et continuez à privilégier le mouvement plutôt que de gonfler les dégâts. Si votre soigneur maîtrise l'absorption de la Frappe du serpent de jade et que le groupe esquive les vagues et les flaques, la rencontre se termine proprement même sous la pression du mode Défi.
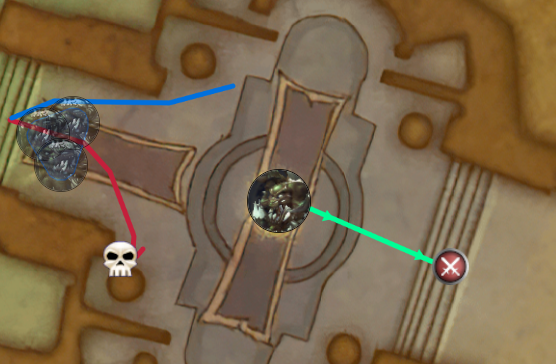
Une fois Liu Cœur de Flamme tombée et la porte ouverte, trois grands Shas commencent à patrouiller vers votre position.
Vous devriez toujours les éviter car ils sont extrêmement difficiles à battre ensemble (et nous avons déjà tué 45/45 ennemis). Désignez un joueur avec une capacité de perte de menace totale (Disparition, Feinte spectrale, Feindre la mort, Camouflage dans l'ombre, ou l'Invisibilité supérieure d'un Mage) pour engager les trois, puis utilisez un bonus de vitesse pour les attirer dans le coin supérieur droit. Quand ils sont à peu près à mi-chemin, le reste du groupe entre par le côté gauche, en prenant soin de ne pas entrer en combat avec le trio. Une fois que tout le monde est à l'intérieur, le joueur désigné utilise sa capacité de perte de menace, et vous pouvez engager le boss sans vous soucier que ces Shas se joignent au combat.
La même astuce fonctionne avec un Chaman utilisant la Réincarnation ou un Démoniste avec une Pierre d’âme, bien que vous perdiez votre bonus de nourriture pour le boss final si vous mourez pour l'exécuter. Si le temps est serré, n'importe quelle classe peut effectuer l'appât et simplement recevoir une résurrection en combat par la suite, mais cela coûte environ 15 secondes supplémentaires et risque que le soigneur attire accidentellement soit le trio, soit le boss en ressuscitant.
Lorsque la zone est sécurisée et que le raccourci est terminé, repositionnez-vous, confirmez les temps de recharge et engagez le boss.

Il n'y a aucune différence mécanique par rapport à l'Héroïque, donc vous ne devriez pas avoir de mal à vaincre le boss. Dans cette optique, concentrez-vous sur les mécaniques qui maximisent le DPS plutôt que sur la pure évasion des dégâts.
Demandez au tank d'engager et de placer le boss de manière à ce que le tank se tienne en haut des escaliers derrière lui, avec le boss placé à mi-hauteur des marches. Une fois positionné, tout le monde se regroupe de manière compacte sur le tank – y compris les mêlées. Le soigneur doit surveiller le Toucher du néant et le dissiper immédiatement au contact. Lorsque les Limites de la réalité commencent, les adds apparaîtront en un tas bien ordonné derrière le groupe; éliminez-les rapidement avec de l'AoE, puis revenez immédiatement sur le boss.
Utilisez le deuxième Héroïsme du donjon et tous les temps de recharge de DPS restants pendant cette fenêtre. Les mêlées peuvent maintenant se glisser derrière le boss, et avec un burst approprié, il devrait tomber avant les prochaines Limites de la réalité.
Et félicitations – vous avez terminé!
Nous souhaitons également partager un ensemble plus complet de stratégies de vitesse et d'astuces nuancées pour le mode Défi du Temple du Serpent de jade – optimisations d'itinéraire, chemins de raccourci, synchronisations de temps de recharge, manipulation de la menace et triage du soigneur – qui peuvent raser des secondes à chaque temps intermédiaire. Bien utilisées, elles vous aident non seulement à obtenir la médaille d'or, mais aussi à pousser vos records personnels, à améliorer votre temps tentative après tentative, et à rivaliser avec d'autres groupes qui grimpent dans les classements du mode Défi.
Ces tactiques ne sont viables que pour des groupes coordonnés avec des attributions claires, une communication vocale et une exécution constante. Ne les tentez pas avec des coéquipiers aléatoires: beaucoup impliquent des timings d'invisibilité précis, des enchaînements de groupes d'ennemis avec des filets de sécurité limités, et des fenêtres de burst serrées qui peuvent se transformer en échecs si un seul joueur hésite. Développez d'abord la coordination – puis déployez ces stratégies:
Pour les ennemis menant au sage Mari: Vous pouvez en fait engager le boss avec tout le couloir attiré. Avec Héroïsme et tous les temps de recharge majeurs engagés, le groupe combiné est gérable. Demandez au tank de rassembler le couloir et de se positionner près du boss pour que les joueurs à distance ne subissent pas de dégâts aléatoires en étant hors de portée ou de ligne de vue. Ce faisant, donnez la priorité à chaque grand add qui conditionne l'apparition du sage Mari; plus vite ils meurent, plus tôt la rencontre progresse et plus vous gagnez de temps.
Pour les ennemis menant à Discorde/Péril: Après avoir utilisé une Potion d’invisibilité et pendant que votre tank se dirige vers les groupes de la Grue et du Scarabée/Tigre, vous pouvez tuer le Parchemin corrompu d'abord, puis engager le boss immédiatement. Cela vous permet de cleave sur le boss pour finir les ennemis restants tout en contrôlant les charges de la manière habituelle. Gardez les totaux de santé équilibrés et changez de cible proprement; le but est de mêler les dégâts sur le boss à un nettoyage sûr et efficace des ennemis.
Pour les ennemis menant à Liu Cœur de Flamme: Vous pouvez enchaîner les trois groupes si vous voulez l'itinéraire le plus rapide, mais soyez prêt à des dégâts entrants très élevés et à des pics aléatoires sur les non-tanks. Utilisez les temps de recharge ici – aides externes du soigneur, défensifs du tank et mitigation de groupe – pour qu'ils se recyclent à temps pour la pression de mi-combat pendant le Sha du doute. Si votre groupe est sous-équipé ou si la communication est fragile, divisez l'enchaînement en deux groupes pour réduire les risques.
Encore pour les ennemis menant à Liu Cœur de Flamme: Il existe une stratégie alternative qui consiste à tuer les trois serviteurs du doute stationnaires mais à laisser les patrouilles (ou une seule patrouille) en vie jusqu'à ce que le boss soit engagé. Les PNJ qui combattaient ces serviteurs stationnaires passeront alors à l'add restant et au boss, fournissant des dégâts gratuits et une distraction. Cela ne vaut pas toujours la peine de la mise en place, mais si vous êtes juste sur le temps ou avez besoin d'un petit avantage, cela peut être un jeu intelligent.
Avec ce guide en main, vous et vos coéquipiers connaissez l'itinéraire, les raccourcis, le plan des temps de recharge et les habitudes qui transforment une bonne tentative en une tentative en or. À partir de là, il ne reste plus que la pratique et l'assurance – des groupes d'ennemis propres, des annonces claires et un chronomètre vert. Bonne chance pour vos prochaines tentatives; que votre cheminement soit serré et vos secondes d'avance nombreuses.
Mais au cas où vous n'auriez pas de groupe dédié pour ce mode Défi particulier (ou les 8 autres présents dans MoP Classic) ou si les choses ne fonctionnent tout simplement pas même après de nombreuses tentatives, nos PROs sont toujours prêts à aider. Contactez-nous, et nous vous guiderons à travers les réussites et toutes les récompenses que vous convoitez: titres, montures, transmogrifications, et toutes les autres choses que le mode Défi a à offrir!