
Welcome to the comprehensive guide for the Stormstout Brewery Challenge Mode in Pandaria Classic. This dungeon is a chaotic and fast-paced test of coordination, demanding precise execution and a solid strategy to beat the clock. From the unpredictable trash packs full of cast abilities to the unforgiving boss mechanics, every pull requires your group's full attention. This guide will provide you with a detailed walkthrough, outlining the most efficient routes, critical interrupts, and cooldown management necessary to overcome the brewery's toughest challenges and secure that coveted Gold Medal.
Whether you are aiming to simply complete the dungeon for the achievement or are pushing for competitive leaderboard times, the strategies within will help you optimize your run. We will cover advanced tactics such as large-scale trash pulls and positioning secrets that can shave precious seconds off your timer. Prepare your group, coordinate your cooldowns, and get ready to master the drunken madness of Stormstout Brewery.
The Stormstout Brewery stands as one of the most demanding Challenge Modes, a brutal trial of speed and teamwork that punishes any hesitation from the outset. Success in this notoriously fast-paced environment is not achieved through caution; it is forged in aggressive chain-pulls, navigating a constant sea of stuns, and unleashing overwhelming group damage to beat the unforgiving timer.
The key to victory lies in converting the dungeon's inherent chaos into controlled momentum. Strategic cooldown management for enormous pulls, flawless interrupt coordination, and crystal-clear communication are non-negotiable for keeping pace. A group that masters this frantic dance sets a new standard for their own performance, building the synergy required for any top-tier challenge.
But before we break down the specific routes, pull-by-pull strategies, and cooldown maps needed for a Gold Medal run, we must first establish a firm understanding of Challenge Modes themselves: the universal scaling, the ever-present clock, and the foundational principles of this unique content.
New from our creator Poizy: a step-by-step Stormstout Brewery Challenge Mode video that shows exactly how to secure a Gold Medal. Watch the full route unfold — tuned pulls, every pack explained, BL timings, clean boss plans, and practical tips to keep the timer green.
Chasing the same result? Start with the video. Prefer reading instead? Scroll down for detailed, text-based breakdowns of every pull and each boss.
First introduced in Mists of Pandaria, Challenge Modes were the precursor to the modern Mythic+ system. They were designed to be intensely difficult from the beginning, featuring strict timers, challenging trash packs, and a core focus on player skill rather than the power of their equipment. This format established the standard that Mythic+ would later build upon.
To ensure a level playing field throughout the expansion, Blizzard normalized all player stats to a set baseline and implemented enemy count requirements that defined the viable routes. This meant you could never out-gear the content with items from later tiers or powerful legendaries; success was purely a result of strategy, teamwork, and flawless execution.
Completing a Mists of Pandaria Challenge Mode does not reward powerful gear. Instead, it offers some of the most sought-after cosmetic rewards in the game: class-specific armor sets, unique mounts, and prestigious titles. For a full breakdown of the rules, limitations, and available prizes, see our dedicated guides:
Now that you've reviewed the general rules and seen the rewards, you have a solid understanding of what makes Challenge Modes such a unique and compelling feature of MoP. It's time to apply that knowledge as we dive into the practical strategy for today's dungeon: the Stormstout Brewery.

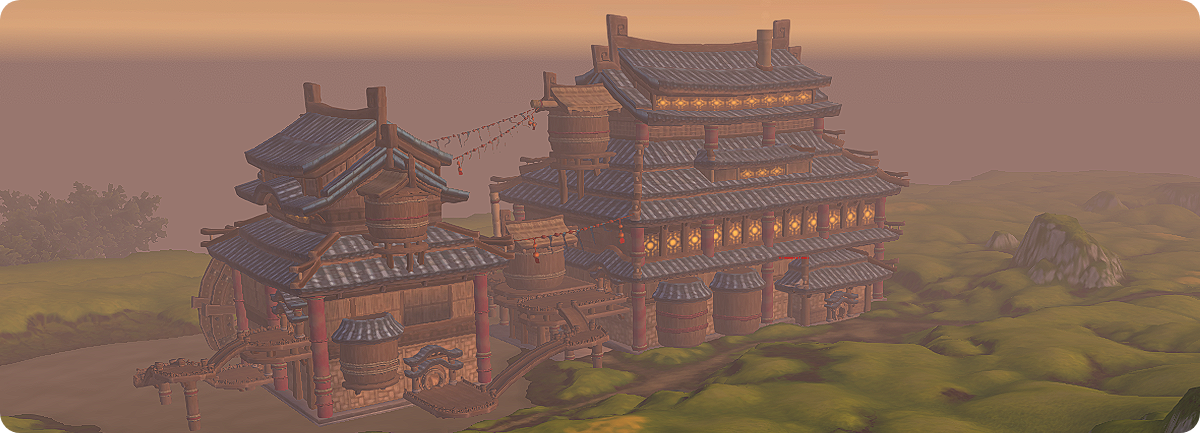
You can find the entrance to Stormstout Brewery in the southeastern part of the Valley of the Four Winds. The portal is located inside the main brewery building at approximately /way 36.1 69.1. The meeting stone is situated just outside, with the instance portals found within the main hall.
To begin the Challenge Mode, you must first form a party and zone into the dungeon. Inside, you will find the Challenge Mode Console, a feature added in MoP Classic that allows groups to initiate a timed run much more quickly than in the original release.
Success in Challenge Mode is measured by the clock, and Stormstout Brewery's notoriously tight timer is a true test of a group's skill. Bronze and Silver offer some leeway, allowing for a steady pace and even a few mistakes, such as an extra pull or a mistimed cooldown, without jeopardizing the run.
Gold, however, is a different beast entirely. At a blistering twelve minutes, it demands a relentless pace from start to finish. Success requires aggressive chain-pulling, perfect crowd control, and maximizing every second of uptime. Flawless planning and disciplined execution are essential.
| Medal | Timer | Reward |
| Gold | 00:12:00 | 85 Valor Points |
| Silver | 00:21:00 | 70 Valor Points |
| Bronze | 00:45:00 | 55 Valor Points |
Beyond just the medal, every completed run also awards Valor Points, with more points granted for higher medals. This means that even practice runs contribute to your character's progression, while polishing your route will build the confidence and consistency needed to achieve a Gold time.
Now we dive into the heart of the matter: a detailed playbook for every encounter. This is where we turn the frantic energy of the brewery into a focused assault, using superior routing, clever skips, and the kind of flawless performance that keeps you well ahead of the clock.
This guide is for Gold. As such, every decision outlined is about gaining speed. A clean run is composed of non-stop forward momentum, ironclad control over enemy packs, and squeezing every ounce of potential out of your global cooldowns.
Let's be clear about what victory in Stormstout Brewery looks like:
When the timer starts, you get one attempt. Success depends on your team's ability to execute the plan flawlessly and recover instantly from any mistake. The strategy outlined below is powerful and repeatable for any dedicated group willing to practice it, not just the top 0.1% of players.
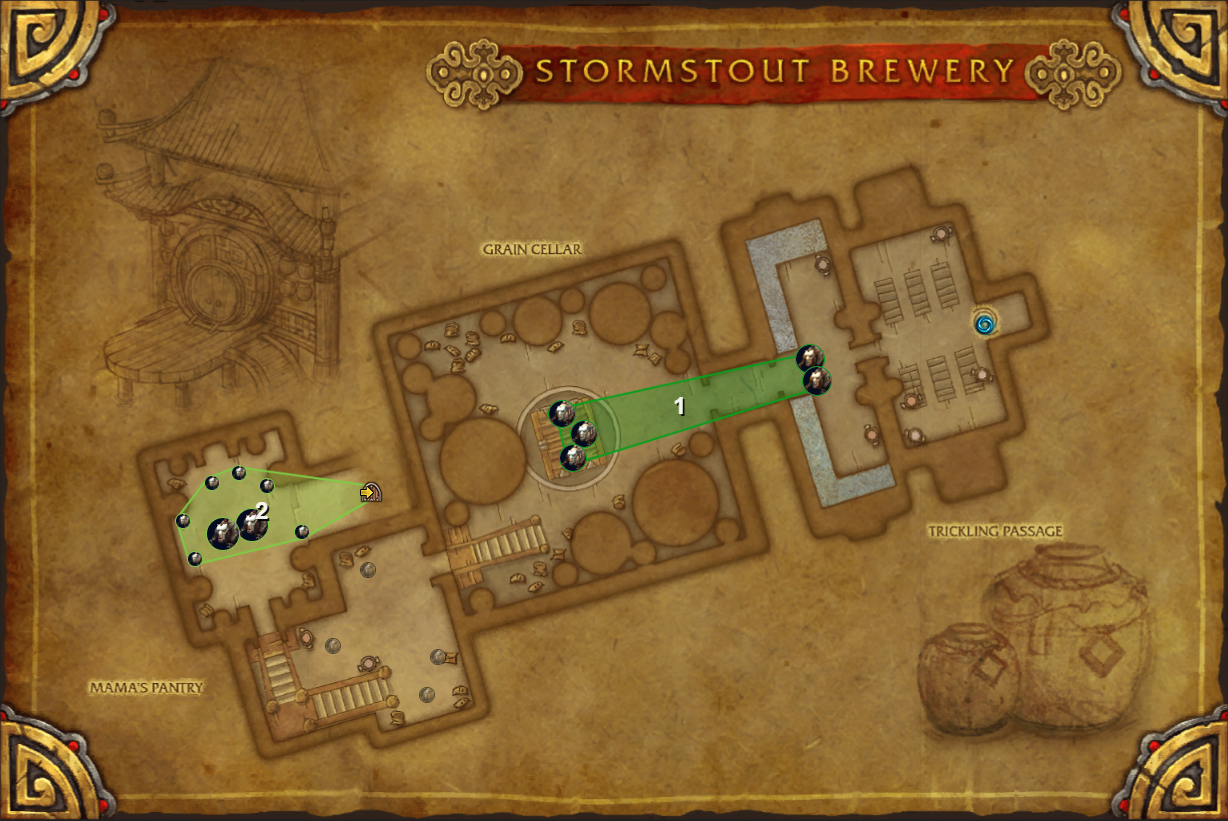
Pull 1
Pull 2 & Ook-Ook
The initial pulls at the start of the dungeon are relatively straightforward and shouldn't pose a significant threat to a coordinated group. Your main goal here is efficiency. Begin by having your tank gather the first two packs of mobs near the entrance. Group them up tightly for effective area-of-effect damage and burn them down as quickly as possible.
Once defeated, move forward to the two Drunken Hozen Brawler fighting each other; they should be pulled along with every other Hozen Party Animal in the chamber. For the cleanest execution of this large pull, using a Battle Horn is highly recommended. This will simplify the task and save precious time on the timer. Once you've taken out 40 of the Hozen Party Animal, Ook-Ook will engage.
The spoiler below contains an advanced, more challenging version of this pulls, ideal for experienced groups:
If your group is highly confident, you can attempt to combine all the trash before the first boss into one massive pull. Be warned, this is a high-risk strategy that will demand maximum performance and excellent coordination from every single player.
For this to work, DPS players must exercise patience and hold their damage until the very last moment to ensure they don't pull aggro from the tank. At the same time, it is highly recommended for the tank to position themselves with their back against a wall. This will prevent any knockback effects from displacing them and disrupting the pull.
This entire pull is achievable even without using Bloodlust or Heroism. If you can successfully manage it and save that crucial cooldown for the boss during its increased damage taken phase, you will gain a very significant advantage and save a great deal of time.
The tank should immediately pull him to the center of the room and face him away from the group. This positioning is critical, as it keeps the party safe from his frontal cone attack, Ground Pound, and simplifies the main fight mechanic: the Rolling Barrel.
The Rolling Barrel is the key to beating this boss quickly. Players can right-click a barrel to control it, then steer it into Ook-Ook. A successful hit triggers a Brew Explosion, applying a debuff that increases all damage he takes by 10%, and this effect stacks. Because of this massive damage amp, this is the ideal moment to pop Heroism/Bloodlust for a huge burst phase that will save you significant time.
Watch out for his enrage phases. At 90%, 60%, and 30% health, Ook-Ook gains a stack of Going Bananas, boosting his attack speed and damage by 15% each time. Tanks, be ready with your defensive cooldowns, as his damage becomes incredibly dangerous once he reaches three stacks.

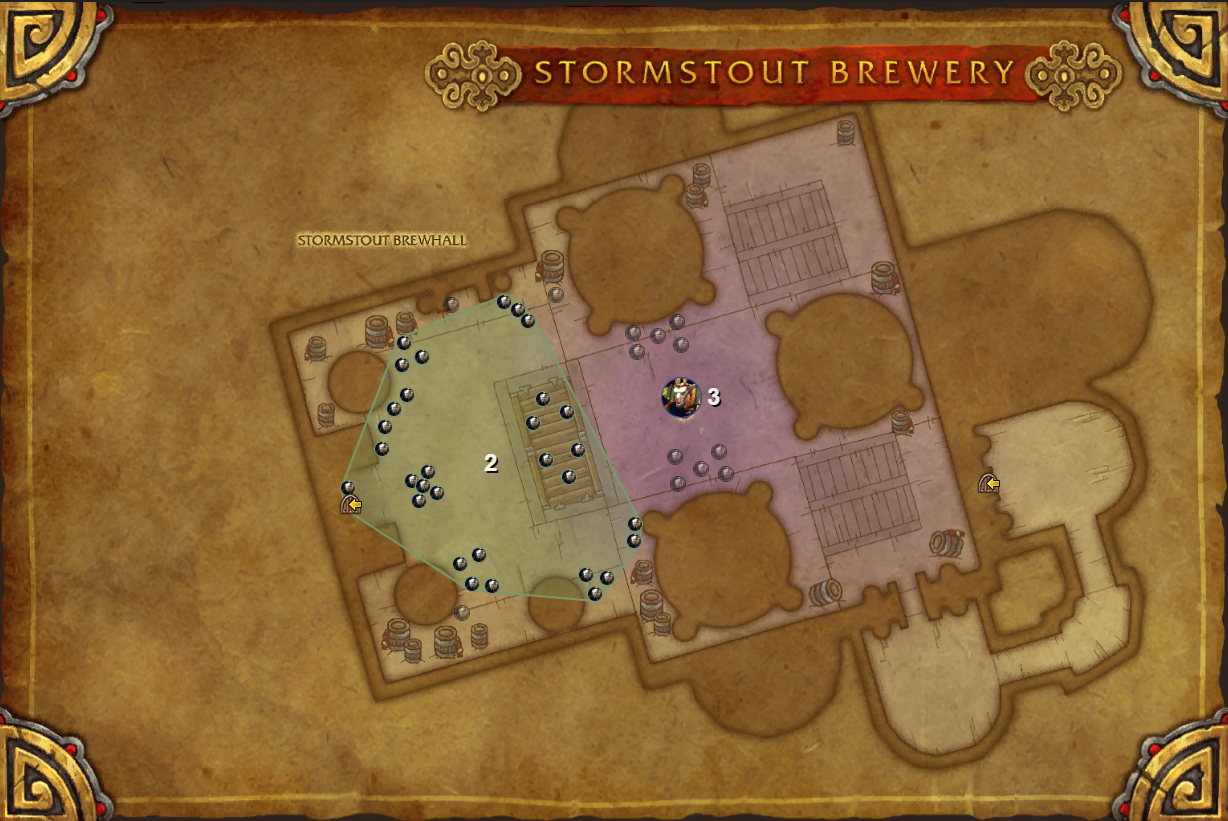
Pull 4
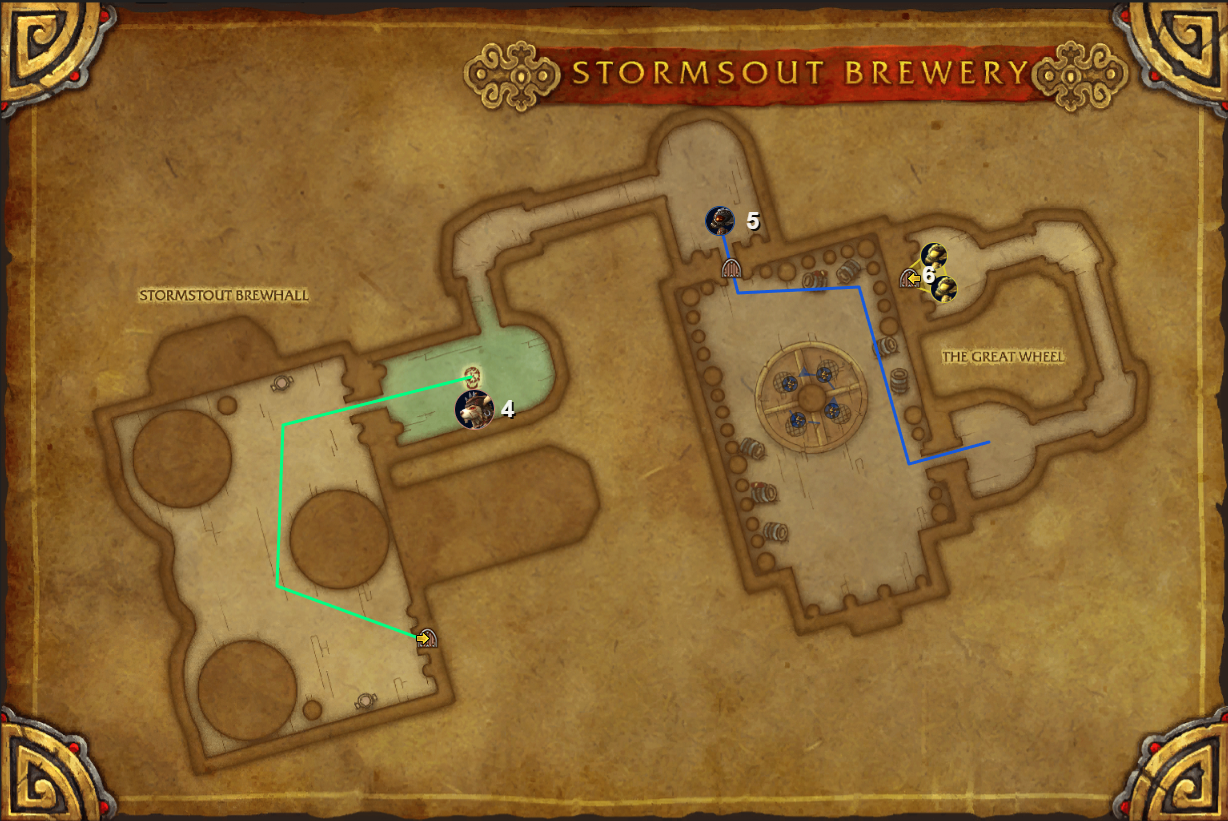
Pull 4
With the first boss down, you've got a quick run to the second boss's platform. Stack up as a group and run there without stopping. DPS need to be careful not to attack too early during this pull; let the tank establish threat first, otherwise you risk pulling aggro and making a mess of the run.
Once you're on the platform and everything is grouped up, it's time to AoE everything down. Watch out for the Hopper - they cast Explosive Brew and then detonate, dealing heavy damage in a small area, so be ready to move. The Bopper will drop hammers when they die; make sure to pick these up, as you'll need them for the boss fight. The boss will activate as soon as you kill the last add on the platform.
Hoptallus is a giant, frenetic rabbit whose fight is defined by positioning and add control. He frequently uses Furlwind, fixating on a random player and spinning for several seconds; anyone caught in his melee range will take rapid damage, so the targeted player must run away until he stops. He also casts Carrot Breath, a channeled frontal cone that slowly rotates 360 degrees. As soon as he begins the cast, move behind him and continue to circle with him to stay out of the damaging stream.
The true test of this encounter, however, is the waves of virmen adds that Hoptallus periodically summons. When a wave appears, the group should stack on the tank so the adds converge on one spot. Then, use the Smash! charges from the hammers to instantly obliterate the wave. Any Hopper that survive the hammer can be cleaved through the boss and stunned before they can explode. Between waves, focus all damage on Hoptallus himself. If your team manages the virmen efficiently with the hammers, Hoptallus will fall quickly.
Pull 5
Pull 5-6-7-8
Pull 5: After defeating Hoptallus, you can proceed to the Bloated Brew Alemental, which has two abilities: Bloat and Brew Bolt.
To avoid taking unnecessary damage, it is highly recommended that you spread out from the player targeted by Bloat. Brew Bolt is a standard cast that should be interrupted as many times as possible. Coordinate an interrupt rotation with your group to avoid overlapping.
You also have a couple of options for how to handle this segment:
Pull 6: Once you've cleared previous section, move forward, and you will encounter two Sudsy Brew Alemental. You should pull them into the next room to chain-pull them with the Bloated Brew Alemental that spawn in the center of the room after a short RP event.
You are already familiar with the Bloated Brew Alemental abilities. The Sudsy Brew Alemental, which you are encountering for the first time, have a standard interruptible cast, Brew Bolt, and an uninterruptible ability, Suds. Be extremely careful with interrupts on this pull. If a few Brew Bolt hit the same target, it's a guaranteed death. It is wise to assign an interrupter to each mob to manage their casts effectively.
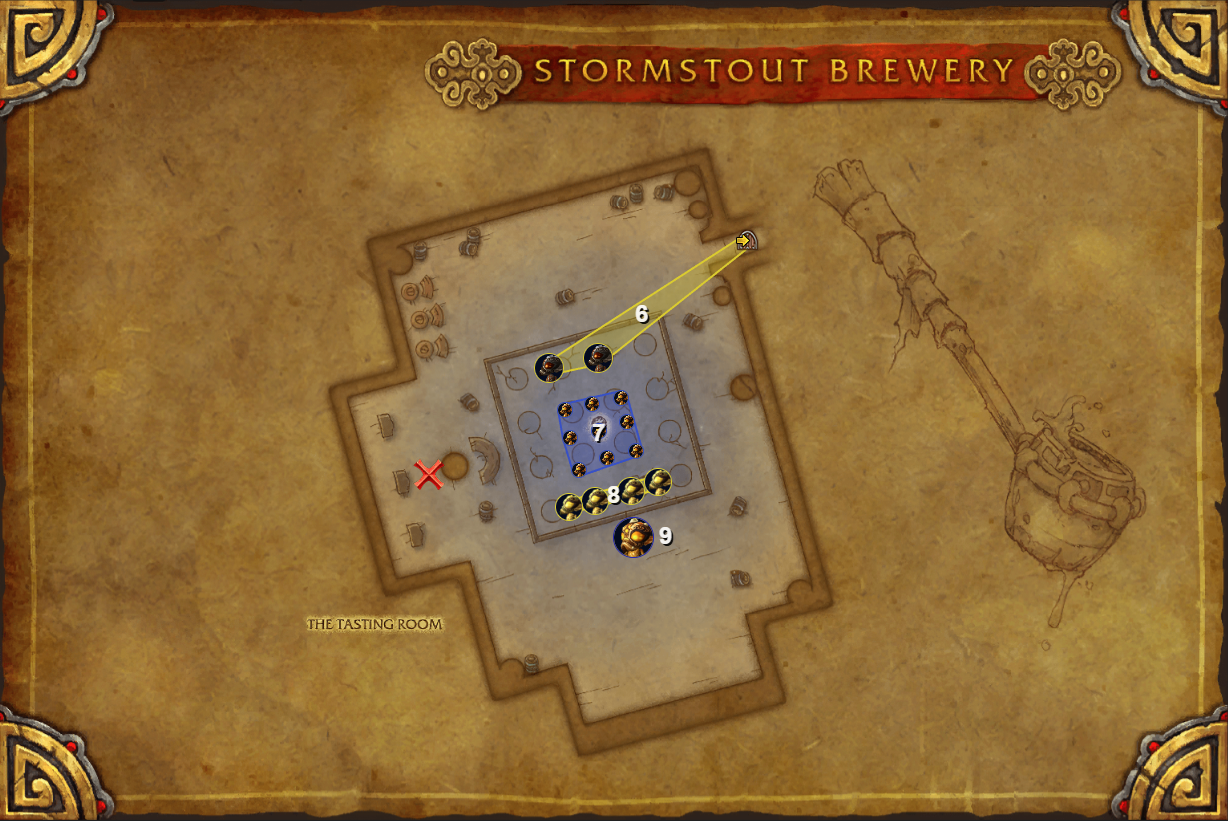
Pull 7: After that pull is defeated and another short RP event concludes, the next mobs will spawn: a group of 9 caster mobs called Yeasty Brew Alemental. To simplify this pull, your entire group must hide behind the pillar shown in the image as "X". The tank can then use any ability on one of the mobs and immediately hide behind the pillar as well. Patiently wait for the mobs to run to your location, where they will be conveniently stacked for cleave damage. Since every mob will be casting Brew Bolt, be sure to use all available AoE stuns and stops here.
The final pull before the boss, Yan-Zhu the Uncasked, consists of four familiar Sudsy Brew Alemental. The strategy is the same as before: Use interrupts and AoE stops to handle the Brew Bolt casts, do not stand in the puddles left by the Suds ability, move the mobs out of the puddles so that melee DPS can damage them safely.

Unlike other difficulties, the Challenge Mode version of this boss always uses three key abilities: Wall of Suds, Yeasty Brew Alemental, and Bloat. Also, if there are no players near boss, he will start casting Brew Bolt, so tank should not move too far away from him.
The Bloat ability functions identically to the one used by the Bloated Brew Alemental. The targeted player simply needs to move away from other group members and be extremely careful while the debuff is active.
Wall of Suds will summon several waves of beer that travel across the boss arena, stunning players caught in them for 5 seconds and dealing damage. Thanks to the Sudsy buff, which allows for high jumps, you can simply leap over these waves.
Finally, and perhaps most importantly, is the Yeasty Brew Alemental ability. The boss will summon familiar adds to aid him. These adds will cast a weaker version of Brew Bolt, which you should interrupt as much as possible. They also gain a new ability: Ferment. The adds will channel a beam at the boss, restoring 3% of his health and mana per second. To simplify the fight and prevent losing time, a player must intercept this beam by standing in it. Additionally, use all available crowd control on these adds whenever possible. Prioritize all damage on the boss, instead of killing the adds, simply manage their mechanics as they appear.
And congratulations — you’re done!
Armed with this guide, you and your team are now equipped with the route, the skips, the cooldown strategy, and the mindset that elevates a good attempt into a Gold success. From this point on, it all comes down to practice and composure — executing clean pulls, making clear calls, and keeping the timer green. Good luck on your runs; may your pathing be precise and may you have seconds to spare.
However, if you don't have a consistent group for this particularly demanding Challenge Mode (or any of the other 8 in MoP Classic), or if you're hitting a wall after countless attempts, our professional players are standing by to help. Get in touch, and we'll carry you through the clears to secure all the rewards you're after: prestigious titles, unique mounts, class-defining transmogs, and everything else these challenges provide.