
Siege of Niuzao Temple isn't a dungeon you defeat; it's a system you exploit. Forget simply surviving mechanics - this Challenge Mode is about turning them into your primary source of power. The path to a gold timer is paved with counterintuitive strategies that transform lethal threats into overwhelming advantages.
This guide will walk you through re-engineering the instance's core encounters. You will learn to weaponize the trash, using their deadly on-death effects to build a damage buff so immense that the first boss becomes a footnote. We will show you how to subvert entire boss phases by positioning your group in ways the encounter was never designed to handle, and how to orchestrate the chaos of the third boss fight into an efficient, room-clearing exercise. This isn't just a route; it's a sequence of tactical solutions designed to break the siege from the inside out.
Siege of Niuzao Temple is regarded as one of the most volatile Challenge Modes in Pandaria, a brutal gauntlet where victory is earned through controlled chaos, not caution. Where other dungeons test a group's endurance, Niuzao demands explosive bursts of coordinated power. The entire instance is a testament to a singular philosophy: the greatest defense is an overwhelming, all-or-nothing offense, executed with split-second precision.
The true mark of a Gold Medal run is the intentional manipulation of the dungeon's most lethal elements. This is defined by the infamous Residue buff from the Resin Flakes; a successful team doesn't just survive their detonations - they deliberately trigger a cascade of them. They weaponize a self-inflicted, near-fatal wound to forge a temporary damage amplifier of unparalleled strength. This is an arena where the timer is beaten not by inches, but by miles, through a single, perfectly executed gambit.
However, before we can dissect the precise pull strategies, cooldown timings, and risk assessments required to conquer this fortress, we must first establish a foundational understanding of the competitive system it belongs to.
Challenge Modes were the ultimate proving ground. By stripping away all external advantages - normalizing gear and nullifying powerful items like legendary cloaks - the system created a level playing field where a player's raw ability was the only thing that mattered.
Victory was a testament not to an item level, but to the flawless interplay of individual skill, group coordination, and strategic execution under the crushing weight of a timer. This was a battlefield where intellect and reflexes were the only weapons that mattered; you couldn't over-gear the challenge - you had to overcome it.
The spoils of this war were not items of power, but symbols of prestige. Completing these trials left a permanent legacy in the form of unique armor sets, mounts, and titles that marked a team's mastery for all to see. For a complete inventory of these rewards, consult our comprehensive guides:
With the battlefield now defined, we can proceed to the battle plan. It is time to dissect the series of high-stakes gambits and precise executions that define a Gold Medal run in the Siege of Niuzao Temple.
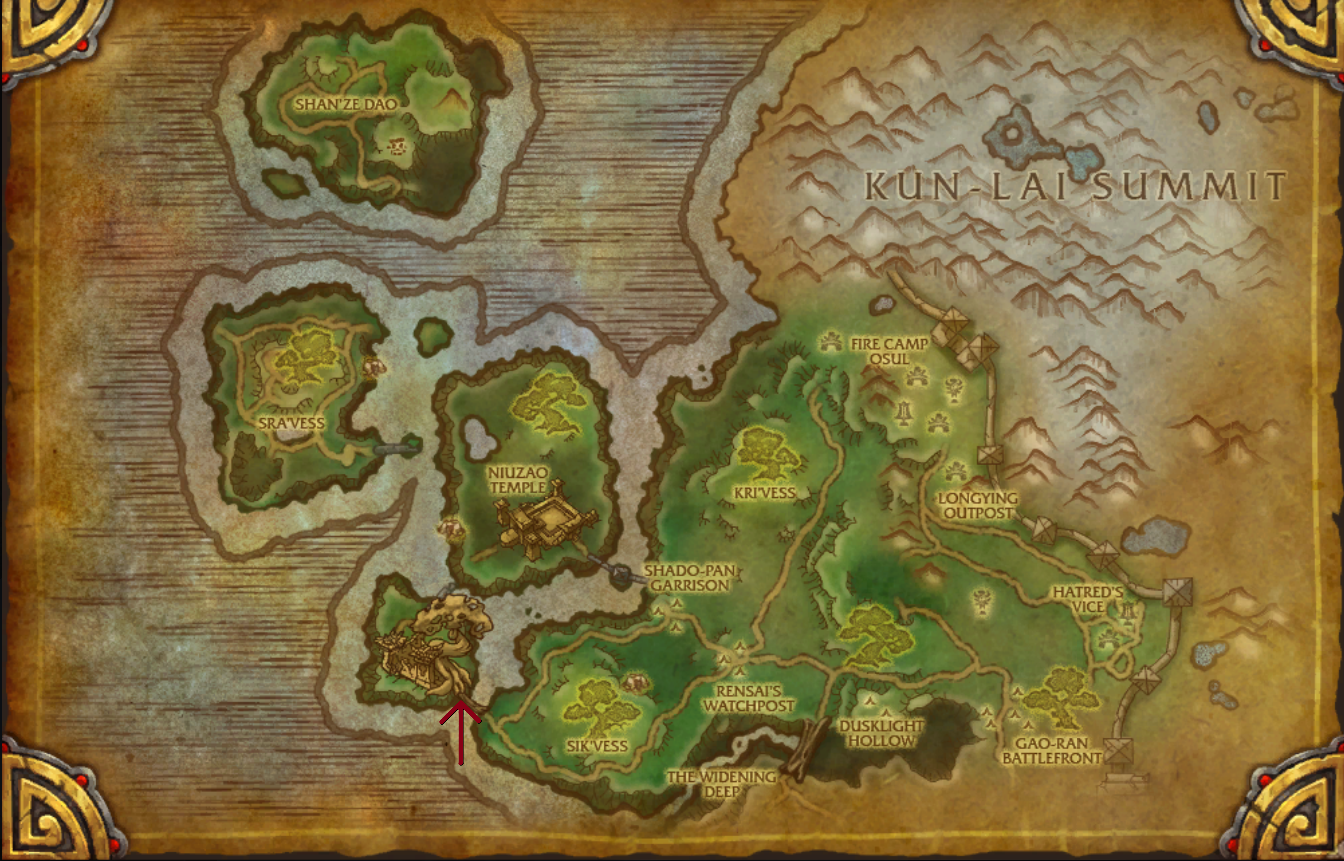
The battle for Niuzao Temple begins on the western shores of Townlong Steppes. The instance portal is located at the base of the great wall separating the steppes from the Dread Wastes, at coordinates /way 34.7 81.7.
To begin your timed assault, you must first form your five-person strike team and travel together to the dungeon's entrance. Flanking the portal, you will find the Challenge Mode Console. Interacting with this artifact and activating it will scale down your gear and officially begin the trial, starting the clock on your attempt to save the temple.
In Siege of Niuzao Temple, the relentless clock is more than a timer; it truly measures your group's strategic audacity and the iron will needed to see it through.
The Bronze and Silver timers are achievable with solid, methodical play. They allow for a more defensive approach - repelling the mantid forces wave by wave, with room to recover from a minor mistake or a mistimed cooldown. These medals prove your group can withstand the siege.
The requirements for a Gold time, however, represent a monumental leap in difficulty. At almost eighteen minutes, it is mathematically unforgiving and demands a complete mastery of the high-risk, high-reward strategies outlined in this guide. There is no "safe" route to Gold. You must abuse the Residue buff, you must execute the chaotic General Pa'valak bomb-pull, and you must do it with flawless coordination. This timer doesn't just ask you to win; it asks you to dominate.
| Medal | Timer | Reward |
| Gold | 00:17:30 | 85 Valor Points |
| Silver | 00:30:00 | 70 Valor Points |
| Bronze | 00:50:00 | 55 Valor Points |
No effort is ever wasted. A tiered Valor Points reward for each completion incentivizes the persistence needed to perfect the dungeon's demanding strategies. This ensures that every attempt, whether a near-miss or a learning run, contributes meaningfully to the ultimate goal: transforming a high-risk plan into a consistent, gold-tier success.
This is where we dismantle the siege from within. The following sections provide a high-risk, pull-by-pull blueprint for systematically breaking each encounter in Niuzao Temple. Think of this not as a fight, but as a heist - exploiting every loophole and turning the dungeon's own power against itself for maximum speed.
Since the objective is a Gold Medal, the strategies detailed here are aggressive and unforgiving. This route is built around the core gambits of the run: the massive Resin Flake damage buff and the chaotic General Pa'valak bomb-pull. There is no safer alternative for Gold; you either commit to the high-risk plan or the timer will beat you.
Let's establish the non-negotiable victory conditions for Siege of Niuzao Temple:
Once the timer begins, there are no checkpoints and no second chances. You commit to a volatile plan that demands flawless execution from all five members. A single failed interrupt on a key mob or a moment's hesitation during a big pull can mean the end of the run. Now, let's deconstruct the route that the most daring groups use to conquer the siege.
The initial trash packs leading up to the first boss require the careful execution of several mechanics. Among these, one particular strategy can significantly speed up your dungeon run. However, this approach is not without its risks; it will place considerable strain on your healer and demand the coordinated use of every defensive cooldown available to your group to ensure survival.
In the first and second pulls, you will encounter a caster mob known as the Sik'thik Amber-Weaver. Its primary ability is a channeled spell called Resin Weaving, which deals a small amount of Shadow Damage every second. The real danger of this spell is that if the channel completes, it will stun the target for a full five seconds. Therefore, it is absolutely essential that this cast is always interrupted as quickly as possible. This mob also creates a yellow sphere on the ground, the Resin Shell, which reduces damage taken by any enemies inside it by 90%, so your tank must immediately pull all mobs out of its effective area.
You will also face the Sik'thik Guardian, a standard melee mob with one critical instant-cast ability, Malleable Resin. This attack deals minor Nature Damage and applies a magical debuff that reduces both casting and attack speed by 50%. It is vital for the healer to remain vigilant and dispel this debuff from any affected party members as soon as it appears to maintain the group's effectiveness.
The most important enemy for this strategy is the Resin Flake. Upon death, this mob triggers an ability called Residue, which deals an initial burst of Shadow Damage to the entire party. More significantly, it applies a stacking debuff that lasts for 30 seconds. Each stack increases the damage you deal by 10%, but it also increases the damage you take from subsequent Resin Flake explosions by 10%. This mechanic is the core of the high-risk, high-reward strategy.
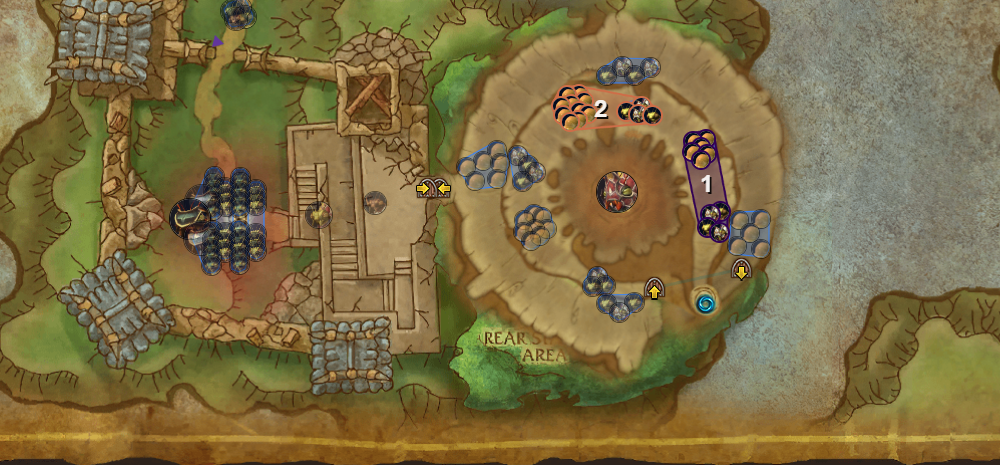
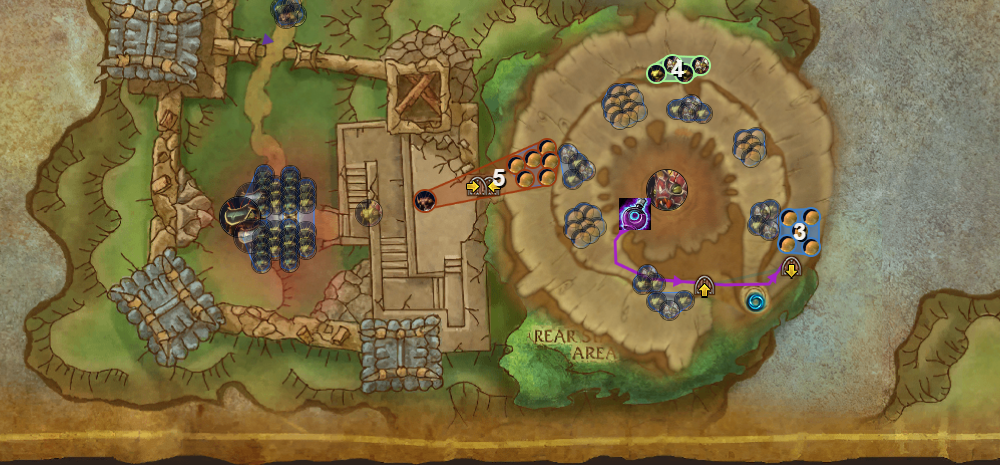
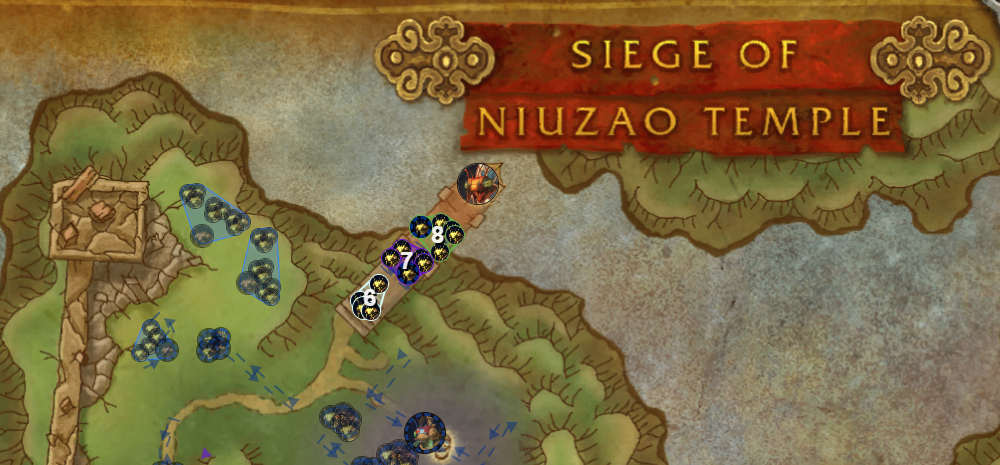
To execute this, you will clear the first and second pulls as shown in the provided image. After the first pull, your group will have six stacks of the debuff. As the Resin Flakes in the second pull begin to die, the incoming damage will become lethal, and you will need to activate all group defensive abilities to survive the chain reaction of explosions. If successful, your party will gain an incredible 160% damage increase. You must then immediately engage the boss to take full advantage of this powerful but temporary buff.
Vizier Jin'bak is the first boss encounter in the Siege of Niuzao Temple, fought within a large arena defined by an ever-growing Sap Puddle. For a successful Challenge Mode run, the primary strategy involves carrying over a massive damage buff from the preceding trash packs. By correctly executing the pulls with the Resin Flakes, your group will gain a 160% damage increase. This buff is the key to defeating the boss so quickly that his mechanics become almost entirely trivial, allowing you to "burn" him down before he can pose a significant threat. Consequently, you should not use Bloodlust or Heroism here. With the trash buff active, the boss will die in approximately 20-30 seconds anyway. It is far more strategic to save this crucial cooldown for the third boss, where it will be genuinely needed.
Ultimately, your group's goal is to ignore the boss's mechanics as much as possible through overwhelming offensive power. By engaging Vizier Jin'bak with the full 30-second duration of your Resin Flake buff, you should have more than enough damage to completely burn him down before the Sap Puddle grows to a threatening size or he can use his Detonate ability effectively. Focus all damage on the boss, and you will secure a fast and efficient kill.
After the boss is defeated, your next step is a simple invisibility skip. You will need to bypass two packs of mobs, which will allow you to reach the required count of 65 enemies and avoid wasting time on unnecessary trash. At the position marked on the image, activate your Invisibility Potion to perform the skip and move past the enemies undetected. However, you must be careful, as the puddles on the floor can knock you out of invisibility. To prevent this, try to hug the right wall and jump consistently as you move through the area.
Next, you have a choice. You can pull the five Resin Flakes together with the following pack, which consists of two Sik'thik Amber-Weavers and two Sik'thik Guardians, whose abilities you are already familiar with. The risk with this approach is that the stacking debuff may still be active on your group when you engage the next set of mobs, and your defensive cooldowns might not have reset. This could make it impossible to survive the AoE damage from the next set of flakes. Therefore, the more stable and reliable strategy is to kill the first pack and then proceed to the second one.
Further ahead, you will encounter another six Resin Flakes. Do not kill them where they stand. Instead, it is best to have someone other than the tank, preferably the healer, run ahead to open the door. This allows you to pull the mobs outside, where a single Sik'thik Warden awaits. This warden has no special abilities. Once it is defeated, a short role-playing event will begin, and you can start the next boss encounter by speaking with Yang Ironclaw.
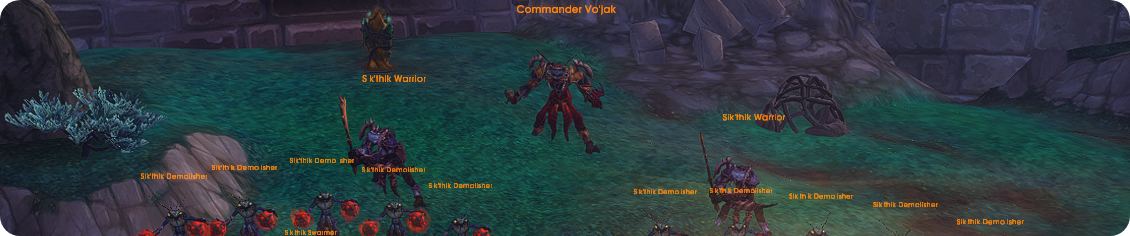
Commander Vo'jak is a two-phase encounter that tests a group's ability to handle waves of adds efficiently before confronting the boss himself. In a Challenge Mode setting, maintaining momentum is paramount. Therefore, it is essential to activate the gong immediately as it becomes available to trigger the next wave without delay. Throughout the fight, friendly NPCs will provide interactable Caustic Tar kegs, which are the central tool for controlling adds and managing the boss.
Phase 1: The Assaulting Waves
Phase 2: Commander Vo'jak
The key to this encounter is a combination of speed and control. During Phase 1, leveraging the Demolisher's Unstable Blast is paramount. Once Vo'jak appears, the fight becomes simple: have one player keep tar on him while the group follows the specific positioning strategy to prevent his charge. Master these elements, and the commander will fall quickly.
Following Commander Vo'jak's defeat, you will encounter a well-known and unskippable role-playing event that lasts for about 70 seconds. There is no way to accelerate this, so use this time for mana regeneration or cooldown management. Once the sequence concludes, the large gates blocking your path will be blasted open by friendly forces. This explosion creates a powerful knockback effect that will send you flying backward if you are caught in the open. To completely negate this and ensure a smooth, immediate transition into the next area, you must position your character snugly into the far-left corner of the gate. This will allow you to start sprinting forward the very instant the path is cleared, saving crucial seconds.
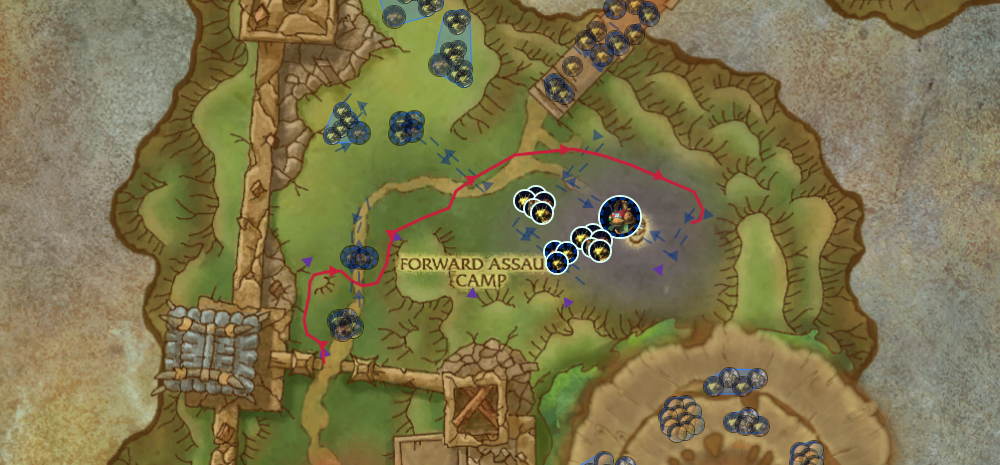
Once you are through the now-destroyed gate, your next task is to navigate a critical skip. You must run past the first two packs of mobs, following the specific path indicated in the image. This requires careful timing and spatial awareness. While the first pack is relatively easy to bypass, the second pack patrols in a way that can easily lead to accidental aggro. To guarantee a clean skip, you may need to pause for a moment, waiting for this second group to move further along their route. Be patient here; rushing and accidentally pulling these enemies will cost you far more time than waiting for the opportune moment to pass them safely.
Successfully bypassing those patrols brings you to what is arguably the most challenging and pivotal segment of the entire dungeon. The upcoming pull is an intricate and demanding sequence that, if executed correctly, saves an immense amount of time on your run. This is the precise moment you have been waiting for, the very reason we have diligently conserved our most powerful offensive cooldowns up to this point. Prepare your group, as this is where you will finally unleash Bloodlust/Heroism to overcome the dungeon's greatest hurdle and secure a significant advantage on your timer.
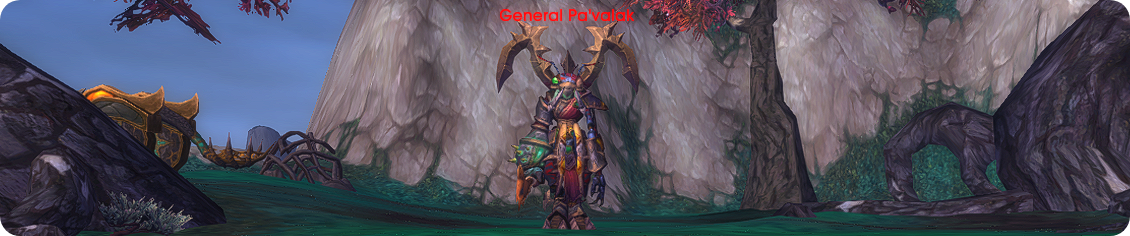
General Pa'valak is the third encounter, and the fight is designed around a central mechanic: using the boss's own explosives against his forces. For a Challenge Mode run, this strategy is taken a step further. Instead of just fighting the boss in isolation, the goal is to pull the three surrounding trash packs into the boss arena and eliminate them using the powerful Siege Explosives that become available during the fight. This tactic saves a significant amount of time but requires the entire group to be coordinated and active in throwing bombs. Everyone must participate to ensure the adds and trash die quickly.
The fight against General Pa'valak is less a test of raw damage on the boss and more a test of your group's coordination and efficiency in using the Siege Explosive. Success hinges on a well-executed phase where the tank survives immense pressure and all interrupts are handled perfectly. By mastering this all-in strategy, your group can turn a potentially lengthy encounter into a quick and simple burn, saving valuable minutes on your Challenge Mode timer.
With the most difficult part of the dungeon now behind you, you are left with two or three final trash pulls before the last boss. Whether you do two or three depends on your group's confidence and ability to effectively manage their crowd control and interrupts.
There are two new types of mobs in these packs. The first is the Sik'thik Builders. They have only one ability, Hurl Brick, which they will use constantly. While the ability itself only deals minor Physical Damage, the key detail is that the Builder must stop moving to cast it. This is important to remember when you are trying to group them up with other mobs.
The second and far more dangerous mob is the Sik'thik Engineers. These casters have two abilities with a deadly synergy: Burning Pitch and Crystallize. Burning Pitch applies a debuff that deals significant Fire Damage over time. However, the true danger lies with Crystallize. If an Engineer successfully casts Crystallize on a player who is already affected by the Burning Pitch debuff, that player will be stunned for a full seven seconds. If this devastating stun lands on your tank or healer, it will almost certainly result in a wipe.
You have the option to combine pulls 6 and 7 to save time. To do this safely, you must have a coordinated interrupt rotation, assigning at least two players to each Sik'thik Engineer to ensure no Crystallize casts go through. Furthermore, you need to be patient when establishing the pull. Do not rush in too far. You need to wait for a moment to allow the Sik'thik Builders to stop throwing bricks and walk closer, so you can group all the enemies together for efficient cleave and AoE damage.
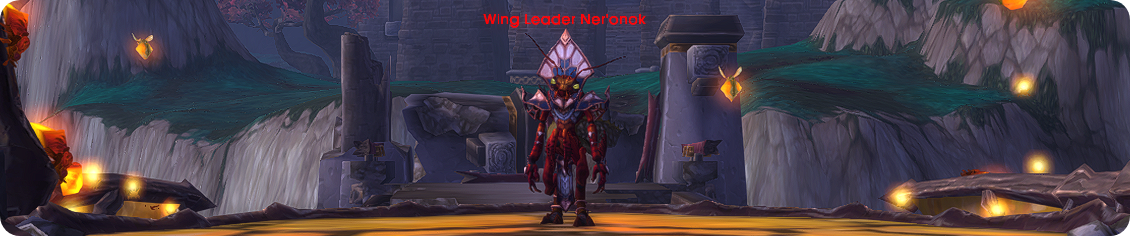
Wing Leader Ner'onok is the final encounter of the Siege of Niuzao Temple, fought on a long bridge. The fight is relatively simple and painless, with its core challenge revolving around constant player movement and a critical interrupt during two phase transitions. To handle the fight's main mechanic efficiently, the ideal strategy is to send at least one player, preferably the healer or a ranged DPS with high mobility, to the far side of the bridge ahead of the phase change. This ensures an almost immediate interrupt, trivializing the most dangerous part of the encounter.
Success in this fight comes down to simple personal responsibility and one well-executed interrupt. The entire group, especially those targeted by Quick-Dry Resin, should never stop jumping to avoid the stun and gain the valuable Invigorated buff. By avoiding the Caustic Pitch pools and having a player pre-positioned to interrupt Gusting Winds, your group will neutralize all of the boss's threats and secure a quick, clean victory to complete the dungeon.
The strategies for dismantling the Siege of Niuzao Temple are now yours. This guide has provided the tactical framework, but knowledge alone cannot earn a Gold medal. This dungeon is a crucible, designed to test not only a group's skill but its very cohesion under fire. The path forward is one of relentless practice, where chaos is slowly forged into perfection. Go forth, and may your execution be as flawless as your strategy.
But the crucible is not for everyone. The dedication required to master Niuzao's unforgiving mechanics can be immense, demanding a level of synergy that many groups never achieve. For those who seek the immortalizing rewards - the exclusive mounts and transmogs that signify mastery - without enduring the punishing process of trial and error, we offer a direct path to victory. Let our veterans navigate the chaos for you and secure your place among the legends of Pandaria.