
Prepare to test your limits within the shadow-corrupted walls of the Shado-Pan Monastery in this demanding Pandaria Classic Challenge Mode. Success is a race against time, demanding near-perfect teamwork and a deep understanding of every encounter to emerge victorious. From the relentless onslaught of Sha-infested trash packs to the punishing mechanics of the final bosses, each step requires your group's undivided attention and precise execution. This is a true test of skill, where only the most coordinated teams will conquer the darkness that has taken root.
This guide provides the comprehensive strategy needed to achieve a Gold Medal and even push for record times. We will dissect the most efficient routes, identify critical interrupts, and outline advanced tactics like strategic trash pulls and clever positioning to shave precious seconds off your run. Whether you're aiming for the prestigious achievement or seeking to dominate the leaderboards, our detailed walkthrough will help you coordinate your cooldowns and master the monastery's challenges. Assemble your team, sharpen your focus, and prepare to cleanse the ancient halls.
The Shado-Pan Monastery is widely regarded as a formidable upper-tier Challenge Mode. It is demanding to learn and notoriously unforgiving of even minor errors. Progress comes from absolute control, perfect interrupt assignments, and proactive damage mitigation, not just brute force.
What truly defines this dungeon is how disciplined execution directly translates into time saved. Meticulous planning for crowd control and smart defensive cooldowns are what prevent pulls from descending into chaos. With a practiced strategy and constant communication, the monastery becomes a conquerable challenge - a focused test of coordination that prepares a group for anything.
Before we dive into the nuanced routing, pull planning, and cooldown trading required to speed-run the monastery and secure a Gold Medal, let's first look closely at what Challenge Modes are in general - their scaling rules, the timer pressure that sets the pace, and the core fundamentals that shape every run.
Fresh from our creator Poizy: a clear, step-by-step Shado-Pan Monastery Challenge Mode run that shows exactly how to earn a Gold Medal.
Watch the full route in action — optimized pulls, safe skips (including the key invis skip), tight cooldown and BL timings, clean boss plans, and practical tips to keep the timer green. Everything is on screen and easy to replicate with your group.
Chasing the same result? Start with the video. Prefer text? Scroll down for detailed breakdowns of every pull and each boss.
Challenge Modes, first introduced in Mists of Pandaria, created a pure, competitive environment by scaling every player's stats down to a fixed baseline. This meant there was no over-gearing the content; victory was earned through superior strategy, flawless coordination, and perfect execution against a punishing clock. As the direct ancestor to the modern Mythic+ system, it established the thrilling, high-stakes format that players love today.
The rewards for this intense trial were not temporary power gains, but permanent symbols of prestige. Instead of epic gear, completing these dungeons unlocked some of the most sought-after cosmetic rewards in the game's history, including unique class armor sets, exclusive mounts, and distinguished character titles. These trophies were a testament to true mastery. For a deeper look at the specific rules and the full catalog of rewards, our comprehensive guides have you covered.
Ready to earn your place among the masters? Now that you understand the philosophy behind Challenge Modes and the incredible prizes at stake, it’s time to put theory into practice. Let’s begin our descent into the treacherous halls of the Shado-Pan Monastery.
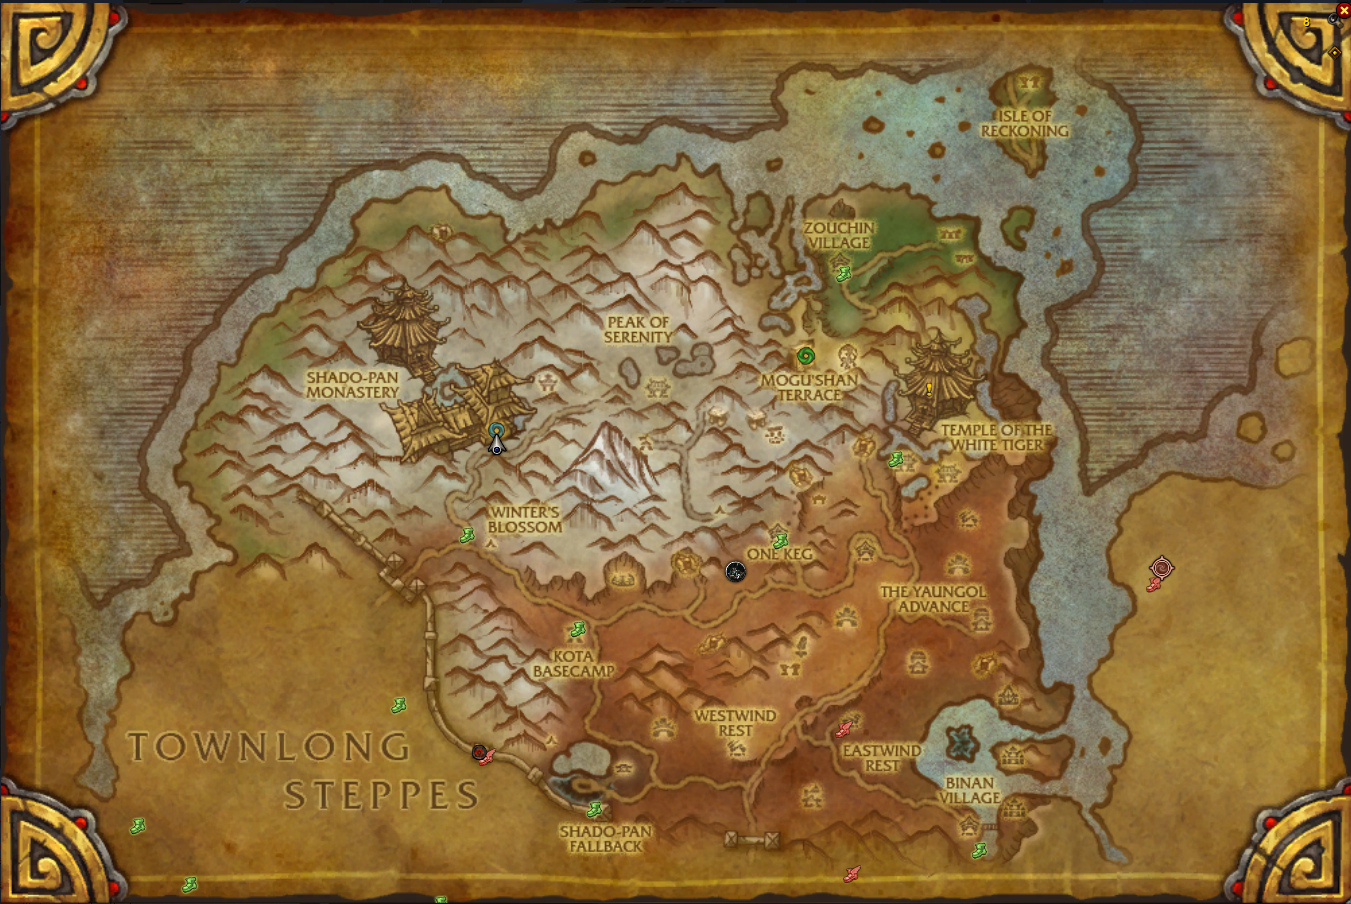
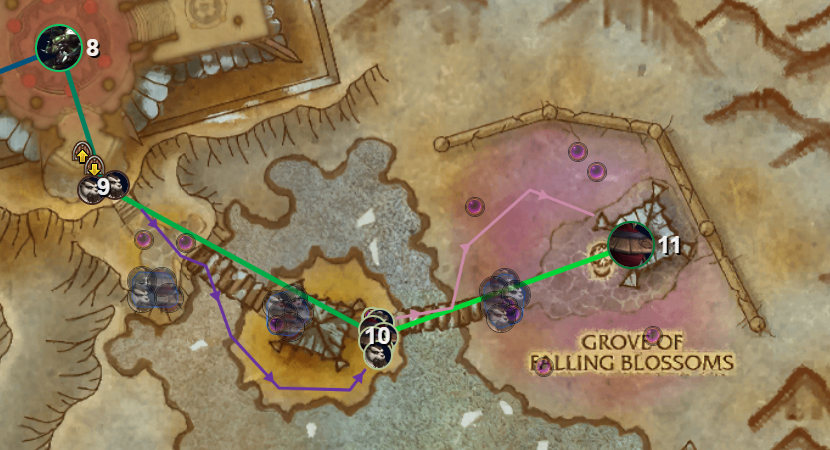
The entrance to the Shado-Pan Monastery is carved into the northern mountains of Kun-Lai Summit. You'll find the portal inside the main temple courtyard, located at approximately /way 36.77, 47.63. The meeting stone is situated just outside the instance entrance.
To begin the trial, your group must form up and enter the dungeon, where you'll find the Challenge Mode Console. This is a new feature in MoP Classic that allows you to activate the challenge instantly, a welcome improvement from the original system in 2012.
Challenge Mode runs are a battle against the clock, and the Shado-Pan Monastery is notoriously demanding. Bronze and Silver serve as a stringent baseline, requiring a well-coordinated group that executes mechanics cleanly and avoids deaths. These timers can tolerate a few small mistakes, but a single wipe will almost certainly end your chances.
Gold is a different beast entirely. At twenty one minutes, this timer requires near-perfect play. Success is only achieved through aggressive, well-planned pulls, flawless interrupt assignments, and a group that moves with purpose and precision from start to finish.
| Medal | Timer | Reward |
| Gold | 00:21:00 | 85 Valor Points |
| Silver | 00:35:00 | 70 Valor Points |
| Bronze | 01:00:00 | 55 Valor Points |
In addition to the medal itself, successful runs also grant Valor Points, with faster times yielding greater rewards. This ensures every attempt helps your progression, while dedicated practice will transform your strategy into the muscle memory required for a consistent and successful Gold run.
Now we arrive at the core of this guide: a precise, practical strategy for every pull and each boss encounter. Think of it as transforming the monastery's unforgiving trial into a lethal ballet of precision—with routes that save time, proactive crowd control, synchronized cooldowns, and the perfect execution required to keep the timer on your side.
Since the goal for most groups is not simply to finish, but to secure the coveted Gold Medal, the following strategies are built for optimal performance. This means unwavering discipline, flawless interrupt assignments, and a proactive plan that leaves no room for error.
Let's break down the exact requirements for a successful Gold Medal run in the Shado-Pan Monastery:
Once you begin, there are no checkpoints and no do-overs. You must commit to your strategy, execute with precision, and adapt instantly when things deviate from the plan. Now, let’s dive into an efficient route that dedicated teams can use to conquer this challenge.
Despite the number of trash mobs, the first pull isn't overly complex, but it still requires a good amount of group damage to handle the various stacking effects.
Once the timer starts, the tank should run ahead, pull the first Shado-Pan Warden, and continue without stopping to the center of the room where the Shado-Pan Stormbringers are located. After pulling the second Shado-Pan Warden, the tank should stop - this is where you'll fight. It's recommended that the group stacks up close together to make it easier for the tank to gather aggro, as Shado-Pan Ambushers will jump down on random players using the Flip Out ability. When an Ambusher uses this ability, its damage is increased by 20%, and this effect stacks.
Shado-Pan Wardens have two main abilities: Thundering Fist and Weakened Defenses. The tank and healer need to pay special attention to Thundering Fist - it's a melee-range ability that stuns the target for 4 seconds, but this stun can be dispelled by the healer. The second ability, Weakened Defenses, reduces armor by 5% per stack. It's highly recommended to make these mobs your priority target.
The Shado-Pan Stormbringers do nothing but cast Focus Energy. This is an uninterruptible cast that causes a random party member to take Nature Damage approximately every second.
If your group is struggling with this pull, you can consider using Bloodlust/Heroism here. However, the more common strategy is to save it for the first boss, as you are unlikely to get more than two uses in the entire dungeon run. Also, don't forget to use your class's available AoE crowd control abilities - this will significantly increase your chances of success.
The fight against Gu Cloudstrike is a structured three-phase encounter where the primary challenge is surviving the heavy and consistent Nature damage that permeates every stage of the battle, demanding high healing output and sharp situational awareness from all players.
Phase One: In this phase, you will face Gu Cloudstrike alone. He will cast Invoke Lightning on a random player, an ability that chains to anyone standing too close. To prevent this, the group must maintain a spread formation. Additionally, Azure Serpent will target a player with Static Field, placing a large lightning zone at their location. Anyone caught inside must move out immediately to avoid significant damage over time. This zone persists for about 15 seconds, gradually reducing the available safe space in the room. Ranged players should remain spread out while staying within the healers' range.
Phase Two: When Gu reaches 50% health, he will become immune by casting Charging Soul. Gu cannot be damaged until the serpent is defeated. The tank must immediately taunt the Azure Serpent and position it facing away from the group, as it frequently uses Lightning Breath, a frontal cone attack. The serpent will also apply Magnetic Shroud to the entire party, a large healing-absorption shield. This is a critical healing challenge. Use major healing cooldowns and Bloodlust/Heroism during this phase to break the shields as quickly as possible. Failing to do so will result in overwhelming party-wide damage.
Phase Three: Once the serpent is defeated, the final phase begins. Gu Cloudstrike becomes active again and will repeatedly cast Overcharged Soul, a pulsing area-of-effect ability. The damage from this ability increases as his health decreases, making this a "burn phase". Players should use personal defensive cooldowns, maintain their spread positions, and focus all damage to defeat him as quickly as possible before the incoming damage becomes unhealable.
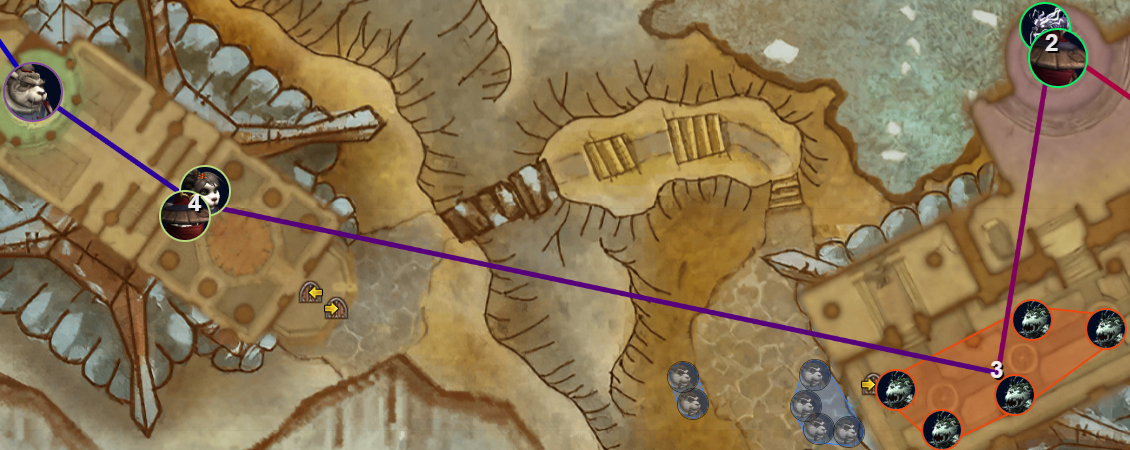
After defeating the first boss, proceed to the next room where you'll find five Ethereal Sha. This pull is straightforward, as the mobs have only one ability: Sha Blast. To group them all up, interrupt the casts of the first two Sha. This will cause them to move, allowing you to pull them back to the other three. Also, when the Sha are close to death, they'll start casting Sha Nova, which deals huge damage and knocks everyone back in a 10-meter radius. You must interrupt the cast or get out of range. To avoid overlapping interrupts, you can assign one player to each mob. Be sure to use your AoE crowd control abilities as well.
Your route proceeds forward. As you exit the doorway, hug the right wall tightly to avoid accidentally pulling the Shado-Pan Disciples positioned near the entrance. You'll then face a gauntlet run under fire from Shado-Pan Ice Archers. Get on your mounts and carefully dodge the falling arrows. The barrage will stop as soon as the first player reaches the top.
Continue ahead, where a short roleplaying event will begin. This involves clearing several waves of Shado-Pan Novices, which pose no real threat. To speed this up slightly, the tank can switch to their DPS specialization. Don't forget to spec back to tank for the next pull, though!
Once you've cleared the waves, the second part of the event will trigger - a fight against two mini-bosses. Flying Snow uses Whirling Steel. She will spin towards a random player, changing targets multiple times and dealing physical damage to anyone in a small radius around her. Watch your health and avoid this ability. Fragrant Lotus uses Flying Kick, which deals minor damage to the tank and knocks him into the air. It is crucial to focus down Fragrant Lotus first. If she isn't defeated quickly, she will summon a Jade Staff add that will assist her and start to casting Ball of Fire, ability that deals a lot of Fire Damage.
Once both mini-bosses are defeated, you can proceed to the next encounter with the boss, Master Snowdrift.
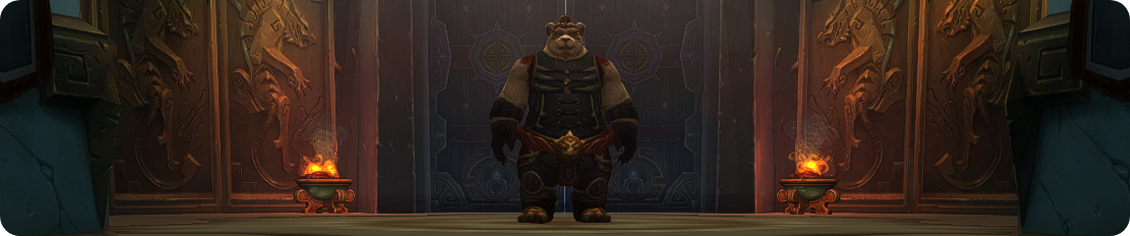
Master Snowdrift is a three-phase encounter focused on punishing mistakes and testing your group’s ability to react quickly to dangerous mechanics. The fight demands strong positioning discipline, awareness, and execution.
Phase one: Engage Snowdrift in the center of the arena, keeping him faced away from the group. He will use Fists of Fury, a rapid frontal attack dealing moderate Fire Damage, melee and tanks should sidestep out of his frontal cone when it begins. Tornado Kick hits all players in melee range with Physical damage and a knockback. To maintain damage output, players can disregard this ability as it only deals light, healable damage. This phase is straightforward - focus on dodging and DPS.
Phase two: At set points, Snowdrift summons three clones around the room, each firing Ball of Fire projectiles in straight lines. These fireballs inflict heavy Fire Damage on anyone in their path. Assign each DPS to burn down a different clone to minimize time spent in this phase - fewer clones alive means fewer projectiles to dodge. Maintain constant movement, using mobility skills to cross dangerous lanes safely. The faster the clones are killed, the safer and shorter this phase will be.
Phase three: Snowdrift adds several new abilities. Tornado Slam fixates a random player, charging them and dealing 60% of their max HP as Physical Damage if he connects. To maximize damage uptime, players should stand still and take this hit. The ability deals a fixed, non-lethal amount of damage, so moving is unnecessary. He will also enter Parry Stance, during which all attacks against him will miss and cause a powerful retaliation. Melee attackers will be punished with Quivering Palm followed by Unleash Vibrations, while ranged attackers outside melee range will trigger a Flying Kick. All players must immediately stop attacking during Parry Stance to avoid triggering these counters. Once the stance ends, resume DPS and finish the fight.
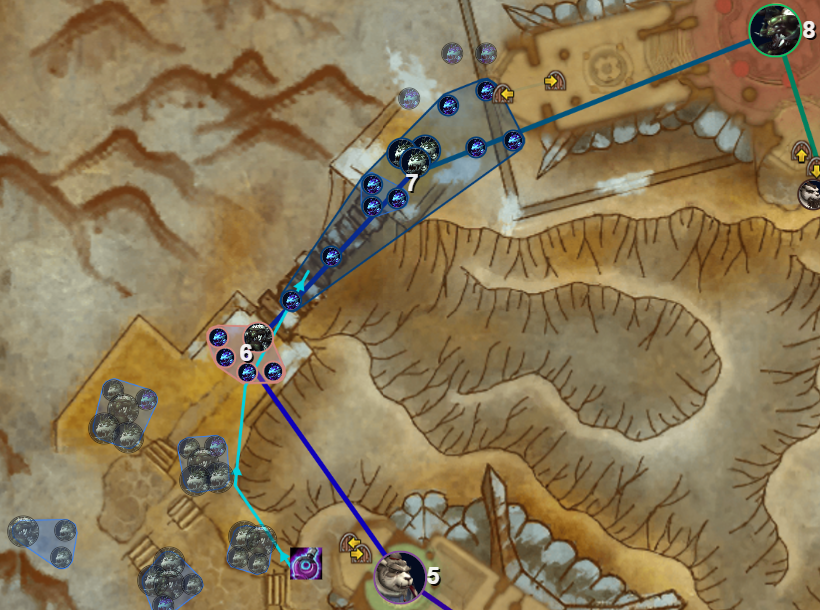
After Master Snowdrift is defeated, your group will need to perform the classic invisibility skip for this dungeon. To set this up, have everyone stack tightly together between the base of the staircase and the fence. Before using potions, be sure to activate any party-wide or personal speed-increasing abilities you have, such as Stampeding Roar, Sprint, or Speed of Light. On a coordinated countdown, everyone should use an Invisibility Potion and run along the far-right edge of the area. Push as far as you possibly can, but be extremely careful: Shado-Pan Fire Archers will be firing Flame Arrows at your location, and a direct hit will break your invisibility. If a party member gets caught and dies, you can stop to resurrect them before the next major trash pull. If executed perfectly, however, you can bypass that pull entirely and regroup safely near the middle of the final bridge.
The amount of trash you must clear before the final boss depends on how far your skip took you. If you didn't make it to the middle of the bridge, you'll have to fight a pack containing a Regenerating Sha. This mob must be watched closely, as its Regenerate cast will heal all nearby allies and must be interrupted immediately. This pack also includes Volatile Energy mobs; on death, they do Explosion, dealing heavy damage to anyone nearby, so melee players should move away as they get low on health and let ranged DPS finish them.
Further ahead on the bridge, you will face more Volatile Energy and three Destroying Sha. These use Shadows of Destruction, a high-damage channeled frontal attack. You can either move out of the frontal cone or, more easily, simply interrupt the cast. Once these final mobs are down, your path to the Sha of Violence is clear.
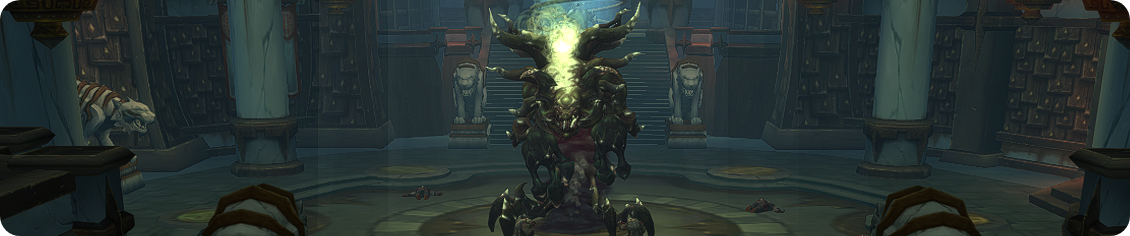
The Sha of Violence is a fast-paced fight that rewards clean mechanics execution and punishes sloppy positioning. The goal in Challenge Mode is to keep the encounter focused entirely on the boss, minimizing distractions from adds while capitalizing on burst windows.
Keep uptime high on the boss while managing debuffs efficiently. Break Disorienting Smash on the tank instantly, clear Smoke Blades quickly to trigger your Parting Smoke burst window, avoid unnecessary damage from Sha Spike, and control or kill Volatile Energy adds safely. Plan to finish the boss before the Enrage becomes overwhelming. Clean execution and using Parting Smoke crits effectively will make this fight fast and manageable for a Gold Challenge Mode run.
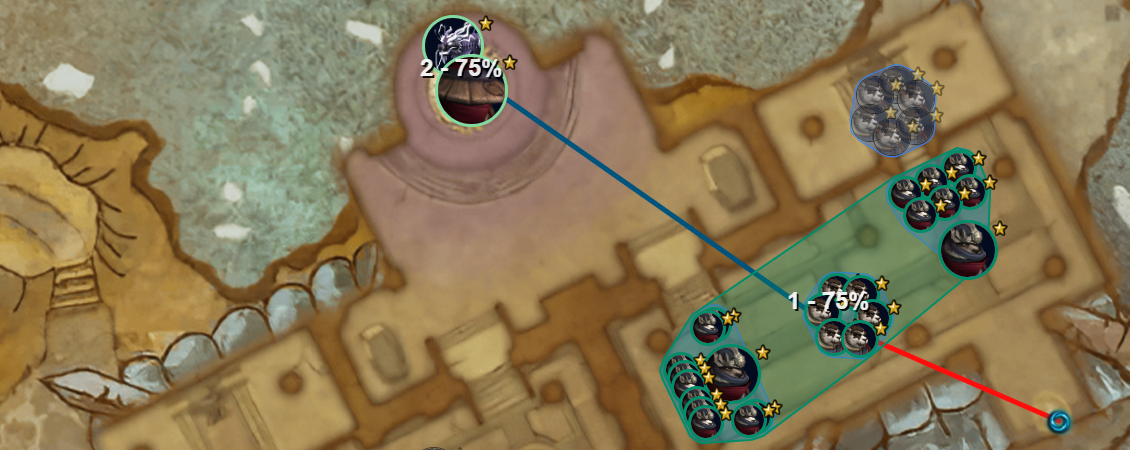
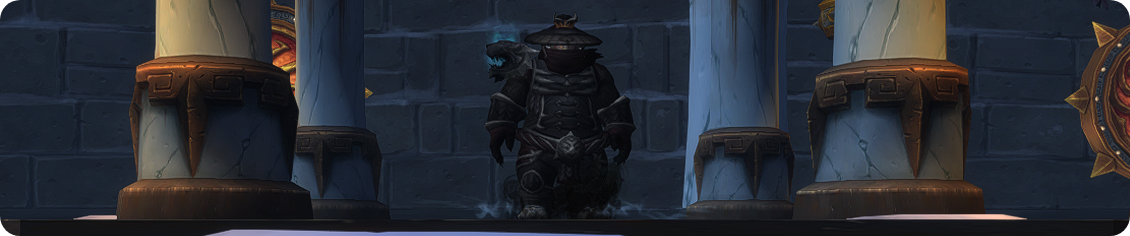
Excellent, with three of the four bosses defeated and the trash count requirement met, your focus now shifts to the final bonus objective: purifying four Shado-Pan Defenders. You will encounter the first defender's body immediately after exiting the Sha of Violence's arena. There is a crucial time-saving trick here that has existed since the original Mists of Pandaria release: if all party members click on the body at the exact same time, the ritual's completion will grant 4/4 progress instantly. This allows you to complete the entire objective with a single defender and skip the remaining trash packs guarding the other bodies, as shown in the picture above. Should you fail the timing, don't worry - the last trash pack before the final boss contains another defender, giving you a second chance.
Now, let's cover the mobs guarding these defenders. The most important thing to know is that they are unkillable until the purification ritual is complete. Your group must first activate the body together and then focus on killing the Vestige of Hatred. They have two abilities to watch for - Black Cleave: This attack hits the primary target and up to three nearby allies, applying a stacking Shadow Damage-over-time effect and Touch of Weakness: A stacking, instant-cast debuff that reduces your Attack Power by 10% per stack.
The next pull introduces two new mob types. The Residual Hatred mobs apply a non-threatening DoT Curse of Agony, and cast Shadow Bolt, which should be interrupted as much as possible. The more critical targets are the Fragment of Hatred. They cast Volley of Hatred, a spell that will inflict significant damage on the entire group if the cast completes. This spell must always be interrupted to avoid unnecessary risk. In this pack, you will also see two Hateful Essence orbs. Standing in their radius deals minor Shadow Damage from Pool of Shadows, but they have very little health and are not affected by the immortality buff, so they will die quickly from passive cleave.
After this pull, double-check that your "4/4 Defenders Purified" objective is complete. If so, you are clear to proceed to the final boss of the dungeon.
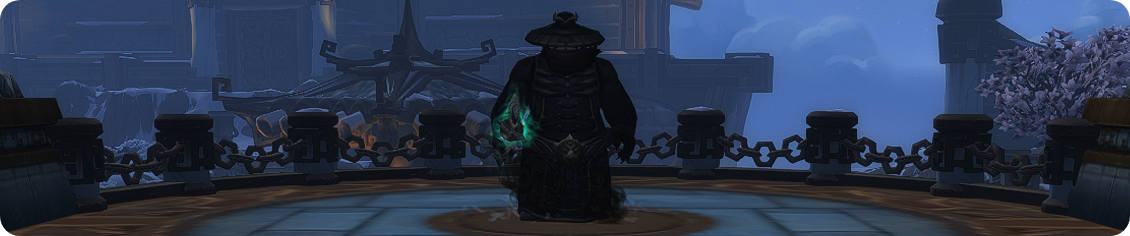
Taran Zhu is the final fight in Shado-Pan Monastery Challenge Mode, where controlling the Hatred mechanic is just as important as avoiding deadly abilities. Success requires careful management of your Haze of Hate stacks, precise movement, and fast reactions to his control effects.
Keep Hatred under control by meditating regularly, and never meditate during an incoming mechanic that requires movement. Maintain an interrupt chain on Rising Hate and kill Gripping Hatred orbs as soon as they appear. Use your second Bloodlust/Heroism in this dungeon on pull to burn him before Hatred stacks become unmanageable. Clean execution of these mechanics will secure a smooth kill and ensure your Gold timer run finishes strong.
You now possess the complete strategy for conquering the Shado-Pan Monastery. This guide has laid out the optimal path, the critical boss tactics, and the mindset required to turn a challenging run into a Gold Medal triumph. The final step is yours: it's about refining your execution, building muscle memory with your team, and maintaining composure under pressure. May your interrupts be swift, your coordination flawless, and your final time well ahead of the clock.
We understand that finding a dedicated team for one of the most difficult Challenge Modes can be a challenge in itself. If you're struggling to find a consistent group, or if you've hit a frustrating plateau after numerous attempts, our team of expert players is ready to assist. Contact us today, and we will guide you through a smooth and successful run, ensuring you unlock all the prestigious rewards you seek—the exclusive titles, the rare mounts, and the iconic transmog sets that define a true Challenge Mode master.