
Scholomance is not a dungeon you beat with caution; you conquer it with calculated aggression. It is a unique Challenge Mode where the greatest risks yield the greatest rewards, constantly tempting your group to pull more, push harder, and live on the razor's edge. The infamous Krastinovian Carvers dare you to manipulate their stacking buff for incredible speed, while the flexible route design forces a critical decision on Bloodlust usage before the timer even starts.
This guide is built for that aggressive mindset. Forget safe, pull-by-pull clears. We will break down the high-risk, high-reward strategies that define a top-tier Scholomance run, from the massive trash pulls into Lilian Voss to the most efficient ways to manage the dungeon's deadly bosses. We’ll show you not just how to survive the halls of this dark academy, but how to bend its rules to your advantage and turn its most dangerous mechanics into a clear path to a Gold Medal.
Scholomance is widely regarded as the ultimate test of strategy and risk assessment in Pandaria's Challenge Modes. Where other dungeons present a linear path of survival, Scholomance is a strategic puzzle. Its defining moments are not just about enduring punishing pulls, but about consciously choosing to create them. The entire dungeon is built around a core philosophy of high-risk, high-reward, demanding a group to know exactly how far they can bend the rules before they break.
What truly defines a Gold Medal run here is mastery of its unique mechanics, particularly the infamous Boiling Bloodthirst buff. A successful team doesn't just kill the Krastinovian Carvers; they manipulate them, turning a deadly liability into a massive damage amplifier. This is a place where the line between a record time and a wipe is measured by a single, aggressive decision.
However, before we can detail the precise pull strategies, cooldown timings, and risk assessments required to conquer this academy, we must first establish a foundational understanding of the core philosophy of the system it belongs to.
New from our creator Poizy: a focused Scholomance Challenge Mode walkthrough that turns crisp fundamentals into a Gold Medal. Follow the route end to end with line-of-sight pulls, ranged-first priorities, safe skips between wings, tight defensives on spike moments, and polished boss plans. Cooldown and BL timings are annotated so your group knows exactly when to commit and when to hold for the next checkpoint.
Hunting for a gold-timer run? Start with the video. If you’d rather read, the full breakdown below covers pull order, positioning cues and contingency notes for awkward pulls.
Challenge Modes were Blizzard's vision for a truly competitive, five-player PvE format. By normalizing gear and nullifying external advantages like legendary cloaks, the system created a level playing field where the only thing that mattered was raw skill.
Success was a measure of your class knowledge, teamwork, and execution under the pressure of a strict timer, not the power of your equipment. You couldn't outgear the content; you had to outplay it.
Completing these challenges didn't award player power but offered some of the most prestigious cosmetic rewards in the game's history, including unique armor sets, mounts, and titles. For a full breakdown of the rules and rewards, see our comprehensive guides.
Now that you understand the stakes and the philosophy behind Challenge Modes, let's apply that knowledge. It's time to dissect the practical strategy for taming the dungeon that defines the Gold Medal grind: Scholomance.
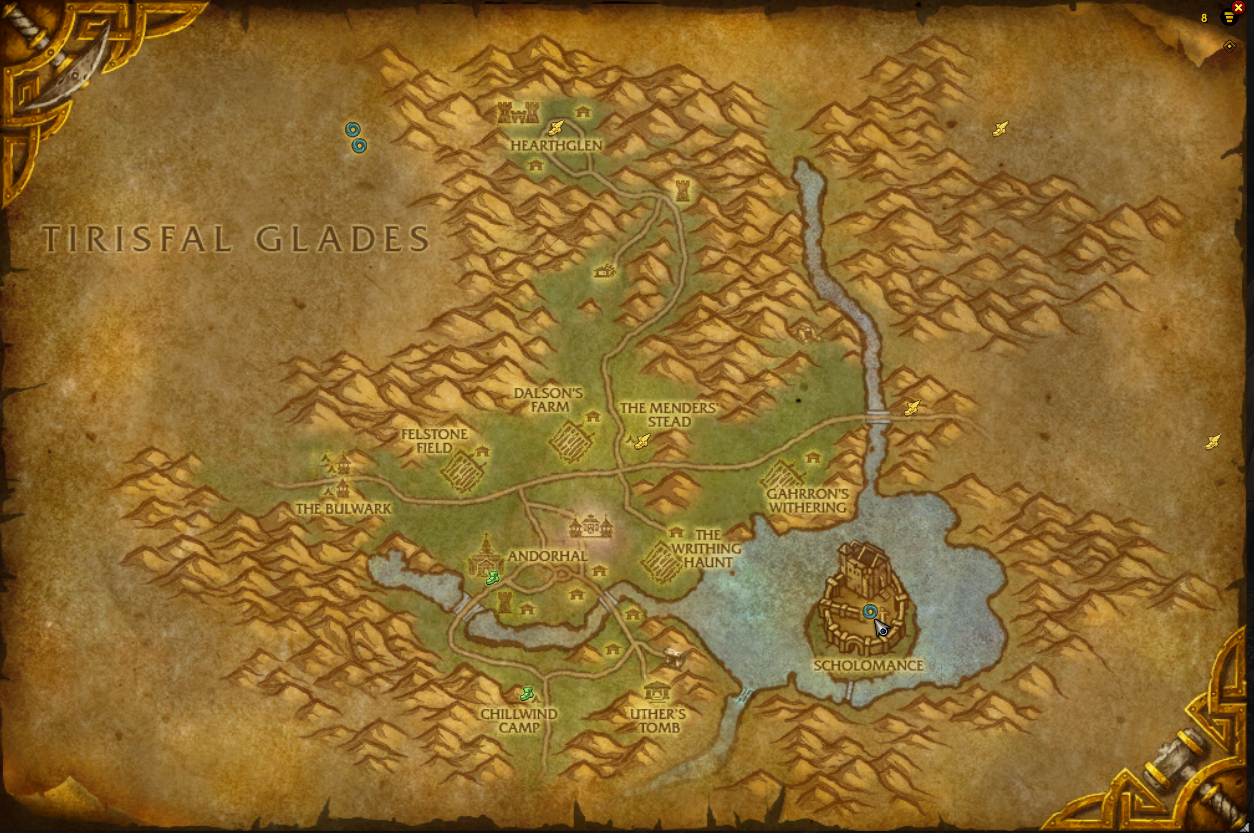
The dark academy of Scholomance awaits on the island of Caer Darrow, nestled in the blighted heart of the Western Plaguelands. The entrance to the instance can be found at the island's center, at roughly the coordinates /way 69.0 73.0. You will find the meeting stone just outside the main gate.
To begin the Challenge Mode, your pre-made group will need to zone into the dungeon and locate the Challenge Mode Console in the antechamber. This quality-of-life feature from MoP Classic allows you to start your timed run immediately without having to reset the instance.
In Challenge Mode, the timer is absolute, and Scholomance is defined by its generous, yet deceptive, clock. Bronze and Silver medals offer a substantial buffer for learning, allowing for a more methodical pace, a few deaths, and even a wiped trash pack without automatically ending the run. Use these brackets to practice your routes and learn the limits of the dungeon's most dangerous pulls.
Gold is a different beast entirely. At nineteen minutes, it is a timer that tests strategy and efficiency over raw throughput. It doesn't require a flawless, breakneck pace, but rather a perfectly executed plan where every pull is optimized and every major cooldown is used to its full potential. Wasted steps and inefficient routing are the true enemies of a Gold run.
| Medal | Timer | Reward |
| Gold | 00:19:00 | 85 Valor Points |
| Silver | 00:33:00 | 70 Valor Points |
| Bronze | 00:55:00 | 55 Valor Points |
More than the medal itself, all completed runs reward Valor Points, with higher medals granting a larger amount. This means every attempt, successful or not, contributes to your weekly gear progression. More importantly, practice runs build the muscle memory and strategic refinement needed to turn a chaotic dungeon into a consistent Gold.
This is where theory ends and execution begins. A Gold medal in Scholomance isn't earned through cautious, pull-by-pull survival; it is seized through calculated audacity. This dungeon is a puzzle of risk and reward, and the following strategy is your solution - a clear, aggressive path designed to bend the dungeon's formidable challenges to your advantage and conquer its unforgiving timer.
The plan laid out here is engineered from the ground up for a Gold-Tier performance. Forget playing it safe. We will leverage the dungeon's own mechanics against it, turning its most dangerous trash into a powerful damage amplifier and using its flexible layout to create massive, time-saving pulls.
Before we begin the lesson, let's define our victory conditions:
From the moment the timer starts, every decision matters. This is a single, continuous performance with no second chances. Let's begin our descent into the halls of Scholomance.
Scholomance is likely the most flexible dungeon in the Mists of Pandaria Challenge Mode pool, which means you have a couple of key decisions to make before you begin your run.
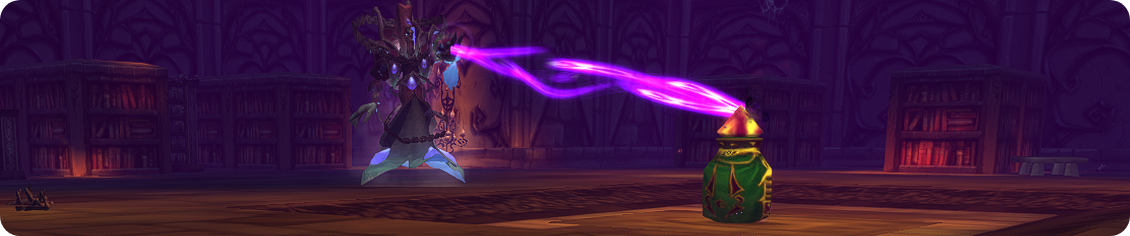
First, ensure you have a Polyformic Acid Potion, as it will increase your overall damage for the entire dungeon by approximately 3-6%. If you don't have one, it can be easily obtained solo on Normal difficulty. To get it, kill Professor Slate and loot the Empty Polyformic Acid Vial from him. Afterward, click the green flask on his table, which will fill the vial in your inventory, turning it into a Nearly Full Vial of Polyformic Acid.
Second, you need to decide on your route, which critically determines when you will use Bloodlust/Heroism. For a good balance between speed and difficulty, the most common and reliable strategy is to use it on the first boss, Instructor Chillheart, and then again on one of the final bosses. This tactic ensures you pass the initial tight DPS check. Depending on your group's clear speed, the 10-minute cooldown should be available again for either Lilian Voss, which is ideal for skipping her difficult phases, or Darkmaster Gandling for a powerful final burn on the last boss.
If you're aiming for a riskier but potentially faster run, you can save your major cooldown for the Lilian Voss encounter and pull additional mobs from the previous room to her. You should only attempt this aggressive strategy if you are extremely confident in yourself and your group. This high-risk, high-reward play saves a huge amount of time but requires flawless execution, as the incoming damage will be substantial. This guide will cover both approaches in detail.
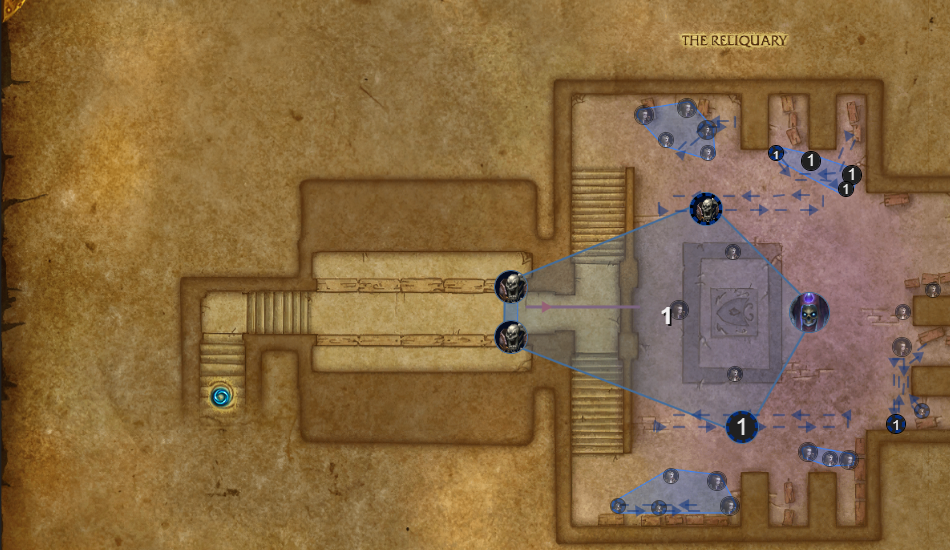
Let's begin. Regardless of the strategy you choose, the first pull of the dungeon remains the same. As soon as the timer starts, run straight ahead towards the two Risen Guard at the entrance and open the gate. You'll then need to jump down and pull the boss. Pulling the boss this way will make her clear all the trash mobs in the room, except for two patrolling Risen Guards, which you also need to pull along with the boss. Including these guards is necessary because the route is designed to let you skip the room with the Bored Students entirely by using an Invisibility Potion later on.
The Risen Guards themselves are very durable mobs that deal significant, though manageable, damage. They have two main abilities. The first is Unholy Blade, which deals minor Shadow Damage but, more importantly, applies a stacking debuff on the tank that increases all damage taken by 30%. Thankfully, this is a magic effect that the healer can and should dispel as soon as it reaches two stacks. Their second ability is Impale, which deals a small amount of physical damage.
It is also important to note that if you pull the Scholomance Acolytes before engaging the boss, she will not kill them, and they will count toward your "Enemies" percentage. However, this is not necessary for the route described here.
Instructor Chillheart is a two-phase encounter that serves as a major DPS check for your group. The fight is a race against time, first against a lethal wall of ice and then against a room filling with damaging effects. Success depends on maximizing your damage output while carefully avoiding deadly mechanics. As mentioned earlier, you can use Bloodlust/Heroism here depending on your chosen route, and don't forget to continue dispelling the stacks of Unholy Blade from your tank.
Phase 1:
From the moment the fight begins, your group is on a strict timer. The entire phase is a race to defeat Chillheart before the lethal Ice Wall crosses the room. You must handle the following abilities while maximizing damage on the boss to survive.
Phase 2:
Once Instructor Chillheart's health reaches zero, the Ice Wall will despawn, and she will retreat to her Phylactery. To defeat the boss, you must destroy this Phylactery. During this phase, you will have to deal with abilities from three books that become active in the room.
The Instructor Chillheart encounter is a pure race against damage and environmental hazards. In Phase 1, the priority is to burn down the boss before the Ice Wall closes in, all while spreading out for Ice Wrath and dodging Frigid Grasp. In Phase 2, the focus shifts to destroying the Phylactery while navigating a room that is rapidly filling with Arcane Bomb and fire patches. Proper positioning and high damage are the keys to victory.
After the boss is defeated, you can continue forward, where you will encounter another Risen Guard. Pull it, but don't stop; instead, keep moving with it into the next room. Your goal is to group this guard up with the two Candlestick Mage standing near the candles. Along the way, you will also gather all the Brittle Skeletons - which have very little health and do almost nothing - and a Reanimated Corpse. The corpse applies a stacking debuff called Dark Plague, which should be dispelled if you have a class that can remove Diseases.
The Candlestick Mage are quite dangerous, not because of cast-time spells that need interrupting, but due to two powerful instant-cast abilities. Skin Like Wax: This ability applies a harmful debuff to a random player, dealing significant Fire Damage every two seconds. It is important to remember that this can be dispelled. If your dispel is on cooldown, the targeted player will require heavy healing. Flickering Flame: This is an instant-cast spell that deals a noticeable amount of damage. While the Candlestick Mages are alive, they will continuously summon the harmless Brittle Skeletons. Don't forget to continue dispelling the Unholy Blade debuff from your tank, which is applied by the Risen Guard.
Once you have defeated this group, you will face another pull of three Candlestick Mages. The strategy for them is identical to the previous group. If you are confident and want to speed up your run, you can combine these two pulls. Alternatively, for a different high-risk, high-reward strategy, you can kill the first group of mages with Risen Guard and then pull the second group along with the next boss.
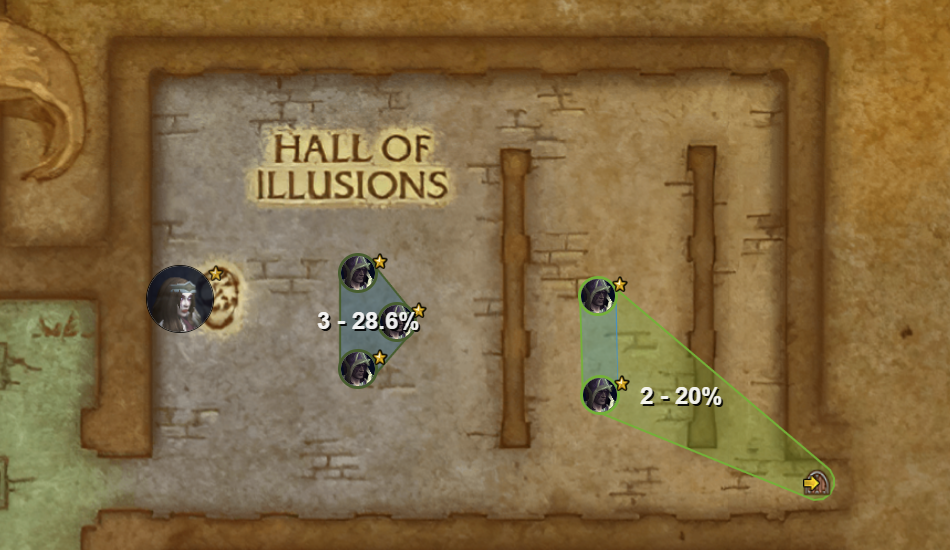
The Jandice Barov encounter is a crucial turning point in any Scholomance Gold run. This fight is not a test of raw power, but a pure mechanical check where success is measured in seconds saved. The entire challenge boils down to her illusion phase - a notorious time-sink that can quickly derail your pace. Your primary goal is not to manage this phase, but to prevent it from ever happening.
In summary, your approach to Jandice Barov should be entirely focused on exploiting the line-of-sight mechanic to skip her illusion phases. While avoiding her frontal cone and ground effects is standard procedure, the true time-save and the key to an efficient kill is preventing the clones from ever spawning. Treat the raid marker as a reliable backup plan, but make executing the LoS skip your primary objective. A clean, skip-based kill is a very large time-saver.
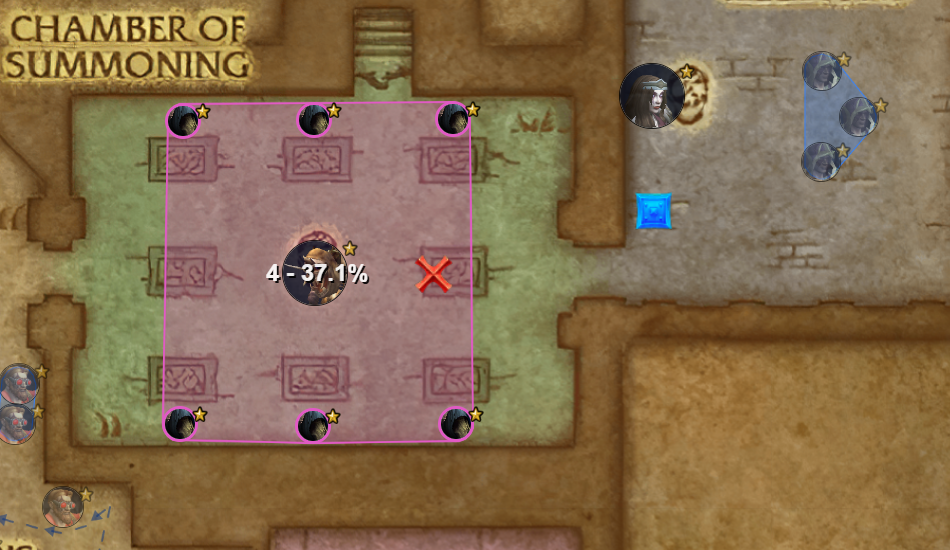
To simplify the next pull as much as possible, you will need the Battle Horn toy. You can use it from the position marked with an "X" on the image without having to run into the center of the room. This allows you to aggro all of the Boneweavers at once, spending a minimal amount of time. Immediately after using the toy, retreat back out of the room to break the line of sight (LoS) and tank the mobs at the location marked with a "Square".
The Boneweavers have only one ability, Bone Shards, which is an uninterruptible channel that deals physical damage in a cone in front of the caster. This frontal attack will quickly become lethal for any group member other than the tank, but the damage is quite tolerable for the tank. The other mobs in this pull, the Woven Boneguards, are simple melee attackers with no special abilities.
Therefore, despite the large number of enemies, this pull is not overly difficult. The entire strategy is to pull the mobs back, which groups them together tightly, and ensure that no one besides the tank gets caught in the Bone Shards frontal cone.
Once the last Boneweaver is defeated, a short role-playing (RP) event will begin, which will cause the next boss to become active.
Rattlegore is a very punishing fight where a single mistake can easily lead to a death, making disciplined execution essential. The encounter revolves around two core mechanics: the tank's responsibility to manage the boss's stacking damage buff, and the entire group's duty to maintain a personal shield called Bone Armor. When played correctly, the fight has very little unavoidable damage, giving your healer a great opportunity to contribute to DPS and help beat the timer.
Victory against Rattlegore is achieved through personal responsibility. The tank is solely responsible for managing the Rusting stacks by kiting the boss at the appropriate time. Meanwhile, the DPS and healer must diligently refresh their Bone Armor from the Bone Pile to completely nullify the threat of Bone Spike. If everyone executes their role and avoids the Soulflame on the ground, the fight becomes a simple and low-damage encounter.
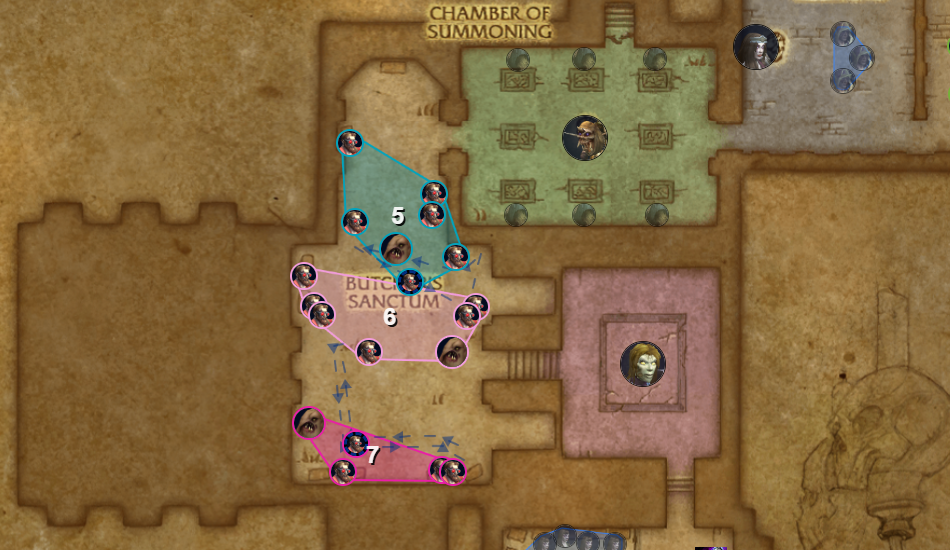
Now we arrive at the most interesting and flexible part of the dungeon. The room ahead is filled with Krastinovian Carvers and Flesh Horrors, and how you handle them will significantly impact your final time.
The Flesh Horror has a massive health pool and an ability called Clotting, making it very difficult to kill directly. The only way to defeat it is by destroying its limbs, called Meat Graft. However, you do not need to single-target these; they will die naturally from your group's passive cleave and AoE damage.
The key to this room is the Krastinovian Carver and its stacking buff, Boiling Bloodthirst. Each stack increases the Carver's attack speed by 10% but also increases the damage it takes by 20%. Most importantly, when a Krastinovian Carver dies, it grants one stack of Boiling Bloodthirst to all other nearby Carvers. This mechanic is a double-edged sword: you can manipulate it to dramatically increase your group's damage output, but it will also significantly increase the damage your tank takes. This is where strategy comes into play, and it all depends on what your tank can handle.
The massive damage increase from Boiling Bloodthirst, combined with major bursts, will allow you to kill all the Krastinovian Carvers very quickly, ideally before the tank's strongest defensive cooldowns and the healer's externals expire. Despite the potential time save, pulling this large number of dangerous mobs at once is arguably the most difficult single pull in any of the Challenge Mode dungeons. The dual benefit of using Bloodlust/Heroism here is that it also helps you burn the boss down, allowing you to kill her before her third phase even begins, saving a huge amount of time.
Regardless of which strategy you choose, you must first open the door leading to the boss's room to trigger a role-playing event that lasts approximately 15 seconds. Plan your pull around this timer.
The Lilian Voss encounter is a multi-phase fight where the primary goal is to do as much damage as possible to skip entire phases, saving a significant amount of time. Your group should use all available cooldowns, including Bloodlust/Heroism if it's not on cooldown, to burn her down before she can transition. A well-executed strategy will involve skipping phases two and three entirely. This is achieved by killing the boss - reducing her health from 60% all the way to zero - during the transformation channel. You have approximately 25 seconds to do this from the moment the transformation begins.
Phase 1:
This is the most critical phase of the fight. Your group's single objective here is to push Lilian's health all the way to zero before Darkmaster Gandling's transformation channel finishes. Success means you skip the next two phases entirely, making this the single biggest time-save in the dungeon. You must handle the following mechanics while maximizing your damage.
Phase 2:
This phase begins if you fail the DPS check in Phase 1. Darkmaster Gandling will successfully extract Lilian's Soul, and you must now defeat it by bringing it to 1% health. The soul cannot be tanked and will fixate on a random player.
Phase 3:
In this final phase, you will face both Lilian Voss and her Soul (now immune to all damage) at the same time. You must finish off Lilian while continuing to manage all the mechanics from the previous phases: spread out, avoid the Dark Blaze fire, and have the fixated player continue to kite the soul.
The best approach for Challenge Mode groups is to burn all cooldowns in Phase 1 to push Lilian directly from 60% to 1%. By skipping Phases 2 and 3 entirely, you avoid dangerous kiting and high raid-wide damage, making the fight much shorter and safer.
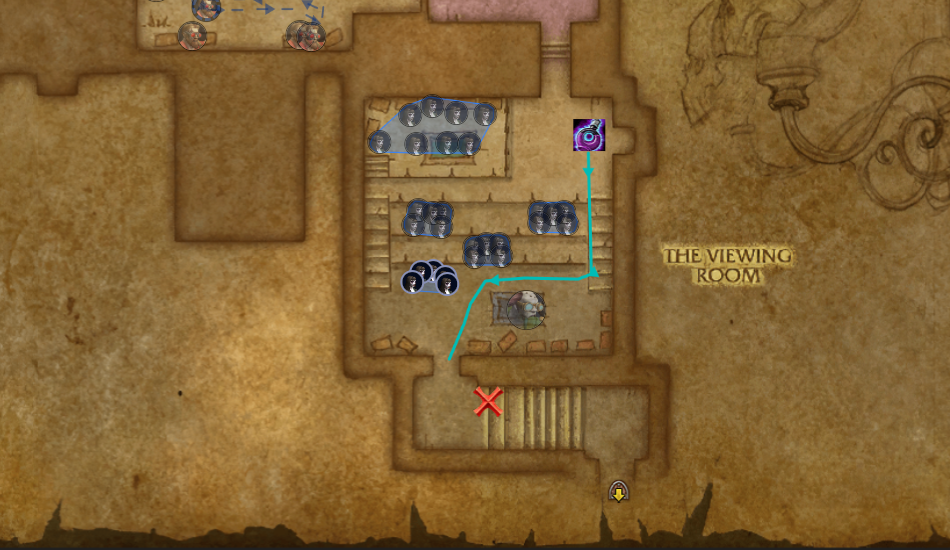
After the boss is defeated, your next step is to perform a very simple invisibility skip. However, before you do, it's crucial to check your "Enemies" forces counter to ensure you've killed enough trash to complete the dungeon.
If your enemy count is sufficient, simply enter the next room, activate any group-wide movement speed abilities you have, and use an Invisibility Potion (or Shroud of Concealment if you have a Rogue). You can then safely walk through the entire room, bypassing all the mobs.
If you find that you are short on the required enemy count, there's a contingency plan. First, execute the invisibility skip as described above. Once you are safely past the room, you can then pull the pack that is closest to the exit of the room. Do not fight these mobs inside their room. The Bored Students are casters, so it's best to have someone aggro them and pull them back out of the room to the position marked with an "X". By using the wall to break their line of sight (LoS), you will force them to group up tightly in one spot, making them easy to cleave down.
Kill these mobs if you need them for your enemy count. Otherwise, skip this entire segment and head straight to the final boss of the dungeon.
Darkmaster Gandling returns as the final, formidable boss of Scholomance, now wielding deadly Fire magic instead of Shadow. The encounter is a high-damage affair that will test your healer's output and your group's ability to handle multiple mechanics simultaneously. Success hinges on quick dispels, efficient add control, and proper execution of a unique teleportation mechanic that isolates individual players.
In conclusion, defeating Darkmaster Gandling requires clean and coordinated execution from the entire group. The highest priorities are to immediately dispel Immolate and to manage the tank's health through the constant barrage of Incinerate. Furthermore, your group must have a clear, predetermined strategy for handling the adds from Rise!, and each player must understand how to resolve the Harsh Lesson mechanic quickly and efficiently. Master these elements, and you will conquer the headmaster and complete your Challenge Mode run.
You now possess the tactical blueprint for conquering Scholomance. The routes, the high-risk pulls, the cooldown assignments—they are all designed to turn this dungeon's chaos into a controlled, aggressive assault on the timer. The knowledge is yours, but the execution requires mastery. From here, all that remains is the refinement of your group's synergy and the courage to commit to the plan. Good luck on your attempts; may your pulls be bold and your timer be beaten with seconds to spare.
But the path to Gold is demanding, and the aggressive coordination required for Scholomance can be a significant hurdle. If finding a dedicated group is proving difficult, or if you simply want to secure the exclusive rewards without the grueling progression, our professional teams are here to assist. Let us handle the strategy and execution while you enjoy the rewards you're chasing: the titles, the mounts, and the coveted transmog armor.