
Scarlet Halls is often underestimated. On paper, it's a straightforward dungeon with only three bosses and a short layout. In practice, it's a razor-thin margin of error where the relentless timer is your true final boss. This instance doesn't test complex mechanic knowledge; it tests the absolute fundamentals of group play - interrupts, positioning, and target priority - under extreme, constant pressure. One sloppy pull, one missed kick, one moment of hesitation is all it takes to turn a promising run into a failure. It's a place that rewards controlled aggression and flawless execution above all else.
This guide provides that plan. We will dissect the dungeon piece by piece, from the opening charge to the final execution. We'll cover the optimal route, vital crowd control assignments, and the cooldown timings that make or break a run. You'll learn how to neutralize the infamous Hounds, control the chaos in the library, and navigate Flameweaver Koegler's deadly arsenal. Follow our strategy, and the Gold Timer won't stand a chance.
Scarlet Halls sits in a unique spot among the Mists of Pandaria Challenge Modes. It’s not the longest, nor the most mechanically complex, but it is brutally unforgiving. This dungeon is a pure, adrenaline-fueled sprint that punishes hesitation. Its tight corridors are packed with aggressive mobs that demand immediate control, while the timer requires relentless forward momentum. Success isn't just about killing things fast; it's about a perfectly choreographed dance of crowd control, burst damage, and efficient movement.
What makes this dungeon a true test is how every pull flows into the next. A clean run feels like a single, continuous engagement, where smart positioning and coordinated stuns create openings to shave off precious seconds. With a solid strategy, Scarlet Halls becomes one of the most satisfying gold timers to achieve - a true testament to a group's raw aggression and coordination.
Before we dive into the optimal route, specific pull compositions, and the cooldown strategy needed to crush the Gold Medal, let's quickly recap what Challenge Modes are all about: the gear scaling, the unforgiving timer, and the core principles that define every run.
New from our creator Poizy: a focused Scarlet Halls Challenge Mode walkthrough that shows how to convert clean fundamentals into a Gold Medal. Follow the route end to end with line-of-sight pulls, ranged-first priorities, safe skips between hallways, tight defensives on spike moments, and polished boss plans. Cooldown and BL timings are annotated, so your group knows exactly when to commit and when to hold for the next checkpoint.
Hunting for a gold-timer run? Start with the video. If you’d rather read, the full breakdown below covers pull order, positioning cues and contingency notes for messy patrols.
Challenge Modes were the precursor to the Mythic+ system we know today, introduced in Mists of Pandaria. They were designed as the ultimate test of skill, featuring aggressive timers, densely packed enemies, and a strict focus on execution rather than gear. The system set a benchmark for coordinated group play that Mythic+ would later build upon.
To ensure a level playing field across the entire expansion, Blizzard normalized player stats to a fixed item level. You couldn't overpower these dungeons with better gear; victory was earned through planning, precise execution, and teamwork.
Instead of gear, MoP Challenge Modes offered something far more lasting: exclusive cosmetic rewards, including stunning class-specific armor sets, a unique mount, and a title to commemorate your achievement. To learn more about the specifics, see our detailed guides:
Now that you're caught up on the rules and rewards, it's time to tackle the practical side of things. Let's begin our descent into the fiery heart of the Scarlet Halls.
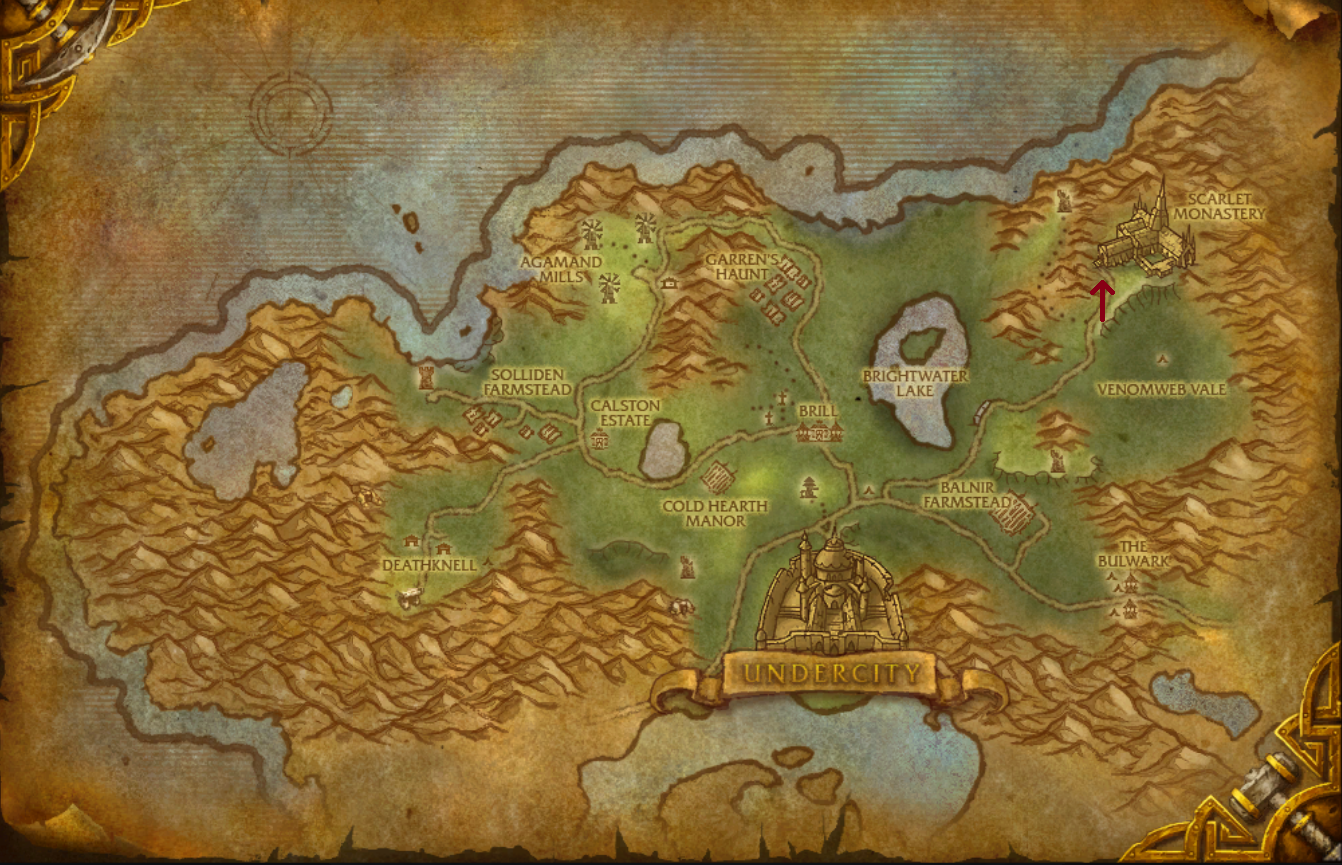
The entrance to Scarlet Halls is located in the northern part of Tirisfal Glades, just northeast of the Undercity. The instance portal is inside the main monastery building at coordinates /way 85.0 30.0. You'll find the meeting stone right outside the main gate.
To begin your Challenge Mode attempt, form a group and head inside the dungeon. You will see a Challenge Mode Console near the entrance, which allows you to activate the timed run. This modern addition makes starting attempts much faster than it was back in 2012.
In Challenge Mode, the clock is king. Scarlet Halls is a frantic race from start to finish where every second counts. Bronze and Silver offer some breathing room, allowing for a safer pace and a few mistakes. They are forgiving enough for a cautious clear with minimal wipes.
The Gold Timer, however, is on a completely different level. Thirteen minutes is an incredibly tight window that requires a finely tuned strategy and near-perfect execution. It demands you play on the edge, pulling large packs, managing cooldowns precisely, and never stopping. This is a pure test of your group's offensive power and coordination.
| Medal | Timer | Reward |
| Gold | 00:13:00 | 85 Valor Points |
| Silver | 00:22:00 | 70 Valor Points |
| Bronze | 00:45:00 | 55 Valor Points |
Remember that all completed runs award Valor Points, rewarding your time investment regardless of the outcome. Use less-than-perfect runs to refine your strategy; each attempt is a stepping stone toward the confidence and consistency required for that coveted Gold Medal.
This is where the real battle begins. We're moving past theory and into a concrete, actionable strategy for every pull and boss in Scarlet Halls. Think of it as a scorched-earth campaign: a relentless push forward that combines calculated aggression, smart use of crowd control, and decisive cooldowns to keep you ahead of the brutal timer.
Since the goal here is the Gold Medal, the following strategy is built for speed and efficiency. It assumes you are aiming for a clean, powerful run with minimal hesitation and maximum impact.
Let's break down the core requirements for a successful Gold run in Scarlet Halls:
The moment you begin, you are committed. There's no room for error and no second chances. Your success hinges on your ability to execute the route flawlessly. Let's examine the step-by-step strategy that the most dedicated teams use to master this instance.
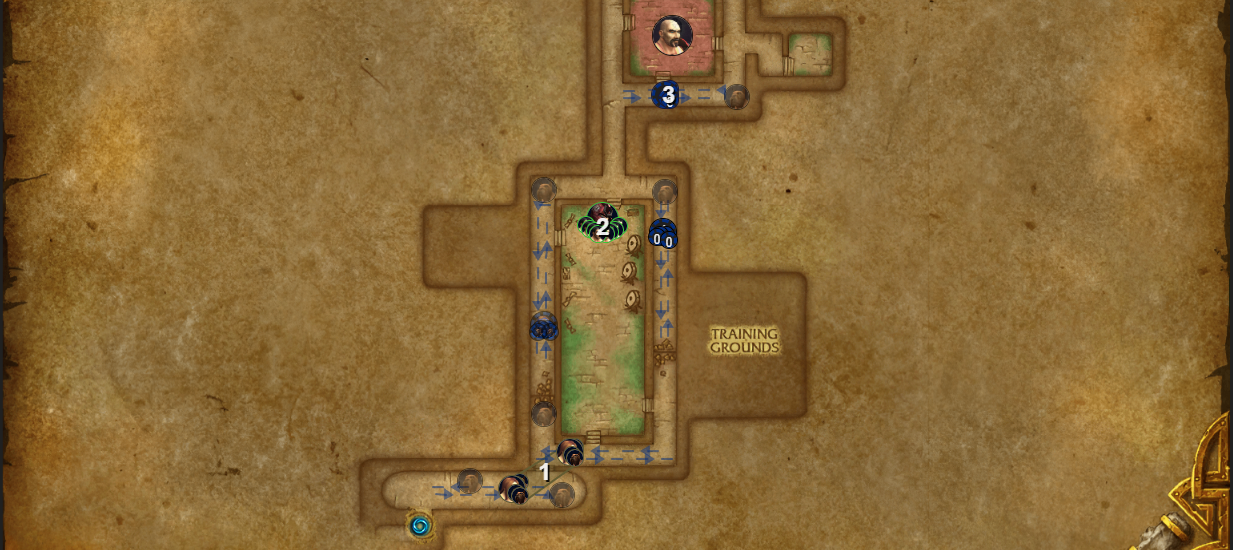
In this dungeon, you can find and use a special item, the Bucket of Meaty Dog Food, to save a significant amount of time. As soon as the dungeon starts, you will find three buckets immediately to your left, around the corner. Before you begin, assign two players to pick them up and use them on the first two Vigilant Watchmen. Crucially, for these mobs to count towards your "Enemies" percentage, you must deal some damage to them before using the buckets.
The chained Angry Hound will aggro as you run by, but they will drop combat once you are out of their attack range. After you use the buckets, the Starving Hound will eat their masters and fall asleep, dropping out of combat and allowing you to proceed.
Next, you'll need to cross the Courtyard using the Reinforced Archery Target, which provides a Heroic Defense. Entrust this task to the fastest character in your group. Once the player with the shield reaches Commander Lindon, the archers will stop firing, and the rest of the group can engage. These mobs aren't particularly dangerous once you reach them. The only thing to watch out for is the Master Archer, who applies a stacking debuff on the tank called Bleeding Wound, which needs to be healed through.
Once these mobs are defeated, you can continue forward. Pick up another Bucket of Meaty Dog Food and use it on the next Vigilant Watchman. Don't forget to damage him first to get credit for the kill! After that, you can proceed to the boss.
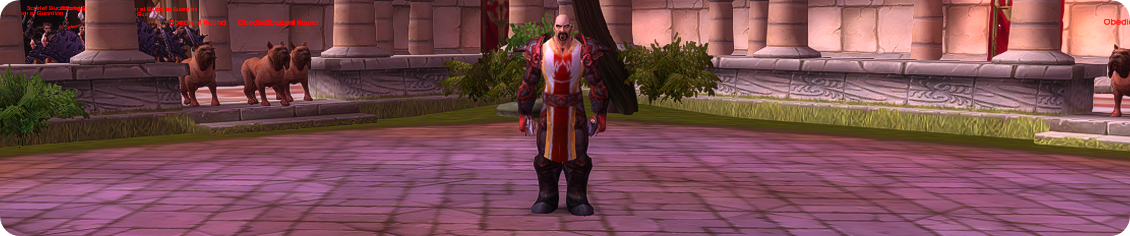
Houndmaster Braun is a disciplined single-target check built around stacking bleeds, short-range whirlwinds, and a constant trickle of hounds. Your win condition is simple: stay spread, keep all damage on the boss, and do not kill the dogs - the more that survive when Braun dies, the faster they chew open the gate to the next wing. This fight is the optimal place to use Bloodlust/Heroism and also you must save your combat potion for an invisibility skip later on. Plan personals and externals for his 50% enrage, and have the tank be the only player interacting with the hounds.
In summary, the path to victory is straightforward: control the space, control your damage, and control the hounds. If your group can nail the spread to prevent multi-person bleeds and trust the tank to handle the adds, the only remaining challenge is the burst of damage at 50%. Execute these fundamentals, and you will not only defeat the boss but also use his own hounds to accelerate your run.
After the boss is defeated, a short role-playing event will begin in which the hounds will first finish off the boss and then kill the pack of Scarlet Guardians blocking your path. Once the RP is over, you can proceed.
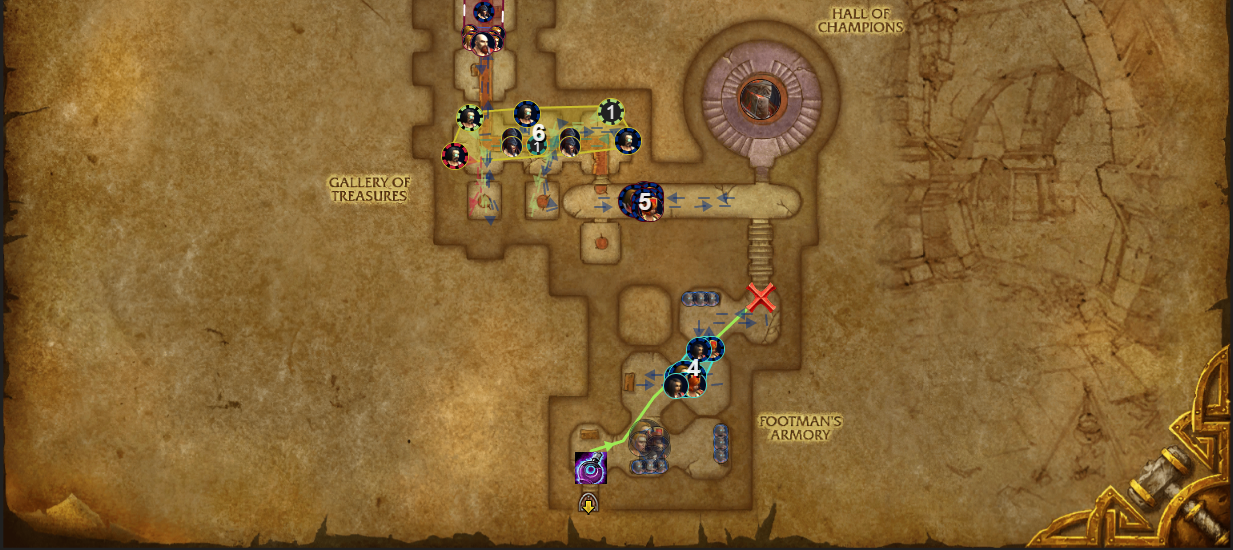
You will need to use an Invisibility Potion to skip the first pack of mobs and then pull the next two packs together. It is important that you do not stop in the center of the room; instead, run further while invisible and stop near the "X" mark, as shown in the picture, to avoid being shelled by the Scarlet Cannoneer. Pulling this large group will deliberately put you slightly over the required enemy count. The purpose of this is to create a safety margin. It ensures you won't fall short and have to backtrack after the final boss, and it also serves as insurance in case the initial Vigilant Watchman trick didn't grant you kill credit.
This large pull contains most of the trash mobs you will encounter for the rest of the dungeon. The Scarlet Defender is a very durable mob due to its Heavy Armor and Shield Barrier abilities, and it also applies a Disarm to the tank. If this is causing problems, you can bring a weapon enchanted with a Living Steel Weapon Chain, while Death Knights can use the Rune of Swordshattering instead. This mob also increases the health of all other enemies by 10% with its Commanding Shout. The Scarlet Myrmidon and Scarlet Scourge Hewer are standard melee mobs that pose little threat, even with the various buffs they apply to themselves.
The real danger comes from the casters: the Scarlet Evangelist and Scarlet Evoker. The Evangelist casts the most critical spell, Holy Fire, which deals massive damage and can even one-shot a player, so you must interrupt every single cast. Death Knights are an exception, as they can use Dark Simulacrum to steal the spell for a huge damage boost. The Evangelist's other spell, Holy Smite, deals minor damage and can be ignored to save interrupts for more important casts. Similarly, the Scarlet Evoker must be controlled. It is mandatory to interrupt its Flamestrike, which inflicts heavy damage on the entire group and ignites the targeted area for 8 seconds. Its other cast, Fireball, is a lower priority. You should decide which of the weaker spells to interrupt based on your group's available crowd control and kicks.
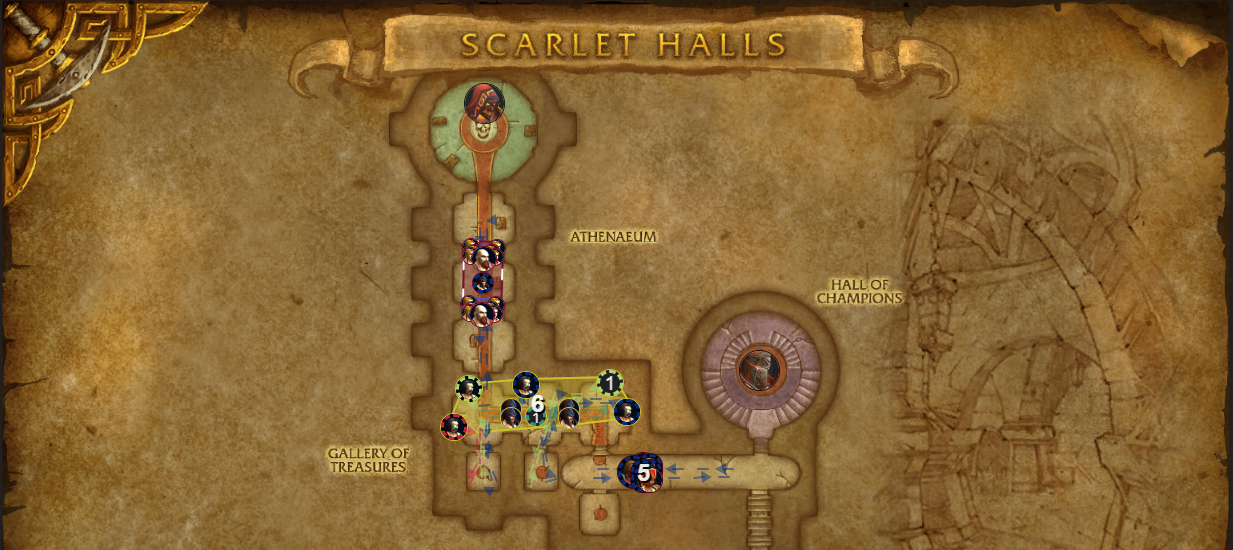
With that challenging pull behind you, it's crucial to maintain your momentum. Your next objective is the patrol in the corridor leading to the boss arena. This group presents a test of the principles you've already mastered; the mobs here use the same abilities you've been countering thus far, offering no new surprises. Apply the same interrupt priorities, focusing on casters, and use your crowd control to manage the flow of the engagement. Once they are defeated, the path to Armsmaster Harlan is clear, and you can move in to prepare for the encounter
Armsmaster Harlan is a pure positioning and awareness check. He will leap to the center and start casting Blades of Light, a lethal 8-yard spin that drags and shreds anyone it touches - on Challenge Mode, being clipped is usually a death. Keep the center of the arena a no-go zone, fight him near the outer edge, and make sure only the tank ever stands in front of his Dragon’s Reach cleave. Burn hard after 50% as his damage ramps every few seconds.
The key takeaway is this: respect the Blades of Light, then dominate the center of the room. The strategy reduces a complex dance into two simple steps: one perfect defensive maneuver, followed by an all-out offensive push. Save your major cooldowns for the 50% enrage, and he will be defeated long before a second spin is ever a concern. This isn't just a strategy; it's a statement of control.
After defeating Armsmaster Harlan, you will advance into a chamber with a new set of adversaries you have not yet encountered. This pull introduces the Scarlet Hall Guardian and the Scarlet Treasurer. The Guardian is the primary threat; it will apply a stacking debuff on your tank called Slash Armor, which can become lethal if the mob is not eliminated swiftly. It also has a powerful Nature-based attack, Jolt, which adds to the tank pressure. In contrast, the Scarlet Treasurer is a low-priority target. Its only notable ability is an uninterruptible Toss Statue cast that deals negligible physical damage.
There are no complex mechanics to manage in this pull. It serves as a straightforward damage check, where the only requirement is to focus your group's damage and bring down the Guardians before the tank is overwhelmed.
The pull immediately following that, however, contains two Scarlet Scholar - very dangerous spell-casting mobs, along with several Scarlet Pupil and another Scarlet Hall Guardian. These casters possess a channeling ability called Scarlet Protection, which reduces incoming damage to nearby allies by 99% and must be interrupted immediately. They also cast Fireball Volley, which deals significant group-wide damage and should also be fully interrupted. A less critical spell is Fireball, which deals minor Fire Damage and can be allowed to go through to conserve interrupts for more important casts. The Scarlet Pupil apply a stacking Beatdown debuff to the tank, dealing physical damage. This debuff, especially when combined with Slash Armor, can become problematic, so the faster you eliminate this pull, the better.
With this final pull defeated, your path forward to the last boss of the dungeon is now completely clear. Prepare for the encounter.

Flameweaver Koegler is a strict interrupt/dispell check with one lethal twist: Book Burner. If his fiery bolt hits a bookshelf the room fills with burning zones that quickly overwhelm a Challenge Mode group. Assign one player to body-block every Book Burner, set hard interrupt rotations for Pyroblast and Fireball Volley, and Purge/Spellsteal Quickened Mind instantly.
Remember to treat Greater Dragon’s Breath as a forced reposition - stay calm, step out of the cone, and reset your spread. Crucially, check the cooldown on Bloodlust/Heroism; depending on your group's pace through the dungeon, it may be available again for this final push.
Success on Koegler is about control: a reliable Book Burner block, clean interrupts on Pyroblast/Fireball Volley, and instant Quickened Mind dispels. Step out of Dragon’s Breath without panic, and reset positioning before the next cast cycle. Execute that discipline and Koegler falls quickly - with a safe, uncluttered room and no time lost on your Gold push.
You now possess the complete battle plan to dismantle the Scarlet Crusade. This guide provides the map, but victory in this unforgiving sprint is earned through discipline. It's won in the perfect chain of crowd control, the split-second dodges, and the unwavering focus required to turn raw chaos into a controlled demolition. Go forth, execute the plan, and let the timer be a witness to your precision.
But even the best plans can be difficult to execute. If you're tired of runs falling apart at the last moment or struggling to assemble a team with the right chemistry, our seasoned veterans stand ready. We've mastered this trial and can provide the seamless, guaranteed run you need to claim all the iconic rewards Mists of Pandaria has to offer. Reach out, and let us finish the fight for you.