
Mogu'shan Palace is the ultimate arbiter of a group's discipline. Its grand, silent halls create a false sense of security, masking a brutal reality where the most significant threats are not the bosses but the merciless packs of sentinels and warlords that stand guard. Here, victory is forged not through brute force but through a shared mastery of crowd control and perfectly timed interrupts, turning each dangerous patrol into a display of controlled chaos.
This guide serves as your definitive strategy for taming this unforgiving instance. We offer a precise route that methodically dissects the dungeon's most notorious hurdles, from the overwhelming initial assault at the gates to the gauntlet of traps in the final throne room. Inside, you'll find the essential cooldown mapping, the non-negotiable interrupt assignments, and the pacing required to conquer the timer. By learning the unique tempo of the palace - knowing when to be aggressive and when to be methodical - you will transform this monument of mogu power into your own Gold Medal triumph.
Mogu'shan Palace is widely regarded as the great filter of Pandaria's Challenge Modes. It is a top-heavy gauntlet, front-loaded with some of the most punishing trash packs ever designed. The bosses themselves are relatively straightforward, but the journey to them is a relentless trial of crowd control, target prioritization, and spatial awareness. This dungeon is a test of prevention, not recovery; a single mistake in the opening rooms can easily cascade into a depleted timer. Success here is a direct reflection of a group's synergy and its ability to execute a flawless chain of command under pressure.
What truly defines a gold-medal run in this instance is the mastery of its brutal tempo. Aggressive, coordinated use of interrupts and cooldowns is not just a strategy but a necessity to build and maintain momentum from one pull to the next.
However, before we can detail the precise routing, stun rotations, and coordinated cooldown assignments required to conquer this fortress, we must first establish a foundational understanding of the core philosophy of the system it belongs to.
New from our creator Poizy: a focused Mogu’shan Palace Challenge Mode walkthrough that shows how clean execution converts into a Gold Medal. You’ll get the full route with line-of-sight pulls, ranged-first priorities, safe skips between hallways, well-timed defensive windows on damage spikes, and refined boss plans. Cooldown and BL timings are annotated so your group can commit with confidence and hold when needed.
Chasing a gold timer? Start with the video. Prefer reading? Below you’ll find the pull order, positioning cues, and contingency notes for messy packs.
Challenge Modes were Blizzard's original vision for a truly competitive, five-player PvE format. They established a level playing field where gear was normalized and external advantages were nullified, creating a pure test of skill. Your epic items and legendary cloaks were scaled down, leaving only your knowledge of your class, your teamwork, and your execution under the pressure of a tight timer. You couldn't outgear the content; you had to outplay it.
Completing these challenges didn't award player power but offered some of the most prestigious cosmetic rewards in the game's history, including unique armor sets, mounts, and titles. For a full breakdown of the rules and rewards, see our comprehensive guides:
Now that you understand the stakes and the philosophy behind Challenge Modes, let's apply that knowledge. It's time to dissect the practical strategy for taming the dungeon that defines the Gold Medal grind: Mogu'shan Palace.

The entrance to Mogu'shan Palace is located in the eastern part of the Vale of Eternal Blossoms, with the portal found inside the main palace structure at roughly the coordinates /way 80.5 33.2. You will find the meeting stone just outside the large staircase leading up to the instance.
To begin the Challenge Mode, your pre-made group will need to enter the dungeon and activate the Challenge Mode Console located in the foyer. This quality-of-life feature from MoP Classic allows you to start your timed run immediately without resetting the instance.
In Challenge Mode, the timer is absolute, and Mogu'shan Palace is defined by its unforgiving clock. Bronze and Silver medals offer a substantial buffer for learning. They allow for a more methodical pace, a few deaths, and even a wiped trash pack without automatically ending the run. Use these brackets to practice your interrupt orders and familiarize yourself with the dungeon's lethal patrols.
Gold is its own challenge. At twelve minutes, it is one of the tightest and most demanding timers in Pandaria, requiring an aggressive, pre-planned route that is executed with near-perfect precision. Every global cooldown matters, every stun has a purpose, and every second is earned through flawless coordination.
| Medal | Timer | Reward |
| Gold | 00:12:00 | 85 Valor Points |
| Silver | 00:24:00 | 70 Valor Points |
| Bronze | 00:45:00 | 55 Valor Points |
More than the medal itself, all completed runs reward Valor Points, with higher medals granting a larger amount. This means every attempt, successful or not, contributes to your weekly gear progression. More importantly, practice runs build the muscle memory and strategic refinement needed to turn a chaotic attempt into a consistent Gold.

Now we move to the heart of this guide: the tactical blueprint for every pull and each boss encounter. Think of this as a precision strike - a plan where calculated aggression, proactive crowd control, and flawless execution dismantle the palace's defenses and keep you ahead of the unforgiving clock.
Since the ultimate objective for any serious team is the Gold Medal, the strategies that follow are built for speed and efficiency. This means optimized pathing, minimal downtime between pulls, and a disciplined approach to cooldown management. We are aiming for a clean, repeatable performance.
Let's establish the non-negotiable victory conditions for Mogu'shan Palace:
From the first pull onward, there is no pause button and no redo. Your group must commit to the plan, execute with precision, and adapt instantly when things go wrong. Now, let's break down the efficient route that will turn these requirements into a reality for any dedicated team.
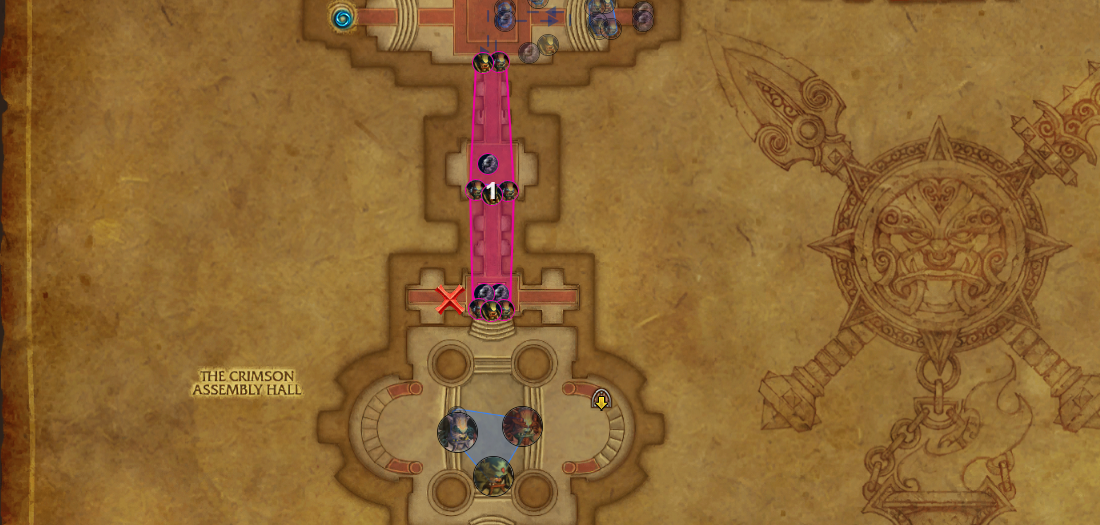
Your run begins with a classic, very risky but very time-efficient pull of a large number of mobs, using Bloodlust/Heroism. As soon as the timer starts, use all of your movement speed abilities, primarily to make the tank's job easier, and run as a group to the LoS (Line of Sight) point marked on the picture as "X" to group the mobs in one spot for comfortable cleaving.
There will be three types of mobs in the pull. The first is the Kargesh Ribcrusher, which hits your tank with Mace Smash, an ability that deals 200% weapon damage, and also uses Whirlwind, a channeled ability that deals damage to all enemies in a small radius over 3 seconds. Everyone except the tank should try to avoid damage from this ability; its channel can also be interrupted by a stun. The second, more dangerous mob, is the Gurthan Iron Maw, which has a very dangerous 3-second stun for the tank called Intimidation, as well as a debuff, Demoralizing Roar, which reduces the melee attack power of nearby enemies by 10%.
The most dangerous mob in this pull is the Harthak Stormcaller, which has three casts. The most dangerous of these is Shock, which applies a 6-second CC (Crowd Control) to the target. If this cast hits your healer, it will most likely lead to a wipe, so ALL shocks must be interrupted. It also has less dangerous, but still very unpleasant abilities: Lightning Bolt, a standard cast that deals minor Nature Damage to a target, which in turn creates a Lightning Storm void zone that you can simply walk out of.
Since there are three very dangerous casters in the pull, as well as the channeled Whirlwind ability, you must intelligently manage all of your available AoE control. To make this easier, you can agree before the dungeon starts on the sequence in which to use it, and you can also assign one person to each Harthak Stormcaller who will kick their Shock cast.
Because the pull is very dangerous for the tank due to the large number of mobs and the Intimidation stun, do not be afraid to kite this pull after you have gained aggro and your defensive cooldowns have expired.
So, your task is: run together to the designated spot, gathering all the mobs in one place using LoS, activate Bloodlust/Heroism, use all the control in your arsenal, and kill the mobs. Also, you can activate the boss's RP (role-playing event) during this pull, which lasts about 20 seconds. But be careful not to activate it too early, because as soon as the RP ends, the boss fight will begin, so this moment should be calculated carefully.

The Trial of the King is a sequential, three-phase encounter where you will face three of the King's lieutenants to prove your worth. Unlike the Heroic version, the order of the bosses in Challenge Mode is always the same: you will start by fighting Kuai the Brute, followed by Ming the Cunning, and finally, Haiyan the Unstoppable. This fight is a significant test of your group's awareness, positioning, and ability to handle distinct mechanics in each phase.
Phase 1: Kuai the Brute
Kuai is accompanied by his pet, Mu'Shiba. The primary strategy is to focus all damage on Kuai, as Mu'Shiba will stop fighting once his master is defeated.
Phase 2: Ming the Cunning
This phase is all about movement and avoiding environmental damage.
Phase 3: Haiyan the Unstoppable
The final phase tests your group's coordination with spreading and stacking mechanics.
Success in the Trial of the King relies on mastering the core mechanic of each phase. For Kuai, it's about dodging frontal attacks. For Ming, it’s about constant movement to avoid ground effects. The final challenge with Haiyan is a disciplined dance of spreading out for Conflagrate and quickly stacking together to survive Meteor. If your group can execute these positioning requirements while the tank and healer manage the heavy incoming damage, you will overcome the trial.

After the boss is defeated, a not-so-easy-to-execute invisibility skip awaits you. The Glintrok Scout, marked on the picture as "Diamond", puts players into combat when he shouts a warning. Your task is for the player who triggers this event to have some ability that allows them to exit combat, for example, a Rogue with Vanish or a Mage with Invisibility. If your group does not have these classes, you can reset combat using the Salyin Battle Banner, but be careful: you need to activate the Invisibility Potion immediately after activating the banner, otherwise you will re-enter combat.
That is, the group member who can drop combat activates this event, after which all group members, except for this person, activate an Invisibility Potion and start running past the mobs. Then, the person who activated the event drops combat, also activates a potion, and runs past the mobs just like the rest of the group. After passing the mobs, you will need to jump down to the boss's arena. Walk right up to the ledge, then press Jump first, and while in the air, press the Forward movement key. You will have very little time to execute this jump, so it might be worth practicing this part separately.
Despite the fact that this is indeed not the easiest skip, it saves a large amount of time on killing trash, which you kill in excess even with this skip.

The encounter with Gekkan is an add-focused battle where you will face the boss alongside his four loyal bodyguards. The fight's primary mechanic revolves around Reckless Inspiration, a stacking buff Gekkan receives each time one of his bodyguards is defeated, significantly increasing his damage output. Therefore, the entire fight is a test of your group's ability to control the adds and follow a strict kill order to manage the incoming damage and enemy abilities effectively. The recommended strategy is for the tank to pull Gekkan first and use a pillar to line-of-sight the adds, grouping them all together for easier cleave and control. Once grouped, follow this kill order precisely.
Success in this fight hinges on disciplined execution of the kill order. Begin by stacking the adds using line-of-sight, burst down the Glintrok Ironhide to remove the damage reduction aura, and ensure all Cleansing Flame casts from the Oracle are interrupted. By managing the adds in the correct sequence, you control the flow of the fight and ensure that Gekkan's damage is manageable when you finally face him alone.

With the boss defeated, you can proceed to a straightforward skip. You'll need to apply hard Crowd Control (CC) to the two Glintrok Oracle, which are marked on the previous picture with the "Moon" icon. Abilities like a Rogue's Sap or a Monk's Paralysis are perfect for this. If your group doesn't have enough CC, the Rod of Ambershaping item can be used as a substitute.
Next up is the dungeon's real challenge: the elevator, which can be a significant time loss. The elevator only activates after Gekkan is killed, so move quickly to avoid a long wait. Once you're on the platform, make sure to jump to prevent falling through the platform as it begins to ascend.
Once you're off the elevator, head forward and then turn left to find a patrol. This group contains two enemy types. First is the Gurthan Swiftblade, a simple melee mob. It uses Blade Rush to charge a random player, dealing damage to them and two nearby allies, and Swift Strike an instant attack that applies a minor bleed effect.
The more dangerous enemy is the Harthak Flameseeker. This caster has three abilities to watch for. Its top priority interrupt is Molten Barrage, a channeled ability during which the mob launches fireballs at random targets - this must be stopped immediately. The second priority is Erupting Flame, which deals minor Fire Damage but also knocks the target into the air, causing a loss of group damage, so interrupt this as well. Its least threatening ability is a standard Fireball, which you can let go through in order to save your interrupts for more important abilities. Note that Death Knights can use Dark Simulacrum on this mob's spells to boost their own damage.
The next pull is particularly fatal for the tank. It includes two Gurthan Swiftblades, one Harthak Flameseeker, and introduces new enemies: three Kargesh Highguards. These Highguards have a nasty ability called Crunch Armor, which deals minor damage but critically reduces the tank's armor by 20% per application, stacking up to ten times. They will also use Hurl Shield if their target is more than 5 meters away. The strategy here is to burn this group down quickly. Focus the caster first. Once it's down, the tank may need to start kiting the remaining mobs if the minus armor stacks get too high. If you aren't pressed for time and want to play it safe, you can split this group into two separate pulls.
The final group of enemies before the last boss is composed of four Quilen Guardians. These mobs apply a stacking bleed effect called Carnivorous Bite (up to 5 stacks) that deals heavy damage, which needs to be healed. They also use Leaping Rush to jump to random players. Because of this leap, your group should stay relatively close together to minimize movement and maintain DPS uptime. Although the bleed is insecure, a confident group can choose to pull these guardians along with the final boss.

As the final encounter in Mogu'shan Palace, Xin the Weaponmaster tests a group's ability to handle multiple simultaneous threats. The room is filled with an array of traps that activate as the fight progresses, making constant movement and careful positioning the keys to victory. To simplify the encounter, the tank should position the boss in the area marked by a square on the image; this strategy minimizes group movement. The primary challenge of this fight is not the boss himself, but successfully navigating the deadly arsenal and hazardous environment he commands. Remember to check your Bloodlust/Heroism cooldown; depending on your group's tempo, it might be ready to use again.
In summary, this encounter is a dance of constant movement and spatial awareness. The most effective strategy is to confine the fight to the area near the entrance, which helps manage many of the room's traps. By consistently dodging the Ground Slam cone, moving out of the Circle of Flame, and navigating the Whirlwinding Axes and Blade Traps, your group can mitigate most of the damage. The fight becomes a race against time once Death From Above! activates at 33%, demanding focused healing and a final burst of damage to defeat the Weaponmaster.
You now have the blueprint to dismantle Mogu'shan Palace. This guide transforms the dungeon's infamous difficulty from an insurmountable wall into a series of calculated, repeatable steps. With this knowledge, each deadly patrol becomes a solved puzzle, every cooldown a deliberate strike, and the punishing timer a metric you control. The path to a Gold Medal is no longer a mystery; it is a matter of execution. All that remains is for your team to put this strategy into practice and claim your victory.
However, Mogu'shan Palace is a legend for a reason. It is often the final, frustrating roadblock for many groups, demanding a level of coordination and patience that can be exhausting. If you find yourself wanting to secure the exclusive rewards without the stress and endless attempts, our veteran teams are on standby. We offer a direct, guaranteed path to the titles, mounts, and transmogs you're chasing, letting you bypass the grind entirely.