
Der Zuckende Parasit ist ein groteskes, verstörendes Reittier, das die chaotische Essenz von N’Zoths Schwarzem Imperium perfekt einfängt. Wie der Name schon andeutet, windet und verdreht sich die Kreatur ständig - eine Masse aus Fleisch und Augen, die jeder natürlichen Anatomie zu trotzen scheint. Der Beschreibungstext im Spiel sagt alles: „Er ist so zappelig! Ihm nur beim Bewegen zuzusehen, ist chaotisch und beunruhigend.“ Dieses Reittier ist die finale Belohnung für den Abschluss des Metaerfolgs Ruhm des Schlachtzüglers von Ny’alotha, für den Ihr eine Reihe einzigartiger Herausforderungen bei allen zwölf Bossen des Raids Ny’alotha, die Erwachte Stadt meistern müsst.
Der Zuckende Parasit wurde erstmals mit Patch 8.3.0 „Visionen von N’Zoth“ eingeführt und ist seitdem bei Erfolgsjägern und Reittiersammlern beliebt, die kreative Begegnungsbedingungen mögen. Anders als seltene Drops, die auf Glück basieren, ist dieses Reittier eine garantierte Belohnung für den Abschluss aller Einzelerfolge - ein echter Test Eurer Fähigkeit, ungewöhnliche Mechaniken korrekt zu spielen, Euch mit anderen zu koordinieren (besonders bei den späteren Bossen) und die verderbten Versionen von Uldum und dem Tal der Ewigen Blüten zu nutzen, um Zugang zum Raid zu erhalten.

Der Zuckende Parasit wird durch den Abschluss des Metaerfolgs Ruhm des Schlachtzüglers von Ny’alotha erhalten. Dafür müsst Ihr 12 einzelne Erfolge abschließen, einen für jeden Boss im Raid Ny’alotha. Die meisten dieser Erfolge können auf Normal erledigt werden (empfohlen), auch wenn sich manche Mechaniken auf Mythisch anders verhalten - bleibt für den reibungslosesten Ablauf bei Normal oder Heroisch. Ihr könnt sie über mehrere IDs hinweg abschließen, müsst die Bedingungen für jeden Erfolg aber persönlich erfüllen.
Da Ny’alotha ein Legacy-Raid aus Battle for Azeroth ist, könnt Ihr die meisten Bosse auf Stufe 70 oder höher problemlos solo besiegen. Einige Erfolge (besonders Säubernde Behandlung bei Panzer von N’Zoth und der finale Kampf gegen N’Zoth selbst) sind mit mindestens einem weiteren Spieler jedoch deutlich einfacher. Der folgende Guide erklärt jeden Erfolg im Detail, inklusive Schritt-für-Schritt-Taktiken, wichtigen Warnungen und Tipps für Solospieler.
Wenn Ihr komplett neu in BFA-Inhalten seid, müsst Ihr die BFA-Einführungsquestreihe bis einschließlich Eine geteilte Nation abschließen, wenn Ihr Allianz spielt, oder Willkommen in Zuldazar, wenn Ihr Horde spielt. Für die Horde beginnt die Questreihe mit Battle for Azeroth: Missionserklärung, die Ihr vom Herold des Kriegshäuptlings im Tal der Stärke außerhalb von Grommashfeste bekommt. Als Allianz holt Ihr die Quest beim Heldenherold neben dem Auftragsbrett des Helden vor dem Hauktionshaus im Handelsdistrikt von Sturmwind ab. Die Quest heißt Battle for Azeroth: Gezeiten des Krieges.
Außerdem müsst Ihr über die Quest Eine sterbende Welt Euer Herz von Azeroth erhalten. Sie sollte Euch automatisch angeboten werden, wenn Ihr Boralus oder Dazar’alor besucht, solange Ihr gerade nicht in Einführungsquests von Dragonflight steckt. Falls nicht, könnt Ihr die Quest beim Irdenen Wächter an den folgenden Orten annehmen.
/way #1165 50.2 41.6 Irdenen Wächter Zuldazar
/way #1161 75 15.1 Irdenen Wächter Boralus
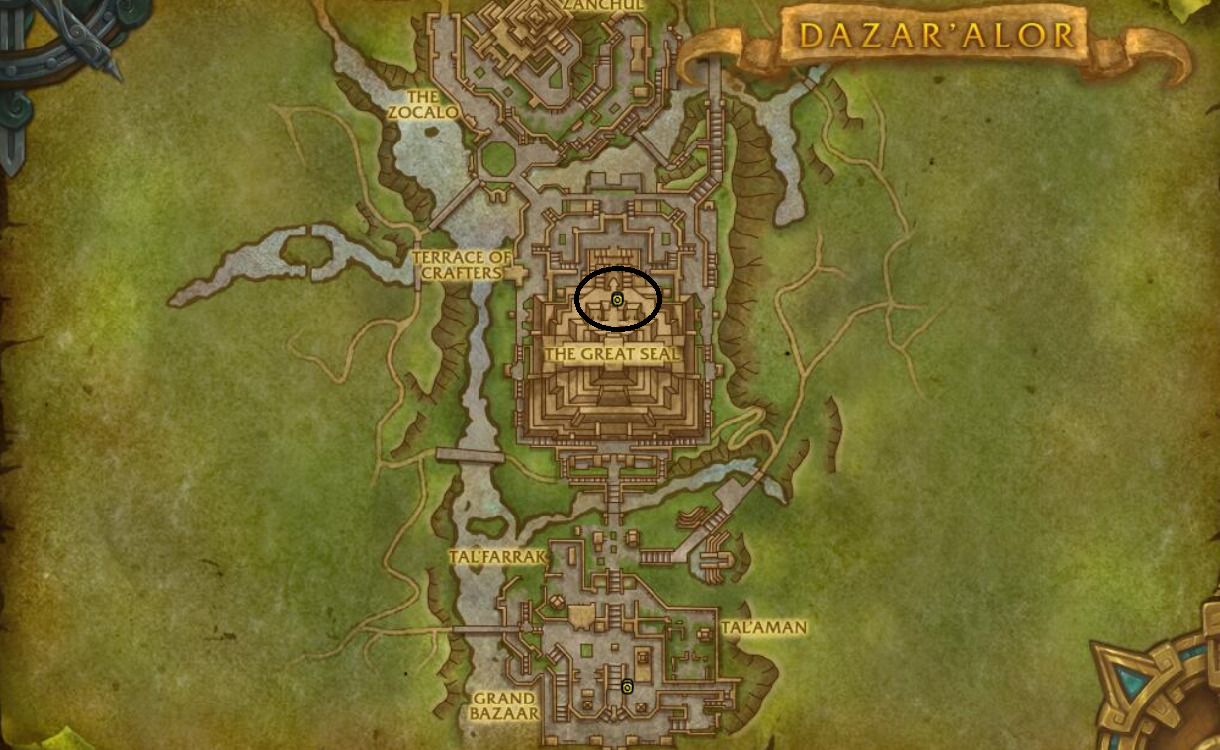
Irdenen Wächter Zuldazar
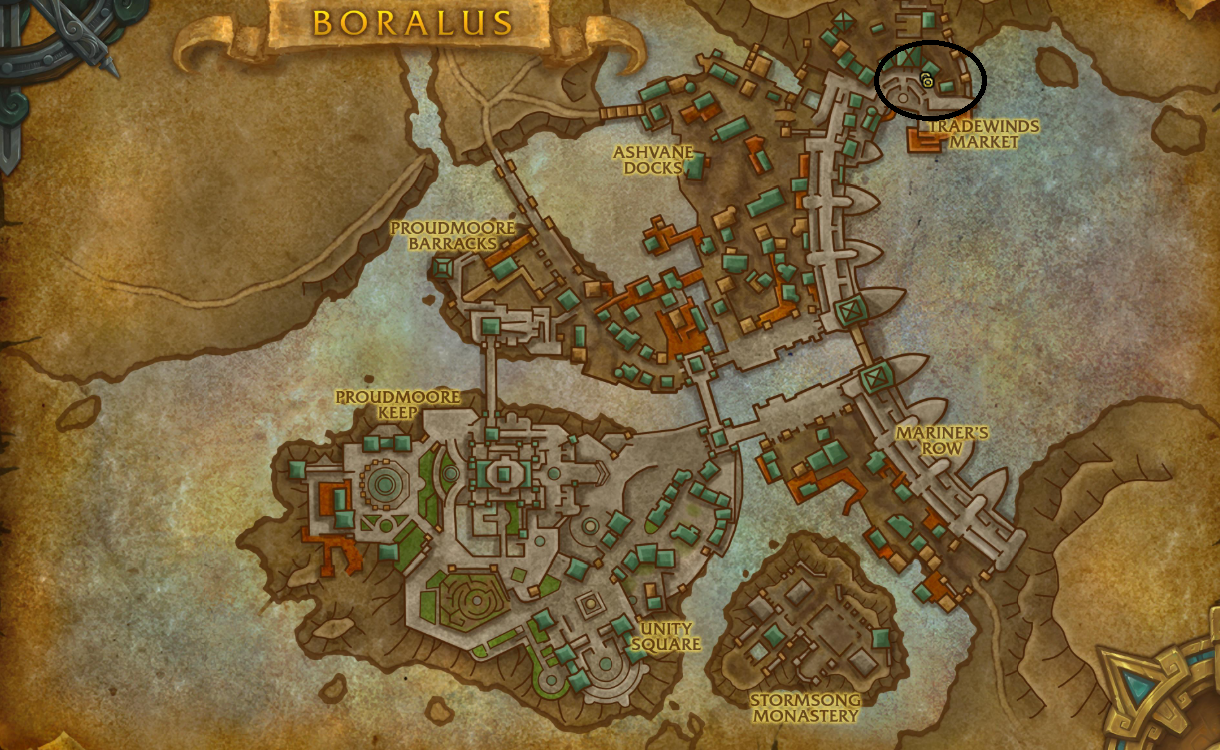
Irdenen Wächter Boralus
Sobald Ihr diese Schritte erledigt habt, sucht als Allianz auf dem Allianzschiff im Hafen von Boralus nach der Quest Die Offensive der Wölfe oder Die Flotte aussenden, die von Genn Graumähne vergeben wird. Als Horde sucht Ihr auf dem Hordeschiff im Hafen von Zuldazar nach Der Befehl des Kriegshäuptlings oder Die Flotte aussenden, vergeben von Nathanos.
Schließt die Einführung in Nazjatar ab, bis Magni Bronzebart in Eurem Lager erscheint. Das sollte nach der Quest Ein Weg nach Hause passieren. Schließt die Quests ab, die Magni Euch gibt, bis einschließlich Die Macht nutzen.
Danach solltet Ihr die Questreihe von Visionen von N’Zoth aus Patch 8.3 starten können, mit Rückkehr des Schwarzen Prinzen für die Horde oder Ein unangenehmer Berater für die Allianz. Diese Quests sollten beim nächsten Besuch in Boralus/Dazar’alor in Eurem Questlog erscheinen. Es wird empfohlen, die gesamte Questreihe abzuschließen, um Funktionen wie Visionen von N’Zoth vollständig freizuschalten. Außerdem erhaltet Ihr Ashjra’kamas, Tuch der Entschlossenheit, das früher für die letzten beiden Bosse erforderlich war.
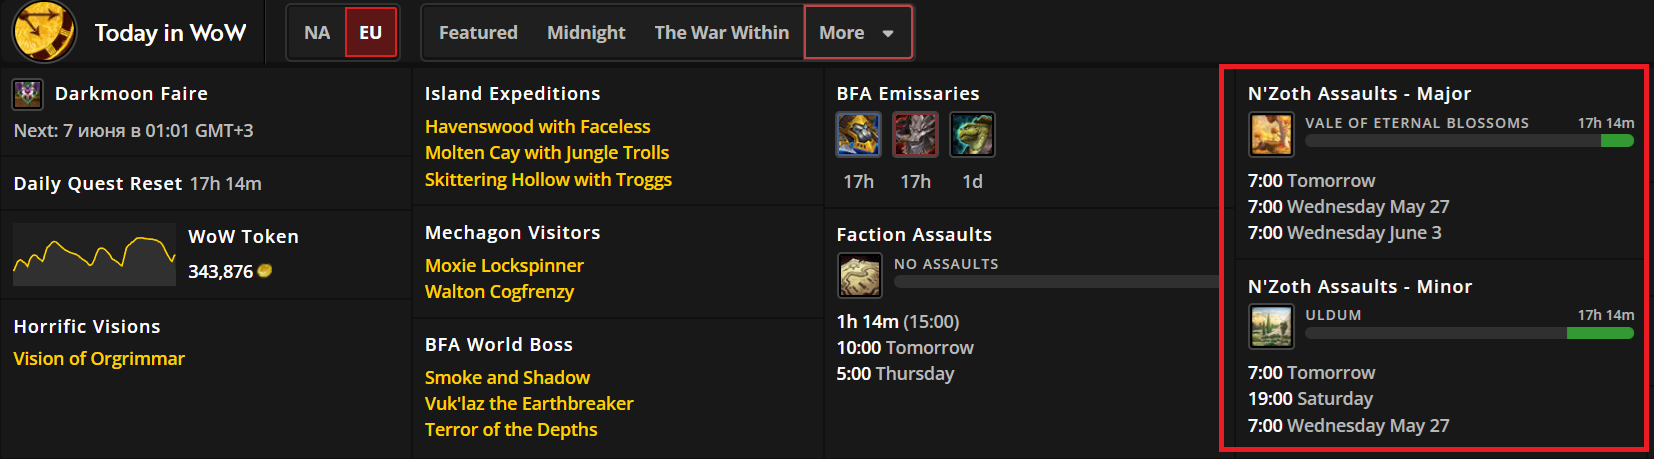
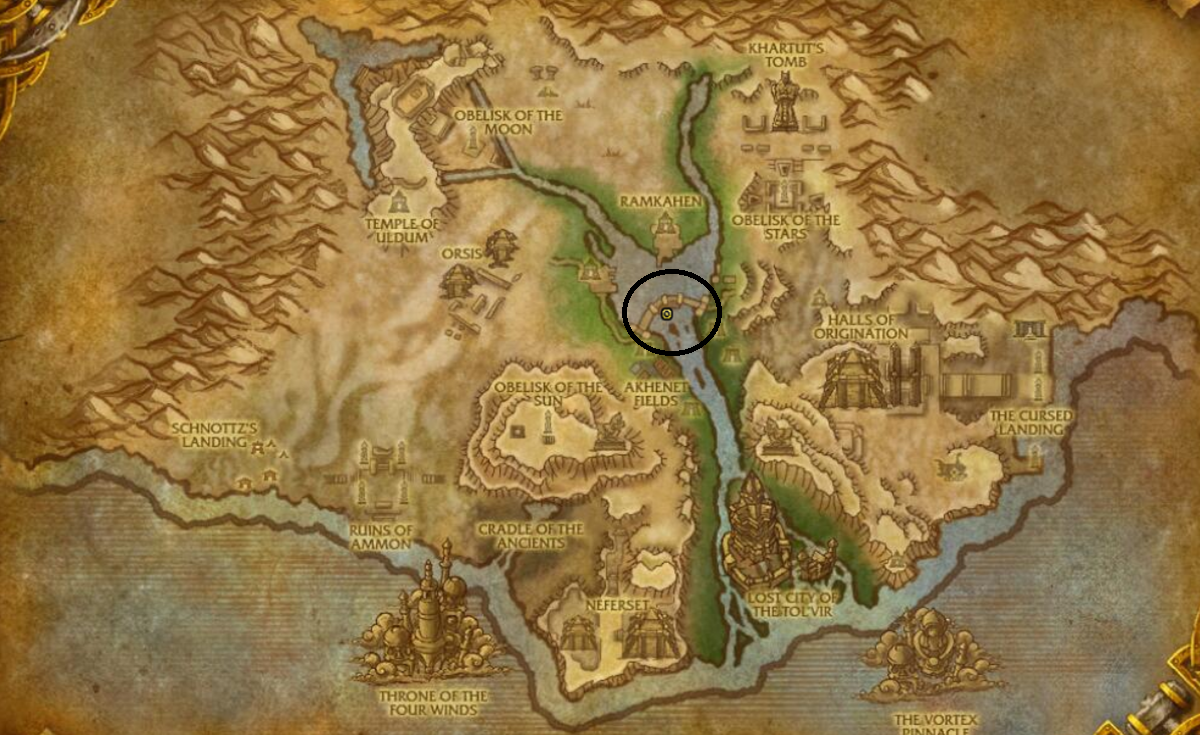
Ny’alotha ist ein besonderer Raid, da es zwei mögliche Eingänge gibt. Der erste befindet sich in Uldum, Kalimdor. In Eurer Hauptstadt gibt es im Bereich mit den anderen Cataclysm-Portalen ein Portal direkt nach Uldum. Der andere Eingang befindet sich im Tal der Ewigen Blüten in Pandaria. Dorthin gelangt Ihr über das Portal in den Jadewald in Eurem Hauptraum mit Portalen und fliegt den Rest der Strecke.
Der Eingang rotiert jede Woche und hängt davon ab, welche Zone gerade den großen Angriff erlebt. Diese Information findet Ihr auf der Startseite von Wowhead im BFA-Bereich.
Wichtig ist, dass sowohl Uldum als auch das Tal der Ewigen Blüten alte Phasen besitzen, die zeigen, wie die Zonen vor den N’Zoth-Invasionen aussahen. In der alten Phase könnt Ihr Ny’alotha nicht betreten. Ihr müsst Euch in der 8.3-Phase von Battle for Azeroth befinden. Sprecht zum Phasenwechsel mit Zidormi. Sie sollte auf Eurer Karte mit einer kleinen Sprechblase markiert sein. In Uldum findet Ihr Zidormi in Ramkahen. Im Tal steht sie auf dem oberen Balkon des Mogu’shanpalasts.
Unten findet Ihr die Kartenpositionen/Koordinaten für beide Eingänge:
/way #249 55 43.7 Eingang in Uldum
/way #390 41 45.5 Eingang im Tal der Ewigen Blüten
Ny’alotha in Uldum betreten
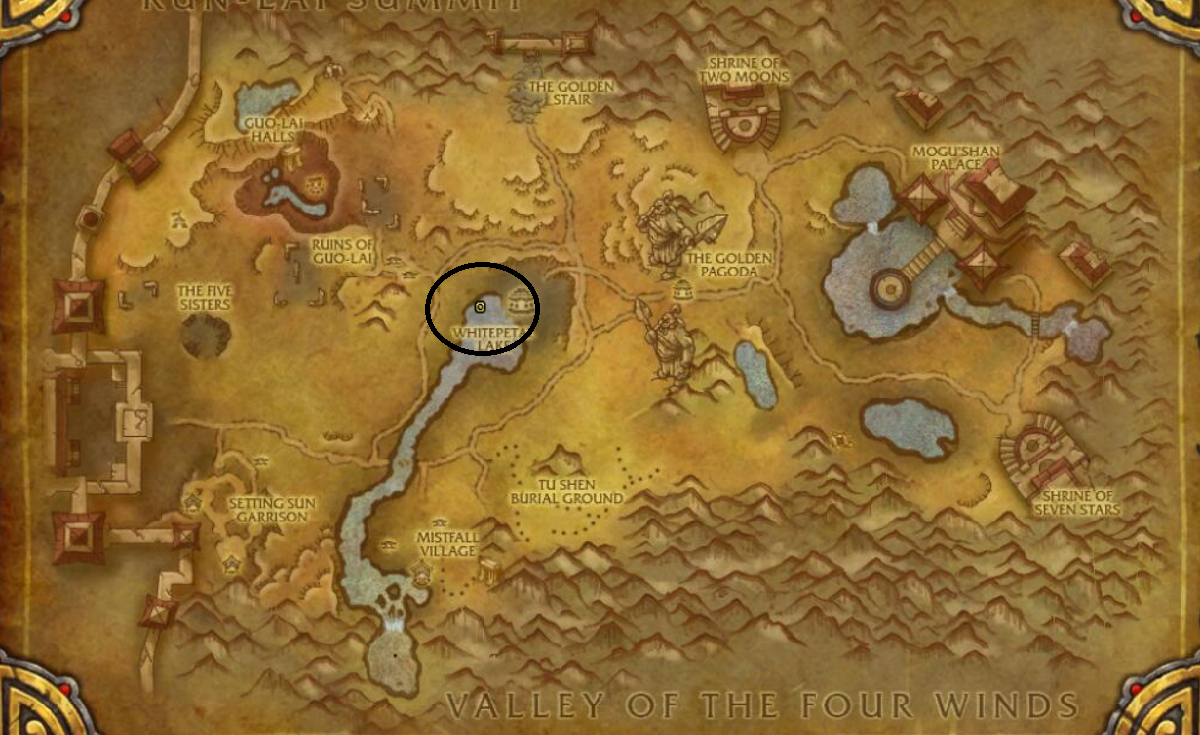
Ny’alotha im Tal der Ewigen Blüten betreten
Seit Patch 10.2.7 benötigt Ihr Ashjra’kamas, Tuch der Entschlossenheit nicht mehr, um Panzer von N’Zoth und N’Zoth zu töten. Das scheint solo zu gelten, in Gruppen werdet Ihr aber offenbar weiterhin wahnsinnig. Ich würde trotzdem empfehlen, den Umhang vorsichtshalber zu holen.
Die Bosse sind in der Reihenfolge aufgeführt, in der Gruppen sie traditionell zu erledigen scheinen.
Unten erklären wir jeden Erfolg, der für Ruhm des Schlachtzüglers von Ny’alotha benötigt wird. Jeder Eintrag enthält den Boss, das Ziel und eine Schritt-für-Schritt-Strategie. Die meisten Erfolge funktionieren auf dem Schwierigkeitsgrad Normal.
Dieser Erfolg Rauchtest gehört zum ersten Boss von Ny’alotha, Furorion. Eine schnelle Klasse wie Dämonenjäger oder Mönch ist hier hilfreich. Mindestens braucht Ihr soliden AoE-Schaden. Erledigt den Erfolg außerdem auf Normal, da die Fähigkeit auf Mythisch anders funktioniert.
Strategie: Bringt Furorion auf ungefähr 50% Gesundheit. Er wirkt zweimal Geschmolzene Eruption, bevor er in Phase zwei geht. Ihr erkennt Phase zwei daran, dass er Rauch und Spiegel wirkt. Außerdem wirkt er Schuppen von Furorion, was Ihr einfach ignorieren könnt (nicht abfangen). Danach erscheinen viele Knisternde Splitter. Zündet alle Eure Fähigkeiten und tötet 10 davon innerhalb von 3 Sekunden voneinander.
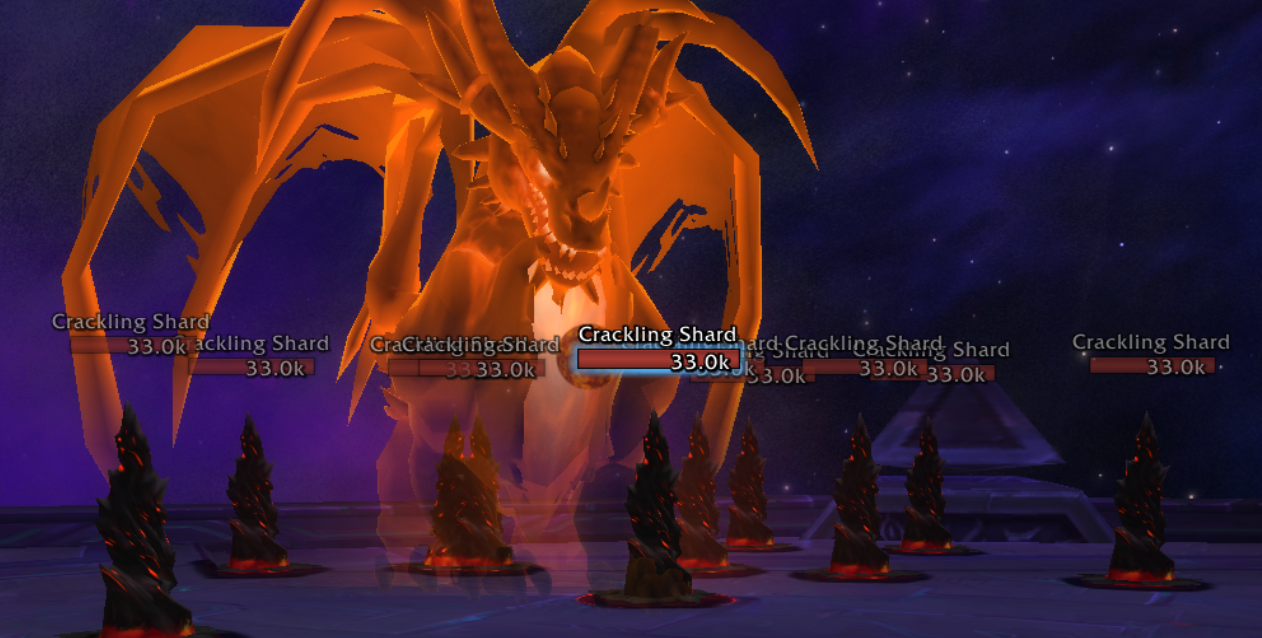
Wenn Ihr den Erfolg verfolgt, wird er weiß, sobald Ihr die Splitter schnell genug getötet habt. Wenn der Erfolg weiß wird, räumt die restlichen Knisternden Splitter weg, damit Furorion wieder anvisierbar wird. Danach erledigt ihn.
Dieser Erfolg Manaschwamm gehört zum zweiten Boss, Maut. Beachtet, dass Ihr zuerst die gesamte Plattform von Gegnern säubern müsst, damit der Boss aktiv wird. Dieser Erfolg ist mit einer Begleiterklasse (Hexenmeister, Jäger) deutlich einfacher, da der Begleiter den Boss vom Add weg tanken kann.
Strategie: Zieht den Boss und reduziert seine Gesundheit auf ungefähr 50%. Irgendwann wirkt Maut Dunkle Manifestation, wodurch große violette Flächen erscheinen. Vermeidet es, hineingezogen zu werden, und wartet, bis das Add Dunkle Manifestation erscheint. Stellt Euch zwischen Add und Boss - wenn Ihr das nicht tut, stirbt das Add. Haltet das Add am Leben, bis Maut in Phase zwei geht.

Wenn Maut in Phase zwei geht, wird er zu einer Statue und beginnt Obsidiansplitter zu wirken. Blaue Kugeln erscheinen und bewegen sich zum Boss. Zieht das Add vor eine Kugel, bevor sie den Boss erreicht - das Add wächst und wird zu einer Verbotenen Manifestation. Tötet sie und danach Maut.
Dieser Erfolg Phase 3: Prophet gehört zum dritten Boss, Prophet Skitra. Säubert den Raum von Adds, verlasst dann den Bossraum geradeaus und biegt rechts ab, sobald es möglich ist. Lauft nach Norden, bis Ihr gegen Ende des Korridors einen Gegner namens Jünger des Propheten findet. Zieht ihn und bringt ihn zurück in den Bossraum - tötet ihn nicht!
Sobald er im Bossraum ist, zieht den Boss. Der Jünger teilt sich in drei Gegner auf. Tötet alle drei und danach Prophet Skitra.
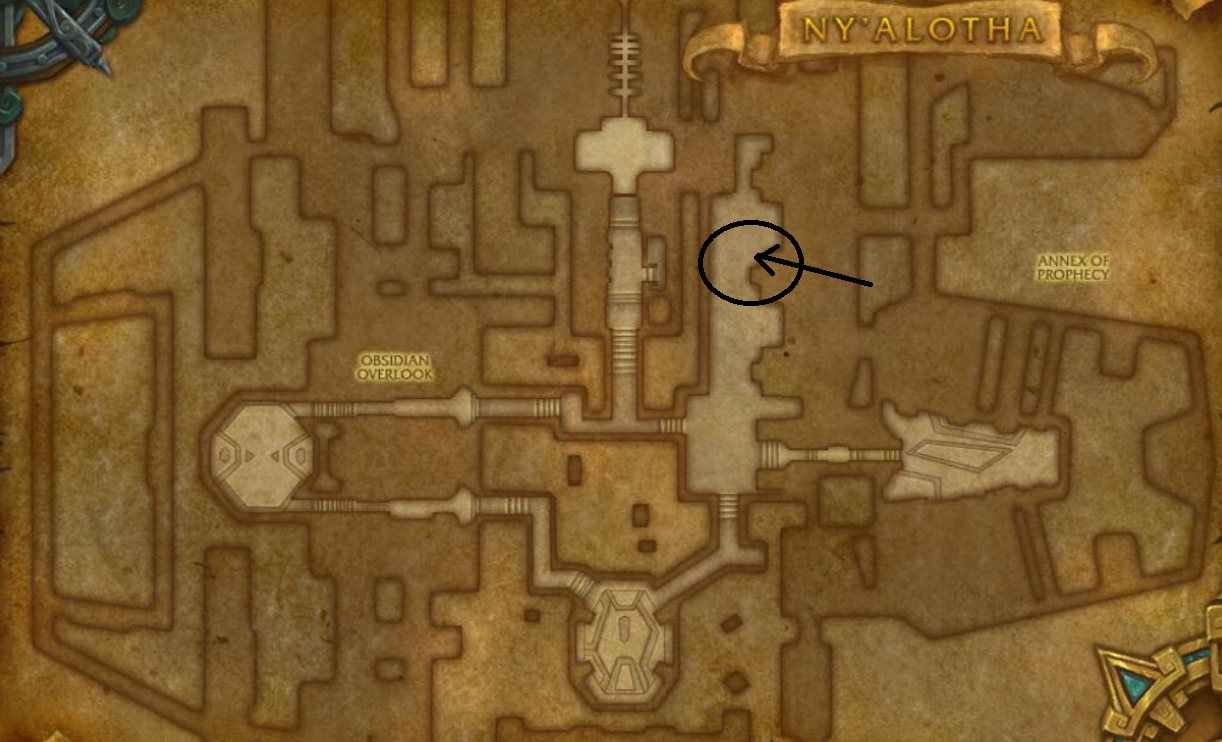
Dieser Erfolg Buzzer Beater gehört zu Dunkle Inquisitorin Xanesh. Während des Kampfes wirkt Xanesh Leerenritual, wodurch drei mehrfarbige Kreise erscheinen. Stellt Euch in einen davon, um den Debuff Leerenberührt zu erhalten (40-Sekunden-Timer).
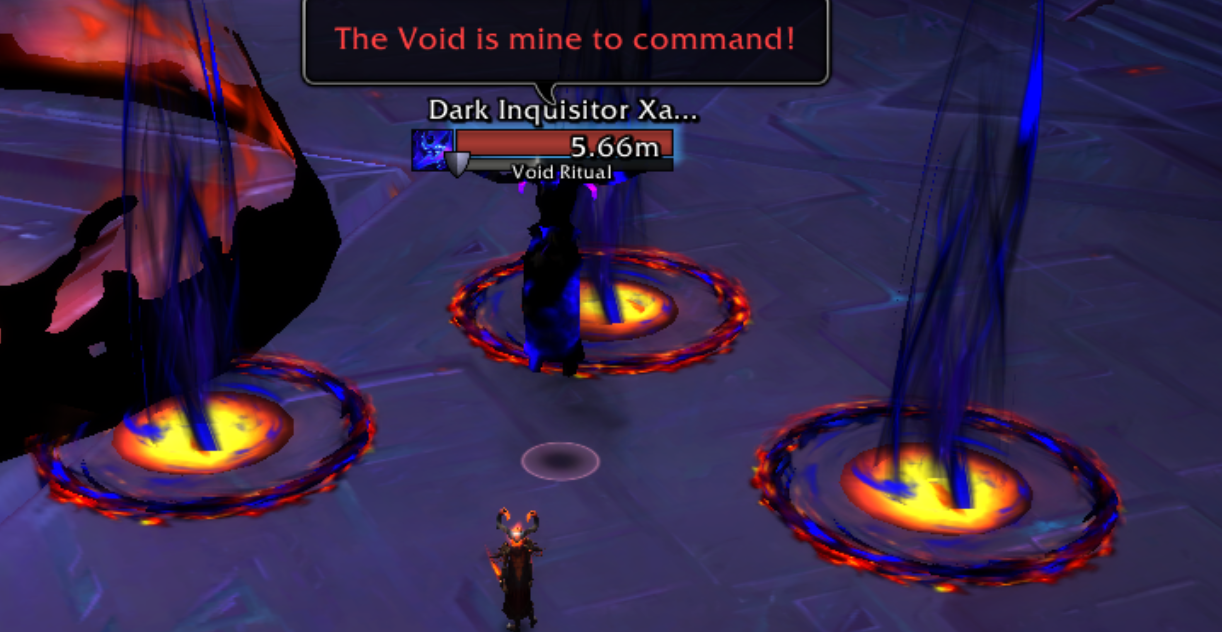
Es erscheint eine Leerenkugel, die Ihr steuern könnt, indem Ihr in sie hineinlauft. Haltet sie von Azshara, Spielern ohne Leerenberührt und Wänden fern. Ihr wollt die Kugel in das Portal auf der gegenüberliegenden Seite schießen, während Euer Leerenberührt-Buff nur noch 1-3 Sekunden übrig hat. Schiebt die Kugel grob in Richtung Portal, bis noch etwa 5-8 Sekunden übrig sind, richtet sie dann aus und schießt sie hinein. Wenn es klappt, explodiert Konfetti an der Stelle des Portals. Wiederholt das noch zweimal (insgesamt drei Treffer) und tötet danach den Boss.
Dieser Erfolg Totale Vernichtung gehört zum Drachenboss Vexiona. Säubert ihre Plattform von allen Gegnern. Stellt Euch vor das Add namens Leeraufgestiegener. Lasst es dreimal Vernichtung auf Euch wirken (es sieht wie ein riesiger Leerenstrahl aus).
Wichtig: Wenn Ihr Stufe 70 oder höher seid, „verfehlt“ die Fähigkeit Vernichtung oft und Ihr bekommt keine Stapel. Beobachtet den Debuff genau. Wenn er nicht angewendet wird, legt etwas Ausrüstung ab oder nutzt einen Charakter mit niedrigerer Stufe.
Nach drei Treffern tötet Ihr das Add und anschließend Vexiona. Klickt nach dem Kill auf den leuchtenden gelben Reoriginationanker, um zum Eingang ihres Flügels zurückteleportiert zu werden.
Dieser Erfolg Das eigene Potenzial ausschöpfen gehört zum Boss Der Schwarmgeist. Bevor Ihr in den Bossraum geht, müsst Ihr 3 Vielversprechende Exemplare finden. Nutzt das folgende Makro, um sie anzuvisieren und mit einem Totenkopf-Schlachtzugszeichen zu markieren:
Wenn Ihr eines findet, klickt es an und Ihr erhaltet einen zweistündigen Debuff. Die Positionen sind unten gezeigt.
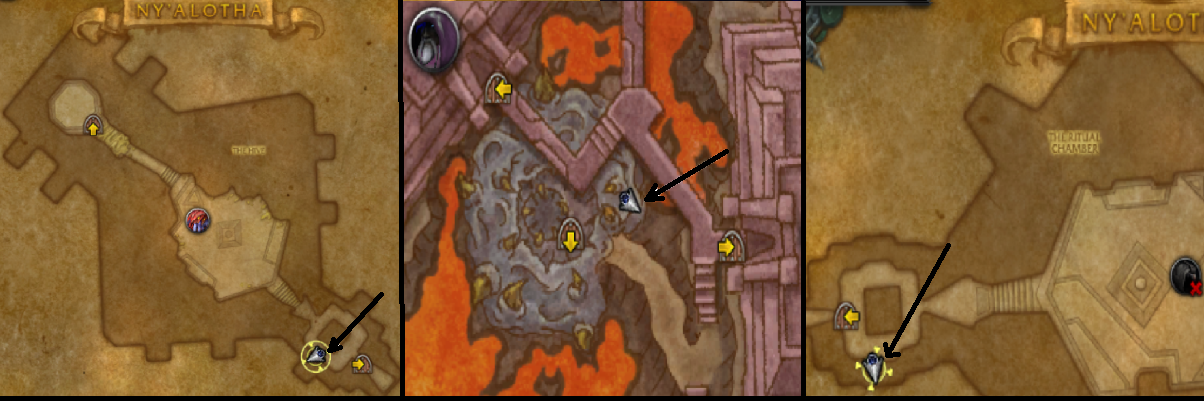
Sobald Ihr alle drei Debuffs habt, geht in den Bossraum und zieht den Schwarmgeist. Drei Weiterentwickelte Exemplare erscheinen schließlich. Tötet sie und danach die Bosse.
Dieser Erfolg Wie? Ist doch kein Obelisk? gehört zu Ra-den. Wenn Ihr seinen Raum betretet, achtet auf die zwei großen Obelisken ganz links und ganz rechts.
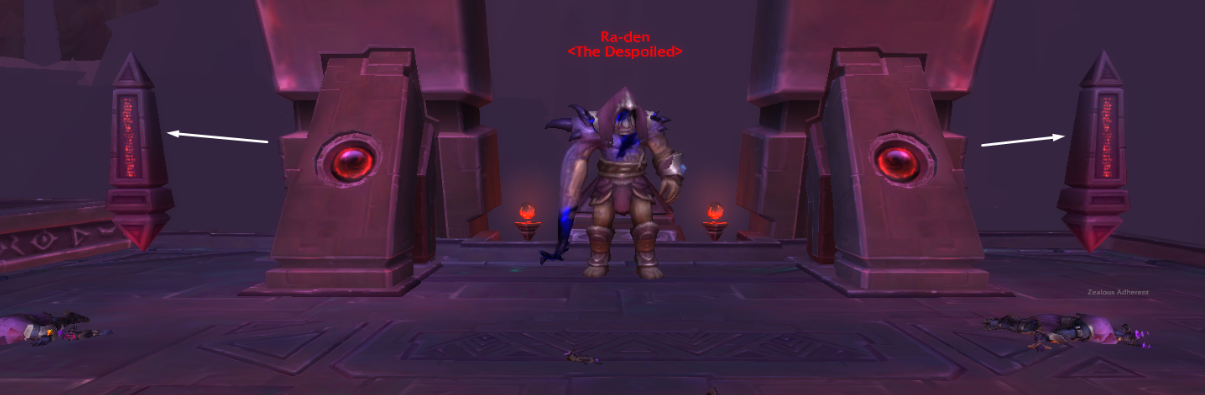
Säubert den Trash und zieht Ra-den in die Nähe eines Obelisken. Zwei Kugeln erscheinen: Essenz der Leere (lasst sie den Boss erreichen) und Essenz der Vita (tötet sie, bevor sie ihn berührt). Wenn alles richtig gemacht wurde, wirkt Ra-den Entfesselte Leere und erzeugt eine Leerenkugel. Die Einschlagstelle wird durch eine schwarze Fläche angezeigt. Fangt die erste schwarze Fläche ab, während Ihr IN RICHTUNG des Obelisken schaut - dadurch springt die Kugel in diese Richtung. Wiederholt das, bis die Kugel den Obelisken trifft und zerstört. Macht dasselbe mit dem zweiten Obelisken. Sobald beide zerstört sind, tötet Ra-den. Klickt nach dem Kampf auf den leuchtenden gelben Anker, um wieder nach unten teleportiert zu werden. Geht danach durch das Loch in der Mitte nach unten zu den nächsten Bossen (auf jeder Ebene gibt es einen Boss).
Dieser Erfolg Du kannst den Hund streicheln, aber... gehört zu Shad’har der Unersättliche. Zieht den Boss. Während Ihr ihn anvisiert, gebt /streicheln Shad'har in den Chat ein. Ihr wisst, dass es funktioniert hat, wenn Ihr den Debuff Gebissene Hand erhaltet. Wenn Ihr in einer Gruppe seid, muss jeder ihn ebenfalls streicheln und den Debuff bekommen. Tötet danach den Boss.
Dieser Erfolg Wutanfall gehört zu Drest’agath. Zieht den Boss und tötet die ersten zwei zusätzlichen Adds. Wartet etwa eine Minute, bis viele Gliedmaßen erschienen sind.
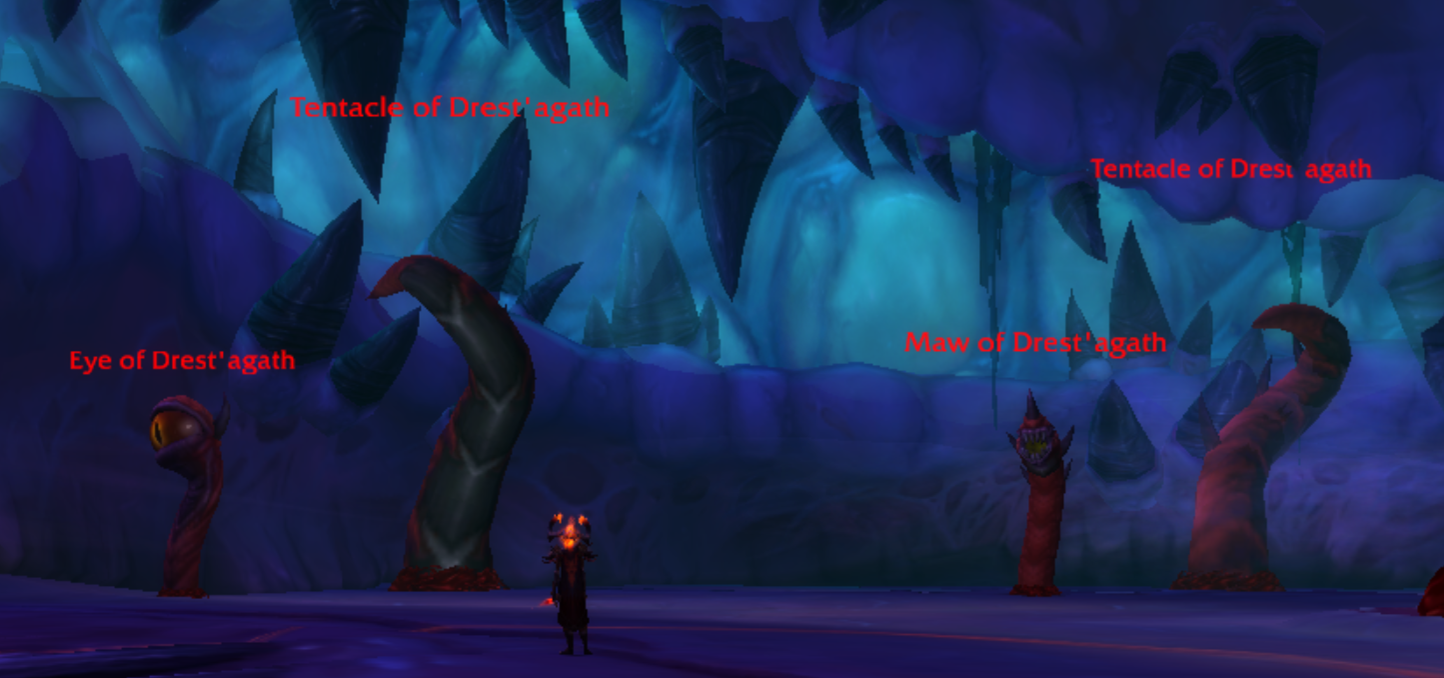
Tötet ungefähr die Hälfte der Gliedmaßen - dadurch wird Qualvolle Zuckungen ausgelöst. Wartet, bis der Zauber abgeschlossen ist. Tötet dann die übrigen Gliedmaßen, wodurch Qualvolle Zuckungen erneut ausgelöst wird. Danach tötet Ihr Drest’agath. In einer kleinen Leerenzone zu stehen, die von einer Gliedmaße hinterlassen wurde, hilft Euch, den Boss zu beschädigen.
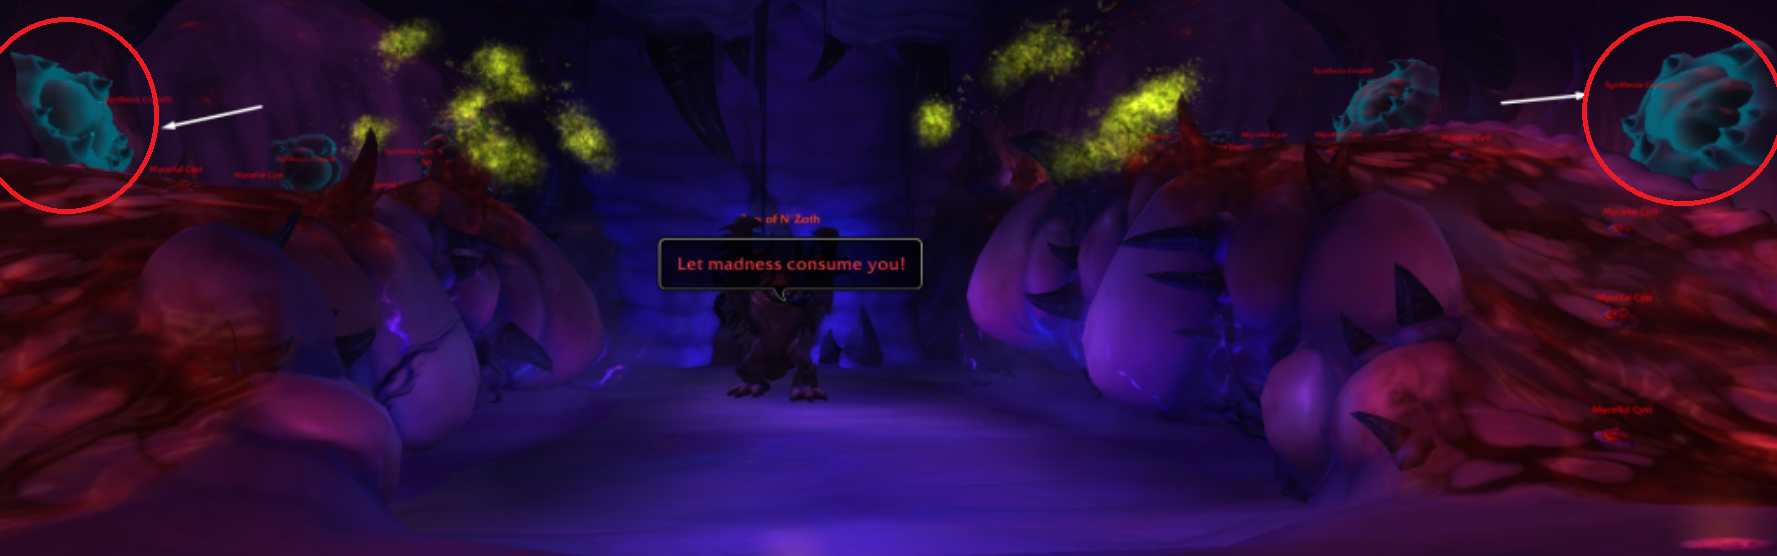
Dieser Erfolg Blutiges Durcheinander gehört zu Il’gynoth, die Wiedergeborene Verderbnis. Zieht den Boss und bringt ihn herunter, bis er zum ersten Mal „stirbt“ - dann geht er in Phase zwei und Organe erscheinen im Raum. Die Organe wirken Pulsierendes Blut, wodurch Adds namens Blut von Ny’alotha erscheinen. Lasst 10 davon bei Euch zusammenkommen und tötet dann alle 10 innerhalb von 3 Sekunden mit AoE-Fähigkeiten. Danach beendet Ihr den Kampf, indem Ihr abwechselnd Organe und Il’gynoth tötet, bis er endgültig tot ist.
Nutzt erneut den Reoriginationanker, um zum Anfang zurückzukehren. Der Weg zu N’Zoth ist jetzt geöffnet. Ihr müsst alle Adds auf der Plattform vor dem Eingang töten, bevor das Portal erscheint.
Dieser Erfolg Säubernde Behandlung gehört zu Panzer von N’Zoth. Legt an diesem Punkt Ashjra’kamas, Tuch der Entschlossenheit an, falls Ihr ihn besitzt.
Dieser Erfolg ist solo sehr schwierig, weil Ihr alle Synthesewucherungen innerhalb von 10 Sekunden töten müsst, und sie sich auf zwei verschiedenen Seiten des Raums befinden. Nachdem Ihr Furor von N’Zoth weit genug in der Gesundheit reduziert habt, zieht er sich zurück und öffnet zwei Wege (links und rechts), die mit Synthesewucherungen und verlangsamenden Myzelzysten gefüllt sind. Räumt so viele Zysten wie möglich, bevor Ihr den Erfolg versucht. Bringt dann mindestens einen weiteren Spieler mit - jeder übernimmt einen Weg. Koordiniert Euch per Sprachchat oder Countdown, tötet alle Wucherungen auf beiden Seiten innerhalb von 10 Sekunden und beendet danach den Boss.
Dieser Erfolg Das ist kein Kult gehört zum Endboss, N’Zoth selbst.
Strategie: Zieht N’Zoth und kämpft normal. Ihr werdet in das Reich des Geistes versetzt. Tötet das große Add (Psychus) und einige Tentakel, verlasst den Bereich dann, indem Ihr Euren Körper findet und anklickt (an derselben Stelle, an der Ihr hineingegangen seid). Dadurch wird N’Zoths Schild kurz gebrochen. Wartet, bis N’Zoth Geistportal wirkt, um erneut ins Reich des Geistes zu gelangen (stellt Euch in eine Leerenzone nahe am Rand). Tötet Psychus erneut und verlasst den Bereich. Wenn Ihr den Umhang habt, nutzt den zusätzlichen Aktionsbutton, um in den ersten beiden Phasen nicht wahnsinnig zu werden. Wiederholt den Geistportal-Ablauf noch einmal.
Nachdem Ihr das Reich des Geistes zum dritten Mal verlassen habt, wechselt N’Zoth in die letzte Phase. Lasst das neue Add, Gedankenernter, Euch angreifen. Benutzt Euren Umhang nicht - wartet, bis Ihr wahnsinnig werdet. Wenn Eure geistige Gesundheit null erreicht, erhaltet Ihr den Debuff Geschenk von N’Zoth (20 Sekunden). Brennt N’Zoth schnell herunter, bevor der Debuff ausläuft. Der Erfolg erscheint bei seinem Tod.
Das Farmen des Metaerfolgs Ruhm des Schlachtzüglers von Ny’alotha läuft mit den richtigen Tools deutlich reibungsloser. Unten findet Ihr Addons, die Euch helfen, Ziele zu verfolgen, Euch mit anderen zu koordinieren und verschwendete Versuche zu vermeiden.
Profi-Tipp: Öffnet vor jedem Boss das Erfolgsfenster von IAT und lest die genaue Bedingung. Bei komplexen Erfolgen wie „Säubernde Behandlung“ oder „Wie? Ist doch kein Obelisk?“ könnt Ihr die Anweisungen über den Chatbefehl von IAT mit der Gruppe teilen. Das reduziert Wipes durch Missverständnisse deutlich.