
Planen Sie eine Besetzungsliste für die Manaschmiede Omega ? Dieser Leitfaden konzentriert sich darauf, welche DPS Spezialisierungen in der aktuellen Abstimmung den größten Wert für Fortschritt und Farm bringen. Wir priorisieren reale Schlachtzugsanforderungen: Überleben tödlicher Überlappungen, Eliminieren von Prioritätszielen nach Zeitplan und Bereitstellen der richtigen Schlachtzugsbuffs und Abklingzeiten zur Stabilisierung von Zügen. Rohe Parsetaten sind wichtig, aber Encounter Lösungen, Sicherheit und Konsistenz entscheiden oft über Kills – daher wägen wir all diese Faktoren ab, nicht nur den Spitzenwertschaden.
Was diese Liste ist: Sie ist ein Schnappschuss des aktuellen Gleichgewichts und der gängigen Strategien, geschrieben für Schlachtzugleiter und Spieler, die ein klares Bild von Stärken und Kompromissen erhalten möchten. Sie ist keine Garantie dafür, dass eine Spezialisierung in jeder Gruppe besser abschneidet als eine andere. Encounter Zuweisungen, Spielerfähigkeiten und Synergien mit Ihrer Zusammensetzung werden immer mehr Einfluss haben als ein einzelner Tier Buchstabe.
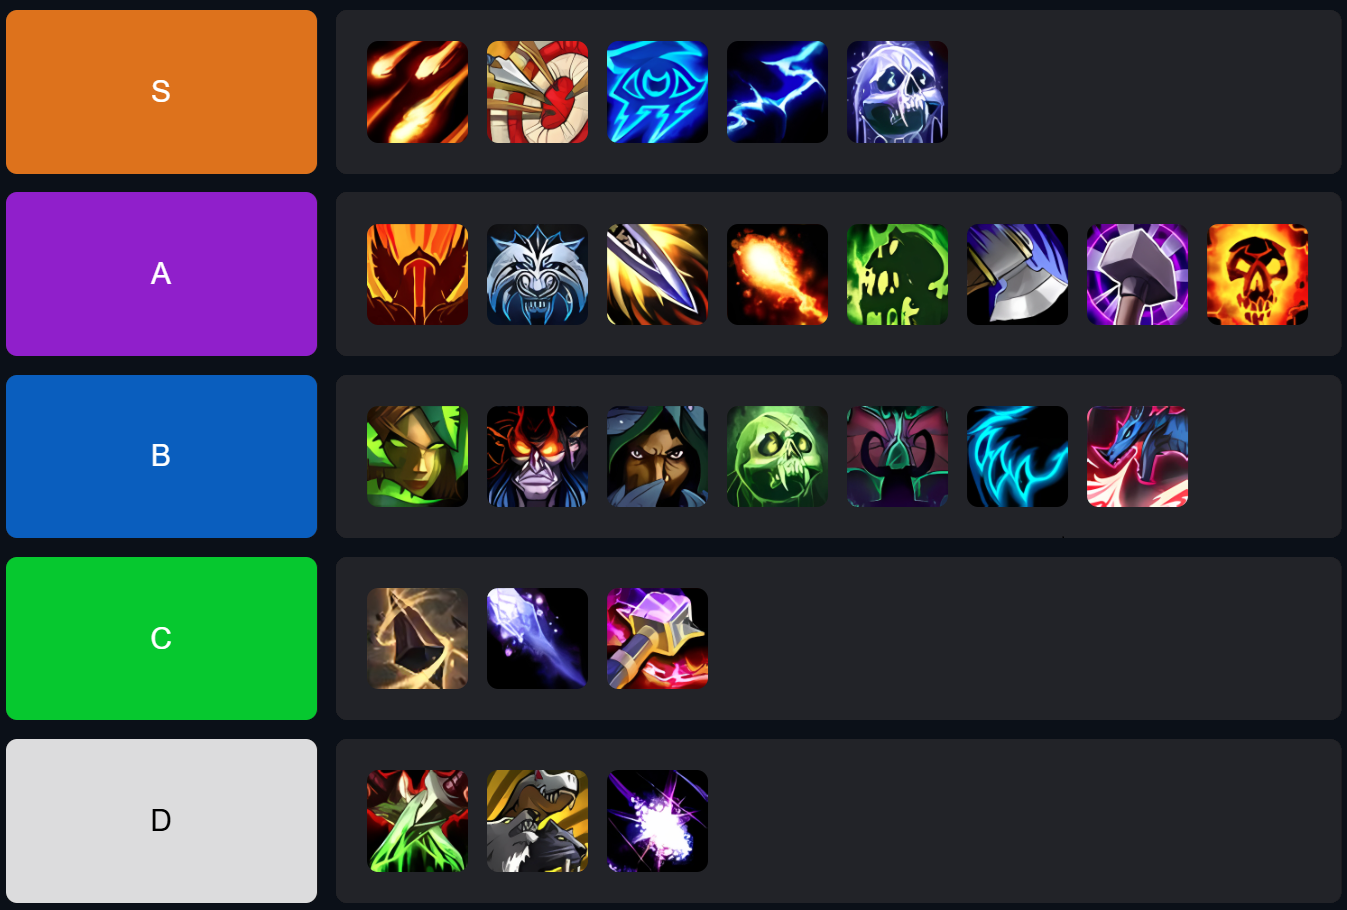
Bei der Auswahl einer Spezialisierung für anspruchsvolle Inhalte wie den Omega Schlachtzug ist es hilfreich, die allgemeinen Stärken jeder Option zu verstehen. Die folgende Tierliste bietet eine Aufschlüsselung der Ranglisten von S Tier bis D Tier und erklärt die Kriterien für jedes Niveau. Nutzen Sie diesen Leitfaden, um zu verstehen, wie sich verschiedene Spezialisierungen in Bezug auf Schaden, Nutzen und allgemeine Zuverlässigkeit vergleichen.
Abschließender Hinweis: Bringe den Spieler und den Plan, nicht nur die Spezialisierung. Eine disziplinierte Ausführung von Mechaniken, kluge Abklingzeiten Weiterleitung und ausgewogene Schlachtzugsbuffs übertreffen eine „perfekte“ Tierliste mit schlechten Grundlagen. Nutzen Sie diese Ranglisten zur Entscheidungsfindung und optimieren Sie dann Ihre tatsächlichen Stärken der Gruppe.
Zerstörungs Hexenmeister - Wenn ein Kampf punktuelle Belastung erfordert, die sich durch Bewegung oder unerwartete Überlappungen nicht auflöst, verwandelt dieses Kit Zwei Ziel Fenster durch Verwüstung in einen Vorteil, während es gleichzeitig stabilen Einzelzielschaden auf Bossen mit minimaler Add Verfügbarkeit beibehält. Das breitere Paket aus Dämonentor zur Verlagerung und Seelenstein für Zwischenzug Rettungen hält den Fortschritt aufrecht, ohne dass sich die Besetzung um sie herum biegen muss. Der kontrollierte Flächenschaden ermöglicht es Ihnen, Prioritätsziele zu eliminieren, ohne Boss DPS zu verlieren. Dieses Muster gewinnt bei Omegas langen Choreografie Checks. Da der defensive Fußabdruck die Heilerbelastung reduziert und das Tor Reisen eliminiert, die sonst Güsse abbrechen würden, werden Zeitlimits erreichbar, auch wenn Plattformen und Köder den Plan durcheinanderbringen. Diese leise Zuverlässigkeit ist der Grund, warum Besetzungen einen Zerstörungsplatz in Strategien einbauen, anstatt ihn nachträglich hinzuzufügen.
Stellen Sie in der Praxis das Dämonentor auf die längste Laufstrecke statt auf den auffälligsten Sprung, weisen Sie Seelensteine dort zu, wo ein fehlgeschlagener Check die meiste Zeit verschwendet (Tanks während des Lernens, wichtige Heiler bei Mauern), und rufen Sie im Voraus Verwüstungskombinationen auf, damit duplizierter Schaden auf wichtigen Zielen landet, anstatt auf allem, was sich in der Nähe befindet. Verfolgen Sie die Scherbenwirtschaft, um leere Mauern zu vermeiden, die durch fehlerhafte Bewegungen entstehen, und richten Sie Schmuckstücke auf echte Add Verschmelzungen statt auf generische Eröffnungen aus, wenn das Skript es belohnt – kleine operationelle Entscheidungen, die sich zu einem spürbaren Unterschied bei der Killgeschwindigkeit summieren. Betrachten Sie die Auswahl des Fluchs als Hebel: Zungen durchschneiden wichtige gegnerische Güsse, Erschöpfung verlangsamt gefährliche Läufer und Schwäche kann Tanks helfen, sich während Spitzenfenstern zu stabilisieren; es geht nicht darum, ein Logbuch aufzublähen, sondern das Skript für alle anderen einfacher zu gestalten, damit Ihr Boss Timer früher als erwartet abläuft.
Treffsicherheit Jäger, auf knackige Nuke Schäden und unerbittliche Uptime ausgelegt, liefert Wahrheitsschuss -Bursts, die Bosse durch brüchige Schwellenwerte jagen oder gefährliche Spawns nach Zählung auslöschen. Zwischen diesen Fenstern halten sofortige Bewegung und sauberes Pathing den Schaden aufrecht, während ein Zähmungstier die Schlachtzug Blutlust durch Urzeitliche Wut abdeckt, auch wenn Jägersmal ein persönlicher Eröffnungsbonus bleibt statt eine Team Aura. Die Uptime von MM in angezielten Kegeln, Frontalstößen und Korridor Kites ist für eine Burst Spezialisierung ungewöhnlich hoch, und Schildkröte erlaubt es dem Schlachtzug, tödliche Aufgaben umzuleiten, ohne einen DPS Slot zu opfern – genau die Art von praktischer Flexibilität, die Fortschrittskämpfe belohnen. Planen Sie die Abdeckung von Gegenangriffschüssen, damit Prioritätsgüsse niemals aufgelöst werden, verweben Sie die Entfesselung in Ködertänze, um Abstands Breakeven Punkte aufrechtzuerhalten, und nutzen Sie das Vortäuschen des Todes, um Bedrohung abzubauen oder gezielte Debuffs mit minimalem Durchsatzverlust zu löschen; bei kurzlebigen Add Wellen positionieren Sie sich im Voraus für Volley-artige Fokussierung und bevorzugen Präzision gegenüber Padding, da MM punktuelle Ausführung in sichtbare Boss HP Bewegung umwandelt.
Arkan Magier - diszipliniertes Planen trifft hier auf explosive Fenster, mit einem Burn/Sustain Rhythmus, der sich an die DPS Gates von Omega anpasst, während die Spezialisierung den Schlachtzug durch Arkaner Intellekt und Zeitkrümmer hebt; tödliche Aufgaben verschwinden unter Eisblock, und Verlagerungsrätsel verlieren ihre Belastung durch Blinzeln und Zeitumkehr, wodurch das Fundament auch außerhalb der primären Bursts fest bleibt – eine Eigenschaft, die zählt, wenn Timer im Fortschritt um ein paar Sekunden verrutschen. Wenn die Zusammensetzung stark auf Zauberer ausgerichtet ist, verbessert der Intellekt leise jede Mauer; wenn sie stark auf Nahkämpfer ausgerichtet ist, nähen Blinzelketten immer noch Lücken, die für andere Spezialisierungen Güsse löschen würden. Behandeln Sie Ressourcen als Zeitsteuerungswerkzeuge und nicht als Fesseln, und Sie werden feststellen, dass Sustain Phasen Schlachtzug Tiefs auffüllen; gut abgerufene Bursts schießen nicht nur die Werte in die Höhe, sondern verkürzen gefährliche Zwischenspiele und geben Heiler frei, um vor dem Skript zu spielen.
Elementar Schamane funktioniert in Omega sowohl als Metronom als auch als Megafon: Blutdurst / Heldentum richten den Schlachtzug auf entscheidende Beats aus, Windstoß-Totem komprimiert Bewegungsrätsel in Sprints und Himmelszorn hebt leise den Team Schaden an. Sofort-orientierte Knöpfe und flexible Talentwahl ermöglichen es Ele, zu wechseln, ohne den Boss Faden zu verlieren, während Geistwandler Gnade die Güsse durch gefahrenintensive Neupositionierung aufrechterhält; die Form ist anpassungsfähig, ohne unzuverlässig zu werden, weshalb sie vom ersten Zug bis zum Farmen Wert behält. Gelagerte Procs wandeln sich in punktuelle Prüfschäden um, und die Fähigkeit, Talente zwischen Versuchen neu abzustimmen, gibt Schlachtzugleitern eine Möglichkeit, die Schadensform zu ändern, ohne jemanden aus der Besetzung zu nehmen; fügen Sie Nebenheilungen, Unterbrechungen und gezielte Totems hinzu, und der Elementarschamane verhält sich wie ein kleines Werkzeugset, das gierige Spezialisierungen am Boss kleben lässt.
Frost Todesritter spielt im besten Fall Schaden plus Sicherheitsnetz – natürlicher Flächenschaden verwandelt Boss/Add-Überlappungen in effizienten Durchsatz, Anti Magie Zone glättet geskriptete magische Spitzen, Todesgriff bündelt Probleme in Flächenschaden Kegel, und Verbündeten Erwecken verwandelt fatale Fehler in fortlaufende Versuche; es gibt keine Schlachtzugs Stat Aura, aber nur wenige Nahkämpfer bündeln so viel Kontrolle und Erholung in einem Slot, und das bewahrt wackelige erste Kills davor, auseinanderzufallen, wenn die Zeitpläne schwanken. Ketten des Eises und auf Abruf wirkende Verlangsamungen festigen Kites, und der defensive Rhythmus passt gut zu Atemzügen, Novas und anderen geskripteten Spitzen; wenn Fernkämpfer keine Adds schnell neu positionieren können, ist ein organisierter Griffplan der Unterschied zwischen einem ordentlichen Flächenschaden und einer spiralförmigen Auslöschung.
Furor Krieger - wiederholte Bursts mit geringem Drift und Haltbarkeit für den Schlachtzug schlagen oft einen einzelnen verlängerten Cooldown; die 1-1,5-minütige Maschine unter Tollkühnheit gibt den Rufenden vorhersehbare Spitzen, Kampfschrei hebt den physischen Kern an, und Sammelruf kauft Stabilität bei geskripteten Mauern; Mobilität plus stetige Schadensminderung erhalten die Uptime bei Rückschlägen und Umstellungen aufrecht, und die Rotation toleriert Zeitverschiebungen, ohne den Boden zum Einsturz zu bringen – genau die Art von Widerstandsfähigkeit, die bei Fortschrittsnächten zusätzliche Versuche ermöglicht.
Für die besten Ergebnisse leiten Sie Tollkühnheits Fenster zu echten Checks statt zu Gewohnheitsfenstern, stapeln Sie Kriegsruf mit externen Heilern bei den hässlichsten Überlappungen und halten Sie die Wegfindung knapp um die Füße des Bosses, damit Verlagerungen keine globalen Treffer auslöschen; der Wert von Furor vervielfacht sich, wenn Ihre Nahkämpfergruppe weiter schwingen kann, während sich alle anderen neu positionieren, und dieser kumulative Schaden ist oft das, was einen Wipe unter 1 % in einen sauberen Abschluss beim nächsten Versuch verwandelt.
Windläufer Mönch, der stille Multiplikator, zahlt sich bei jedem Global aus: Mystische Berührung bläht physische Teamkollegen permanent auf, während der Bossdruck bestehen bleibt; Add Kontrolle und sofortiger Schaden werden ohne Einbußen beim Einzelzielschaden geliefert, Mobilität reduziert die Bewegungsbelastung, und da der Debuff niemals schläft, profitiert Ihre Zusammensetzung während des gesamten Zugs von spürbaren Erträgen statt von einem einzigen Feuerwerksmoment – genau die Art von unsichtbarem Wert, der Zeitpläne „plötzlich angenehm“ macht. Friedensring unterbricht Add Pfade oder schützt den Nahkampfbereich bei hässlichen Überlappungen, Berührungs des Karmas Zuweisungen ermöglichen gierigere Soaks, und das Reisekit lässt einen WW Mönch Mechaniken vom Schlachtzug wegtragen und immer noch im nächsten GCD zurück sein, wodurch überraschend viel Bosszeit erhalten bleibt.
Gesetzlosigkeit Schurke - Wenn zufällige Wellen, Aggro Spitzen beim Eröffnen und unordentliche Positionierungen den Schwung zu verlangsamen drohen, hält dieses Toolkit den Plan intakt; Klingenflurry fängt Flächenschaden auf, ohne den Boss zu verlassen, Taschenspielertricks beruhigt frühe Aggro, und natürliche Überlebensfähigkeit plus Kontrolle bedeuten, dass Sie Unterbrechungen und Betäubungen zuweisen können, ohne dass der Schaden einbricht. Fortschritt bevorzugt Konsistenz; Gesetzlosigkeit liefert sie, wenn der Raum laut wird. Greifhaken reduzieren Reisezeiten bei verteilten Mechaniken, Ausweiden oder Nieren können spezifische Güsse lösen, und Tarnung/Ausweichen ermöglichen es Ihnen, zusätzliche Globale zu greifen, die über die Zeitlimits entscheiden, während alle anderen sich auf den Aufprall vorbereiten.
Feuer Magier fühlt sich maßgeschneidert für Omegas Angewohnheit an, punktuelle Checks inmitten tödlicher Aufgaben zu verlangen: Verbrennungs Fenster treffen genau, Eisblock löscht wipe-anfällige Aufgaben, und Arkaner Intellekt plus Zeitkrümmer erhöhen die Schlachtzugszuverlässigkeit; Bewegung kostet hier weniger Schaden als bei vielen Burst Zauberern, und bewusste Fenster machen externe Weiterleitung einfach – so bleiben Ihre „großen Sekunden“ sauber, auch wenn Plattformen und Ringe versuchen, alles andere zu desynchronisieren.
Die Spezialisierung belohnt eine pragmatische Denkweise: Verschieben Sie eine Verbrennung um ein paar Globale, um die tatsächliche Wand zu treffen, anstatt den Kampf an Ihren Zeitplan anzupassen, halten Sie die Disziplin "Aufheizen" eng, damit ein schlechter Schritt nicht eskaliert, und nutzen Sie die Logik von Schmelzfeuer plus Brandstifter, um Schaden bei Schwellenwerten knapp unter dem Leben zu quetschen, wo andere Zauberer keuchen; betrachten Sie Spiegelbild als Bedrohungssicherung bei volatilen Eröffnungen, und Ihre Kill Zeitpläne werden weniger wie Münzwürfe und mehr wie Termine aussehen. Zwischen den Hauptdarstellern halten gelagerte Sofortzauber und Entzünden-Übertragungen den Boden überraschend hoch; dieser „Haushaltsführungsschaden“ ist der Grund, warum Feuer oft unordentliche Versuche überlebensfähig macht, während es gleichzeitig die exakten Sekunden liefert, auf die Ihre Strategie Wert legt.
Gebrechen Hexenmeister, ein stetiger Metronom bei langen Bosskämpfen, kombiniert dot-gestützte Uptime mit Bewegungs und Erholungs Trumpfkarten – Dämonentor und Seelenstein; selbst bei periodischen harten Wechseln kann das Kit Prioritätsziele inszenieren, ohne den Boss Faden zu verlieren, und dabei das klassische Fehlerprofil „Adds perfekt, Enrage fehlgeschlagen“ vermeiden. In Burst-lastigen Zusammensetzungen glättet Gebrechen die Schadenskurve zwischen Feuerwerken, sodass die Killgeschwindigkeit nicht verdampft, wenn der Raum Bewegung erzwingt. Flüche gestalten das Feld neu – Zungen stumpfen gefährliche Güsse ab, Erschöpfung verlangsamt Läufer – und Gesundheitssteine plus inhärente Robustheit sparen Heiler GCDs über lange Versuche hinweg, was für den Fortschritt wichtiger ist als ein paar Punkte auf einem Parse.
Waffen Krieger - Hinrichtungs Schwerkraft plus Teamhebel definieren das Wertversprechen; Kolosseshake -Fenster treffen hart, wenn Bewegung kooperiert, während Kampfschrei / Sammelruf den Schlachtzug stärken; zeitlich empfindlicher als Furor, ja, aber Bosse mit verlängerten Ausführungen belohnen das Risiko großzügig – besonders wenn die Strategie die Verlagerung während großer Fenster durch Gebrüll oder Tor Routing kürzt. Eingreifen und Tod durch das Schwert bilden Ankerpunkte bei fragwürdigen Überlappungen für Tanks, und wenn Sie externe Fähigkeiten in die Ausführung stapeln, wandelt Waffen sie in einen sichtbaren freien Fall der Boss HP um – das sauberste Ende eines Kampfes, das Sie sich wünschen können.
Vergeltung Paladin, die Antwort auf die Frage „Wie überleben wir das, ohne den Schaden zu reduzieren?“, reduziert eingehende Treffer während des gesamten Kampfes durch Gottseliger Segen, flickt Spitzen mit Segen der Aufopferung und liefert stabile Avenging Wrath Bursts auf einem vorhersehbaren Takt; es gibt keine Schlachtzugs Schadens Aura, aber die Schadensminderung erlaubt es Heilern, Durchsatz CDs zu verzögern und Tanks, Stapel zu pushen – beides beschleunigt leise den Fortschritt und macht unschöne Überlappungen überlebbar, ohne den Plan zu verändern. Segen der Freiheit entwirrt wurzelhaltige Skripte, und der bedachte Einsatz von Segen der Macht kann spezifische physische Spitzen oder Blutungseffekte trivialisieren; der Slot verdient sein Geld, indem er „unmöglich, es sei denn, wir drosseln den Schaden“ in „sicher bei voller Geschwindigkeit“ verwandelt.
Schatten Priester bleibt unschätzbar wertvoll, indem er seltene Schlachtzug-weite Fähigkeiten mit einer Schadensform kombiniert, die Bewegung trotzt: Machtwort: Körperstärke erhöht die Ausdauer von Zug bis Kill, Machtinfusion beschleunigt Verbündete während entscheidender Bursts, und Dots halten den Bossdruck hoch, während sich die Aufmerksamkeit der Fernkämpfer teilt. Die Zusammensetzungsberechnung wird einfacher, wenn ein Slot Haltbarkeit plus einen gezielten Injektor abdeckt – und anderen ermöglicht, sich zu spezialisieren, ohne Lücken zu hinterlassen.
Nutzen Sie die politische Macht von PI, indem Sie Zielpaare für jede Wand (und einen Backup, falls ein Ziel stirbt) im Voraus zuweisen, nutzen Sie Massenzerstreuung und Nebenheilungen chirurgisch statt reflexartig, damit Schadensfenster sauber bleiben, und behandeln Sie Bewegungsbeats als Dot Refresh Möglichkeiten, die den Boss Faden aufrechterhalten; mit diesen Gewohnheiten spielt Schatten wie ein Stabilisator, der stillschweigend den Weg von „Lernen“ zu „Kill“ verkürzt. Wenn der Raum chaotisch wird, kauft Dispersion wertvolle Sekunden, ohne externe Hilfe zu verlangen, und diese Sekunden fallen häufig mit den genauen Momenten zusammen, in denen Ihre Cooldown Karte überleben muss, um den nächsten Burn zu erreichen.
Überleben Jäger - präziser Prioritätsschaden, elastische Bewegung und zuverlässige Aufgabenabdeckung definieren die Nische; es gibt keine Schlachtzugsaura, aber das Urzeitliche Wut eines Zähmungstiers bewahrt das Timing der Blutlust, und Überleben wechselt zu kritischen Zielen, ohne Boss DPS zu verlieren wie viele Nahkämpfer; Fallen, Unterbrechungen und Köderrouten kommen fast „kostenlos“, was die Fortschritts Zeitpläne intakt hält, während der Raum laut wird. Die Aspekte des Geparden und Harpunen ermöglichen es SV, ferne Spawns auf Plattformen zu beherrschen, ohne Tempo zu verlieren, und Exilirung plus natürliche Elastizität zwischen Nahkampf und Fernkampfmustern halten Sie am Leben, wenn das Pathing gierig wird.
Dämonologie Hexenmeister, spitz, wenn Zeitpläne übereinstimmen, aber stabil, wenn Chaos eindringt, komprimiert immer noch Bewegung und rettet Fehler mit dem Hexenmeister Paket – Dämonentor für Verlagerung und Seelenstein für Wiederherstellungen; lange stationäre Phasen oder gestaffelte Add Wellen lassen Dämonologie überdurchschnittlich gut abschneiden, und wenn Skripte wackeln, halten Robustheit plus respektabler Boss Schaden sie in der Besetzungsliste würdig, während Sie den Plan verfeinern.
Verankern Sie Tyrannen an echten Encounter Wänden statt an praktischen Minuten, weisen Sie Haustier Utility im Voraus zu, damit Unterbrechungen und Betäubungen „kostenlos“ sind, und behandeln Sie Dämonentor als gewonnene Zeit für jeden Zauberer statt als neuartige Brücke; die Haltbarkeit lädt zu gierigeren Positionierungen beim Fortschritt ein – quetschen Sie Übergänge für zusätzliche Globale, die andere Zauberer aufgeben, und Sie werden beobachten, wie Kill Zeitpläne zu Ihren Gunsten driften. Vergessen Sie nicht den stillen Wert von Gesundheitssteinen und Flüchen für den gesamten Schlachtzug – Fortschritt ist oft ein Spiel von gespeicherten GCDs, nicht nur von persönlichen Spitzen.
Täuschung Schurke - deterministische Einträge und wiederholbare Entfernungen sind das Markenzeichen; Prioritätsziele verdampfen in Symbolen des Todes und Schatten Tanz, und obwohl es keine Stat Aura gibt, halten Überlebensfähigkeit und Kontrolle Täuschung tragfähig, wo immer der Schlachtzug wirklich ein Skalpell braucht; schmutzige Zeitpläne kürzen die Decke, aber der Boden bleibt brauchbar - oft genug, um einen Platz zu behalten, während die Taktiken abgestimmt werden. Schattengeheimnis löscht Reisezeit bei verstreuten Spawns, und Umhang/Feint Abdeckung lassen dich riskante Aufsaugungen anbieten, ohne deinen nächsten Tanz zu verpfänden, was genau die Art von praktischem Vorteil ist, der Fortschrittszüge gewinnt.
Unheilig Todesritter fügt sich in den Rhythmus von Omega ein, mit langem Druck, unterbrochen von kurzen Explosionen; Anti Magie Zone stabilisiert geskriptete Bursts, Verbündeten wiederbeleben macht Katastrophen rückgängig, und selbst ohne Schlachtzug Aura erhältst du Schaden plus Versicherung in einem einzigen Nahkampfplatz - besonders nützlich in Zusammensetzungen mit wenig anderen Wiederherstellungswerkzeugen. Füge hinzu, dass Wellen, die „gerade lange genug“ leben, für deine Ausgaben bereit sind; wenn du Rampe leitest, um Rückschläge zu vermeiden, fühlt sich dein Beitrag unvermeidlich und nicht schwankend an, und diese Stetigkeit ist es, was Anführer schätzen.
Verwüstung Dämonenjäger, die „alle anderen besser machen“-Wahl, hebt Magier und Hybriden durch Chaosbrandmal hervor, während Dunkelheit probabilistische Polsterung zu Multi Treffer Wänden hinzufügt; unübertroffene Mobilität verwandelt Relokationsbeine in Fußnoten statt in Schadensenken, und eine rotationsresistente Rotation hält die Nutzungszeit hoch, auch wenn die Arena unkooperativ ist.
Brand will Partner - koordiniere dich mit Hexenmeistern, Magiern und Priestern, damit ihre Spitzen unter deiner Nutzungszeit liegen - und behandle Dunkelheit wie eine Schlachtzugsabklingzeit, die „Sekunden druckt“ bei vielen Treffer-Überlappungen, anstatt ein Panikknopf; gehe aggressiv zwischen Plattformen, um globale Werte zu beanspruchen, die andere Nahkämpfer aufgeben, und die Tötungsgeschwindigkeit verbessert sich auf Weisen, die dein persönlicher Parse nicht vollständig zeigt. Verschwimmen und Selbstheilung runden ein Profil ab, das es dir erlaubt, beim Schaden gierig zu bleiben, während alle anderen sich zusammennehmen, und genau so fallen Mauern an Fortschrittsnächten.
Wildheit Druide - gib dieser Spezialisierung Zeit-am Boss und sie zahlt es dir mit hartnäckigem Einzelziel Schaden zurück; Wiedergeburt und Stampeden Brüller wandeln Wipes in Anläufe und Bewegungshindernisse in einfache Sprints um, und obwohl es keine Schlachtzugsschadens Aura gibt, hält die Mobilität von Wildheit sie durch Chaos an Ziele gefesselt, reduziert die Angst der Heiler bei Nahkampf Stacks und bewahrt den stillen, kumulativen Boss Schaden, der lange Kämpfe gewinnt. Beruhigung reißt Wutausbrüche ab, die sonst Verteidigungen erzwingen würden, Schädel Schlag plus nützliche Betäubungen räumen Magierwellen auf, und geplante Sprintlinien decken verteilte Lockmittel ab, ohne dass Blutungsschäden ausfallen - kleine, disziplinierte Spielzüge, die sich zu einem Kill summieren.
Verheerung Rufer rundet strukturierte Zusammensetzungen mit flexiblem Fernkampf Durchsatz, Lust Abdeckung durch Zorn der Aspekte, Schadensminderung durch Zephyr und Timing Tricks durch Zeitschnecke ab; mittlere Abstände erfordern Aufmerksamkeit, aber Ermächtigungsfenster landen sauber auf geplanten Bränden, wodurch Verheerung das Stück ist, das das Bild vervollständigt, anstatt dasjenige, das den Kampf um sich herum erfordert. Schwebe Disziplin trennt gute von großartigen Spielern - wenn du lernst, Brände zu treiben statt zu pflanzen, hören Ringe und Strahlen auf, deine Zauber zu löschen, und fangen an, wie Geschwindigkeitsbegrenzer auszusehen.
Augmentation Rufer - ein gerichteter Verstärker, der Wert in Logs versteckt, aber auf Kill Timern zeigt - leitet Macht mit Dunkler Macht und Voraussicht in die Spieler, die sie am besten umwandeln; die Zahlen sind typischerweise niedrig und es gibt keine traditionelle Schlachtzugsaura, also glänzt sie nur, wenn du genau kartiert hast, wer den Saft in welchem Fenster bekommt; ohne Plan eingesetzt, verschiebt es Meter, ohne das Schicksal zu ändern, aber mit Disziplin vervielfacht es die richtigen Leute in den Momenten, die den Kampf entscheiden. Weisen Sie Voraussichts Swaps im Voraus zu und rufen Sie sie so auf, wie Sie eine Heilungsabklingzeit aufrufen würden; so behandelt, verhält sich Augmentation wie ein Durchsatz CD, der auch die Begegnung verkürzt.
Frost Magier, der Kontrolle und Stabilität gegenüber explosiven Spitzen bevorzugt, bietet immer noch Arkaner Intellekt und Zeitkrümmung, um den Boden hoch zu halten; es sei denn, ein Kampf belohnt kontinuierliches Cleave und schwere Verlangsamungen, Frost liegt hinter den heißeren Magier Specs bei scharfen Wänden zurück, doch er kauft dem Schlachtzug zusätzliche Lernzeit, indem er den Durchsatz durch Bewegungsbeats intakt hält, die andere lahmlegen - was den Weg zur Meisterschaft verkürzt, auch wenn die theoretische Decke nachgibt.
Behandle Blink Choreografie als Teil des Schadensplans, halte Eisblock für echte Fehlerpunkte zurück und lehne dich auf Add Zügen, die gezogen werden müssen, auf Verlangsamung/Anlocken Kontrolle, und Frosts Talent, eine chaotische Arena geordnet erscheinen zu lassen, ist genau der Grund, warum wackelige Anläufe zu konsistenter Phase Zwei-Übung statt zu zufälligen Wipes werden. Die Immunitätsabdeckung des Specs schafft auch „sichere Hände“-Zuweisungen, die Katastrophen verhindern, bevor sie beginnen, und diese Prävention zeigt sich selten im Parse, aber immer im Kill Timer.
Verstärkung Schamane fungiert als klassischer Fortschritts Kleber für Nahkampf-lastige Zusammensetzungen: Der Klassenbuff Himmelszorn hebt das Grundniveau des Raumes an, während Blutdurst -Abdeckung verfügbar bleibt, wenn Elementar sitzt; persönlicher Output schwankt mit Bewegung und Immunitäten, aber Unterbrechungen, Aufsaugungen und Köderrouten kommen natürlich und sprengen nicht die Rotation, was unordentliche Pläne am Laufen hält, bis der Boss dafür bezahlt. Kapazitäts Totem und Windstoß vereinfachen Unterbrechungskarten, Off Heilung stabilisiert Erholungen, und wenn du Abklingzeiten zu den eigentlichen Engpässen des Schlachtzugs leitest, übertrifft Verstärkung seinen Perzentil genau so, wie es der Fortschritt braucht.
Meucheln Schurke - ein Rampen-orientiertes Profil in einer Saison, die immer wieder nach pünktlichen Bursts und häufigen Wechseln verlangt; keine Schlachtzug Stat Aura und Fenster, die auf Maß geschneidert werden müssen, um zu glänzen, bedeuten, dass seine besten Momente selten in Zusammensetzungs Level Gewinne beim Fortschritt umgewandelt werden, auch wenn Überlebensfähigkeit, aufgebaut auf Umhang der Schatten, immer noch hochriskante Zuweisungen ermöglicht. Wenn Skripte lange, stabile Boss Uptime mit minimaler Verlagerung bieten, kann es exzellent aussehen, aber Omega verlangt öfter sofortige, wiederholbare Nuke Angriffe - daher die Rangliste. Wenn Sie darauf wetten, schützen Sie den Ramp und koppeln Sie große Fenster mit externen Teamfähigkeiten; andernfalls wird sich jeder plötzliche Wechsel wie eine Steuer anfühlen, die sich Ihre Zusammensetzung nicht leisten kann.
Tierherrschaft Jäger, unübertroffen in Mobilität und konstantem Cleave, neigt dazu, auf den strengsten Wänden hinter dem Feld zurückzubleiben; Blutdurst bleibt über ein Haustier der Wildheit Urzeitlicher Zorn verfügbar, aber die Durchsatzform begünstigt die Abdeckung von Bewegung gegenüber rohen Spitzen, was BM zu einem hervorragenden Lernwerkzeug macht - Ihr Boden bleibt hoch, während andere ausweichen - aber ein wackeligerer Abschluss bei den letzten Klingen, wo Sekunden wirklich zählen; die meisten Zusammensetzungen bevorzugen schärferen Burst am Ende, auch wenn BMs Protokolle wunderschön konsistent aussehen.
Spielen Sie auf Stärken: Bieten Sie sich für Soak und Köderrouten an, die stationäre Zauberer zermürben, gehen Sie aggressiv vor, um weit entfernte Spawns zu markieren, ohne um Hilfe zu bitten, und behandeln Sie Rückzug/Vortäuschen nicht als reine Sicherheit, sondern als Durchsatzerhaltung; diese Gewohnheiten ermöglichen es BM, Mechaniken zu tragen, ohne signifikanten Schaden zu opfern, damit der Rest des Rosters den Boss weiter bohren kann. Wenn Sie Gegenangriff und Bindungswerkzeuge in den Plan einweben, hört die Mobilität von BM auf, „nur Überlebensfähigkeit“ zu sein, und wird zu gewonnener Schlachtzugzeit.
Gleichgewicht Druide bringt beneidenswerte Unterstützung - Innervate für Manavorrat des Heilers, Stampeden Brüller für Gruppenbewegung und Wiedergeburt für Erholungen - doch sein Schadensprofil stimmt selten mit Omegas schärfsten Bitten überein; ohne Schlachtzug Schadens Aura und mit Vorliebe für anhaltende oder verteilte Ziele, funktioniert Gleichgewicht am besten als Plan Ermöglicher bei Strategien, bei denen Kontrolle, Mobilität und Erholung die Engpässe sind, anstatt als erste Wahl für brutales Erzwingen von Enrage Timern. Taifun und Ursols Vortex korralisieren Add Pfade, damit Nahkämpfer ihre Nutzungszeit behalten, und diese stille Ermöglichung ist oft wichtiger als ein auffälliges Burn Fenster.