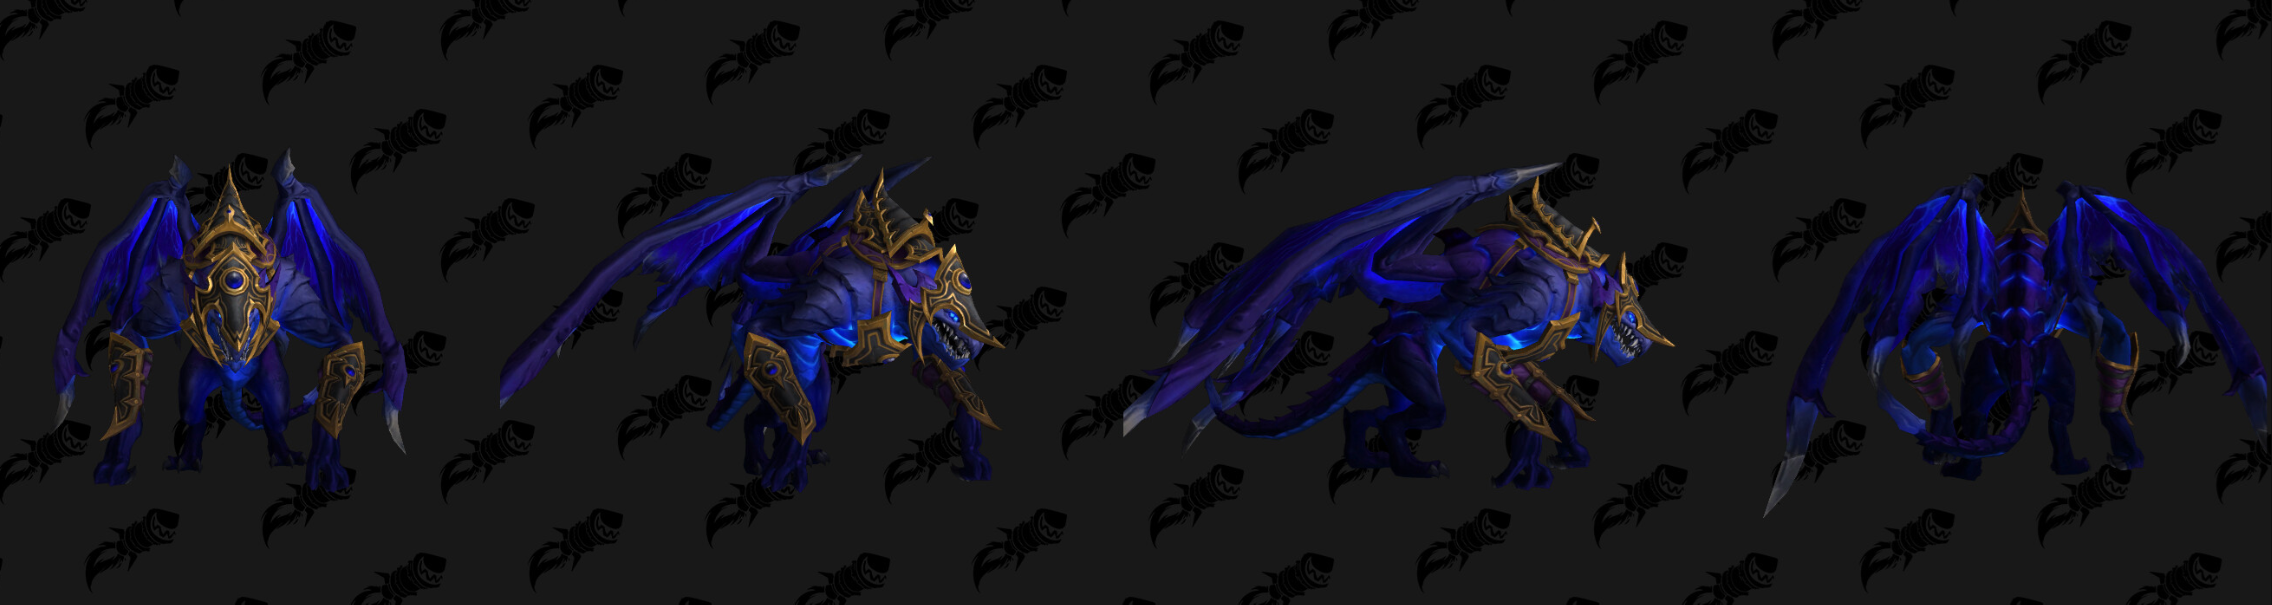
Der Schattenhafter Plager ist ein furchterregender, von Schatten durchdrungener Jäger, der aus den dunkelsten Rissen des Leerensturms auftaucht. Sein schlanker, pechschwarzer Körper ist von knisternden Leerenenergien durchzogen, und seine leuchtenden, bösartigen Augen versprechen jedem Gegner ein schnelles Ende. Anders als einfache Dungeon- oder Welt-Drops steht dieses Reittier für den Höhepunkt engagierter Schlachtzugsarbeit in der ersten Saison der Erweiterung Midnight. Es ist die finale Belohnung für den umfangreichen Meta-Erfolg Ruhm des Schlachtzüglers von Midnight und damit ein echter Beweis für die Koordination einer Gilde und ihre Beherrschung jedes Bosskampfs in allen drei Einstiegsraids.
Für Reittiersammler ist der Schattenhafter Plager mehr als nur ein weiteres fliegendes Wesen - er ist ein Ehrenabzeichen. Der Weg dorthin zwingt Euch und Eure Schlachtzugsgruppe dazu, besondere Mechaniken zu meistern: vom Tic-Tac-Toe gegen einen imperialen Leerenlord über das Füttern hungriger Jungtiere bis hin zum Niederknien vor einem gefallenen König. Jeder Erfolg verlangt präzise Ausführung, und der gesamte Ablauf stellt Geduld und Kommunikation Eurer Gruppe auf die Probe. Wer durchhält, wird jedoch mit einem der bedrohlichsten Reittiere der Midnight-Ära belohnt.
- Hinzugefügt mit Patch: 12.0.0 “Midnight”
- Reittiertyp: Fliegend
- Quelle: Meta-Erfolg - Ruhm des Schlachtzüglers von Midnight
- Voraussetzungen: Stufe 90, 11 bestimmte Schlachtzugserfolge abschließen
- Schwierigkeit: Hoch (volle Schlachtzugskoordination erforderlich)
So bekommt Ihr den Schattenhaften Plager
Um den Schattenhaften Plager zu erhalten, müsst Ihr mit Eurem Schlachtzug den Meta-Erfolg Ruhm des Schlachtzüglers von Midnight abschließen. Dieser übergreifende Erfolg verlangt eine Reihe spezieller, kampfbezogener Aufgaben in den drei Raids von Midnight Saison 1: Die Leerenspitze, Der Traumriss und Marsch auf Quel’Danas. Anders als bei einfachen Bosskills geht es bei diesen Herausforderungen häufig um ungewöhnliche Mechaniken, optionale Interaktionen oder besondere Timings, die über die normale Kampfstrategie hinausgehen.
Insgesamt müsst Ihr elf einzelne Erfolge abhaken. Die meisten davon werden in einer Schlachtzugsgruppe erledigt (flexible Gruppengröße, aber Koordination ist entscheidend). Die gute Nachricht: Ihr müsst sie nicht alle auf derselben Schwierigkeit abschließen - Normal oder Heroisch funktioniert für alle Glory-Erfolge. Einige Aufgaben verlangen jedoch, dass zusätzliche Gegner am Leben bleiben oder bestimmte Spieler genau festgelegte Aktionen ausführen. Kommunikation und Planung sind also Pflicht. Sobald alle elf Erfolge abgeschlossen sind, erhaltet Ihr den Meta-Erfolg Ruhm des Schlachtzüglers von Midnight, und das Reittier Schattenhafter Plager wird Eurer Sammlung hinzugefügt (accountweit).
Habt Ihr Probleme, Euren Schlachtzug für diese komplexen Erfolge zu koordinieren? Unser Schattenhafter Plager Service hilft Euch und Eurer Gruppe dabei, jede Glory-Anforderung effizient abzuschließen, damit Ihr dieses prestigeträchtige Reittier ohne unnötigen Stress bekommt.
Glory-Erfolge in der Leerenspitze
Der erste Raid der Midnight-Saison, Die Leerenspitze, enthält sieben einzigartige Glory-Erfolge. Unten findet Ihr jeden Erfolg mit Schritt-für-Schritt-Taktik, wichtigen Hinweisen und visuellen Referenzen, damit Euer Raid die Aufgaben sauber abschließen kann.
Der einzige Gewinnzug ist, nicht zu spielen
Imperator Averzian fordert Euch zu einer Partie Tic-Tac-Toe heraus. Für Der einzige Gewinnzug ist, nicht zu spielen muss Euer Raid Averzian besiegen, nachdem Ihr drei Banner in einer Reihe auf seinem 3×3-Arenaraster platziert habt.
Strategie:
- Räumt vor dem Kampf den Trash auf dem Weg zu Averzian. Auf dem Boden findet Ihr drei leuchtende Banner. Weist drei Spieler zu, die sie aufnehmen (sie tragen die Banner sichtbar bei sich).
- Die Bossarena ist ein 3×3-Raster. Während der Begegnung beschwört Averzian drei Abyssische Leerenformer in unterschiedlichen Rasterfeldern.
- Euer Raid muss die Adds töten, aber achtet auf den Soak von Umbralkollaps, der erscheint, nachdem das zweite Add stirbt. Erst danach kann einer der Bannerträger sein Banner in diesem Feld platzieren.
- Dieser Ablauf wiederholt sich über drei Add-Wellen, sodass alle drei Banner gesetzt werden können. Tötet den Boss nicht zu früh - wartet, bis alle drei Banner stehen.
- Sobald die drei Banner eine gerade Linie bilden (horizontal, vertikal oder diagonal), zerstört Averzian sie, und Ihr könnt ihn sicher töten.
HINWEIS: Nutzt Schlachtzugsmarkierungen (z. B. Stern, Kreis, Diamant), um die genauen Rasterfelder festzulegen, auf denen die Banner platziert werden sollen. Das verhindert Verwirrung und beschleunigt die Koordination.
Sooooo hungrig
Im Kampf gegen Vorasius muss sich der gesamte Schlachtzug um kleine Kreaturen kümmern. Für Sooooo hungrig muss jeder Spieler sein eigenes Hungriges Jungtier mit acht Fleischstücken füttern, bevor Vorasius stirbt.
So funktioniert es:
- Bevor Ihr Vorasius angreift, muss jedes Schlachtzugsmitglied das Fass in der Ecke des Raums anklicken. Dadurch erscheint ein persönliches hungriges Jungtier, das Euch folgt.
- Während des Kampfes erscheinen regelmäßig Blasenkriecher. Wenn sie sterben, lassen sie ein Stück Fleisch auf dem Boden zurück.
- Jeder Spieler muss sein Jungtier zu einem Fleischhaufen führen. Sobald es nah genug ist, beginnt das Jungtier automatisch zu fressen. Wiederholt das, bis es acht Stücke gefressen hat.
- Wenn ein Jungtier satt ist, schläft es ein. Der Erfolg wird gewährt, sobald alle Schlachtzugsmitglieder ihre Jungtiere bis zum Einschlafen gefüttert haben.
- Erst danach solltet Ihr Vorasius töten. Wichtig: Die Jungtiere verschwinden nicht, wenn Ihr wiped - Ihr könnt beim nächsten Versuch weitermachen.
HINWEIS: Weist ein paar Spieler dazu ein, Blasenkriecher zuverlässig zu töten, während sich die anderen auf das Füttern konzentrieren. Heiler sollten die Besitzer der Jungtiere im Blick behalten, da sie beim Laufen zu Fleischhaufen zusätzlichen Schaden nehmen können.
Dann also Verrat
Zeigt Eure Treue gegenüber Gefallener König Salhadaar - indem Ihr niederkniet. Für Dann also Verrat muss jedes Schlachtzugsmitglied vor Kampfbeginn das Emote /knien ausführen und ihn anschließend besiegen.
Details:
- Versammelt Euch vor Salhadaar und lasst alle /knien eingeben (oder ein Makro benutzen). Dadurch erhaltet Ihr einen Debuff namens Lehnseid.
- Während des Kampfes erscheinen regelmäßig Leerengeister jedes Spielers. Wenn Ihr Eure Kamera nicht innerhalb weniger Sekunden zu Eurem Geist dreht, sterbt Ihr sofort. Diese Mechanik erinnert an die mythische Mechanik aus der Manaschmiede Omega.
- Tode lassen den Erfolg nicht scheitern - entscheidend ist nur das Niederknien vor dem Pull. Wiederbelebungen können aber schwierig sein, also versucht am Leben zu bleiben, indem Ihr Euren Geist sofort anschaut, sobald er erscheint.
- Die Geister erscheinen ungefähr alle 30 Sekunden und werden durch einen großen Leerenstrahl angekündigt. Dreht Euren Charakter einfach in Richtung des Geistes, um den Tod zu vermeiden.
HINWEIS: Der Erfolg verlangt nur, dass alle vor dem Pull knien. Ihr müsst den Debuff nicht den ganzen Kampf über behalten; die zusätzliche Geistmechanik ist lediglich die zusätzliche Herausforderung.
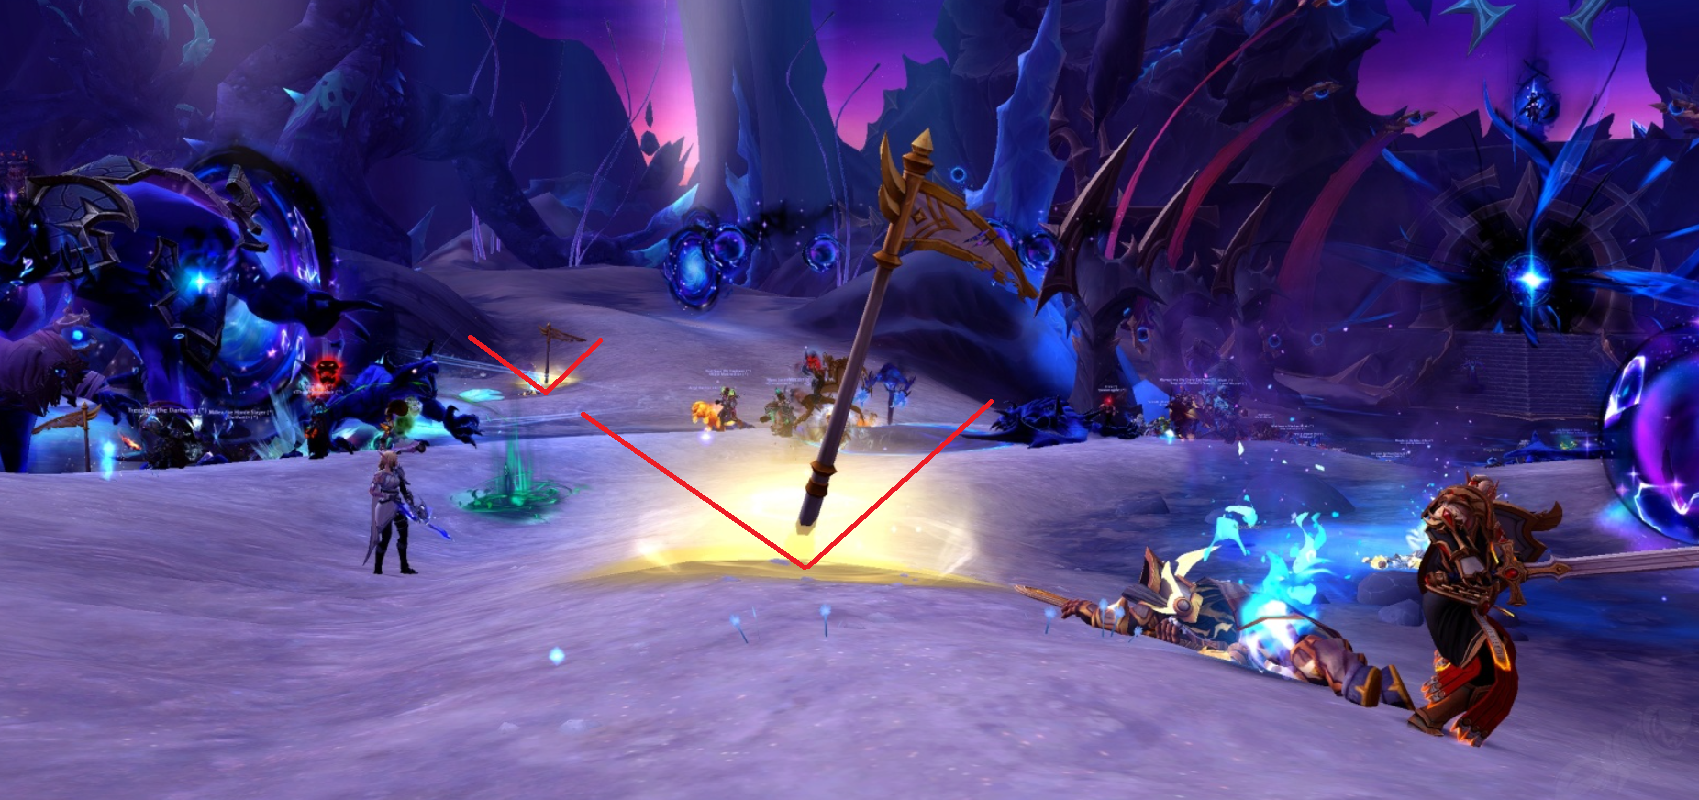
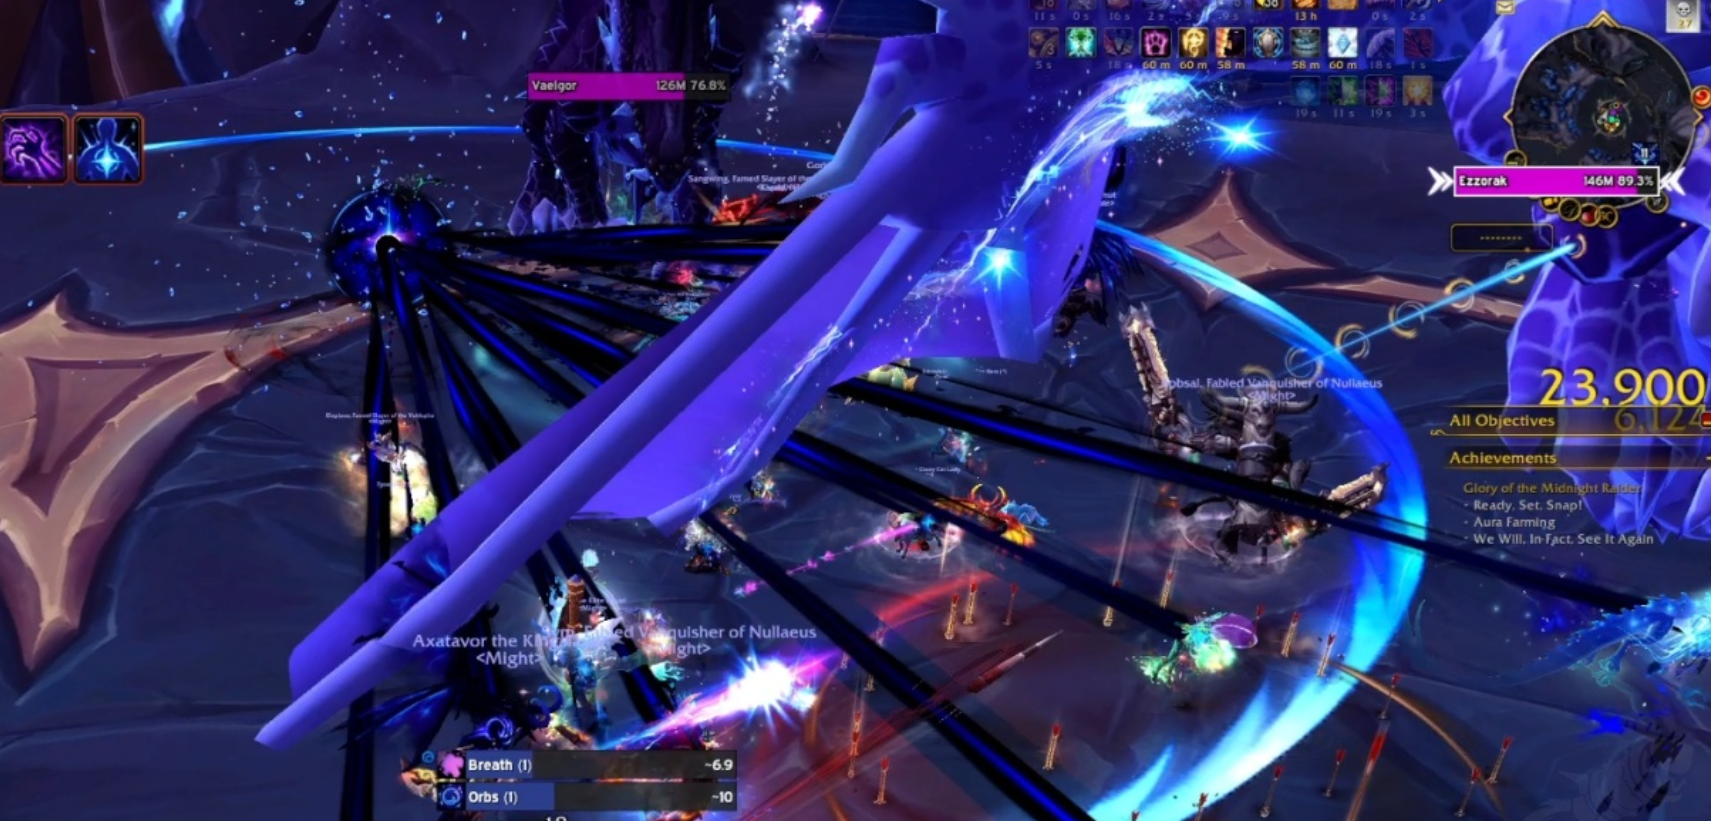
Schnipp, schnapp, ab!
Testet Eure Reaktionszeit gegen Vaelgor. Für Schnipp, schnapp, ab! müssen alle Spieler jede Verbindung von Nullzone innerhalb von drei Sekunden nach ihrem Erscheinen trennen.
Strategie:
- Vaelgor wirkt regelmäßig Nullstrahl auf den aktuellen Tank. Nach Ende des Zaubers erscheint ein violetter Nullzone-Kreis, der alle Spieler darin verbindet.
- Jeder Spieler muss sich vom Zentrum des Kreises entfernen, um die Verbindung zu brechen. Ihr habt nur drei Sekunden; bleibt jemand verbunden, schlägt der Erfolg fehl.
- Nutzt Bewegungstempo-Buffs wie Totem des Windsturms (Schamane) oder Anstachelndes Gebrüll (Druide), um langsameren Klassen zu helfen.
- Die Größe der Nullzone hängt davon ab, wie viele Stapel von Nullstrahl der Tank hat. Für einen kleineren Kreis können mehrere Spieler den Nullstrahl-Soak teilen. Dadurch wird es für alle leichter, die Verbindung zu brechen.
HINWEIS: Bestimmt einen festen Ansager, der sofort „brechen“ ruft, sobald die Nullzone erscheint. Das verbessert die Reaktionszeit deutlich.
Aura-Farmen
Für Aura-Farmen muss Euer gesamter Schlachtzug Kriegskaplan Senn besiegen, während alle den Buff Maximale Aura haben.
So bekommt Ihr die Aura:
- Sucht vor Senn nach dem Foliant der Göttlichkeit rechts neben der Treppe, die zum Boss führt. Klickt ihn an, um den anfänglichen Buff Aura-Farmen zu erhalten.
- Während des Kampfes rotiert Senn durch drei Paladinauren: Aura der Hingabe orange, Aura des Zorns gelb und Aura des Friedens blau. Wenn Ihr in jeder Aura steht, wird Euer Buff verbessert: zuerst zu +1000 Aura (kleiner orangefarbener Kreis), dann zu +10000 Aura (größerer gelber Kreis) und schließlich zu Maximale Aura (blauer Kreis).
- Alle Spieler müssen die Maximale Aura erreichen, bevor Senn besiegt wird. Vorsicht: Berühren sich zwei Spieler mit unterschiedlichen Aura-Stufen, wird der Spieler mit der schwächeren Aura 3 Sekunden lang betäubt. Verteilt Euch leicht, um versehentliche Kontakte zu vermeiden.
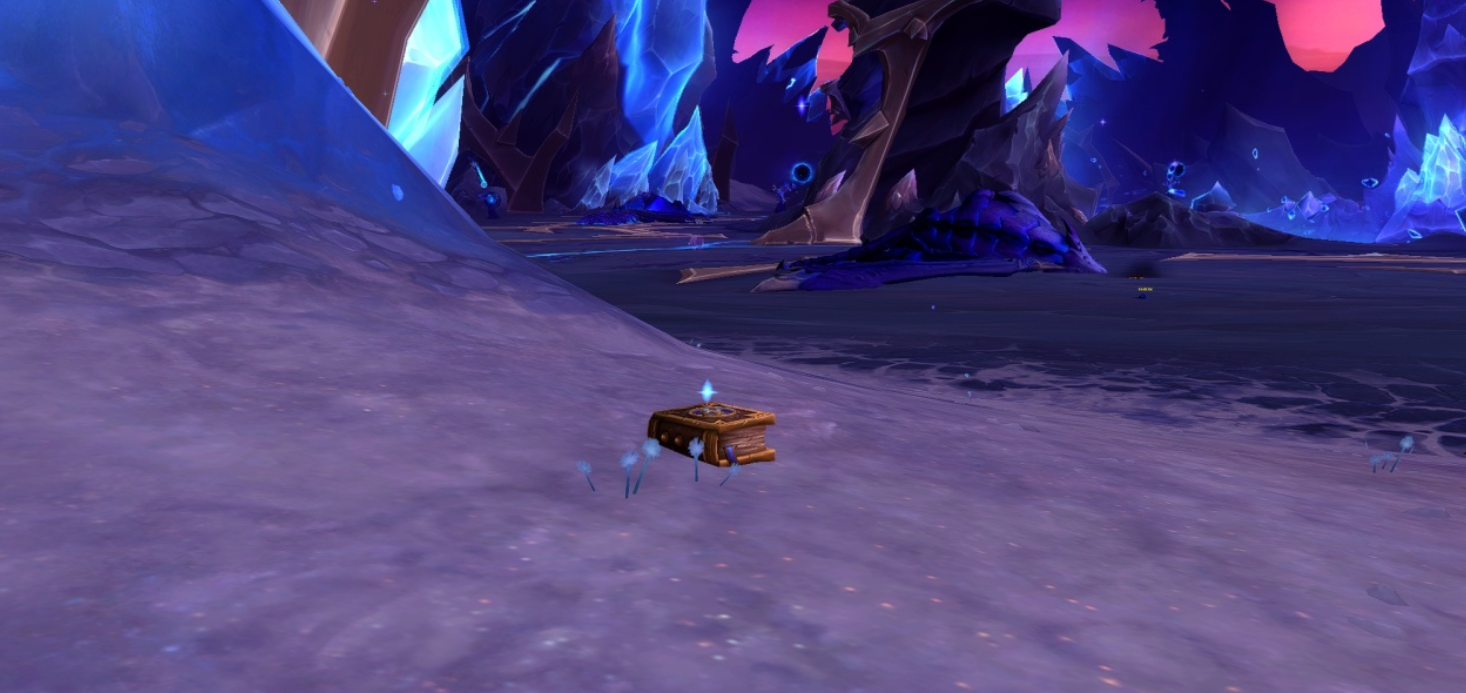
Foliant der Göttlichkeit
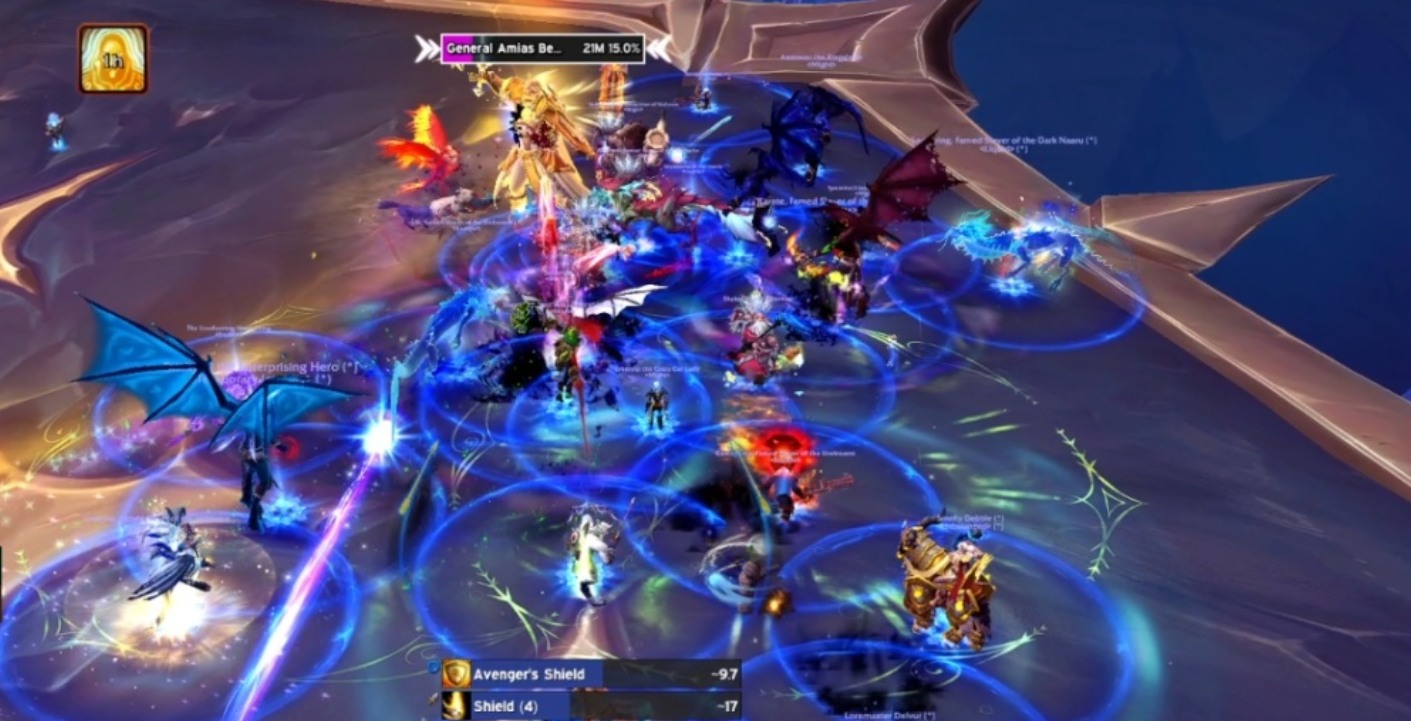
Aura
Wichtig: Haltet den Boss am Leben, bis alle bestätigt haben, dass sie den blauen Kreis der Maximalen Aura besitzen. Danach könnt Ihr Kriegskaplan Senn töten.
Wiedersehen macht Freude
Dieser Erfolg ist eine Anspielung auf Das werden wir sicher nie wieder erleben aus Aberrus. Für Wiedersehen macht Freude müsst Ihr während der Begegnung mit der Krone des Kosmos fleischige Brocken ins Nichts werfen.
Schritte:
- Nach dem Sieg über die lichtblinde Vorhut seht Ihr kurz vor dem geladenen Umbralkern, der zur Spitze der Leerenspitze führt, eine kleine Leerenpfütze. Alle Spieler müssen in dieser Pfütze stehen, bis sie eine zusätzliche Aktionstaste für Fleischbrocken erhalten. Dieser Debuff verringert die Gesundheit um 30% und hält 10 Minuten lang an.
- Während der ersten Zwischenphase des Kampfs gegen die Krone des Kosmos müsst Ihr Euch Alleria nähern, sie als Ziel wählen und die zusätzliche Aktionstaste benutzen, um den Fleischbrocken ins Nichts zu werfen. Jeder Spieler muss das tun.
- Wenn es klappt, erscheint in Phase 2 ein Fleischiges Monstrum. Tötet es, und Eure zusätzliche Aktionstaste wird zu Fleischbersten verbessert.
- In der zweiten Zwischenphase wiederholt Ihr den Vorgang - alle Spieler müssen Fleischbersten ins Nichts werfen. Sobald alle das erledigt haben, könnt Ihr den Boss töten.
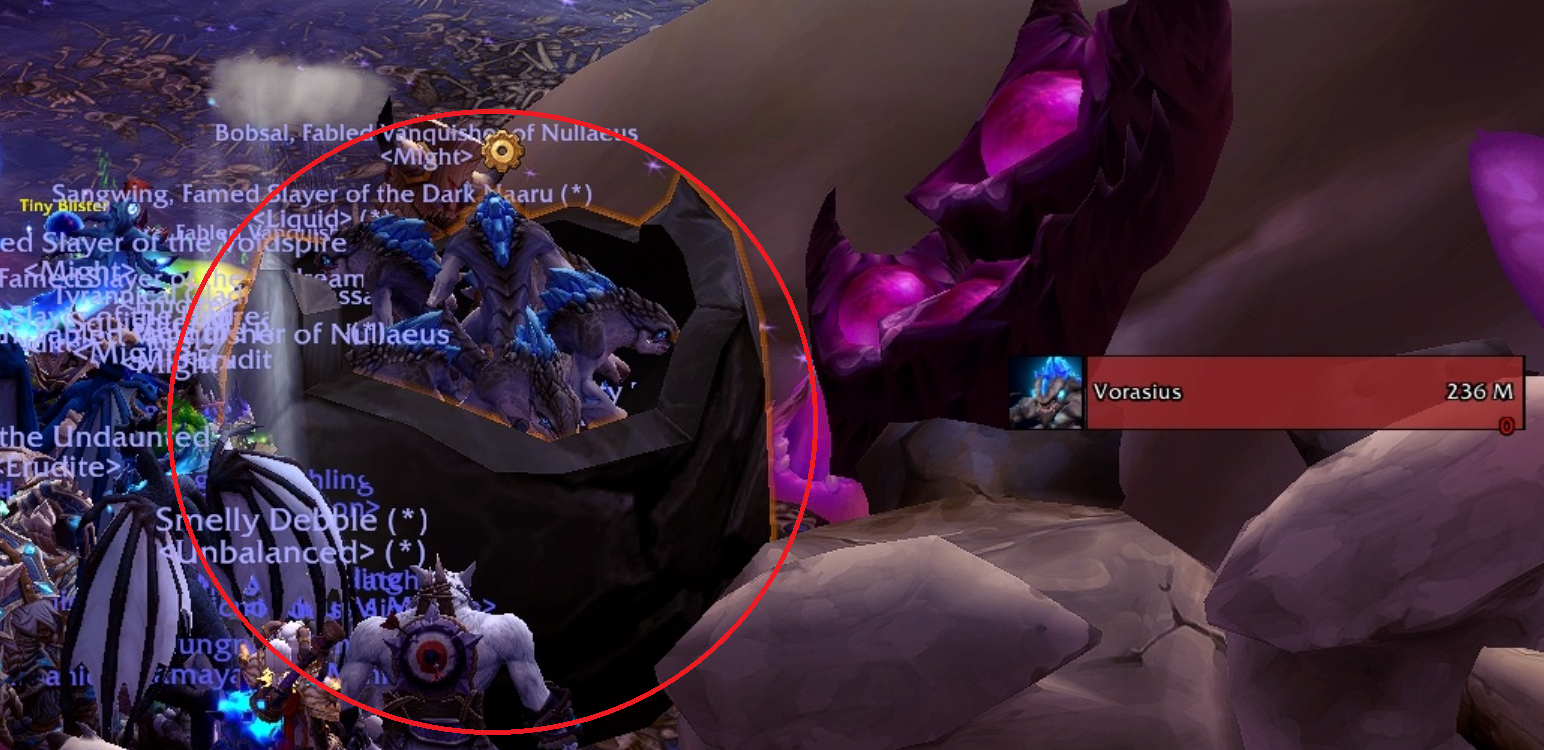
Hier gibt es nichts zu sehen
Das ist der einfachste Erfolg von allen. Hier gibt es nichts zu sehen verlangt, dass Ihr die Grenzen des Spielfelds verlasst und sterbt - irgendwo in Die Leerenspitze oder Marsch auf Quel’Danas.
Einfachster Ort: Geht in der Leerenspitze zur Arena von Vorasius (die runde Plattform mit der riesigen Bestie). Lauft einfach über den Rand und fallt in den Tod. Der Erfolg erscheint sofort. Ihr könnt das allein oder mit Eurer Gruppe machen; ein Bosskill ist nicht nötig.
Glory-Erfolg im Traumriss
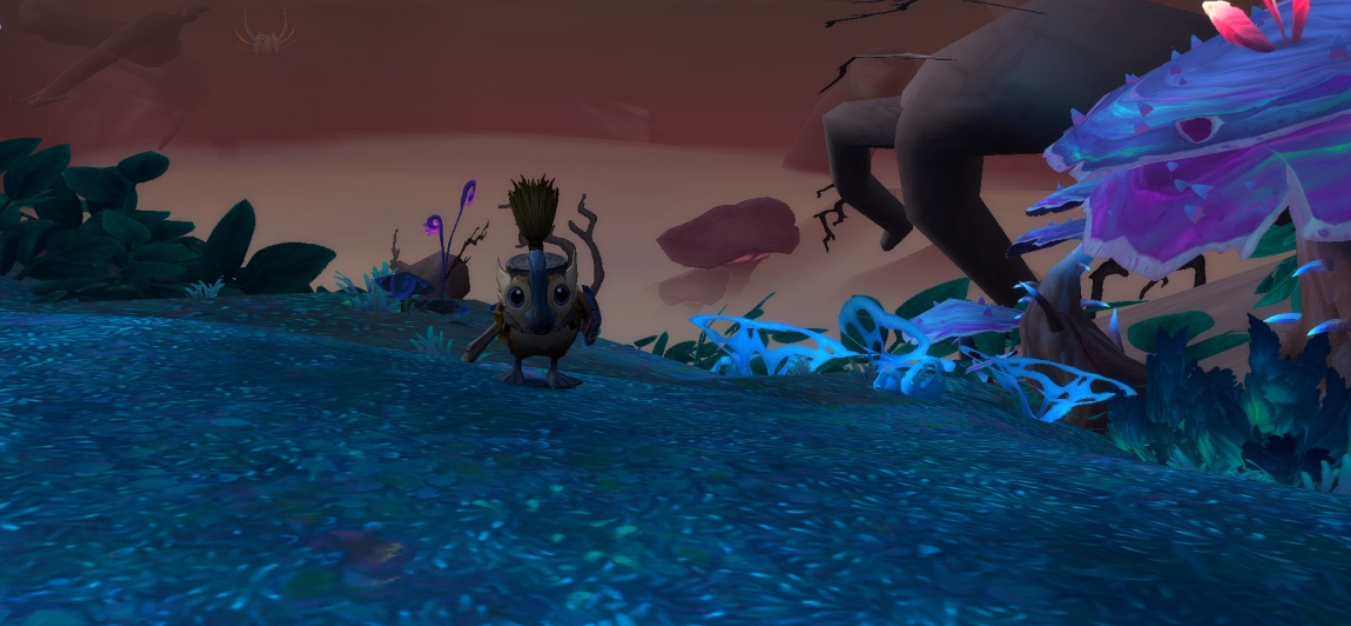
Der Traumriss bietet nur einen Glory-Erfolg, aber darin geht es um den beliebtesten gefiederten Freund aller: Unteroffizier Quaker.
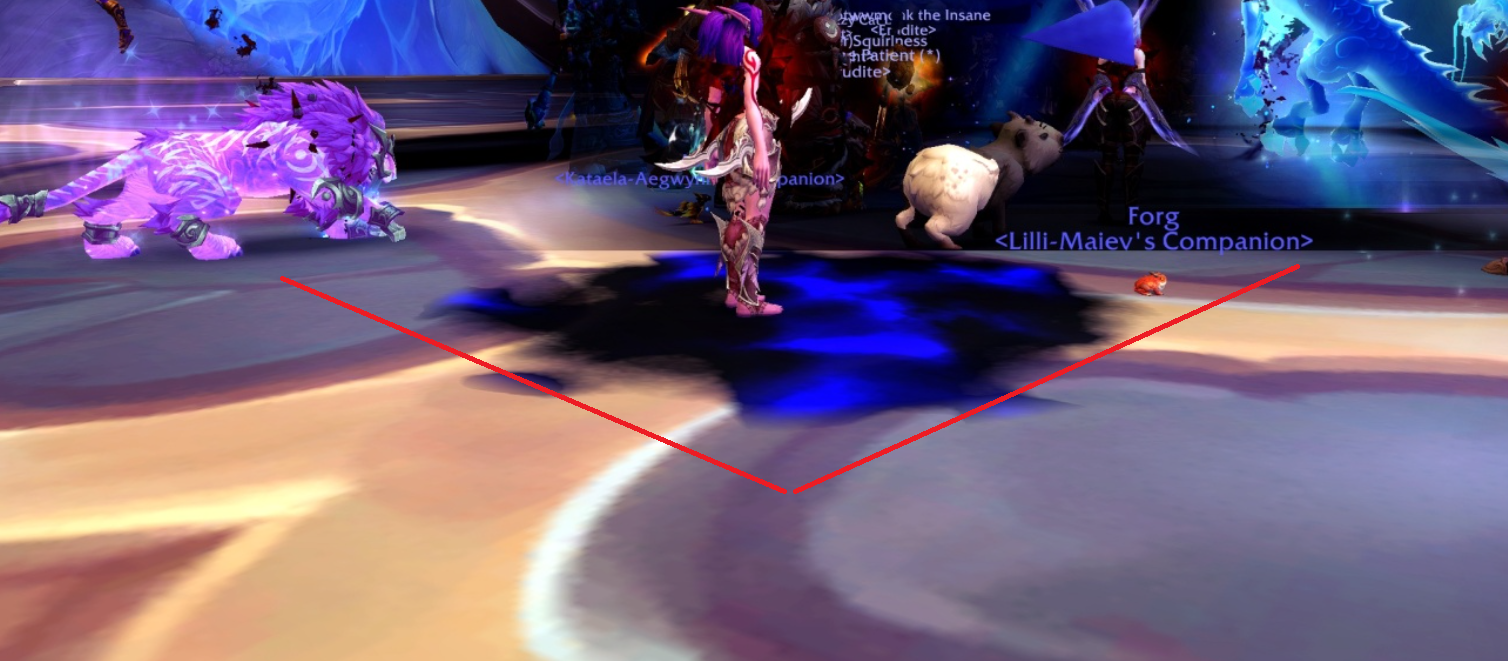
Quackastrophe
Für Quackastrophe müssen alle Spieler während des Kampfs gegen Chimaerus mit Unteroffizier Quaker interagieren, solange sie sich im Reich Aln befinden.
So funktioniert es:
- Bevor Ihr Chimaerus pullt, setzt eine Schlachtzugsmarkierung auf Unteroffizier Quaker (er steht irgendwo in der Arena). Teilt Euren Raid in zwei Gruppen auf.
- Wenn Chimaerus Alnstaub-Aufwühlung wirkt, werden Spieler nach Aln gezogen. Dort rennt Unteroffizier Quaker sehr schnell herum.
- Jeder Spieler muss ihn verfolgen und mit ihm interagieren. Dadurch erhaltet Ihr eine Verderbte Feder, die für den Rest der Begegnung um Euren Charakter kreist.
- Ihr habt pro Bossversuch nur eine Alnstaub-Aufwühlung-Phase, deshalb ist es am besten, den Raid in zwei Gruppen aufzuteilen: Die erste Gruppe geht bei der ersten Aufwühlung hinein, die zweite Gruppe bei der nächsten (falls der Kampf so lange dauert).
- Sobald jeder Spieler eine Feder gerupft hat, wird Unteroffizier Quaker aus Aln befreit, und der Erfolg wird beim Töten von Chimaerus gewährt.
HINWEIS: Belegt in den Einstellungen eine Taste für „Mit Mouseover interagieren“ (z. B. `F` oder `Strg+Klick`). Spamt diese Taste, wenn Ihr in der Nähe von Unteroffizier Quaker seid - er bewegt sich unberechenbar, aber die Interaktionsreichweite ist großzügig.
Glory-Erfolge in Marsch auf Quel'Danas
Der dritte Raid der Saison, die zurückeroberte Insel von Quel'Danas, enthält drei Glory-Erfolge.
Ei-skalation
Bevor Ihr Belo'ren angreift, müsst Ihr ein Sonnenbrunnenei finden. Für Ei-skalation muss Euer Raid dieses Ei mit Licht- und Leerenmagie erfüllen, bevor Belo'ren besiegt wird.
Strategie:
- Das Sonnenbrunnenei befindet sich links von Belo’rens Arena, an einer Wand, die von Trash-Mobs bewacht wird (Koordinaten /way 42.0 44.1). Räumt den Trash und bestimmt einen Spieler, der das Ei aufhebt und während des gesamten Kampfes trägt.
- Um das Ei mit Licht und Leere aufzuladen, muss der Eiträger in den Elementarpfützen stehen, die nach Belo’rens Fähigkeiten Lichttaucher und Leerentaucher erscheinen. Über dem Kopf des Trägers erscheinen zwei Fortschrittsleisten - eine für Licht und eine für Leere.
- Heiler müssen den Eiträger am Leben halten, während er in den gefährlichen Pfützen steht. Sobald beide Leisten 100% erreichen, ist das Ei vollständig erfüllt, und Ihr könnt Belo’ren töten.

HINWEIS: Der Eiträger erleidet erheblichen Schaden durch die Pfützen. Weist diesem Spieler einen festen Heiler zu und nutzt bei Bedarf defensive Cooldowns.
Und das ist alles nur in meinem Kopf
Für Und das ist alles nur in meinem Kopf müsst Ihr vor dem Kampf gegen L'ura eine Leerenfackel aktivieren und während des Kampfs zwölf Adds namens Erinnerung an Alleria unterbrechen.
So funktioniert es:
- Die Leerenfackel befindet sich rechts von L’uras Plattform. Klickt sie an, um sie vor dem Pull zu entzünden.
- Spielt die ersten beiden Phasen normal. In Phase Drei wirkt L’ura Der dunkle Erzengel, wodurch ein Viertel der Arena mit Leere überflutet wird. Während Ihr in Sicherheit lauft, erscheinen drei Erinnerungen an Alleria - jede davon muss unterbrochen werden.
- Ihr müsst vier getrennte Einsätze von Der dunkle Erzengel unterbrechen, also insgesamt 12 Unterbrechungen. Tötet den Boss nicht zu früh; wartet, bis alle vier Wellen stattgefunden haben.
- Legt Unterbrechungsrotationen fest, damit jede Erinnerung gestoppt wird. Magier, Schurken, Schamanen und andere Klassen mit kurzen Unterbrechungs-Cooldowns sind dafür ideal.
HINWEIS: Nutzt einen Bossmod-Timer, um die Einsätze von Der dunkle Erzengel vorherzusehen. Haltet die Gesundheit des Bosses über 25%, bis Ihr alle vier Wellen gesehen habt.
Hier gibt es nichts zu sehen 2
Genau wie das Gegenstück in der Leerenspitze kann Hier gibt es nichts zu sehen auch hier abgeschlossen werden. Der einfachste Ort in Marsch auf Quel’Danas ist die erste Brücke vor Belo’rens Arena. Lauft über den Rand und sterbt - der Erfolg wird sofort freigeschaltet. Das zählt für denselben Meta-Erfolg, Ihr müsst es also nicht zweimal machen.
HINWEIS: Ihr müsst den Erfolg nur in einem der beiden Raids abschließen - einmal reicht für Ruhm des Schlachtzüglers von Midnight.
Zusätzliche Tipps und Tricks für den Meta-Erfolg
- Normal vs. Heroisch: Alle Erfolge können auf dem Schwierigkeitsgrad Normal abgeschlossen werden. Heroisch gibt keinen zusätzlichen Fortschritt, aber einige Mechaniken sind auf Normal verzeihender (z. B. die Größe der Nullzone).
- Ein Pull pro Lockout: Wenn Ihr einen Erfolg verfehlt (z. B. jemand eine Verbindung nicht rechtzeitig trennt oder ein Jungtier nicht gefüttert wird), könnt Ihr den Boss zurücksetzen und es erneut versuchen. Wipes sperren Euch nicht aus.
- Kommunikation ist entscheidend: Nutzt Voice-Chat (Discord, TeamSpeak), um Verbindungsbrüche, Aurawechsel und Add-Wellen anzusagen. Das verringert die Reaktionszeit deutlich.
- Rollen zuweisen: Für „Ei-skalation“ bestimmt Ihr einen festen Eiträger und zwei Backup-Heiler. Für „Aura-Farmen“ sollte ein Spieler ansagen, welche Aura gerade aktiv ist.
- Schlachtzugsmarkierungen nutzen: Setzt Weltmarkierungen auf die 3×3-Felder für Averzians Banner, auf Unteroffizier Quaker und auf die sicheren Zonen während L’uras Der dunkle Erzengel.
Wichtige Addons für Ruhm des Schlachtzüglers von Midnight
Diese Addons erleichtern das Verfolgen und Ausführen der elf Erfolge erheblich, besonders wenn Ihr mit einer vollen Schlachtzugsgruppe koordiniert.
- Deadly Boss Mods (DBM) oder BigWigs: Entscheidend für das Timing von Mechaniken wie Nullzone-Verbindungen, Add-Spawns und Einsätzen von Der dunkle Erzengel. Beide Addons haben integrierte Module für Midnight-Raids.
- Rarity: Verfolgt Euren persönlichen Fortschritt zum Reittier und zeigt, welche Erfolge noch fehlen. Außerdem gibt es eine schöne Feiermeldung, wenn Ihr den Schattenhaften Plager endlich erhaltet.
- Method Raid Tools (MRT): Unverzichtbar für Unterbrechungsrotationen, Cooldown-Planung und geteilte Notizen im Raid. Die Module „Raid Cooldowns“ und „Interrupt Tracker“ sind für „Und das ist alles nur in meinem Kopf“ besonders wertvoll.
- TomTom / Paste: Damit könnt Ihr schnell Wegpunkte für die Position des Sonnenbrunneneis und die Leerenpfütze für „Wiedersehen macht Freude“ setzen.
- SavedInstances: Hilft Euch zu verfolgen, welche Charaktere die Erfolge bereits auf welcher Schwierigkeit versucht haben. Das ist besonders nützlich, wenn Ihr mehrere Twinks nutzt, um Freunden beim Reittier zu helfen (auch wenn das Reittier accountweit ist).
- GTFO: Warnt Euch mit einem lauten Ton, wenn Ihr in schädlichen Bodeneffekten steht - praktisch für Eiträger im Kampf gegen Belo’ren.
Profi-Tipp: Vor jedem Erfolgspull sollte ein Spieler (meist der Raidlead) das Notizsystem von MRT nutzen, um die exakten Schritte aufzuschreiben. So bleiben alle auf demselben Stand, besonders bei mehrstufigen Erfolgen wie „Wiedersehen macht Freude“.
Jedes Reittier mit ConquestCapped
Unsere Erfahrung reicht über unzählige Gaming-Erfolge, doch unsere echte Leidenschaft liegt in der Jagd nach den seltensten Reittieren in World of Warcraft. Wir sind darauf spezialisiert, Aufgaben, die viele Spieler als endlosen Grind sehen - einschließlich vollständiger Glory-Meta-Erfolge aus Raids - in strukturierte, planbare und garantierte Abschlüsse zu verwandeln. Unser Team beherrscht die Mischung aus strategischer Vorbereitung, sauberer Mechanikausführung und Schlachtzugskoordination, die nötig ist, um Azeroths begehrteste Schätze zu sichern.
Ihr legt das Ziel fest, und wir setzen unsere erprobte Vorgehensweise ein, um es Wirklichkeit werden zu lassen. Vom Tic-Tac-Toe gegen Imperator Averzian bis zur Jagd nach Unteroffizier Quaker im Aln entfernen wir Frust aus dem Prozess und liefern Eure gewünschten Reittiere mit professioneller Präzision. Bereit, den Schattenhaften Plager Eurer Sammlung hinzuzufügen?
