
Welcome back to the madness as Patch 11.1.5 breathes new life into one of Battle for Azeroth’s most iconic features — the dreaded Horrific Visions. These once limited, sanity-draining scenarios have returned with a vengeance, now reimagined for The War Within as "Revisited Horrific Visions".
Originally introduced in Patch 8.3 as solo or small group content set within twisted versions of Stormwind and Orgrimmar, Horrific Visions tested players nerves, execution, and resource management under pressure. Now in 2025, Blizzard has brought them back with a new twist: streamlined progression, quality-of-life improvements, and updated rewards that make them just as relevant as they are nostalgic.
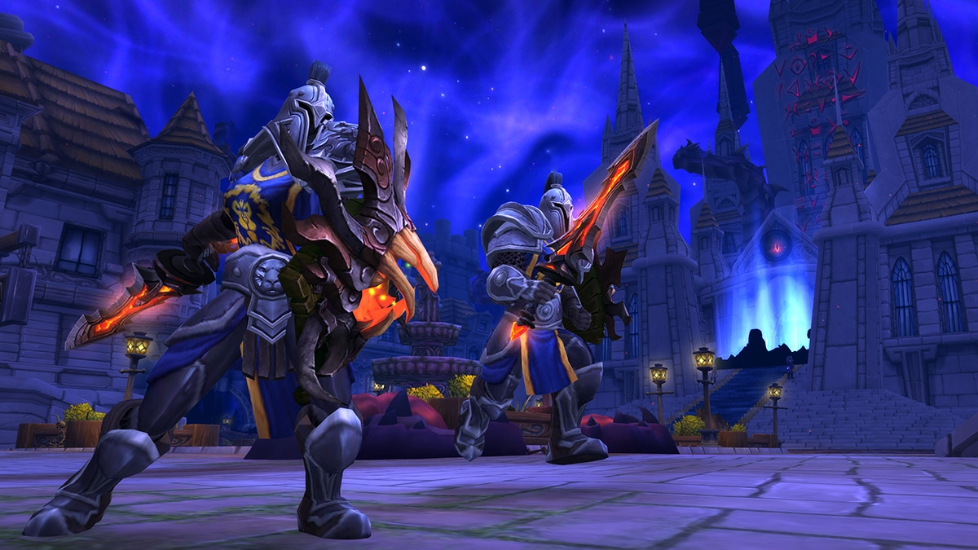
Much like in Battle for Azeroth, you’ll enter a nightmarish, instanced version of Stormwind and Orgrimmar, battling waves of corrupted enemies as you push deeper into the madness. At the end of each run, you’ll face off against either a corrupted Alleria Windrunner or Thrall (depending on the city).
The catch? You’ll need to carefully manage a constantly draining Sanity meter. Once it hits zero, you’re forcibly ejected from the vision in defeat, no matter how close you were to the end. The pressure is always on and that’s exactly what makes the event so fun.
Key features of the event at a glance:
Unlike some limited-time holiday events, Horrific Visions Revisited is a full fledged feature of the patch. After completing a short unlock questline, you’ll gain permanent access to the event — with no weekly cap on how many times you can run it. The visions rotate weekly between Stormwind and Orgrimmar, keeping the experience fresh and varied.
Each city follows the same core structure and challenge format, but with unique layouts, enemy types, and final bosses. Whether you’re navigating the shadowy alleys of Stormwind or the burning corridors of Orgrimmar, the madness never quite feels the same twice.
Jumping into Revisited Horrific Visions doesn’t require weeks of prep or grinding, as it’s designed to be accessible to WoW players as possible:
When you queue up for Revisited Horrific Visions (whether you’re tackling the challenge solo or diving in with a group of friends) you’ll first be placed into a special staging area, designed to help you get ready before entering the chaos. This area, with its atmosphere and layout, feels like a spiritual successor to the old Chamber of Heart from Battle for Azeroth, offering a familiar yet updated environment.
Group Size: You can run Horrific Visions with anywhere from 1 to 5 players. The enemies health and damage will scale with group size, so a 5 man group faces beefier mobs than a solo player would. But additional players obviously make it easier to handle mechanics and cover each other, so it balances out. Solo players get a slight edge from talents (a damage buff that diminishes with more allies) and of course can use the NPC companion, so don’t be afraid to dive in alone if you prefer!
Weekly Rotation: Only one city’s vision is active per week. If Stormwind is up this week, everyone will be challenging Alleria; the next reset it’ll switch to Orgrimmar and Thrall. This weekly rotation means you can’t spam the same city back-to-back, but across two weeks you’ll get to experience both locations. Each has its own map layout and quirks (for example, Stormwind’s mage quarter vs. Orgrimmar’s Valley of Wisdom), but the fundamental goals and mechanics are the same.
Once inside a Horrific Vision, your primary goal is to defeat the final boss (Thrall or Alleria) after completing as many side objectives as possible. Each city vision is divided into zones: 1 Main Boss Area, where your final encounter will happen, and 4 other city districts (two of them being “easy” zones and two “hard” ones). Each has an objective, usually killing a miniboss or completing a task to “cleanse” that area of the vision.
To fully clear a vision, you’ll want to complete all 4 bonus objectives and then slay the main boss in one run. However, the catch is that as soon as you kill the main boss, the vision ends immediately – you can’t go back out and finish other zones afterward. So the optimal strategy is always clear all side areas first, then finish off the boss last. Clearing more zones in one go not only yields better loot rewards, but also is required for achievements and currency gains.
All the while, you must manage your Sanity meter. You start each run with a full bar of Sanity. Being inside the vision causes a passive sanity drain over time, and many enemies or mechanics will chunk away your sanity as well. If that bar hits zero, your character goes insane and is ejected from the vision, ending the run prematurely. In group runs, an insane player might get transformed or essentially die.
Fortunately, you have tools to keep your sanity up:
In summary, the gameplay inside Revisited Horrific Visions is all about striking the right balance between speed and caution. You’ll need to move swiftly through the corrupted city, clearing out enemies and completing objectives as efficiently as possible — but without rushing blindly into danger. Every decision counts, and every detour could cost you precious seconds and even more precious sanity. Above all, you must constantly monitor your purple Sanity bar, as it’s the key to survival.
If you remember the original Horrific Visions from BfA (8.3), the 2025 revisited version will feel very familiar, but with a number of quality-of-life improvements and new challenges. Here’s a breakdown of the major differences:
No Keys or Limited Attempts: In 8.3, you needed to farm "Vessels of Horrific Visions" to enter a run, which limited how often you could play. In 11.1.5, entry is unlimited. You can run Visions as many times as you want, which is awesome for practice or farming currency. There is a weekly loot lockout for gear (so you can’t farm infinite high ilvl items), but otherwise you’re free to dive in repeatedly without spending tokens!
Accountwide Progression: Previously, each character had to level up their Titan Research Tree and legendary cloak separately to handle tougher Visions. Now we have the Hourglass of Horrific Visions (a new Sanity talent tree) and it features Warband-wide progression. In other words, the upgrades you unlock apply to all characters on your account, so alts don’t have to re-grind the entire thing.
Legendary Cloak Replaced: The old legendary cloak (Ashjra’kamas) and its corruption resistance mechanic are gone. You don’t need a special cloak to survive the visions this time. Instead, all the benefits (like sanity drain reductions) are rolled into the talent tree and masks system. So, no cloak to level up, and no bizarre Corrupted gear system attached either – your regular gear works normally.
New Talent Tree (The Hourglass): In place of the Titan Research, you’ll now invest in a 5 tier talent tree via the Hourglass of Horrific Visions object at the hub. This tree offers power-ups to help in Visions, such as: Sanity drain speed reduction by up to 40%, Max Sanity boost, DPS buffs and lots of other extra utility options. You purchase these talent upgrades using Displaced Corrupted Mementos and items called Echoes of N’Zoth. By week 4-5 of the event, a dedicated player can have the entire tree fully unlocked, at which point you’ll be in peak shape to tackle the hardest challenges. Again, these unlocks are account-wide, so you only have to do it once!
Eight Masks Instead of Five: The original Visions had 5 Faceless Masks that you could enable to ramp up the difficulty and rewards. All five of those masks are back with the same effects (Mask of the Long Night still halves your max sanity, Mask of the Daredevil makes sanity damage from hits quadruple etc.). On top of that, 3 new masks have been introduced for the truly masochistic: Mask of the Nemesis, which periodically summons relentless ambushers that attack you during the run, Mask of Vengeance that significantly increases the final bosses DPS so they start hitting like a truck, and Mask of Multitudes, which causes additional enemy spawns in encounters.
With all 8 masks active, the vision run becomes incredibly challenging (imagine all those penalties stacked!). But higher masks also improve rewards provided (and are needed for a couple new achievements as well). The masks are something you’ll gradually "discover" and unlock by completing lower mask runs, similar to the old system where you earned masks by clearing with fewer masks first.
New Rewards and Cosmetics: Blizzard added a slew of new collectibles to earn with two new mounts (in addition to the return of the Black Serpent mount), battle pets, toys, and even void-touched weapon illusion enchantments! If you missed out on the original event’s rewards, many of those are obtainable again here, alongside new prizes for the 8 mask content.
Other than the mentioned changes, the core gameplay loop is the same: maintaining your sanity bar, clearing corrupted zones, and avoiding increasingly dangerous afflictions stays true to the original formula. The pacing, tension, and escalating chaos still deliver that same adrenaline-pumping experience. Veteran players will feel right at home with the familiar mechanics and progression flow, while newcomers now have a golden opportunity to dive into one of WoW’s most unique scenario modes — this time without the frustration of limited entries or tedious grind barriers.
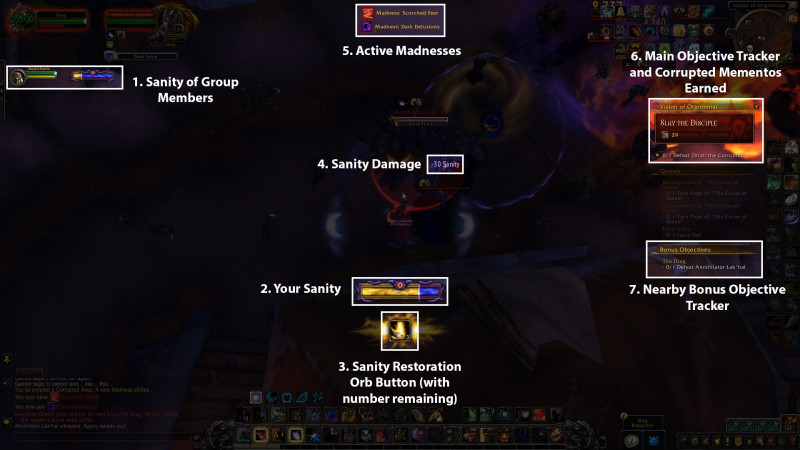
Horrific Visions make use of specific elements from the default in-game User Interface, such as the Sanity Bar and the Sanity Restoration Orb Button that are crucial for navigating the scenario. If you’re using a custom UI add-on and don’t see these elements, it’s likely they’re being hidden or overlapped. Check your add-on settings to ensure these event-specific features are properly displayed!
Keeping an eye on all these UI elements is crucial to surviving and mastering Horrific Visions. These tools give you constant feedback on your status, progress, and surroundings, letting you make quick decisions before it’s too late. In fact, many players find that the default Blizzard UI presents these features more clearly than heavily customized setups like ElvUI or other addon-heavy interfaces. If you're struggling to keep track of everything, try switching back to the default UI. You might be surprised how easier it is to stay alive when the screen isn’t overloaded.
Horrific Visions Revisited brings with it a wide range of new and returning rewards — many of which are tied to both personal performance and progression systems. From high-item-level gear and transmog sets inspired by the Black Empire to coveted collectibles like mounts, pets, toys, and even exclusive titles, there’s no shortage of reasons to dive deep into these twisted visions.
The revamped system introduces fresh incentive loops: players earn currency through repeated runs, unlock progression-based milestones, and chase high-difficulty clears (including 5 and 8-mask challenges) for access to the rarest loot. Some of the standout prizes include a new Black Empire-themed mount, updated Sanity-themed cosmetic weapon illusions, and even limited-time titles for conquering all objectives at maximum difficulty. There’s also the return of the awesome Black Serpent of N’Zoth!
------------------------------
This section of the guide is currently a work in progress, as we’re still uncovering the full extent of what the event has to offer. We’re actively tracking all the reward sources, drop conditions, and unlock requirements, and will be updating this chapter as soon as we have the complete picture. Stay tuned as we dig deeper into the horrors (and loot) of N’Zoth’s visions!
------------------------------
Horrific Visions can be brutal (especially once you start stacking those sanity-draining masks). The pressure ramps up fast, and even high RIO players can get caught off guard. Whether you're venturing in solo for the ultimate challenge or coordinating with a full 5 player squad, a solid strategy can make all the difference. From sanity management to priority targets and efficient routing, these tips will help you push deeper, clear more objectives, and make it out with your sanity (mostly) intact — and maybe even snag some impressive rewards along the way!
Thinking about diving into an 8-mask Horrific Vision right away? Pump the brakes. The best way to master these runs is to ease into it. Start small — add one mask at a time, get a feel for the changes, and build up from there. Each mask doesn’t just crank up enemy health and damage by 25%, it also brings its own unique challenge to the table. Some mess with your sanity drain, others twist the environment or introduce nasty new mechanics. Take your time learning how each one shifts the flow, and you’ll be way better prepared when it’s time to go all in:
Always remember to take advantage of the fact that runs are unlimited. One of the smartest ways to improve is by practicing without any masks active. Got trouble with a specific area, like the Dwarven District boss in Stormwind? Queue up a 0 mask run and laser-focus that section until you've got it down cold. Since you’re not spending any keys or currency, you can run it as many times as you want totally risk-free. This kind of targeted practice builds the muscle memory and confidence you’ll need when it’s time to crank up the difficulty.
Revisited Horrific Visions are built to scale with your progression, offering a steady ramp-up in difficulty as you grow stronger. When you first step in at level 80 with no talents and zero masks, the experience is manageable and perfect for learning the ropes — great for getting familiar with the layout, enemy mechanics, and pacing. As you start unlocking talents and picking up better gear, you’ll naturally move into the 1>3 mask range, which feels similar to Heroic dungeons or low Mythic+ keys: there’s danger, but nothing overwhelming if you play smart.
Once you push to 5 masks (the original cap) the challenge kicks up to Heroic raid levels. Enemies gain 125% more health and damage just from the masks, and you're now dealing with multiple debuffs and mechanics that require real coordination and planning. For most organized players with solid builds, it's tough but very doable. The new 6>8 mask range, however, enters Mythic raid territory. This is endgame content where only well-geared, experienced players will thrive. An 8-mask clear isn’t meant for everyone as it’s the kind of goal you build towards as you farm currency, unlock talents, and maybe grab some gear from raids or mythic+. By the time you're ready for it, you'll not only have the tools but the knowledge and muscle memory to conquer it.
Importantly, the mode is as hard as you want to make it. If you’re a casual player who just wants to see the content, you can stick to low masks and still earn plenty of currency to buy rewards. The event is extremely accessible thanks to unlimited tries and account wide unlocks – it’s just much friendlier than its 2020 predecessor. And for the more hardcore audience the Horrific Visions Returned might present a very decent Mythic+ alternative in case you're enjoing doing harder content either solo or with just 1-2 friends.
To conclude, Revisited Horrific Visions is a nostalgic trip with modern design sensibilities. It brings back the thrill of teetering on the edge of madness in Stormwind’s burning streets, now with improved rewards and flexibility. Whether you’re farming it for gear upgrades on your alts, hunting that elusive mount, or just having a blast with friends in a 5 man sanity marathon, this event has a bit of everything. Good luck, champion and may your mind stay intact and your pockets be full of Mementos. Embrace the whispers of the Old God once more, and show N’Zoth that his vision of horror is no match for Azeroth’s heroes in 2025.