
This TBC Anniversary DPS tier list is a practical, raid-first guide to choosing a damage specialization for Phase 1 progression and early gearing. Instead of ranking specs by perfect target dummy conditions, it focuses on what feels the most reliable when pulls get messy, buffs vary by group, and your raid is still locking in assignments, cooldown timing, and consistent uptime. Use it as a clear roadmap for picking a main or alt that stays valuable through the first weeks of raids and repeat weekly clears.
If you are deciding what to main, planning a raid roster, or picking an alt for quick groups, these TBC Anniversary DPS rankings help you set expectations for
Phase 1 content and early raids like Karazhan, Gruul's Lair, and Magtheridon's Lair.
This TBC Anniversary DPS tier list for Phase 1 helps you quickly understand which damage specs feel the most reliable in real raid conditions. Use it to shortlist your main or alt for early progression, when gear is limited, buffs vary by group, and many pulls reward burst plus clean uptime. The tiers are not about perfect stationary testing, they are about what consistently performs well in typical Karazhan, Gruul's Lair, and Magtheridon's Lair pulls.
Fast kills favor front-loaded damage and clean cooldown timing, while longer fights reward sustain and resource control. Your buff package can swing results a lot, so use tiers to shortlist, then match the pick to your group and its strongest support tools.
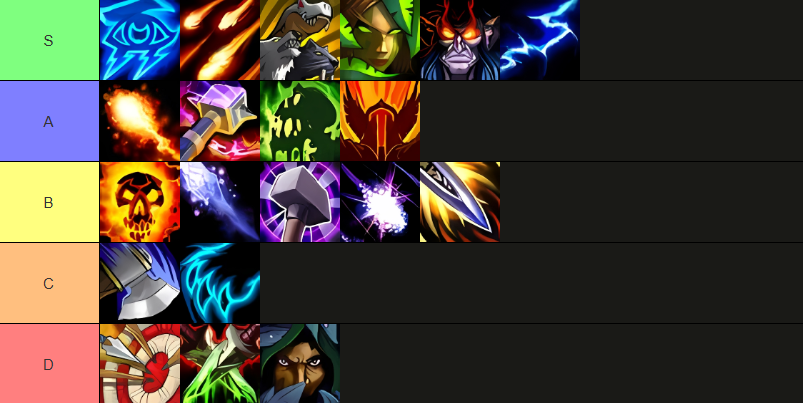
S Tier specs are the core picks for early raids because they combine strong damage with excellent Scaling, high Utility, or both. They stay effective even when gear is average and execution is not perfect.
A Tier specs can perform at a high level in Phase 1, but their results depend more on the right context: fight length, buff coverage, and early gearing.
B Tier picks are viable and can feel great in the right composition, but they usually bring more specialized value or face clearer throughput limits in Phase 1. Many raids take them for role value as much as for damage.
C Tier does not mean “unplayable.” It usually means you rely more on execution, group support, or encounter-specific advantages to compete with higher-tier options in the same gear window.
D Tier specs can still clear raids, but they are the hardest to justify when a group is optimizing early Phase 1. If you love the playstyle, plan around team support and realistic expectations rather than forcing a meta slot.
In the end, a TBC Anniversary DPS tier list is not a rulebook, it is a decision tool for Phase 1 raid reality. Use the tiers to narrow your choices, then pick the spec that matches your roster’s buff package, your group’s pacing, and the kind of pulls you actually run on weekly clears. If your goal is the fastest early progression, build around S Tier cores and add A Tier damage where your comp supports it. If your goal is stable clears with flexible roster spots, B Tier picks can be excellent when they solve a role problem, bring utility, or smooth out caster and melee groups. C Tier and D Tier do not mean “do not play,” they mean you should win with uptime discipline, cleaner positioning, and smart support rather than expecting the spec to carry the meter by itself. Re-check your placement after upgrades and comp changes, because rankings shift with gear, kill times, and how your raid handles mechanics. The best pick is the one you can execute consistently, because in Phase 1 the raid that plays clean will beat the raid that only chases a letter grade.

S Tier in the TBC Anniversary DPS tier list groups specs that repeatedly show the best overall performance in early PvE: strong damage patterns, clean Scaling, and high-value Utility that helps the raid succeed.
Arcane Mage is built around burst windows and fast conversions of spell power into real damage. This profile fits short Phase 1 encounters especially well, where clean timing and aggressive pacing can win the pull.
Arcane Blast creates a simple but demanding loop: you trade resources for tempo. When bosses die quickly, that tempo becomes real value because you spend more time inside your strongest cycle and less time in “recovery” phases.
Arcane Explosion gives you a reliable button for controlled AoE moments. It is not about endless padding, it is about having a clean answer when the encounter briefly asks for stacked damage.
Polymorph keeps Arcane Mage useful even when pure damage is not the only concern. Early raids often reward players who can keep pulls smooth and prevent chaos before it starts.
Spellsteal is situational, but it is the kind of tool that can swing a mistake into a save. That Utility helps explain why Arcane remains a safe pick in Phase 1 even beyond its damage.
The main limitation is resource pressure. Your ceiling is high, but your comfort depends on how well you plan cooldown usage and avoid wasting casts during movement or target swaps.
Destruction Warlock is one of the cleanest ranged damage profiles in Phase 1 because it blends strong single-target, powerful AoE tools, and progression Utility that matters when pulls are still messy.
Shadow Bolt gives you a straightforward engine that stays effective even when the fight gets messy. That matters in early raids where positioning and interrupts can break more complex loops.
Incinerate becomes relevant when the raid environment supports it. The important point for tier placement is not “one spell is better,” but that Destruction has flexible paths to stay competitive.
Curse of the Elements is a direct argument for Warlock raid demand. You are not only a damage slot, you are also part of the raid’s damage structure.
Seed of Corruption is a progression tool disguised as AoE. In fights with adds or stacked targets, having a spec that can deliver controlled, repeatable AoE without falling apart is a major advantage.
Survivability, self-sustain options, and the ability to keep contributing while handling mechanics all support its S Tier status.
Beast Mastery Hunter is often the standout physical DPS in Phase 1 thanks to consistent damage that stays stable while moving and a kit that works well without perfect gear.
Steady Shot is simple, but that simplicity is a strength. It reduces the number of ways you can “break” your own output during mechanics, which makes your damage profile reliable in real raids.
Kill Command highlights why BM scales so well early: a large chunk of your value rides on pet contribution, which stays effective even when you need to reposition.
Bestial Wrath fits Phase 1 pacing. When bosses die quickly, converting cooldown windows into a large share of your total damage is an efficient way to win.
Misdirection is one of those tools that improves the whole raid’s quality. Cleaner pulls and faster threat stabilization mean more uptime for everyone, not just you.
BM remains a safe pick because it is easy to play well and hard to play terribly. That high floor is part of why it is repeatedly recommended for early raids.
Survival Hunter earns its spot by pairing solid personal DPS with a raid-wide physical boost that makes an entire group feel sharper. In Phase 1, that kind of value is huge because it improves pull pacing, stabilizes damage across messy mechanics, and rewards clean execution even while gear is still developing.
Expose Weakness is the headline, and it is why Survival keeps showing up in S Tier conversations: even if your personal DPS is not always the absolute peak, this kind of raid value can push total group damage higher and make every physical player feel stronger on the same pull. Survival is “support DPS” in the best way, you still deal real damage, but you also raise the raid’s ceiling, which often matters more than a tiny meter gap. The spec becomes especially potent in physical-heavy rosters, where the boost turns your slot into an efficient investment for total output, and it stays steady in real encounters, helping you avoid all-or-nothing swings when mechanics get messy.
Demonology Warlock stands out in Phase 1 because its damage profile stays productive when fights force movement, target swaps, or “do the mechanic now” moments. You still bring the full Warlock toolkit, but you also gain an uptime-resistant feel that makes progression pulls less punishing.
Summon Felguard defines the identity, a meaningful share of your damage keeps happening while you reposition, react, or handle raid tasks, and that is a real advantage in early progression. When encounters demand control, quick adjustments, or imperfect casting windows, Demonology tends to stay steady instead of falling apart, which means fewer pulls where you lose momentum just because the fight did not match a perfect rotation. Add the complete Warlock kit on top, and you get a comfortable slot that keeps contributing even when uptime gets rough.
Elemental Shaman earns S Tier status by blending strong caster damage with high-impact raid contribution that helps groups progress faster. In Phase 1, it feels ready early, fits many compositions, and stays relevant because its value is not only personal DPS.
Elemental’s early strength is about being ready fast: when you hit a comfortable performance point quickly, you become a stable contributor in the first raid cycles, exactly when rosters are still settling and gear gaps are real. As a hybrid, Elemental Shaman slides into many setups without demanding a perfect comp, so your spot feels more secure while the group is still learning pulls and refining assignments. The biggest argument is the group buffs that strengthen overall raid output, because even when a pure DPS spec edges you on the meter, the team can still gain more total damage from what you add to everyone else, and that is the kind of raid leverage that defines S Tier in early PvE.

A Tier specs can compete in Phase 1, but they usually rely more on the right fight, the right buffs, or specific gearing patterns to keep pace with S Tier picks.
Fire Mage can be very strong in Phase 1, especially when the raid environment supports consistent crit-driven value and stable casting time.
Fireball is a reliable engine when you can stand and cast. In fights with cleaner uptime, Fire feels smooth and rewarding, which is why it can look excellent in organized raids.
Scorch supports the Fire play pattern and helps keep your output steady. When you can maintain the rhythm of your rotation, you get a strong flow of damage without needing complex swaps.
Ignite highlights the spec’s dependence on crit-driven value. When crit and resist patterns cooperate, your damage spikes. When they do not, you can fall behind the most consistent casters.
The reason Fire lands in A Tier is that it is strong, but a bit more sensitive to variance and fight conditions. In practice, it is often a great pick, just not always the safest one.
Enhancement Shaman is an effective melee DPS that also provides some of the most valuable melee-focused raid support in early content. When your group wants stronger melee output and tighter pull pacing, this spec brings real leverage.
Windfury Weapon defines why Enhancement can look explosive. When the spec’s proc-driven moments line up, you get sharp burst that matters in short Phase 1 fights.
Stormstrike adds structure to that burst profile and gives you a clear button for pressure timing. The more disciplined your usage, the more your output feels repeatable.
Windfury Totem is the main reason raids want Enhancement. Even if your personal numbers vary, the raid-wide melee benefit can be worth the slot.
Enhancement is placed in A Tier because it is powerful but more sensitive to RNG, uptime, and positioning. In a clean melee setup, it can feel close to top tier.
Affliction Warlock brings stable damage over time and strong self-sustain, with a profile that improves when fights allow high uptime and multi-target value. It is the kind of spec that feels better the longer the pull stays alive.
Corruption is a strong baseline that keeps ticking while you deal with mechanics. That makes Affliction feel stable and forgiving in many real raid pulls.
Unstable Affliction adds pressure that scales well with uptime. When a fight is long enough, Affliction’s profile becomes more and more valuable compared to burst-only setups.
Siphon Life reinforces why the spec feels comfortable. You often keep contributing without being forced into defensive downtime.
The A Tier placement is mostly about fight pacing. If bosses die quickly, DoT value can be partially “cut off,” and burst specs can look better. If fights stretch, Affliction can feel excellent.
Fury Warrior is one of the most gear-dependent DPS options early on, but it becomes much stronger when weapon quality and melee support come together. When those pieces click, Fury starts to feel dangerous fast.
Bloodthirst gives Fury its steady core, but that core becomes truly dangerous only when your weapon and stats support it. That is the heart of the spec’s early volatility.
Whirlwind adds strong cleave potential. In the right pulls, Fury can swing a lot of damage quickly, but it still relies on uptime and safe positioning to realize that upside.
Fury benefits heavily from group synergy. With the right melee support, your damage profile becomes more stable and your highs are easier to reproduce.
The A Tier placement is honest about the trade. Fury can perform well, but it usually asks more from your gear and raid structure than S Tier ranged cores.

B Tier specializations can be useful in Phase 1 raids, but their value often comes from role fit, composition needs, and specialized strengths rather than pure damage dominance.
Shadow Priest is a hybrid caster that trades top-end personal damage for meaningful support value that helps certain groups run smoother and more stable on progression.
Shadow Word: Pain and your general DoT profile give you steady output that is easy to maintain through mechanics, which matters even if your ceiling is lower than top-tier casters. Vampiric Touch is the main reason raids consider Shadow, because it supports the group’s ability to keep casting and reduces resource pressure during longer attempts. Mind Blast adds a clear damage button, but Shadow’s identity is less about burst and more about reliable contribution plus support. B Tier reflects reality: Shadow is often wanted not because it will win the meter, but because it makes the group function better in Phase 1.
Frost Mage is comfortable and safe, but it usually lags behind other Mage damage options in early raids, so it is more of a playstyle pick or Utility-oriented choice.
Frostbolt is a straightforward damage button that feels consistent, which can help newer raiders keep output stable while learning mechanics. Ice Lance supports your toolkit but does not change Frost’s Phase 1 issue: other Mage specs often deliver more raw damage in the same environment. Cold Snap reinforces the safe identity, and survivability tools matter on progression nights where one death can end an attempt. B Tier is not a punishment, it is a reminder that Frost is more about control and comfort than being the top damage solution in early raids.
Retribution Paladin is a Utility DPS that can contribute solid damage, but it often relies heavily on weapon strength and is frequently valued for what it adds to the raid beyond meters.
Seal of Command defines Ret’s feel: you bring steady melee pressure with a clear rhythm that is easy to learn and hard to completely derail. Crusader Strike keeps your rotation grounded, and when gear is still developing, having a simple loop is a real advantage for consistent contribution. Ret’s raid value is not only personal DPS, blessings and auras support the whole group, which makes a Ret Paladin a reasonable slot even when top-tier damage specs are preferred. B Tier reflects early reality: Ret can work well, but it usually does not define the raid’s damage ceiling in Phase 1.
Balance Druid can contribute meaningful caster support while dealing damage, but early Phase 1 limitations often show up in efficiency and pacing compared to the best casters.
Wrath and Starfire give Balance a clear loop, but early Phase 1 can expose efficiency issues compared to the top casters. Balance remains interesting because of its group value, and in the right caster setup what you bring can justify the slot even if you are not chasing a top parse. Fight pacing matters a lot here: when encounters end quickly, burst profiles often look better, while Balance tends to prefer steadier windows where it can keep casting and avoid wasted setup time. B Tier signals Balance Druid is playable, but more composition-driven than specs that dominate purely through throughput in Phase 1.
Combat Rogue is a reliable melee spec for steady single-target uptime, but early Phase 1 competition and limited raid Utility often keep it below the top damage cores.
Sinister Strike is simple and dependable, and with strong boss uptime Combat can deliver stable pressure without complicated setup. Slice and Dice is the engine, keep it running and your output stays steady, but when uptime breaks your value drops more noticeably. Adrenaline Rush is a strong cooldown, yet Combat’s placement is influenced by early raid reality: melee competition for spots and positioning issues can be real. Combat Rogue is viable, but B Tier reflects that Phase 1 often rewards ranged cores and high-Utility damage slots first, and if your group is melee-friendly, Combat can still feel excellent.

C Tier specs can still clear Phase 1 raids, but they usually need more uptime, cleaner positioning, and better support to feel as consistent as higher tiers. Think of C Tier as “works with a plan,” not “plug-and-play.”
Arms Warrior can absolutely clear, but it shines most when you treat it like a purpose-driven pick. If your raid is structured and you can keep steady melee uptime, the spec feels sharp and rewarding. If movement and target swaps constantly break your rhythm, damage can swing hard and feel uneven. The best Arms results come from preparation, clean assignments, and a team that helps you stay on target instead of fighting chaos every pull.
Feral Combat Druid is playable, but Phase 1 is a rough window if your raid is messy. The spec rewards a stable single-target rhythm and clean movement, and it punishes constant repositioning by making your output feel demanding. When your group supports your uptime and you can focus on execution, Feral contributes real damage and feels durable and flexible. If you love the playstyle, it is a solid “commit and master it” pick rather than a quick meta shortcut.

D Tier does not mean unplayable. It means Phase 1 rosters rarely prioritize these specs when optimizing early progression, so your success depends more on execution, raid support, and realistic expectations than on the spec carrying you.
Marksmanship Hunter can clear, but it lives under constant comparison pressure because other Hunter options are usually favored early. That makes it a “prove it every pull” spec: you can perform, but you need consistency, clean mechanics, and a group that values the player, not just the letter grade. If you pick MM, do it for preference and comfort, then play to stability and uptime rather than trying to force a top-tier identity in Phase 1.
Assassination Rogue can clear, but Phase 1 optimization tends to treat melee slots as scarce, and that is the real reason it lands in D Tier. If positioning and movement cut your uptime, your output drops fast and can feel underwhelming. It works best when your raid already has its core damage covered and you are filling a slot with a skilled Rogue who plays clean and gets the support needed to stay productive on target.
Subtlety Rogue is the definition of a style pick in Phase 1. It can function, but it wants coordination, clean uptime, and a roster that is not forcing strict “top-only” comps. In organized groups you can still carve out a useful role, but in messy raids the spec feels underwhelming quickly. If you love Sub, treat it as a long-term commitment and measure success by clean clears and consistency, not by chasing S Tier comparisons.

If you are newer to TBC Anniversary raiding, the best DPS choice is usually the one with a high floor: simple rotation, survivability, and consistent damage even when your gear is not perfect.
A stable rotation helps you learn raids faster because you spend less mental load on “what button next” and more on mechanics. Clear cooldown windows make your output more predictable, which matters when you are still learning when to move, when to stop casting, and when to prioritize survival. Raid demand also matters because a spec groups want for Utility or consistency gets invited more often, which means more reps and faster improvement. Finally, low early gear dependence lets you focus on execution first and optimization later, and that path is usually the smoothest for beginners.
Beast Mastery Hunter is beginner-friendly because the rotation is easy to learn and the spec stays useful immediately. Movement matters less for your total output than it does for many casters, so you can focus on mechanics without feeling like every step deletes your damage. Your pet keeps contributing through disruptions, which softens the learning curve while you build raid awareness. Misdirection adds real team value and helps groups run cleaner pulls, which increases your chances of being invited and kept.
Warlock is forgiving because you can keep contributing even when the fight is not perfect. Destruction gives you a very clear casting loop, while Affliction rewards steady uptime and multi-target value, and both options bring strong raid Utility plus personal survivability that helps on early progression. You also benefit from having multiple viable paths: if your raid wants more burst, Destruction fits, and if fights favor longer pressure, Affliction can feel excellent. That flexibility is why Warlock is repeatedly listed among the best beginner DPS choices in TBC Anniversary.
Retribution Paladin is beginner-friendly because it is hard to completely break your rotation, so you can focus on staying alive and doing mechanics. Durability matters in early progression because surviving and maintaining uptime often produces more real value than chasing risky damage. Raid support tools help your slot feel justified even when your personal DPS is not competing with top cores, which reduces pressure while you learn. If you want a melee DPS that is straightforward and still clearly useful, Ret is a solid starting point.
Frost Mage is beginner-friendly because it is comfortable and controlled, with a clean ranged loop and a toolkit that helps you recover from mistakes. Control and survival reduce wipe risk, which helps you learn faster and keeps groups willing to bring you. Cold Snap supports the safe identity by giving you options when you need to stabilize. If you want a calm learning experience that still contributes meaningful DPS, Frost remains a practical entry point.
Feral Druid is often recommended for beginners who want flexibility and a class that can stay useful even when your raid is still finding its rhythm. Even if Cat DPS is not always the easiest slot in early raid optimization, Feral brings strong survivability and adaptability that matters when your group composition changes week to week and assignments shift mid-progression. That flexibility helps you keep real value on pulls while you build fundamentals like positioning, uptime discipline, and mechanic awareness, and as you improve you can push the spec further with cleaner execution and tighter pacing. The learning curve is real, but the path feels rewarding rather than punishing, which makes Feral Druid a solid starting place in TBC Anniversary.

This FAQ focuses on the questions players usually ask when they search for a TBC Anniversary DPS tier list: what to play, how much gear matters, whether melee is viable, and how stable rankings are across phases.
The strongest early picks are usually the ones that bring both damage and raid Utility, so they remain wanted even when your roster changes week to week. Short fights reward burst and clean cooldown timing, which is why several S Tier specs are described as dominant early on: their power shows up fast, without needing a perfect setup. Raid demand is also part of “best” - if groups repeatedly want a spec for Reliability or Utility, you get more invites and more progression reps. Finally, specs that feel good without perfect gear let you start raiding sooner, and that early momentum often matters more than theoretical late-phase ceilings.
Lower tier specs are viable, meaning they can clear raids, but they more often rely on extra gear, stronger support, or encounter-specific advantages to stand near S Tier and A Tier results. The key difference is the cost: a top-tier pick tends to work well in many groups, while a lower-tier pick usually asks for a better environment to show the same output. Encounter details and composition needs can still create moments where an off-meta pick feels excellent, and a coordinated raid with skilled players can make almost any spec work when the roster is not trying to be maximally optimized on every slot.
Gear matters, but in early phases the class and spec choice often has a bigger impact than small gear differences, because the game’s first gear window magnifies spec strengths and weaknesses. Some specs convert basic raid gear into strong results immediately, which is why they rank higher early even before full optimization. Other specs scale better later - that does not make them bad, it just means their best moment arrives after more raid tiers and stronger itemization are available. Use the tier list to choose what will feel strongest right now, then adjust as the gear environment evolves.
Melee DPS is viable, but early raids add extra constraints: positioning, mechanics, and competition for melee slots can reduce uptime compared to ranged cores. Because melee spots can be limited, specs that bring more raid value or scale well with the right buffs tend to be prioritized first. Group setup changes everything: with proper support, picks like Fury Warrior and Combat Rogue can perform much better in practice. If you play melee, focus on uptime discipline and movement planning - those two skills often matter more than small gear differences early on.
DPS rankings change as new raid tiers and gear become available, and some specs scale more strongly into later phases, allowing them to move up. Phase 1 often rewards burst and immediate efficiency, while later phases can reward sustain, longer fights, and stronger Scaling curves. Tier lists are snapshots, not permanent truth, and the same spec can be mid-tier now and top-tier later if its Scaling profile matches upcoming gear. If you are planning long-term, pick something you enjoy, then track how your performance evolves as itemization improves.
The best way to use a TBC Anniversary DPS tier list is to combine it with your personal strengths. If you play a meta spec but do not enjoy it, your execution will suffer and your real output will drop. If you play a lower-tier spec with strong uptime and discipline, you can still be valuable in organized raids.
For Phase 1, prioritize specs that feel reliable, scale well in early gear, and bring Utility that keeps groups inviting you. If your goal is fast progression, build around S Tier cores. If your goal is comfort and growth, beginner-friendly picks can be the smartest path.
As the raid landscape evolves, revisit your choices. Rankings can shift as new content and stronger gear arrive, so treat your spec decision as a living plan rather than a one-time bet.