
Ritual in Path of Exile 2 is simple to start and deep to master: kill inside the circle, resurrect the pack, and spend Tribute on a rolling shop of rewards. The real game is decision-making - revealing every offer, banking Tribute, and leveraging free rerolls to force high-tier outcomes like rare Omens, Currency, and Uniques. This guide takes a practical, step-by-step approach so you can turn every altar into steady profit, not just a burst of luck.
Below you’ll find everything you need to run Ritual at a high level: clear rules for when to buy, defer, or reroll; a recommended Atlas tree; the most effective tower/waystone setup for stacking pack size and free rerolls; and a complete reward table with costs, tiers, and minimum zone levels. We close with an overview of the King in the Mists pinnacle fight and its unique drops, so your farm doesn’t stop at the altars.
Your first brush with the Ritual mechanic happens early in your journey, during Act 1, where the game provides a gentle introduction to its core gameplay loop. The concept is designed to be very simple and intuitive from the start. As you explore, you will come across a distinct circle on the ground with an altar at its center. To initiate the event, your task is to first defeat the monsters located inside this marked area, after which you can interact with the altar to begin the true challenge.

Once activated, the monsters you killed earlier will be resurrected, and you will need to defeat them again. For this, you will be awarded Tribute points. After you clear all the monsters, the altar will drop loot and the Ritual reward window will become available, where you can spend the points you've earned.
It's important to understand that the Ritual resurrects all monsters killed within the marked circle, even those that were not originally there. This means you can even resurrect enemies like Rogue Exiles or Unique Bosses from a Delirium encounter.
Below is a breakdown of the various Ritual types you will encounter, along with a description of the affixes each one presents:
Players can be incredibly thankful for the changes introduced in patch 0.2.1, which significantly nerfed the Ritual abilities. Before this crucial adjustment, the mechanics were notoriously lethal; statistics showed they were responsible for more than half of all player deaths.
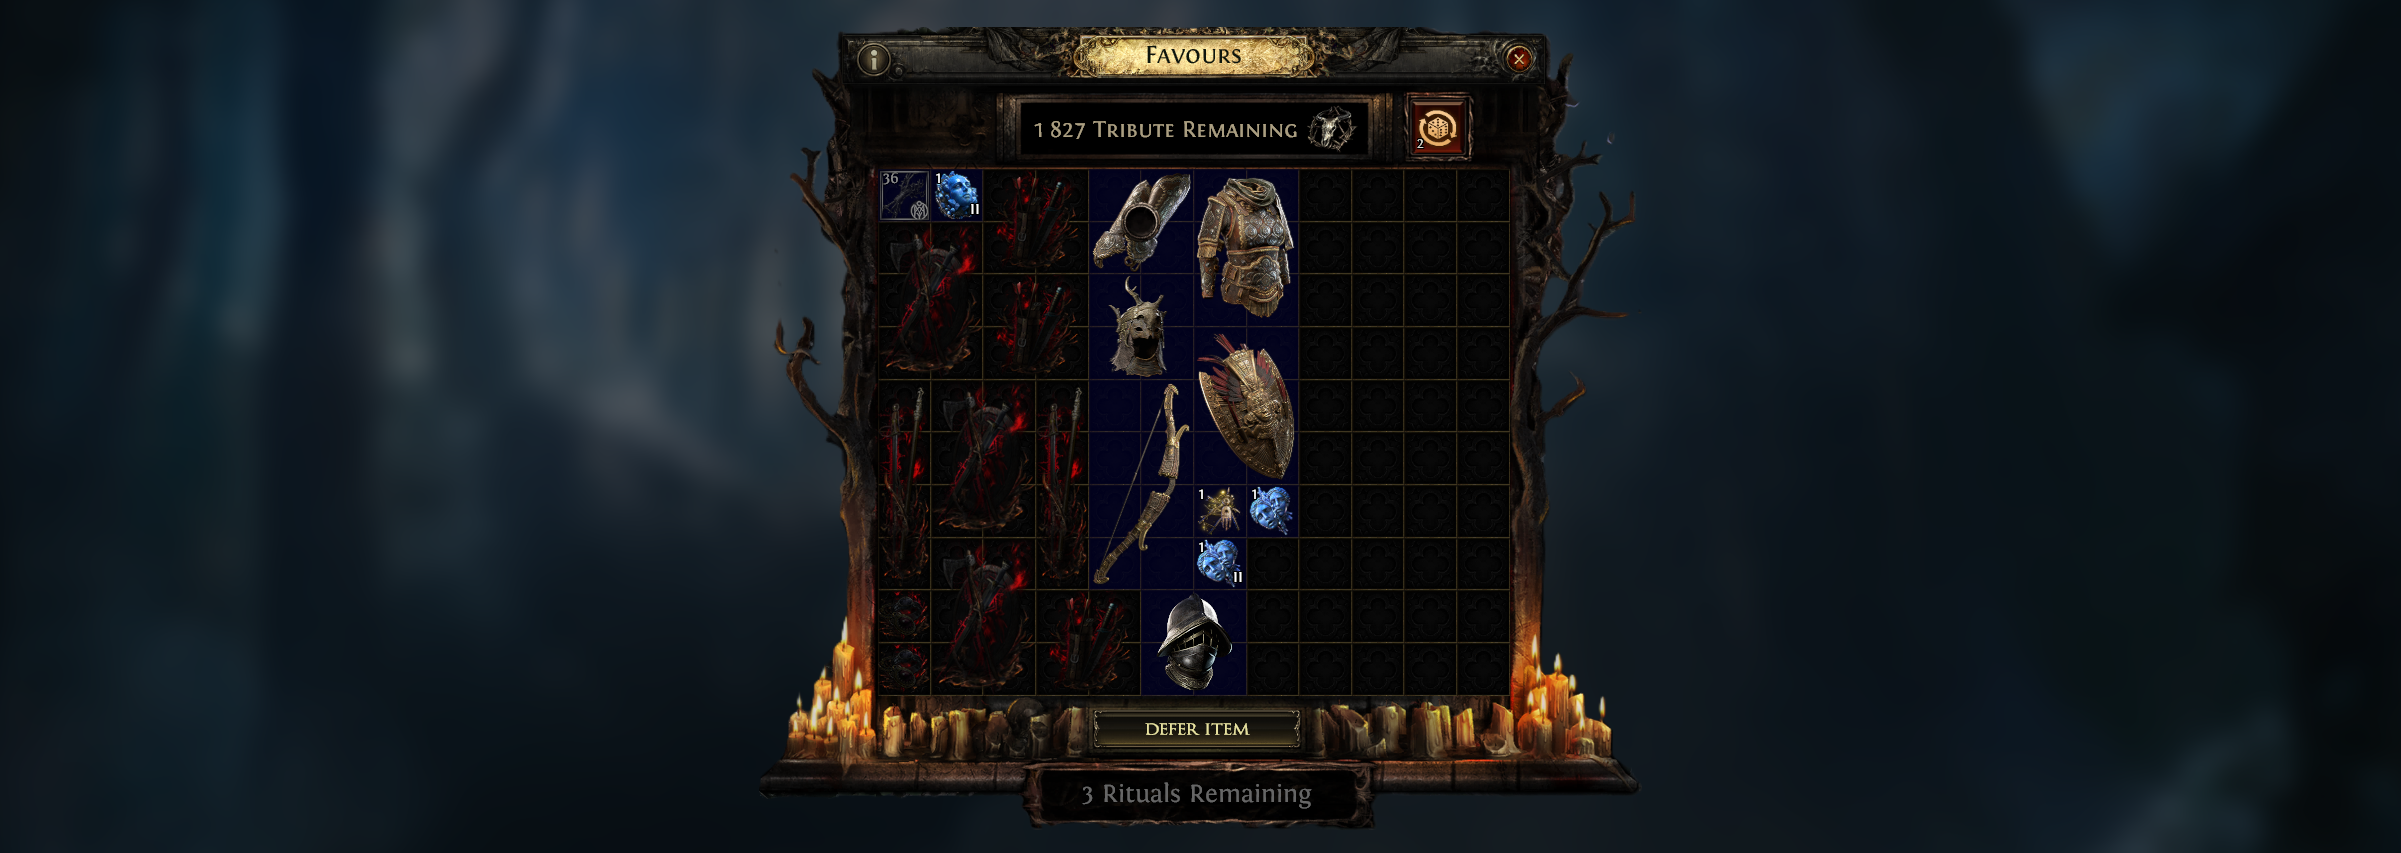
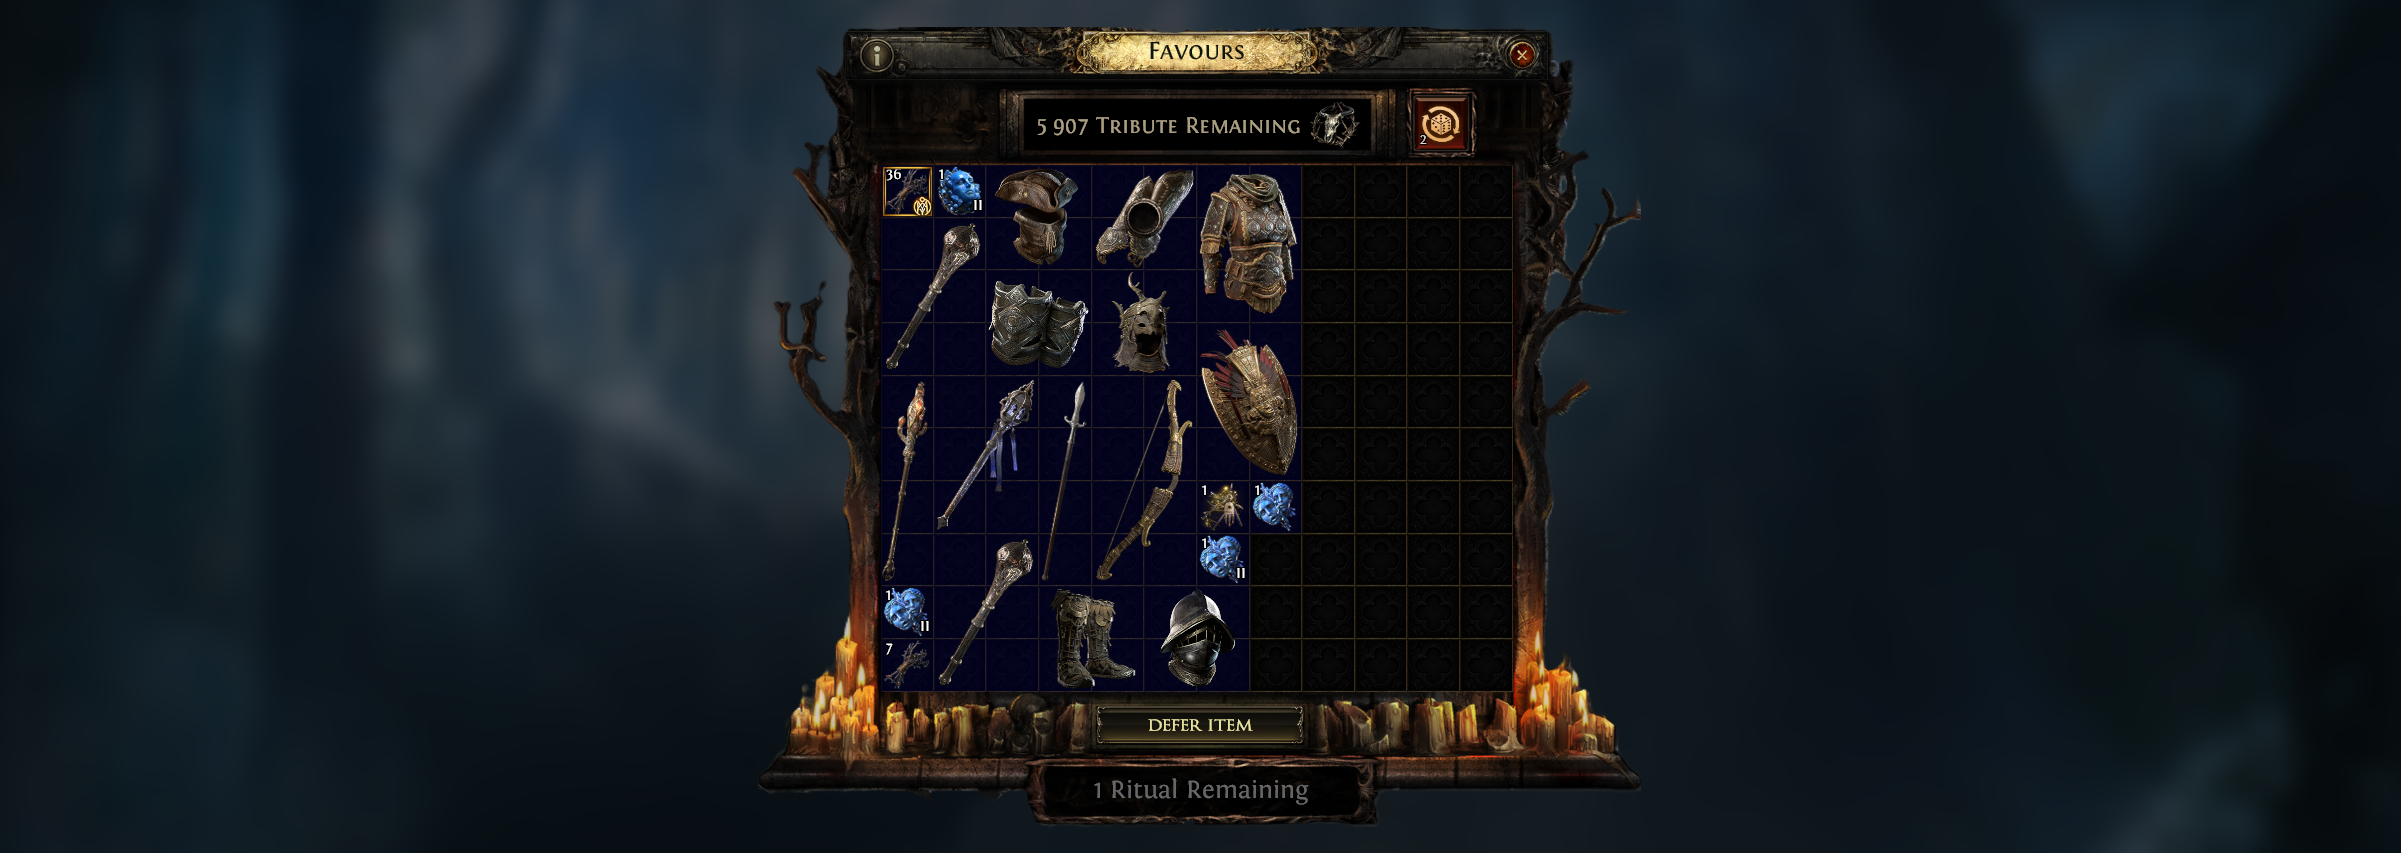
Favours Window
Reveal Items

Defer
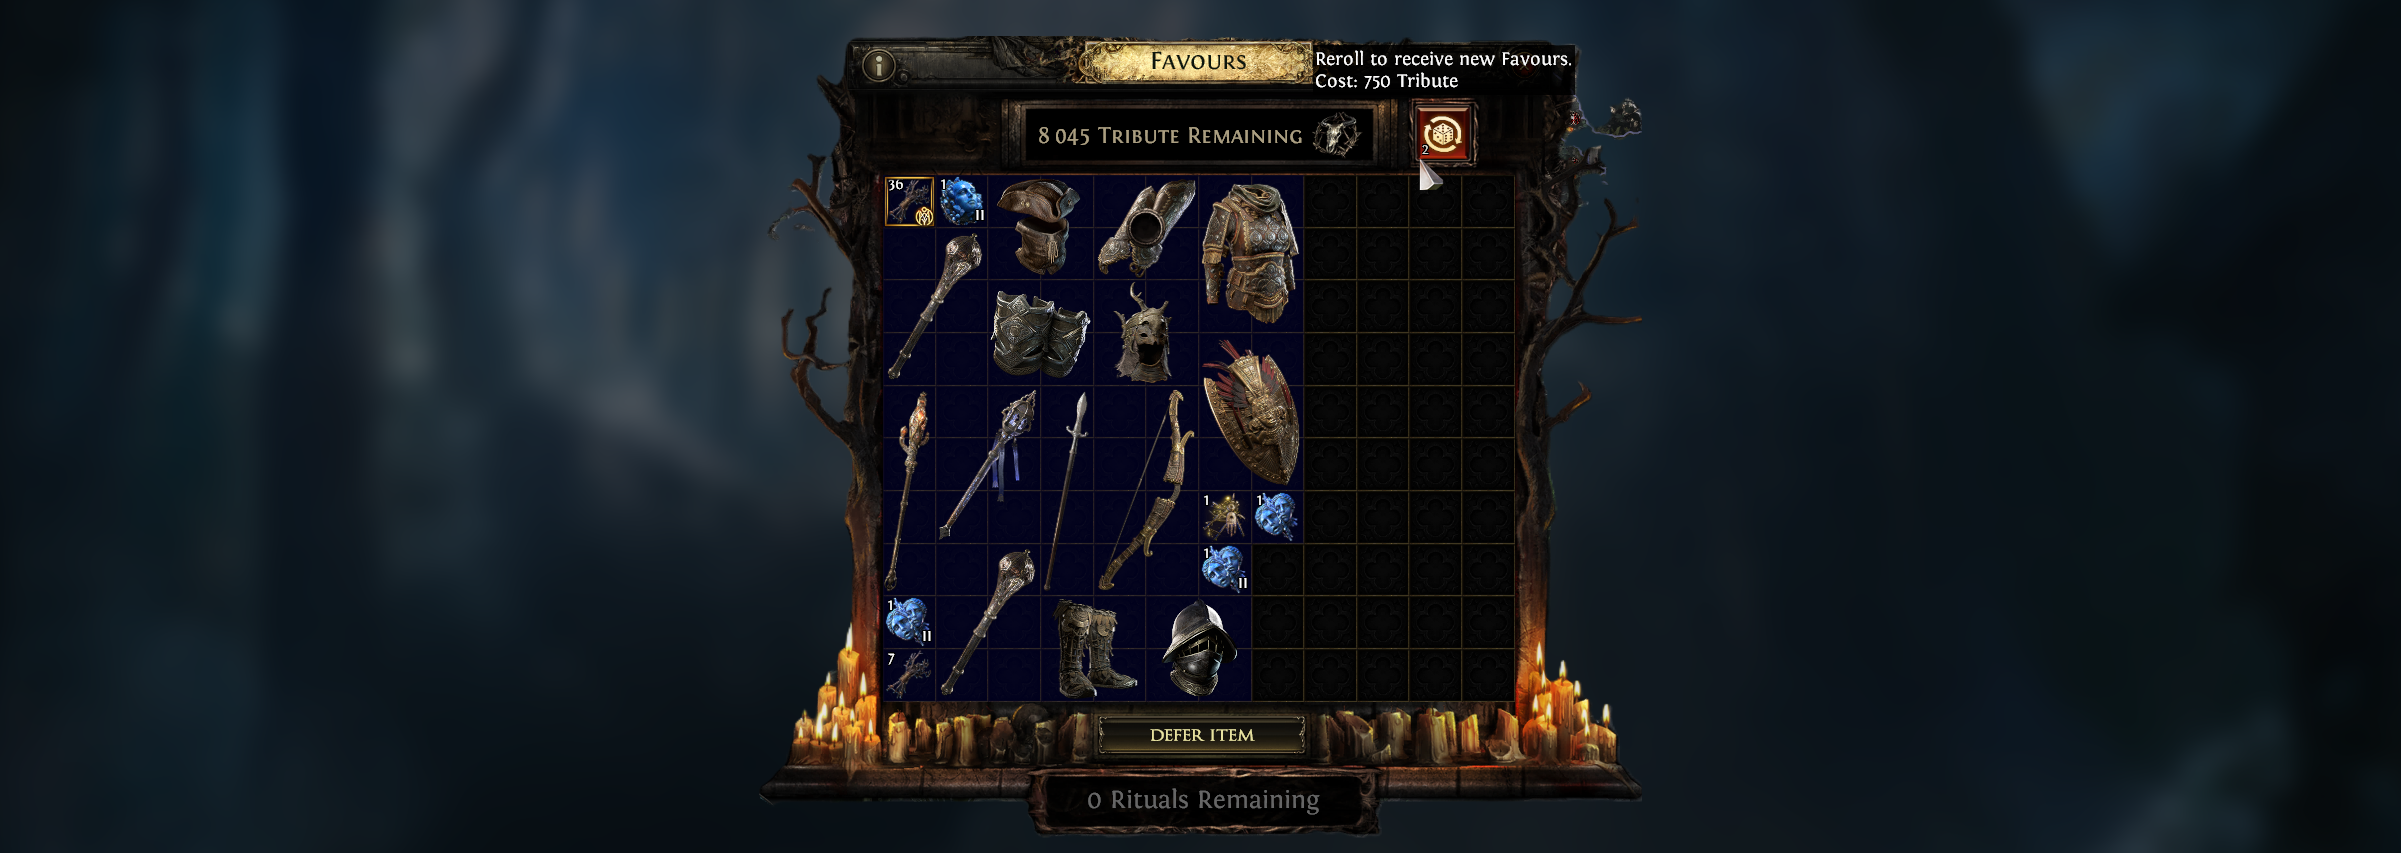
Reroll
Let's now take a more detailed look at how the Ritual rewards window functions and explore the most effective ways to spend your hard-earned Tribute points.
First, although you can open the window after completing just one ritual, most of the rewards will remain hidden. To reveal all of them, you must complete at least three rituals in a map. While it's technically possible to use a reroll after the first ritual to reveal all the items, it’s generally not worth doing. This is because the rarest and most valuable rewards typically remain hidden until you've completed more rituals.
Once you have completed at least three rituals and all the rewards are visible, you need to decide how to spend your Tribute. You have three options:
There are many ways to increase your chances of finding a very valuable item in Ritual. The amount of Tribute you gain from monsters, the number of rerolls and their cost, and even the number of Rituals on a map are all affected by various modifiers, which we will discuss later.

The Ritual passive tree doesn't require much deep thought, as most of the choices are obvious and some nodes are simply stronger than others. Let's take a closer look at the recommended version of the passive tree, as shown in the image above.
Tempting Offers - As mentioned before, the chance of getting valuable loot is directly linked to the number of times you can reroll. For this reason, this node is your unquestionable first choice. The 25% reduction in reroll cost is also a very nice bonus, especially before your character is strong enough to run maps with heavy investment and many modifiers.
Ominous Portents - Rare Omens are a primary reason we want to run Rituals in the first place, so increasing their chance of appearing by 100% is a very significant bonus. The more Omens you are offered, the more likely one of them will be valuable. Additionally, this node helps you clear Rituals faster by making the monsters spawn more quickly.
Promised Devotion - This is a very important node that allows you to consistently and reliably defer the rarest Omens, whose cost can be as high as 29,000 Tribute points. With this node, the discount you get when the deferred item reappears is greater than the initial cost of deferring it. Furthermore, it causes deferred items to show up again 50% sooner. Despite its downside - making Ritual abilities deal 25% more damage - this node is a mandatory pick.
Spreading Darkness - This is the only node for which you could find an alternative. However, in practice, it has proven to be the most powerful option because having a guaranteed four Rituals on your map simply generates more Tribute than the alternatives, such as From the Mists or He Approaches.
From The Mists - While intended to increase the amount of Tribute you earn by adding two packs of Wildwood Monsters, this previously mentioned node falls short in practice. It consistently generates less Tribute than a guaranteed fourth Ritual, especially on maps with high pack size.
Reinvigorated Sacrifices - Removing the Tribute penalty from revived monsters comes at a cost, as this node also makes them stronger and more damaging each time they are revived. While the effect is potentially useful, its position on the tree makes it an inefficient choice, as you are forced to path through a less desirable node to reach it.
Between Two Worlds - Spawning a Wildwood Wisp at each Ritual Altar is the sole function of this node. Unfortunately, after allocating points to all the mandatory and high-priority passives, there are simply no points left over for it in any practical build.
He Approaches - The intention behind this node is to increase the Tribute granted by making revived monsters more likely to be Magic or Rare. The trade-off, however, is a significant increase in difficulty, making it a less reliable method for gaining Tribute than the guaranteed income from a fourth Ritual site.
As with any other league mechanic in Path of Exile 2, there are ways to increase the quality and quantity of loot from Ritual. We will now break down the most effective and popular method currently available.
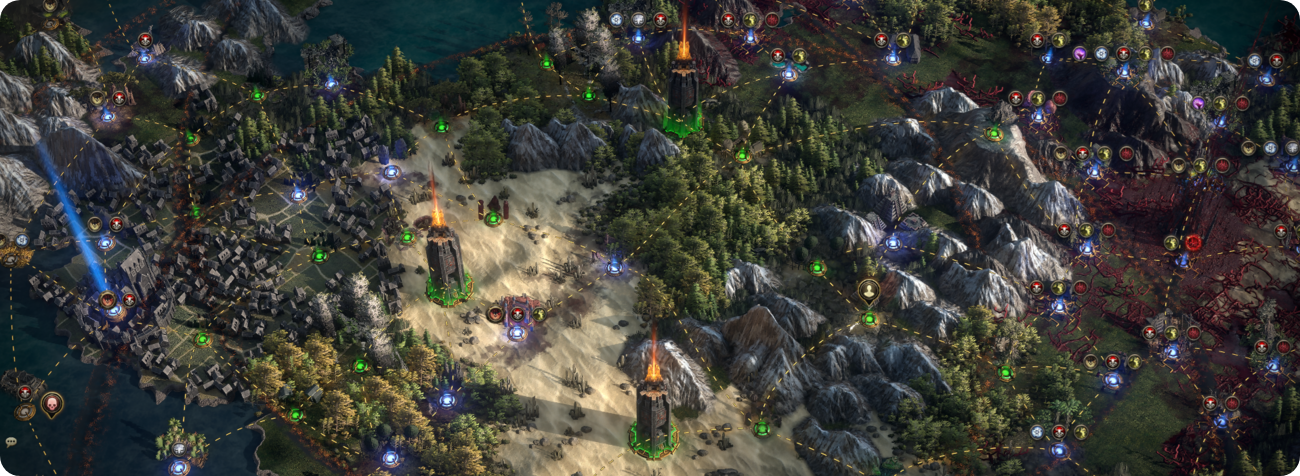
Before you begin, it is highly recommended that you find a region on the World Map where at least two, and preferably three, towers are located, similar to what is shown in the picture. Ideally, there should be as many accessible maps as possible around these towers, especially in the spot where their effects overlap. Try to avoid areas where the towers are surrounded by water.
The concept behind improving your loot in Ritual is extremely simple: you want to increase the number of available rerolls as much as possible. To achieve this, we will need several types of Ritual Precursor Tablets and Precursor Tablets, as well as a carefully planned Atlas Skill Tree.
To make it easier, we've linked searches for these tablets with perfect rolls. The best ones won't be cheap, but believe us when we say they are well worth the cost and you'll make your currency back. If you're looking to save a bit, feel free to tweak the search criteria to find a version that's more affordable for you.

In addition to increasing the number of rerolls, to maximize farming efficiency, we want to get the largest possible amount of Tribute points. The best way to do this is by increasing pack size, not only on tablets but also on the waystone you use.
You can simply purchase such waystones, but it is much cheaper to craft them yourself, especially since it is very simple. To do this, you will need any waystone that already has six random modifiers. After that, you'll want to use a Chaos Orb on this waystone while an Omen of Chaotic Quantity is active. This will reroll all existing modifiers on the waystone into ones that grant increased pack size.
As for the oils we want to anoint on our waystone, the optimal choice is Diluted Liquid Guilt, which will give us another 24% increased pack size on the map. By meeting these requirements, pack size on your map can reach 200-300%, which will give you an average of about 10,000 Tribute points.
Considering that the Omen of Chaotic Monsters and Diluted Liquid Guilt are very cheap consumables, farming Ritual is an extremely inexpensive but very effective farming method. The only things you will have to spend a bit on are the tablets and the time it takes to find the towers.

The Atlas tree for farming Ritual is quite standard and doesn't differ much from those used for farming other mechanics. The key idea is to maximally enhance the effect of the tablets that affect our maps, which will allow us to get even more rerolls that will also be free. It also involves enhancing the effects of the waystones themselves, which will allow us to stack even more pack size.
While the nodes described above are simply too strong and must be taken, we are left with about 10 "free" points for the remaining nodes, which you can spend at your discretion. We recommend increasing the pack size even further, so it's advisable to take the nodes located closer to the bottom-left corner of the tree. However, since you might have enough pack size without them (thanks to having many towers and well-crafted waystones), you can experiment and pick up other mechanics on the tree.
Strongboxes are likely a suboptimal choice for investment, primarily because their rewards are heavily dependent on the "Quantity of Items Found" modifier on your maps, a stat that this particular strategy doesn't focus on stacking. In contrast, the other available mechanics can be genuinely considered as viable methods for supplementary farming, as they provide their own consistent value and self-contained rewards regardless of map quantity.

Let’s briefly recap the core concept of Ritual and how to get the best rewards. At its heart, Ritual loot is a Tribute-management puzzle. Your earned Tribute is the budget you spend on rare items and Omens, and your chance of seeing something truly valuable scales directly with the number of rerolls you can perform.
Summary: reveal everything, bank Tribute, defer smartly, and reroll aggressively. That loop turns your Tribute into top-tier rewards. The complete list of items - with tiers, cost ranges, and minimum zone levels - is in the table below.
| Cost | Minimum Zone Level | Item | Description | |
|---|---|---|---|---|
 |
From 90 to 270 | 1 | Omen of Resurgence | While this item is active in your inventory fully recover your Life, Mana and Energy Shield when you reach Low Life |
 |
From 90 to 270 | 1 | Omen of Refreshment | While this item is active in your inventory will fully recover your flask and charm charges when you reach Low Life |
 |
From 90 to 270 | 1 | Omen of Greater Exaltation | While this item is active in your inventory your next Exalted Orb will add two random modifiers |
 |
From 90 to 270 | 1 | Omen of the Ancients | While this item is active in your inventory your next Orb of Chance will upgrade the Item to a random Unique of the same Item Class |
 |
From 90 to 270 | 1 | Omen of Bartering | While this item is active in your inventory your next sold item's Gold value will be incorrectly assessed by the Vendor |
 |
From 90 to 270 | 1 | Omen of Gambling | While active, your next Gamble purchase has a 50% chance to cost no Gold and not consume this Omen |
| From 90 to 270 | 1 | Orb of Transmutation | Upgrades a Normal item to a Magic item with 1 modifier | |
 |
From 90 to 270 | 1 | Orb of Augmentation | Augments a Magic item with a new random modifier |
| Cost | Minimum Zone Level | Item | Description | |
|---|---|---|---|---|
| From 180 to 520 | 72 | Perfect Orb of Transmutation | Upgrades a Normal item to a Magic item with 1 modifier | |
|
From 180 to 520 | 72 | Perfect Orb of Augmentation | Augments a Magic item with a new random modifier |
 |
From 180 to 520 | — | Magic Equipment | Random Magic item |
 |
From 180 to 520 | — | Tier 5 Unique Items | — |
 |
From 180 to 520 | 1 | 3-6x Petition Splinter | Consume at least 50 Splinters at the Realmgate to travel to the Crux of Nothingness |
 |
From 180 to 520 | 1 | Omen of Chaotic Rarity | While active, your next Chaos Orb will replace all Waystone modifiers with ones that grant Item Rarity |
 |
From 180 to 520 | 1 | Omen of Chaotic Quantity | While active, your next Chaos Orb will replace all Waystone modifiers with ones that grant Pack Size |
 |
From 180 to 520 | 1 | Omen of Chaotic Monsters | While active, your next Chaos Orb will replace all Waystone modifiers with ones that grant Rare and Magic Monsters |
| Cost | Minimum Zone Level | Item | Description | |
|---|---|---|---|---|
 |
From 270 to 780 | 1 | Omen of Corruption | While active, your next Vaal Orb will always result in change |
 |
From 270 to 780 | 1 | Omen of Amelioration | While active, prevents 75% of Experience loss on death |
 |
From 270 to 780 | 1 | Omen of Dextral Exaltation | While active, your next Exalted Orb will add only suffix modifiers |
 |
From 270 to 780 | 1 | Omen of Sinistral Exaltation | While active, your next Exalted Orb will add only prefix modifiers |
 |
From 270 to 780 | 5 | Regal Orb | Upgrades a Magic item to a Rare item, adding 1 modifier |
 |
From 270 to 780 | 5 | Exalted Orb | Augments a Rare item with a new random modifier |
 |
From 270 to 780 | — | Uncut Gem | Uncut Skill, Spirit, or Support Gem |
 |
From 270 to 780 | — | Magic Waystones | Map-affecting Waystone (magic rarity) |
 |
From 270 to 780 | — | Rare Equipment | Random Rare item |
|
From 270 to 780 | — | Tier 4 Unique Items | — |
| Cost | Minimum Zone Level | Item | Description | |
|---|---|---|---|---|
 |
From 900 to 2600 | 75 | Omen of Homogenising Coronation | While active, your next Regal Orb adds a modifier of the same type as an existing one on the item |
 |
From 900 to 2600 | 1 | Orb of Alchemy | Upgrades a Normal item to a Rare item with 4 modifiers |
 |
From 900 to 2600 | 1 | Vaal Orb | Modifies an item unpredictably and Corrupts it |
 |
From 900 to 2600 | 1 | Chaos Orb | Removes a random modifier and adds a new one to a Rare item |
|
From 900 to 2600 | 72 | Greater Exalted Orb | Augments a Rare item with a new random modifier (min. modifier level 35) |
|
From 900 to 2600 | — | Rare Waystones | — |
|
From 900 to 2600 | — | Tier 3 Unique Items | — |
| Cost | Minimum Zone Level | Item | Description | |
|---|---|---|---|---|
 |
From 1800 to 5200 | 75 | Omen of Whittling | While active, your next Chaos Orb removes the lowest level modifier |
 |
From 1800 to 5200 | 75 | Omen of Chance | While active, your next Orb of Chance will not destroy the item |
 |
From 1800 to 5200 | 12 | Orb of Chance | Randomly upgrades a Normal item to Unique or destroys it |
 |
From 1800 to 5200 | 35 | Orb of Annulment | Removes a random modifier from an item |
 |
From 1800 to 5200 | 35 | Divine Orb | Randomises the numeric values of modifiers on an item |
 |
From 1800 to 5200 | 75 | Omen of Homogenising Exaltation | While active, your next Exalted Orb adds a modifier of the same type as an existing one on the item |
 |
From 1800 to 5200 | 75 | Omen of Catalysing Exaltation | While active, your next Exalted Orb adds a Catalyst-compatible modifier and consumes all Catalyst Quality to boost the outcome |
 |
From 1800 to 5200 | 75 | Omen of Sinistral Crystallisation | While active, your next Essence application will remove only Prefix modifiers |
 |
From 1800 to 5200 | 75 | Omen of Dextral Crystallisation | While active, your next Essence application will remove only Suffix modifiers |
 |
From 1800 to 5200 | 75 | Omen of Recombination | While active, your next Recombination is Lucky (rolls twice, keeps the better result) |
|
From 1800 to 5200 | — | Tier 2 Unique Items | — |
| Cost | Minimum Zone Level | Item | Description | |
|---|---|---|---|---|
 |
From 12000 to 29000 | 80 | Omen of Dextral Erasure | While active, your next Chaos Orb removes only suffix modifiers |
 |
From 12000 to 29000 | 80 | Omen of Sinistral Erasure | While active, your next Chaos Orb removes only prefix modifiers |
 |
From 12000 to 29000 | 80 | Omen of Dextral Annulment | While active, your next Orb of Annulment removes only suffix modifiers |
 |
From 12000 to 29000 | 80 | Omen of Sinistral Annulment | While active, your next Orb of Annulment removes only prefix modifiers |
 |
From 12000 to 29000 | 80 | Omen of Sanctification | While this item is active in your inventory your next Divine Orb used on a Rare item will Sanctify it |
 |
From 12000 to 29000 | 80 | Omen of the Blessed | While this item is active in your inventory your next Divine Orb will only reroll Implicit Modifiers |
 |
From 12000 to 29000 | 35 | Mirror of Kalandra | Creates a Mirrored copy of an item (cannot be modified) |
|
From 12000 to 29000 | — | Tier 1 & Tier 0 Unique Items | — |

As with other mechanics, to access the Ritual Pinnacle Boss you will need to collect or purchase a specific amount of a special currency. You will need Petition Splinters in quantities of 50, 100, or 150, corresponding to the difficulty level you wish to attempt.
The King in the Mists himself is not the most difficult, but not the simplest boss either. Particular problems may arise for builds designed to one-shot bosses, because he has two distinct phases. Let's take a closer look at the abilities you should watch out for to make the fight easier, at least until you become strong enough to kill him instantly.
Phase 1:
Phase 2:
When you reduce the boss's health to approximately 25% during the first phase, an intermission begins. You will be transported to a labyrinth and must find the exit to return to the arena. To help you, Wisps of Light will appear as you progress, guiding you in the right direction. Almost immediately, the maze will begin to fill with Branching Affliction, a damaging ground effect that deals both physical and chaos damage to you while you stand in it. The entire labyrinth will be completely filled in just over a minute, so you must move quickly.
In phase one, the various mechanics only appear when a Mystic Fetish is active; in phase two, they are permanently active in the boss arena. In addition to the abilities the boss used in phase one, he gains another deadly skill:
If you can feel relatively comfortable during the first phase, you will want to end the second phase as quickly as possible, because there are too many overlapping mechanics in the arena.
In addition to one guaranteed Unique Item from the boss's specific loot table, you can also receive random Omens, including the rarest ones. And just like with all other Pinnacle bosses, always check the rest of the items he drops, as they can be valuable crafting bases that you can either use yourself or simply sell.
| Required Level | Item | Description | |
|---|---|---|---|
 |
1 | From Nothing | Passives in Radius of "Keystone" can be Allocated without being connected to your tree Corrupted |
 |
33 | Ingenuity | (-20-20)% increased Charm Charges Gained (-10-10)% reduced Charm Charges Used (20-30)% increased bonuses gained from Equipped Left Ring (20-30)% increased bonuses gained from Equipped Right Ring |
 |
52 | Beetlebite | (20–30)% increased Movement Speed (60–120)% increased Evasion and Energy Shield Aggravate Bleeding on Enemies when they Enter your Presence 100% increased Thorns damage |
 |
55 | Pragmatism | (200-300)% increased Armour and Evasion +(10-20)% to all Elemental Resistances -17% to Chaos Resistance Charms use no Charges |
 |
72 | The Burden of Shadows | (20-30)% increased Cast Speed Skill Mana Costs Converted to Life Costs Skills gain 1% of Damage as Chaos Damage per 3 Life Cost |
 |
— | Ritualistic Reliquary Key | Open a Reliquary portal by using this item at The Reliquary Vault. Can only be used once. |