
Breach in Path of Exile 2 is chaotic to behold yet rewarding to master: trigger a grasping hand, unleash an onslaught of monsters, and grab as much loot as possible before the rift snaps shut. The real challenge lies in optimization – keeping the Breach open longer, spawning multiple Breaches per map, and leveraging Atlas upgrades to turn each incursion into a shower of Catalysts, Currency, and coveted Uniques. This guide takes a practical, step-by-step approach so you can transform every Breach from a frantic melee into a reliable jackpot.
Below you’ll find everything you need to run Breach at a high level: guidelines for surviving and maximizing your kills, a recommended Atlas passive tree, the optimal tower & tablet setup for stacking monster count and loot quantity, and a full breakdown of Breach-specific rewards (including all Catalysts and boss drops). We close with an overview of the Twisted Domain pinnacle encounter against Xesht, We Who Are One and its unique loot, ensuring your Breach farm leads to a true endgame payoff.
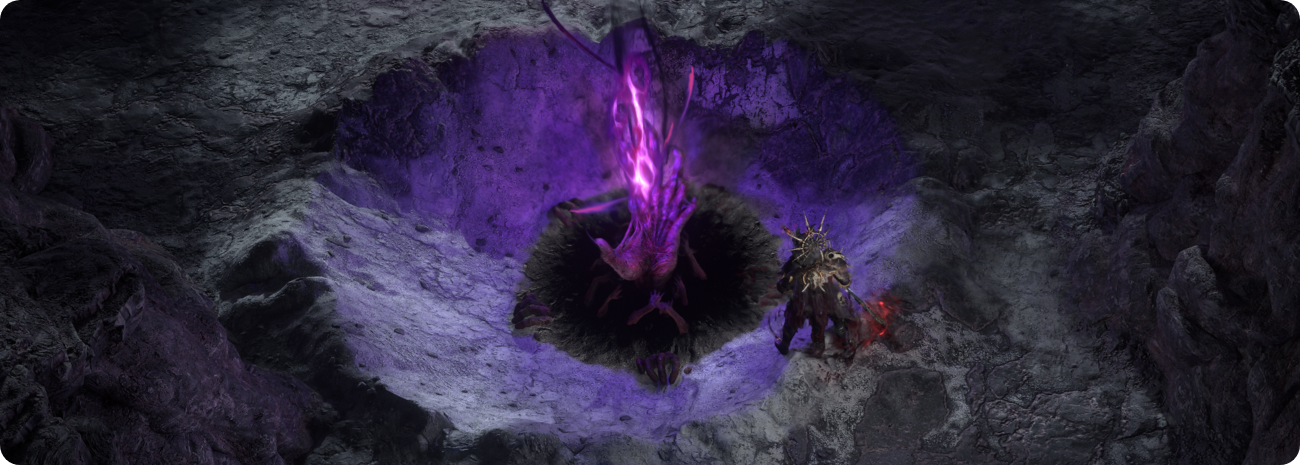
Breach is primarily an endgame mechanic, encountered on the Atlas (it can occur naturally on some maps or be added via towers). You’ll know a Breach by the large purple hand-like monolith protruding from the ground. Touch it, and the Breach event begins: a circle of otherworldly energy expands outward, temporarily flooding the area with monstrosities from another realm. Hordes of enemies – ranging from swarms of whites to numerous Magic and Rare Breach foes – spawn within the circle, attacking relentlessly.
A breach is a timed event that will collapse shortly after opening. Your main objective is to defeat as many monsters as you can before it closes. The more creatures you eliminate within this window, the more Breach Splinters you will receive when the breach closes. Scattered throughout are glowing Clasped Hands – organic chests that can be “opened” just by moving near them. These hands drop extra loot and, importantly, additional Breach Splinters. After a short time, the Breach will collapse: any remaining monsters vanish, and you’re free to collect the spoils.
There are no different “types” of Breach in PoE2 as there were in the past – a single Breach can spawn a mix of deadly elemental and physical enemies. Be mindful: Breach mobs can deal heavy damage in large numbers. However, improvements in recent patches and the availability of Atlas passives have made Breaches more manageable than they once were. Play tactically and you’ll not only survive, but also reap massive experience gains and loot from each successful Breach.

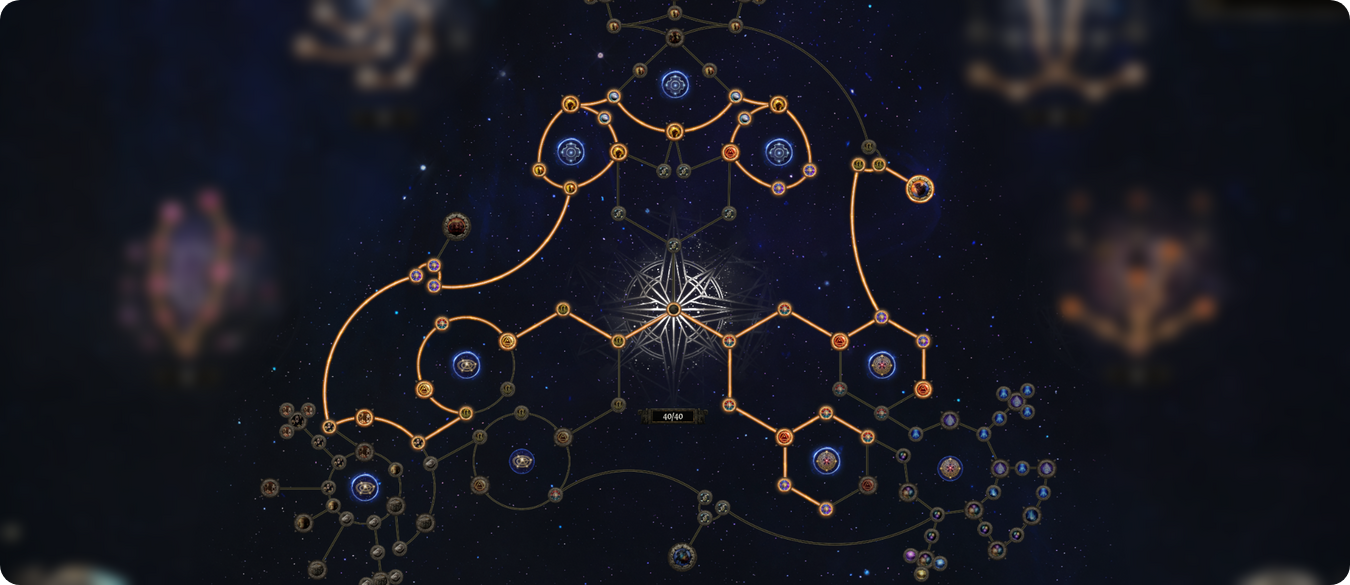
The Breach section of the Atlas passive tree contains several powerful nodes that dramatically increase your rewards. Most of the choices are straightforward – some notables are simply stronger than others. Below is the recommended setup (as shown in the image) for maximizing Breach farming.
Crumbling Walls – Arguably the most powerful and sought-after node you can take, Crumbling Walls massively increases the potential of every map. It grants a 10% chance to spawn an additional Breach, a 3% chance for three extra Breaches, and even a 1% "jackpot" chance for ten additional Breaches. When you're already investing heavily in your maps, the possibility of this explosive boost to monster density is an incredible and valuable bonus.
Xesht's Madness – This option introduces a classic high-risk, high-reward dynamic to your Breaches. It grants rare Breach monsters the formidable "Soul Eater" modifier, making them significantly tougher. In return for the added danger, you gain a 10% chance for a single Catalyst drop to become a full stack of ten. While the empowered monsters are a real threat, they also yield better loot. And for players using a Headhunter belt, this node is a double-win, as you can steal those powerful buffs for yourself.
Frantic Invasion – While many see this node as just a stepping stone to the one behind it, Frantic Invasion is a solid choice in its own right. Its main benefit is a 40% increase to Breach Splinter drops. This provides a consistent stream of currency, especially valuable if you run the pinnacle Breach content yourself instead of just selling the fragments. Be aware of the trade-off, however: all Breach monsters will hit 20% harder.
Rising Pyre – And here is the main prize we've been pathing towards. Rising Pyre offers a simple, powerful, and purely positive effect: it increases the monster density within your Breaches by 25%. There are no downsides. More monsters mean more loot, more experience, and more chances at valuable rewards, making this a cornerstone for any Breach-focused strategy.
Grasping Hands – This node, which increases the number of "Clasped Hands" in your Breaches, was once a staple in every Breach farming strategy. However, its value has plummeted following significant nerfs to Breach Ring drop rates. Considering that splinters are only a minor bonus and the hands themselves rarely drop anything significant since the patch 0.2.0 overhaul, this passive is no longer a recommended pick.
Waking Nightmare – Offering a 60% chance to double the splinters from Clasped Hands, this node seems tempting at first glance. The catch, however, is a harsh one: opening a hand applies a stacking "Waking Nightmare" debuff, increasing your damage taken and shrinking your vision radius. Since our primary goal isn't simply to farm more splinters, the significant risk and annoyance introduced by the debuff far outweigh the minor potential reward, making it an easy skip.
Sustained Siege – This particular node causes Breaches to open and close 30% slower. While having more time in the Breach might sound beneficial, the node offers no benefit whatsoever to loot quantity or rarity. The core issue is that you're spending significantly more time on a single encounter without any additional reward. This drastically hurts your overall farming efficiency. However, if your build is on the slower side and struggles to clear out all the monsters before a normal Breach closes, the extra time might allow you to kill more than you otherwise would. It's worth testing in that specific scenario, but for most builds, it's a significant time-waster.
Interdimensional Assault – At first glance, Interdimensional Assault looks like a decent contender for our passive points. It boosts the monster density of Breaches, which is always welcome. The trade-off is that the Breach itself will close 30% faster, giving you less time to clear it. Ultimately, we simply don't have the points to spare for it, especially when the alternative, Rising Pyre, offers a powerful density boost with no downside at all. It's a good node, but it gets outclassed.
For Breach farming, build every map around the same three-tablet backbone: one Breach tablet to guarantee and scale the content, one Precursor tablet with the Irradiated implicit to raise the zone level (improving base item level and the chance of higher-tier currency), and one additional Breach tablet to push density. This trio does not change between juice tiers; the only thing that scales is how aggressively you roll your Waystone and which Distills you apply there.
On prefixes, keep it simple and consistent: take only Item Rarity and/or Increased Rare Monsters. If your Waystone already provides a lot of rare monsters, bias the tablets toward Item Rarity; if your Waystone is rich in Item Rarity, bias toward Rare Monsters. The rule of thumb from testing is to maintain a slight tilt toward Item Rarity overall - roughly 1.3–1.5× the amount of Item Rarity relative to Rare Monsters. That balance makes the extra rare modifiers you’re stacking on monsters convert into tangible drops instead of “overcapping” one stat that the other can’t leverage.
On suffixes, there are only two details that truly matter. First, for the Precursor tablet with Irradiated, the suffix is optional; the expensive “additional random modifier” line is nice but not necessary for solo play - prioritize the implicit and a strong prefix instead. Second, for the two Breach tablets, pair one “Additional Breach” with one “Triple Additional Breach”. This pairing avoids exceeding 100% when Remnants of Power doubles Precursor effects, preventing waste while still spiking monster count hard on doubled maps.
If currency is tight, cut luxuries without cutting the core: buy tablets that only have the correct prefixes and the Irradiated implicit, and ignore the flashy suffixes. The backbone’s value comes from the prefix mix, the raised zone level, and - crucially - your Waystone + Atlas amplifiers. As long as you keep the Rarity↔Rare Monsters balance and the “+1 and +3 Breaches” pairing, you’ll see consistent returns.
Finally, run this layer with discipline. Slot the same trio every map, match the prefix mix to your current Waystone, and let the Atlas’s Explicit Modifier Effect and Remnants of Power do the heavy lifting. When a map procs doubled tablet effects, the Additional/Triple pairing pays off without tripping caps, and your Breach density jumps without extra cost.

All three juice tiers use the same tablet plan above. What changes is how you roll the Waystone, which Desecration reward you lock in, and which Distills you apply. Always start from a 6-mod Waystone so you can protect a key suffix while adding an Abyss prefix. Before you Desecrate, trigger Omen of Sinistral Necromancy and consume a Preserved Vertebrae so that Desecration adds a prefix and never deletes the suffix you’re trying to keep.
Tier 1 — Rarity + Paranoia: Roll the map with Omen of Chaotic Rarity and a Chaos Orb to land roughly 100–115% Item Rarity at minimal cost. Then Desecrate for a strong Abyss prefix while protecting your suffix. The priority order that performs best is: Area is overrun by the Abyss (top hit; sell these during T1/T2 to bankroll everything), then Abysses have (2–3) additional Pits (more pits and ~25% Item Rarity), then Abyss Pits in Area always have Rewards (+30% rares, +40% magics), then Natural Rare Monsters in Area have 1 extra Abyssal Modifier (+30% rares and an Abyss mod on natural rares). Always check two pages of Desecration offers unless you already see Overrun. Use an Omen of Abyssal Echoes on every map - the ~1-in-5 Overrun hit rate over batches more than covers the Echo cost. Distill with 3× Paranoia for a gentle Delirium bump (~36) and +45% rare monsters.
Tier 2 — Triple-Mod Rares + Fear: Spam Omen of Chaotic Monsters with Chaos until you hit “Rares have an additional modifier” and a high rare-monster % (typically three to four tries). Lock that suffix and add an Abyss prefix via Desecration; here, Abyssal Mod is especially good because it stacks another extra mod onto natural rares. Distill with Fear to push Delirium to ~66 and, with the Atlas effect, effectively guarantee ~three additional modifiers on natural rares (with a small chance for four). The result is a map where almost every rare - including Breach rares - carries multiple extra mods that multiply quantity and rarity per kill. Expect a large jump in difficulty and an equally large jump in returns.
Tier 3 — Isolation + 150 Delirium: Run only on naturally Overrun by the Abyssal maps with many pits. On Desecration, take the line that reads Monsters from Abysses have increased Difficulty and Reward for each closed pit. Then apply 3× Isolation to reach about 150 Delirium. Closing pits now ramps both difficulty and rewards, and Delirium further multiplies drop rate - together they scale multiplicatively. This is the highest-ceiling solo strategy from testing and is where you deploy the best Overrun layouts you saved from earlier tiers.
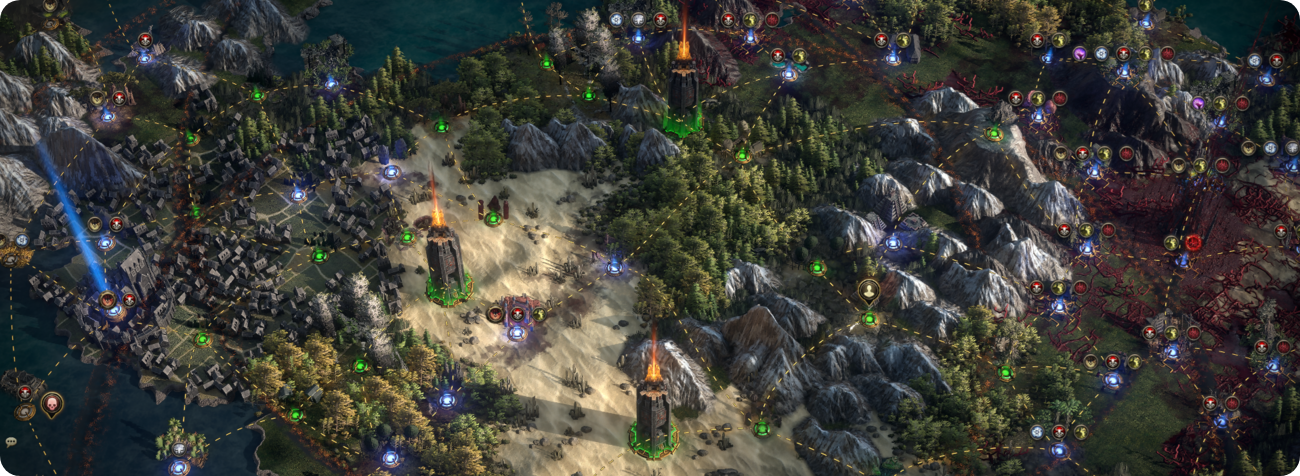
Two zone rules round out Waystone usage. First, whenever possible, run Tier 1 and Tier 2 maps inside Cleansed Zones (created by clearing a Corrupted nexus) for ~20–30 extra packs and strong extras like +1 area level or shrine-style boons. Second, avoid two cleansed rolls that undercut profit: Increased Gold (which suppresses other drops) and Reduced Quantity + Increased Rarity. Between maps, “tower-hop” by applying a Grand Precursor to a tower to access everything in range; use this to chain Cleansed Zones and to farm Citadels for fragments that comfortably finance tablets and Distills.
Use a generic 40-point core that amplifies your Waystone and tablet layers without relying on the Breach wheel (covered elsewhere). The core idea is straightforward: scale explicit modifier effect so your Waystone and tablet numbers overperform, stack global Rarity/Quantity/Rare-Monsters so extra modifiers actually translate into loot, and wire Shrines into your route so map pace and value stay high.
Start by taking every efficient Explicit Modifier Effect cluster you can reach. This is why a line that reads “75%” on paper ends up closer to “~111%” in practice. From there, pick up the Item Rarity, Item Quantity, and Increased Rare Monsters nodes that are on-path; the whole Breach plan is rare-pack centric, so these globals increase the payout per monster across the board.
Next, route into Shrine chance and the adjacent pack-size nodes. Acceleration and Coveted shrines are standouts: the former speeds clear (keeping Breaches open and expanding), the latter adds extra value to drops. The path “costs one extra point,” but there’s nothing else that buys as much pace per point for this strategy.
Remnants of Power is mandatory. Roughly one in five maps will double your Precursor tablet effects, which is exactly why some maps explode with additional Breaches without any extra spend. On the other hand, never take Corrupted Infusion - even if you run corrupted maps, its risk outweighs any real upside in this setup.
For efficient pathing, go through the middle of the boss section to grab another shrine, then move into the +1 area level route (applies in non-Irradiated areas) and the corruption-adds-mobs route. More mobs and a touch more level feed both the Breach density and the currency tiering you’re already pushing via Irradiated. If you like to micro, you can temporarily spec Local Knowledge for Swamp/Water maps and swap off after; if not, just do those maps in a batch when you have the point on.
Everything else on this core is optional or a skip. Simulacrum-side passives aren’t relevant here; nodes that add random “emotions” can disrupt the carefully rolled Waystone; and you don’t need Delirium Mirrors because your Delirium comes from Distills. If you want a flexible filler early on, the Expedition notable that grants four implicit modifiers on Logbooks is decent value, but it’s not part of the Breach engine.

Let’s recap the essence of Breach rewards and how to maximize them. At its core, Breach loot is a numbers game – the more monsters you kill, the more loot explodes onto the ground. Each Breach is an intense but time-limited farming opportunity. Your job is to extend that time and to pack each Breach with as many monsters as possible, thereby scaling your rewards dramatically. Breach-exclusive drops like Catalysts (which add quality to rings and amulets) and special Breach Rings (a base type that pairs especially well with catalyst quality) can be extremely lucrative, either for improving your own gear or selling to other players.
In summary: kill fast, stay mobile, stack those modifiers, and make each Breach count. With this approach, Breach turns from a hectic brawl into one of the most profitable and rewarding activities in PoE 2’s endgame. Below we’ve compiled the special Breach rewards – a complete list of Catalysts and the unique drops from Xesht’s domain – so you know exactly what jackpots to look out for.
| Name | Effect | |
|---|---|---|
 |
Adaptive Catalyst | Adds quality that enhances Attribute modifiers on a ring or amulet Replaces other quality types |
 |
Carapace Catalyst | Adds quality that enhances Defence modifiers on a ring or amulet Replaces other quality types |
 |
Chayula's Catalyst | Adds quality that enhances Chaos modifiers on a ring or amulet Replaces other quality types |
 |
Esh's Catalyst | Adds quality that enhances Lightning modifiers on a ring or amulet Replaces other quality types |
 |
Flesh Catalyst | Adds quality that enhances Life modifiers on a ring or amulet Replaces other quality types |
 |
Neural Catalyst | Adds quality that enhances Mana modifiers on a ring or amulet Replaces other quality types |
 |
Reaver Catalyst | Adds quality that enhances Attack modifiers on a ring or amulet Replaces other quality types |
 |
Sibilant Catalyst | Adds quality that enhances Caster modifiers on a ring or amulet Replaces other quality types |
 |
Skittering Catalyst | Adds quality that enhances Speed modifiers on a ring or amulet Replaces other quality types |
 |
Tul's Catalyst | Adds quality that enhances Cold modifiers on a ring or amulet Replaces other quality types |
 |
Uul-Netol's Catalyst | Adds quality that enhances Physical modifiers on a ring or amulet Replaces other quality types |
 |
Xoph's Catalyst | Adds quality that enhances Fire modifiers on a ring or amulet Replaces other quality types |

To challenge the Breach pinnacle boss – Xesht, We Who Are One – you now enter the Twisted Domain through the current endgame access system. There are multiple escalating difficulty tiers for Xesht’s encounter. The entry tier is forgiving with revives, and each subsequent tier reduces your available lives while increasing Xesht’s power and rewards. By the final tier, you have only a single attempt, but you gain access to drops that do not appear on the earlier tiers.
The Twisted Domain itself is a timed gauntlet. When you enter, you’ll find yourself in a winding ruin filled with Breach monsters. A countdown timer starts immediately. Killing enemies will pause the timer, and killing tougher enemies (especially Rares) or opening Clasped Hands will add precious seconds. Your goal is to push through the hordes quickly, following the path of wisps of light, to reach Xesht’s arena before time runs out. If the timer expires while you’re still in the gauntlet, the encounter fails and the portal closes – so speed is of the essence.
Once you reach the end of the labyrinth, you’ll drop into Xesht’s arena and the real fight begins. Xesht, We Who Are One, is a fusion of all Breach lords’ powers, and the battle is split into two phases. Let’s break down Xesht’s abilities and how to deal with them.
Phase 1:
Phase 2:
When you deplete roughly 50% of Xesht’s life, he will stop in place and begin casting a swirling purple portal above his head. This is the phase transition. You can freely damage Xesht during this brief channel (so pour on whatever DPS you have left). After the portal finishes forming, Xesht gains new abilities and the fight resumes at full intensity.
All of Xesht’s Phase 1 moves remain in his arsenal during Phase 2, but he adds one especially chaotic attack to the mix:
Phase 2 is undeniably hectic – you’ll have the lingering lightning and ice mechanics from Phase 1 happening while arms are spawning. The key is to end the fight as quickly as possible in this phase. If you have any damage buffs or cooldowns, save them for after the 50% mark so you can burn Xesht down before the arena is overrun with overlapping hazards. If you’ve mastered dodging his Phase 1 repertoire, Phase 2 will just be a final exam testing those skills under pressure.
Defeating Xesht rewards you with a cache of loot, including one guaranteed Unique Item from his special drop pool. On lower difficulty tiers, Xesht’s unique drops include powerful Breach-themed items like Hand of Wisdom and Action and the elemental amulets Choir of the Storm, The Pandemonius, and Xoph's Blood – all coveted pieces for specific builds. He can also drop Beyond Reach, a unique item laden with chaos and crowd-control effects.
| Required Level | Item | Description | |
|---|---|---|---|
 |
33 | Hand of Wisdom and Action | +(15-25) to Dexterity +(15-25) to Intelligence 1% increased Attack Speed per 20 Dexterity Adds 1 to 10 Lightning Damage to Attacks per 20 Intelligence |
 |
72 | Choir of the Storm | Grants Skill: Level 18-20 Lightning Bolt +(10-15) to Dexterity +(20-30)% to Lightning Resistance Critical Hits ignore Enemy Lightning Resistance Triggers a Lightning Bolt on Critical Hit |
 |
52 | The Pandemonius | +(10-15) to Intelligence +(20-30)% to Cold Resistance Damage Penetrates 75% Cold Resistance Blind Chilled Enemies on Hit |
 |
52 | Xoph's Blood | +(10-15) to Strength (10-15)% increased maximum Life +(20-30)% to Fire Resistance Enemies in your Presence have Fire Exposure (10% Fire Penetration) |
 |
65 | Beyond Reach | (20-30)% increased Critical Strike Chance for Attacks (10-15)% reduced Attack Speed Chaos Damage from Hits contributes to Freeze Buildup Chaos Damage from Hits contributes to Electrocute Buildup Attacks gain (10-20)% of Physical Damage as Extra Chaos Damage |
 |
1 | Skin of the Loyal | +(5-40) to all Elemental Resistances Armour is increased by your Overcapped Fire Resistance Evasion is increased by your Overcapped Cold Resistance Energy Shield is increased by your Overcapped Lightning Resistance Elemental Ailment Threshold is increased by your Overcapped Chaos Resistance |
 |
1 | Controlled Metamorphosis | Only affects Passives in (Small–Massive) Ring Passives in Radius can be Allocated without being connected to your tree (-20–-5)% to all Elemental Resistances (-23–-3)% to Chaos Resistance Corrupted |
At higher tiers, additional rewards unlock. Xesht can drop the unique chest Skin of the Loyal at elevated difficulties, and at the final tier there is a chance to obtain the extremely rare Controlled Metamorphosis unique jewel – a build-defining item with heavy resistance penalties that many players will chase via carries/services.
In addition to these uniques, Xesht will drop a trove of other loot. He also drops whatever currency, maps, and items any endgame boss might drop – often at very high item level. This means any Rare gear he drops could be an excellent crafting base. Always double-check the rares and bases he leaves on the ground; something like an ilvl 82 Exceptional Item or other high-value bases could have significant value.
Overall, the Breach pinnacle encounter is well worth pursuing once you have the gear and confidence. Not only is it a fun challenge that tests your mastery of the Breach mechanics, it’s also the source of some incredibly powerful equipment that can elevate your build or be sold for a huge profit. Good luck, and may your Breaches be ever bountiful!