
Introduced in Mists of Pandaria, Challenge Modes turned heroic five-man dungeons into timed, skill-driven sprint courses. Legion shelved them in favour of Mythic Plus, yet they lingered in collective memory precisely because success hinged on flawless execution, not inflated item levels.
Now, with Mists of Pandaria Classic launching on 21 July 2025, Challenge Modes are back — not as a museum exhibit, but as a live workshop for optimisation. Whether you’re retracing old footsteps or aiming for your very first gold medal, the essentials lie just ahead.
Challenge Modes in Mists of Pandaria are essentially heroic difficulty dungeons turned into high-pressure time trials. The moment your party activates the Challenge Orb, every item above ilvl 463 is squished down, ensuring that later-tier gear offers no shortcut; your success depends on mastery of pulls rather than raw stats!
All nine Pandaria dungeons participate, and Blizzard has spiced them up with tighter mob packs and gatekeepers that refuse to open until enough trash is dead. Gear damage is switched off (no repair bills here) and you’re free to chug as many potions, drums, or quirky crowd-control items as you can stash in your bags. Hit and expertise caps stay where they are despite the down-scaling, so thoughtful reforging still pays off, especially because dungeon creatures sit a notch below raid-boss level.
Clearing within the dungeon’s timer brackets awards Bronze, Silver, or the coveted Gold medal, each unlocking progressively shinier rewards: unique armour sets, mounts, pets, titles, and Feats of Strength achievements. Fast groups also bag 60 Valor Points per run, making speed-running an efficient farming method long after you’ve collected every cosmetic reward.
And your performance isn’t just personal bragging rights as guild and realm leaderboards track the quickest completions, inviting teams to shave seconds off their routes in endless pursuit of the top slot. A full slate of achievements rounds out the system, rewarding precision, perseverance, and teamwork under the clock.
Inside Challenge Mode dungeons a few ground rules keep the playing field even. First of all, Mass Resurrection is disabled entirely. Should anyone die and release, the game revives them automatically at the entrance.
Challenge Modes can be reset as often as you like: the party leader gets a special menu option that teleports everyone back to the start, respawns the entire instance, and restarts the timer — there’s no hourly cap or daily lockout to worry about.
Resetting also wipes the slate clean on every class cooldown longer than three minutes and on item cooldowns such as Lesser Invisibility Potion and Invisibility Potion. One notable outlier is Ancient Hysteria, whose cooldown survives the reset. Bosses don’t drop any loot and your gear never loses durability inside these runs. You can’t swap party members without exiting and doing a full reset, but you’re free to respec or change glyphs at any time as long as you’re out of combat.
Challenge Modes clamp raw item power to a common baseline, so your character’s strength comes from smart gearing rather than brute ilvl. Anything above ilvl 463 is automatically downscaled to 463, while pieces at 463 or lower stay exactly as they are, so you can’t "out-gear" the timer by farming raids. Trinkets, however, are a special case: every trinket that starts at 463 ilvl or higher keeps its unique proc when scaled, giving you a huge menu of on-use and chance-on-hit effects to mix and match.
Accuracy stats are preserved as well, which means specs that rely on Hit remain perfectly capped even after the downgrade — no need to reshuffle reforges. On the flip side, raid-tier set bonuses are shut off entirely, and so are Sha-Touched Gems, so you can leave those pieces in the bank.
Finally, the system does not touch bonuses that come from outside your gear’s item level. Numbers granted by consumables, enchants, regular gems, and profession perks all stay at full strength, making them key ways to squeeze extra damage, healing, or mitigation out of your 463-scaled kit.
Beyond the standard flasks, food, and potions, seasoned speed-runners swear by a handful of specialised gadgets that turn even tight timers into comfortable clears. These items aren’t strictly required, yet they offer the kind of mobility, crowd control, and emergency utility that can shave precious seconds off a run or rescue a shaky pull. Keep a few of the following in your bags and you’ll feel the difference the moment the clock starts.
A timed run almost always hinges on clean skips, and the gold-standard tool for that remains the Invisibility Potion. Popping one out of combat buys you 18 full seconds of true invisibility, enough to ghost past an entire trash wing: so long as you’ve already triggered any speed boost (think Stampeding Roar) before drinking, because the first action you take will break the cloak. When the gap you need to cross is shorter or you’re just drilling a route, a cheaper but shorter-lived option exists in the Lesser Invisibility Potion, which shares the same cooldown but costs far less to stockpile.
Engineers add another layer of flexibility with the belt-tinker Invisibility Field. It grants a 15-second vanish every three minutes without consuming your potion cooldown, letting you reserve potions for damage buffs later in the run. Many speed-runners keep this on a spare belt so they can swap back to Nitro Boosts once the skip is done, effectively pairing stealth with a rocket-propelled sprint whenever the timer demands both.
A well-rounded stat lineup saves precious seconds when healers and tanks can push harder, yet not every five-man comp brings every raid buff. If your group is missing a Druid, Monk, or Paladin, simply drop a Drums of Forgotten Kings. The drums apply Blessing of Forgotten Kings to every party member for thirty minutes, boosting Strength, Agility, and Intellect by 4% — more than enough to keep your damage and hybrid healing on pace with gold-timer expectations.
Likewise, teams that lack a Priest, Warlock, or Warrior can cover the stamina slot with a single click of a Runescroll of Fortitude III. One scroll grants an 8% health pool increase to the entire party for an hour, ensuring tanks survive aggressive chain pulls and healers gain a forgiving buffer while juggling cooldowns. Pack both consumables and you’ll never let a missing class buff slow down your Challenge Mode run!
Movement upgrades can shave more time off a Challenge-Mode run than any single DPS cooldown, and three gadgets in particular see constant play. A cloak fitted with a Goblin Glider lets you launch into a thirty-second glide on a five-minute cooldown, ideal for leaping off balconies in Shado-Pan Monastery or floating straight onto Gate of the Setting Sun’s final platform. Because the glide behaves like a slow-fall effect, you can pop it mid-air and steer around patrols that would otherwise demand a full clear.
Boot engineers rely on Nitro Boosts: a three-minute sprint that jacks run speed to 250%. Five seconds may sound brief, yet chaining the burst between packs (especially when paired with an invisibility potion) turns dead space into momentum that pushes you ahead of the gold timer.
For groups without universal movement buffs, a leatherworker can drop a quick charge of Drums of Speed. The drums boost nearby party members’ movement by fifteen per cent for thirty seconds on a two-minute cooldown, smoothing out long corridors or back-tracking routes after a strategic wipe-reset. Keep one of each tool in your kit and you’ll feel the dungeon shrink around you.
A couple of pocket-sized toys can take the sting out of otherwise messy pulls. For emergency roots, nothing beats an Embersilk Net: toss it from up to thirty-five yards away and it locks the target in place for three seconds while ticking fire damage — long enough to let the tank shuffle packs into a tidy clump or interrupt a dangerous cast without burning a real cooldown. When you need a full minute of hard crowd control, crack open the Rod of Ambershaping; it cocoons a mob in amber until the group is ready, buying precious breathing room during high-stakes pulls in dungeons like Shado-Pan Monastery’s final hallway.
Damage-oriented gadgets have their own place in the speed-runner’s toolkit. Engineers love the G91 Landshark, an uncapped AoE bomb on a one-minute cooldown that chunks clustered trash for a hefty burst of fire damage. If Scholomance is on the roster, consider farming a Nearly Full Vial of Polyformic Acid; its extra damage against Darkmaster Gandling helps melt the final boss when every second on the clock matters. Finally, the Battle Horn lets you taunt every creature within forty yards, instantly snapping scattered patrols onto the tank so the group can unload cooldowns instead of chasing stragglers. Carry one or two of these trinkets each, and you’ll feel your gold-medal pace tighten with every pull.
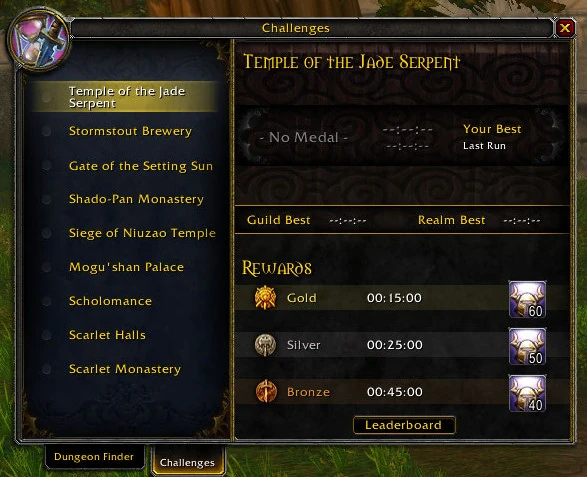
Every MoP Challenge Mode run is, at its heart, a race against the clock. Blizzard fixed the enemy count, route, and gear level, so the only variable left is how quickly your group can finish. Each instance has three cut-off times — Gold, Silver, and Bronze. Hitting them unlocks progressively smaller Valor Points rewards as well as the transmog, title, and mount achievements that make Challenge Modes so coveted.
In practice this timer does more than decide your medal: it shapes your entire pull strategy, dictates when to use Heroism, and even influences class composition. Think of the timer as the dungeon’s invisible boss: ignore it and you’ll limp out with Bronze, plan around it and you’ll blast through mobs, chain-pull packs, and snag that priceless Gold. The tables below list every medal threshold, so you can map your route, benchmark your progress, and shave those last few seconds off your best run.
| Dungeon | Medal | Timer | Reward |
|---|---|---|---|
| Temple of the Jade Serpent | Gold | 00:15:00 | 60 Valor Points |
| Temple of the Jade Serpent | Silver | 00:25:00 | 50 Valor Points |
| Temple of the Jade Serpent | Bronze | 00:45:00 | 40 Valor Points |
| Stormstout Brewery | Gold | 00:12:30 | 60 Valor Points |
| Stormstout Brewery | Silver | 00:21:00 | 50 Valor Points |
| Stormstout Brewery | Bronze | 00:45:00 | 40 Valor Points |
| Gate of the Setting Sun | Gold | 00:13:30 | 60 Valor Points |
| Gate of the Setting Sun | Silver | 00:22:00 | 50 Valor Points |
| Gate of the Setting Sun | Bronze | 00:45:00 | 40 Valor Points |
| Shado-Pan Monastery | Gold | 00:21:00 | 60 Valor Points |
| Shado-Pan Monastery | Silver | 00:35:00 | 50 Valor Points |
| Shado-Pan Monastery | Bronze | 01:00:00 | 40 Valor Points |
| Siege of Niuzao Temple | Gold | 00:19:00 | 60 Valor Points |
| Siege of Niuzao Temple | Silver | 00:30:00 | 50 Valor Points |
| Siege of Niuzao Temple | Bronze | 00:50:00 | 40 Valor Points |
| Mogu'shan Palace | Gold | 00:14:00 | 60 Valor Points |
| Mogu'shan Palace | Silver | 00:24:00 | 50 Valor Points |
| Mogu'shan Palace | Bronze | 00:45:00 | 40 Valor Points |
| Scholomance | Gold | 00:20:00 | 60 Valor Points |
| Scholomance | Silver | 00:33:00 | 50 Valor Points |
| Scholomance | Bronze | 00:55:00 | 40 Valor Points |
| Scarlet Halls | Gold | 00:13:30 | 60 Valor Points |
| Scarlet Halls | Silver | 00:22:00 | 50 Valor Points |
| Scarlet Halls | Bronze | 00:45:00 | 40 Valor Points |
| Scarlet Monastery | Gold | 00:13:30 | 60 Valor Points |
| Scarlet Monastery | Silver | 00:22:00 | 50 Valor Points |
| Scarlet Monastery | Bronze | 00:45:00 | 40 Valor Points |